10 ways to improve your 3D anatomy
Discover the secrets to creating convincing ZBrush sculpts.
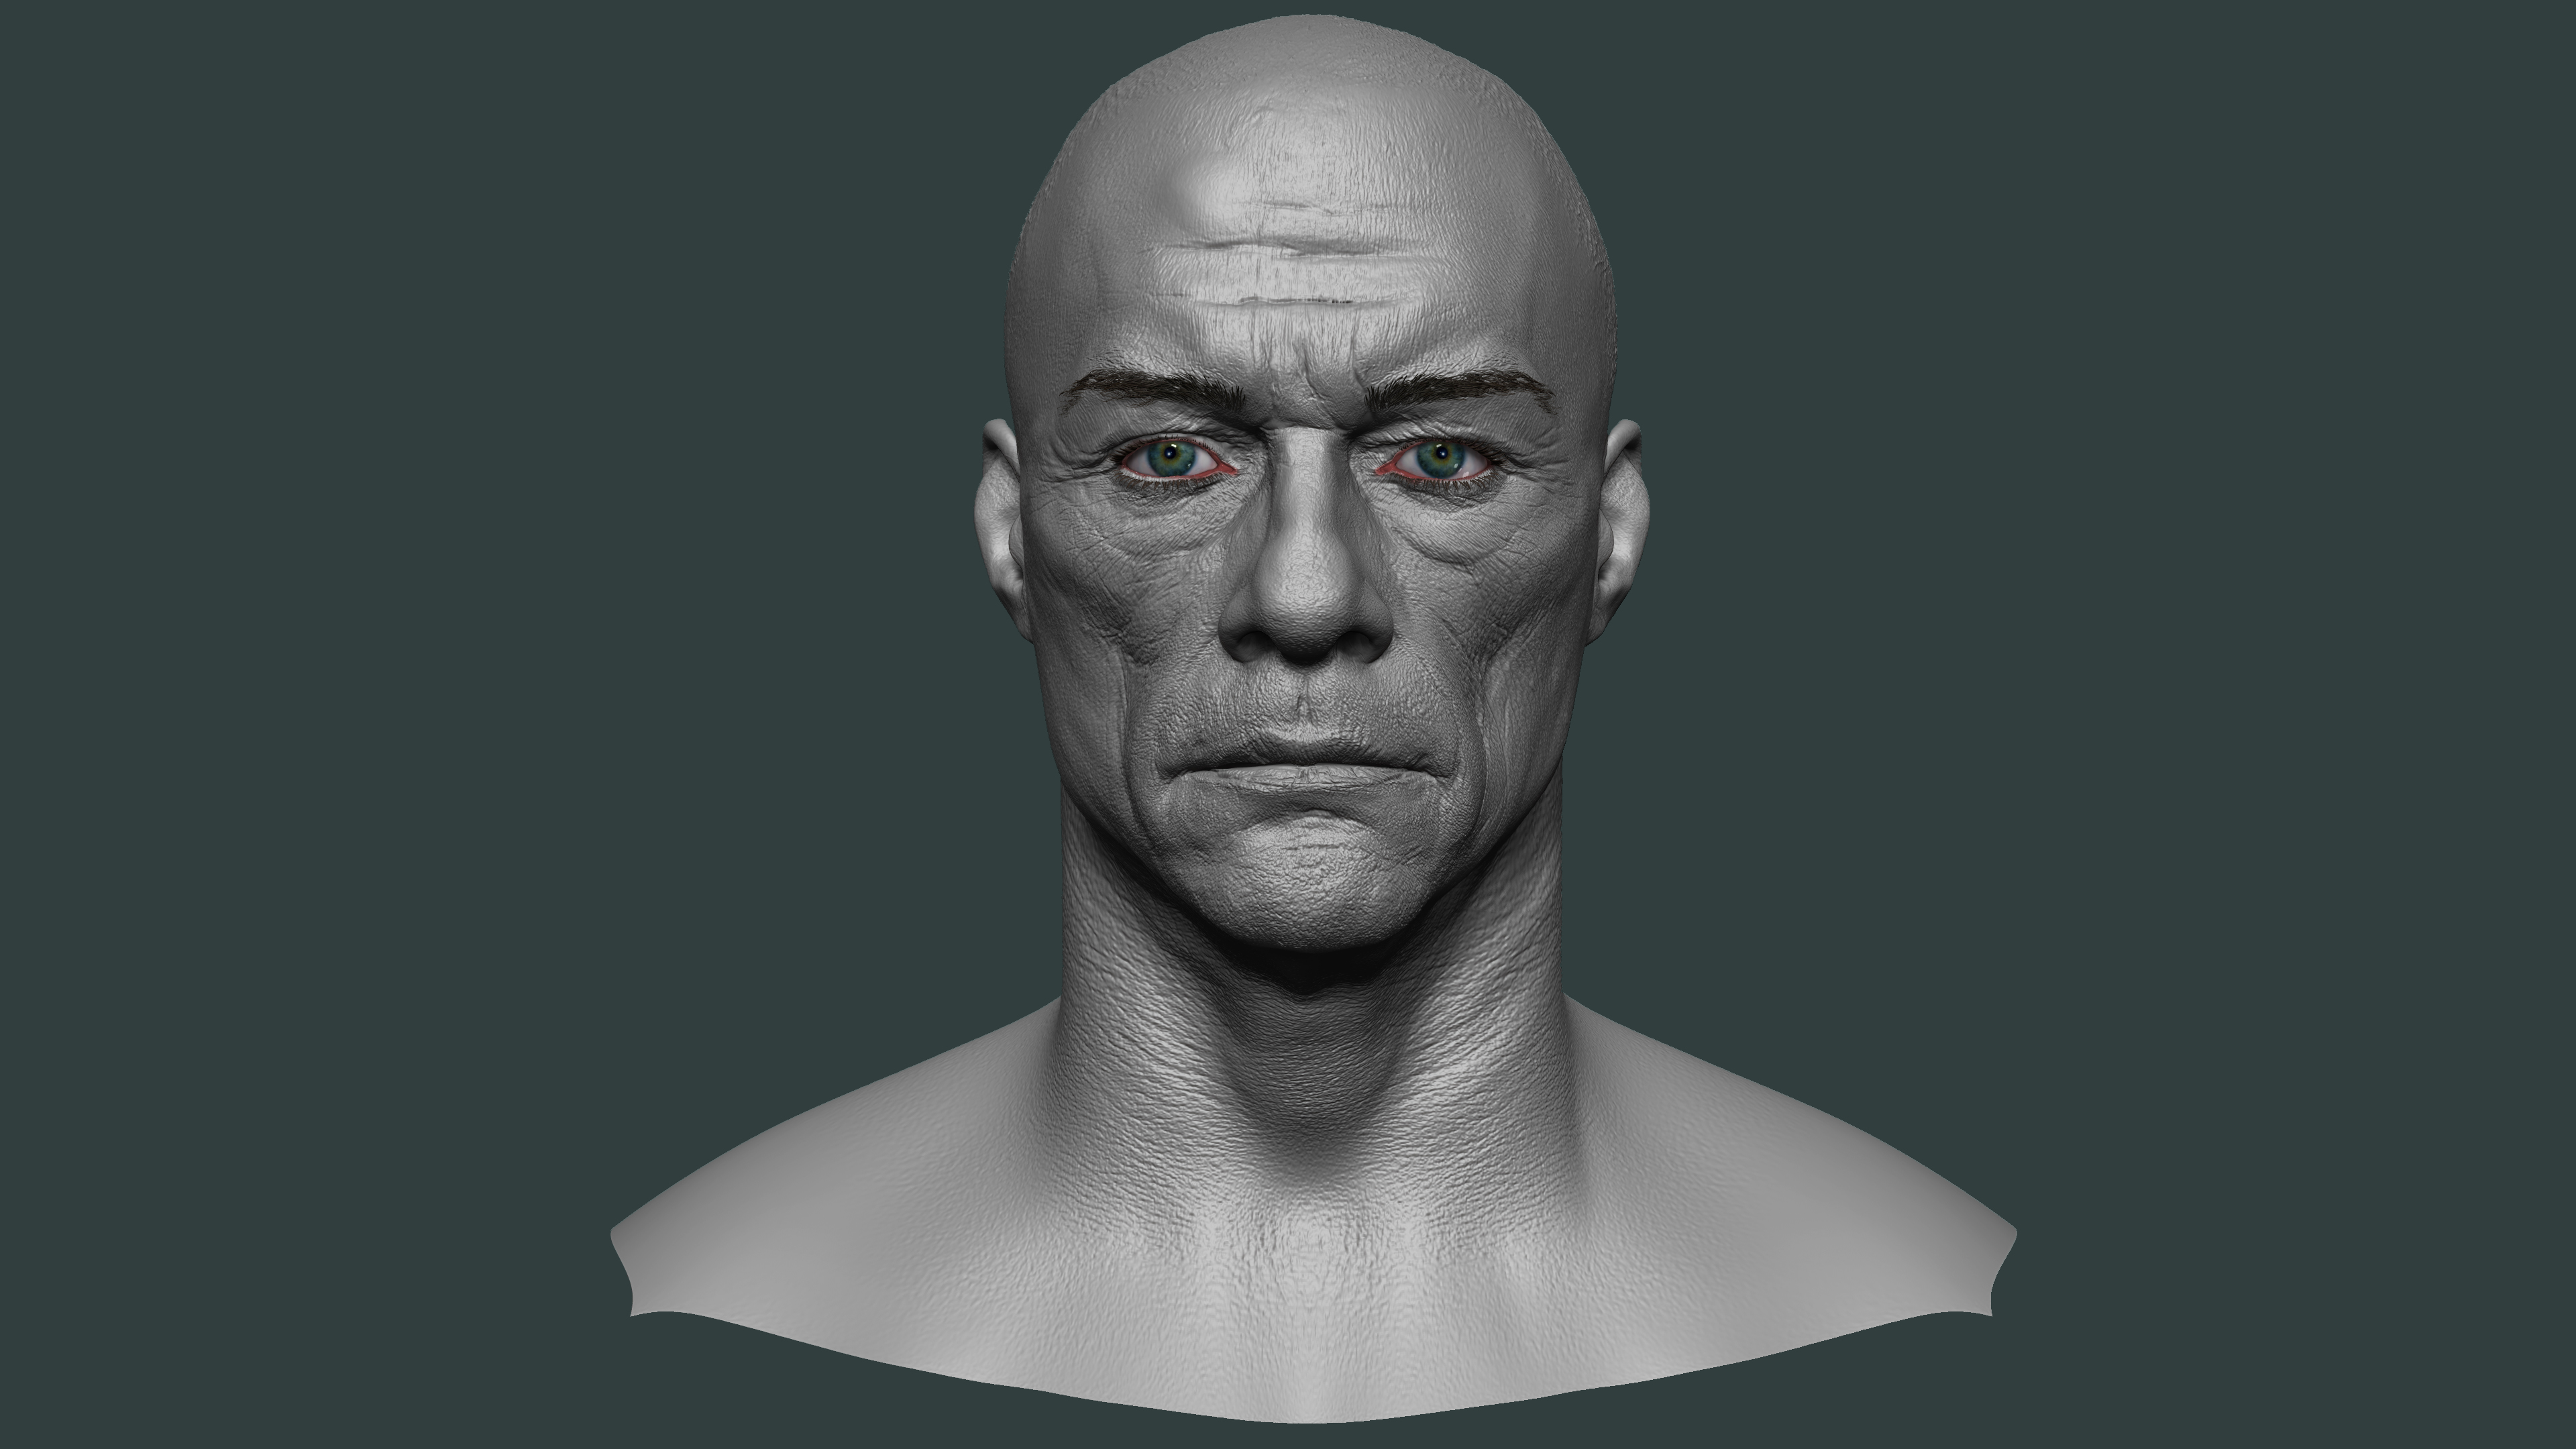
Recreating the human figure is one of the toughest challenges artists face, and that includes 3D artists. After all, the human eye is trained to notice even the smallest details in a person. So if you want to create 3D anatomy that looks lifelike, you'll want to brush up on your sculpting skills.
To help you polish your 3D anatomy skills, we caught up with digital artist and CGI anatomy trainer Ryan Kingslien. With his 10 tips, which don't pull any punches in the discipline department, Kingslien show you what you need to consider when creating convincing sculpts in ZBrush.
And don't forget, if you're stuck for time and need free 3D models, we've got you covered. In the meantime, here's what Kingslien has to say.
01. Start with quality
The key to creating great work is a simple equation: garbage in = garbage out. I learned this from sculptor Richard Macdonald. If you want to create quality work, start with quality material. In Richard’s case, instead of using regular life models, he works with world-class athletes. I use PureRef a lot.
02. Learn the way to use tools
Mastery is not magic. It’s process. Use the process the masters use and you’ll produce great results. People think they need to take class after class and learn tool after tool. The truth is they’ll grow faster if they slow down and take their learning deeper. Learn the ‘way’ masters use tools instead of just learning the tool.
03. Commit to the daily work
It’s ugly – until it’s not ugly. Get over it. Get over the sob story of ‘I should be better’. Get over the drama of ‘I’m not good enough’. Commit yourself to doing the daily work. It will be beautiful in its own time. Stop rushing your greatness. Let it be who it is and by ‘it’ I, of course, mean you!
04. Know that success is built
Art is learned. It’s not genetic, or some magical potion. Some have more talent, some have less. Success doesn’t come by accident, nor is it measured in the small ways you might be thinking about now. We all have the ability to be successful as artists but we don’t all build the capacity to achieve it. Success is built – daily.
Get the Creative Bloq Newsletter
Daily design news, reviews, how-tos and more, as picked by the editors.
05. Start with a blank face
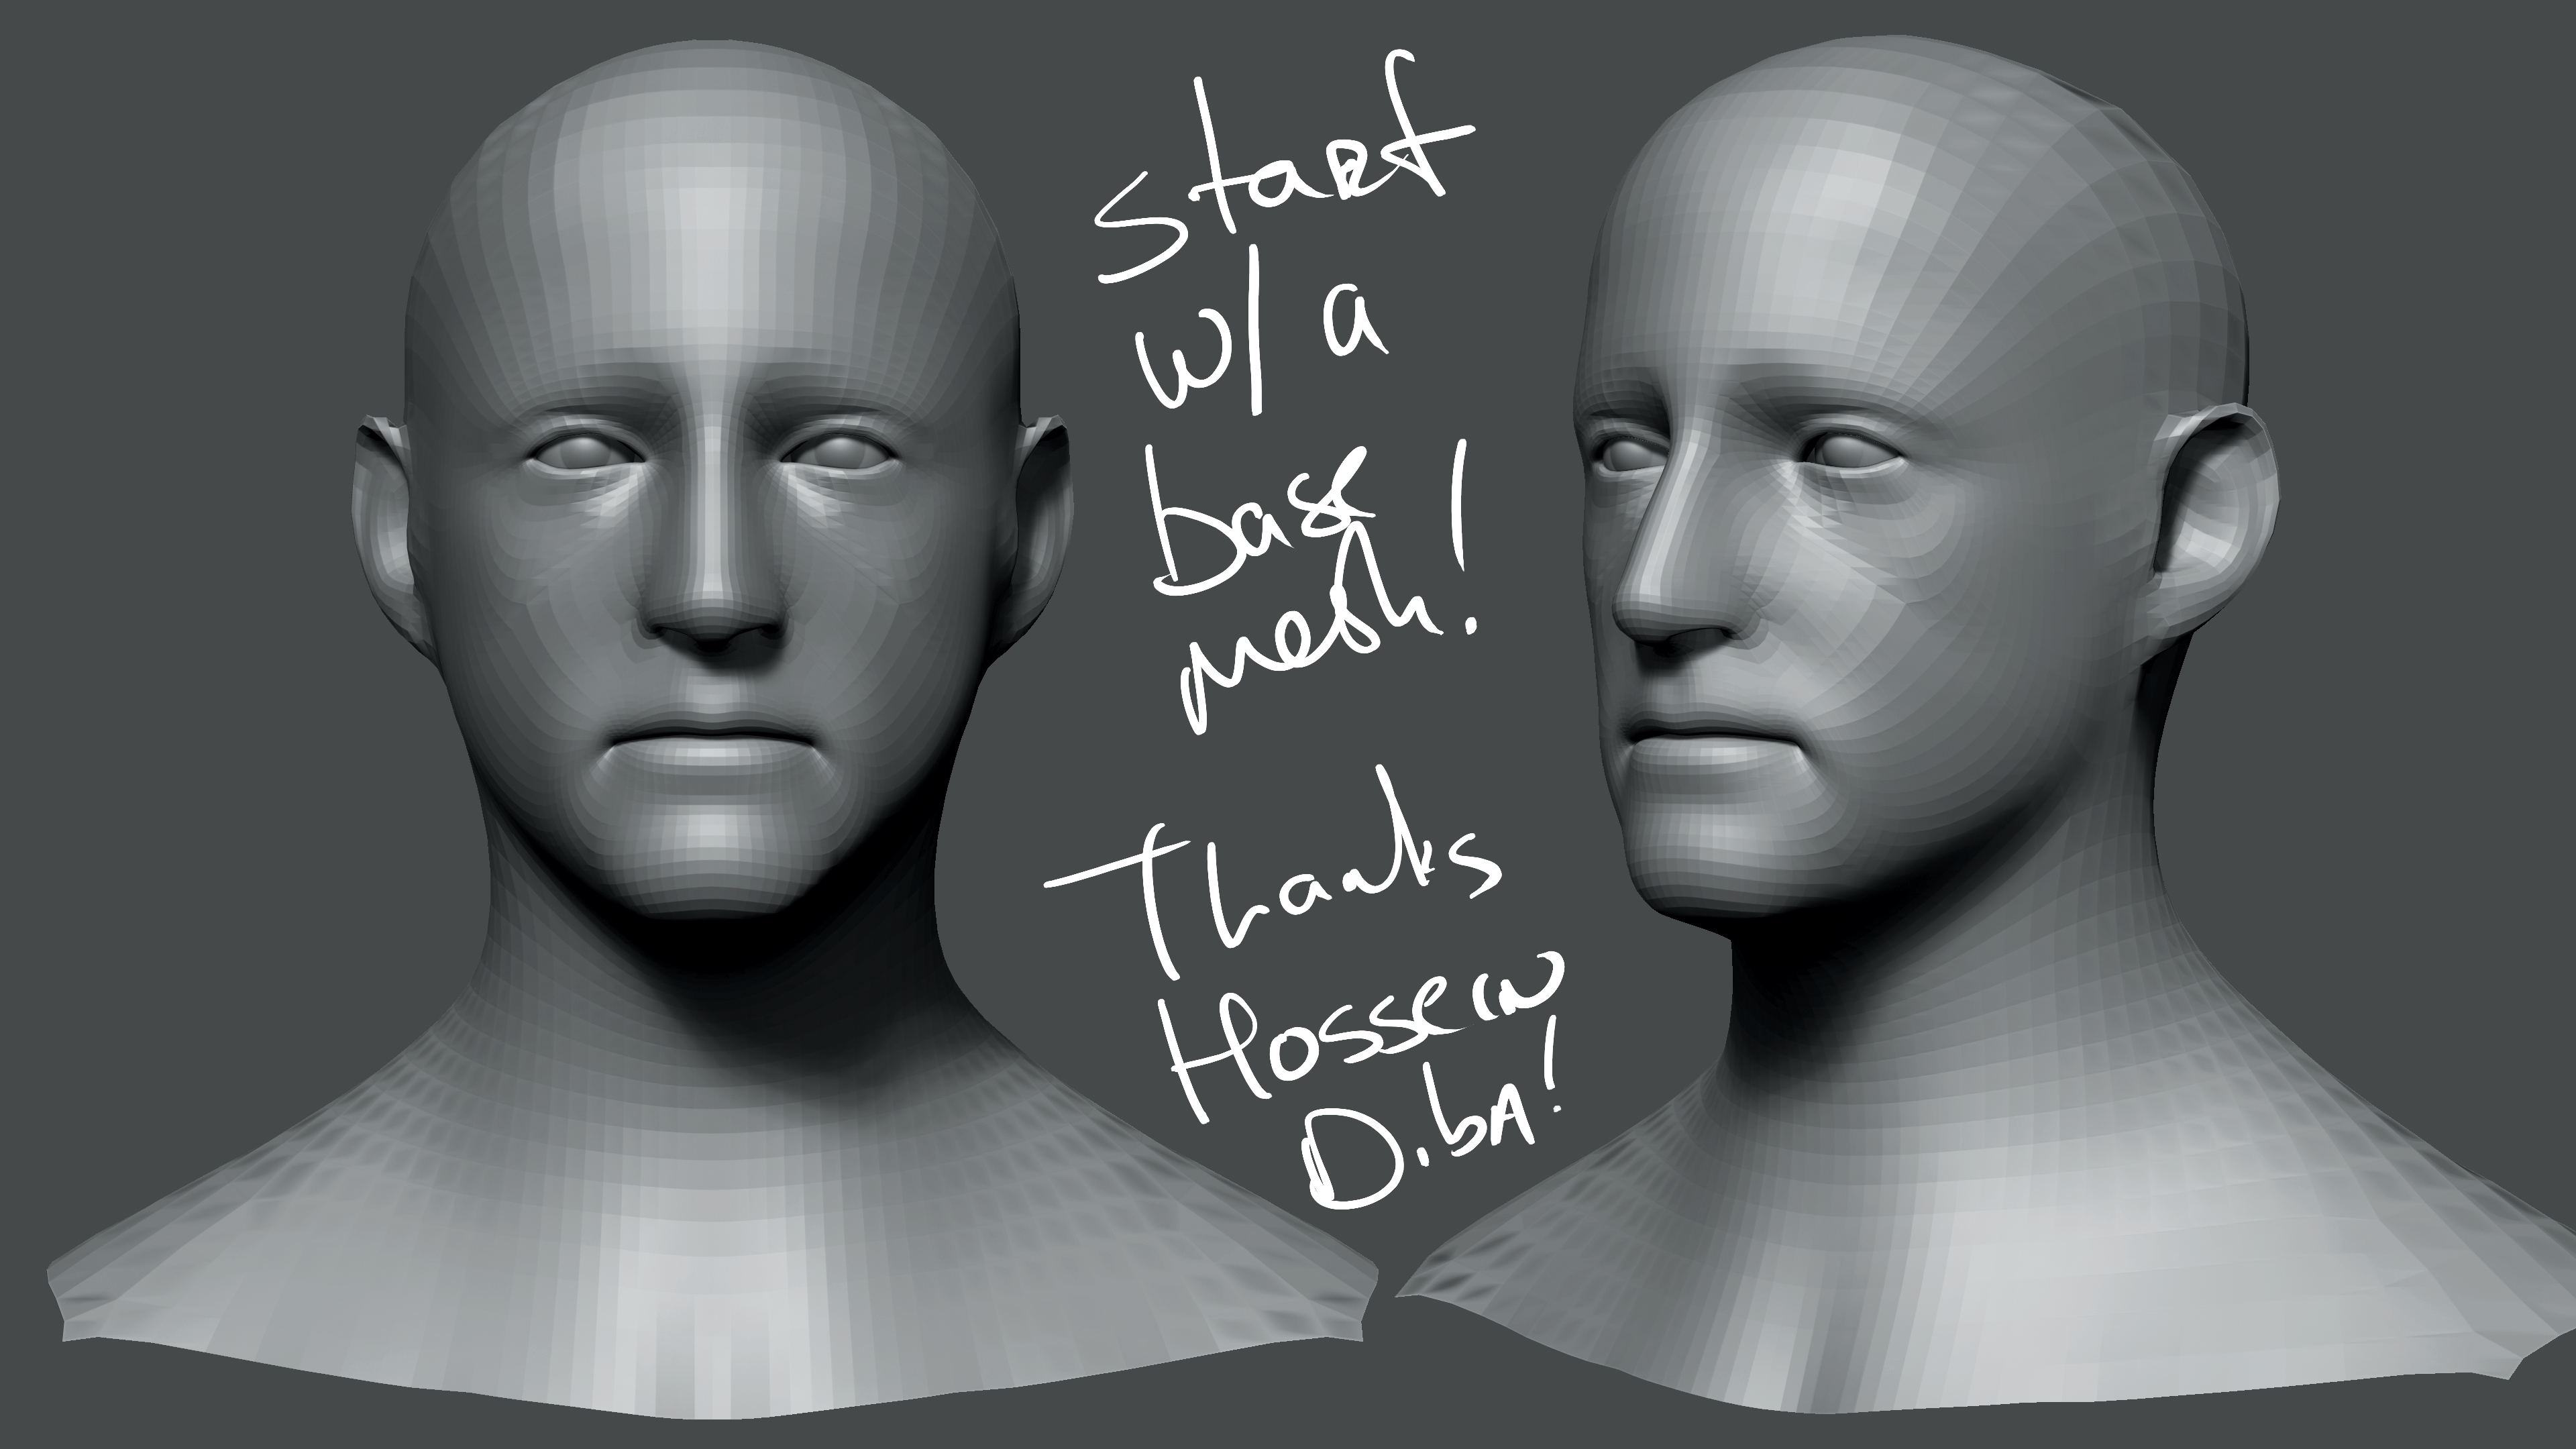
Start with a base mesh. This gives you a blank structure to start with. This gets you the essential structure of the cheek, orbit of the eye, muzzle of the mouth and horse shoe shape of the jaw, as well as the dome of the cranial area.
Remember, the basic structure of a human doesn’t change much, otherwise you would be sculpting a different species, so start with a generic human structure and you’ll make your life much easier. Mine is a modified version of one I got from Hossein Diba’s class he taught with me.
06. Settle on a generalisation
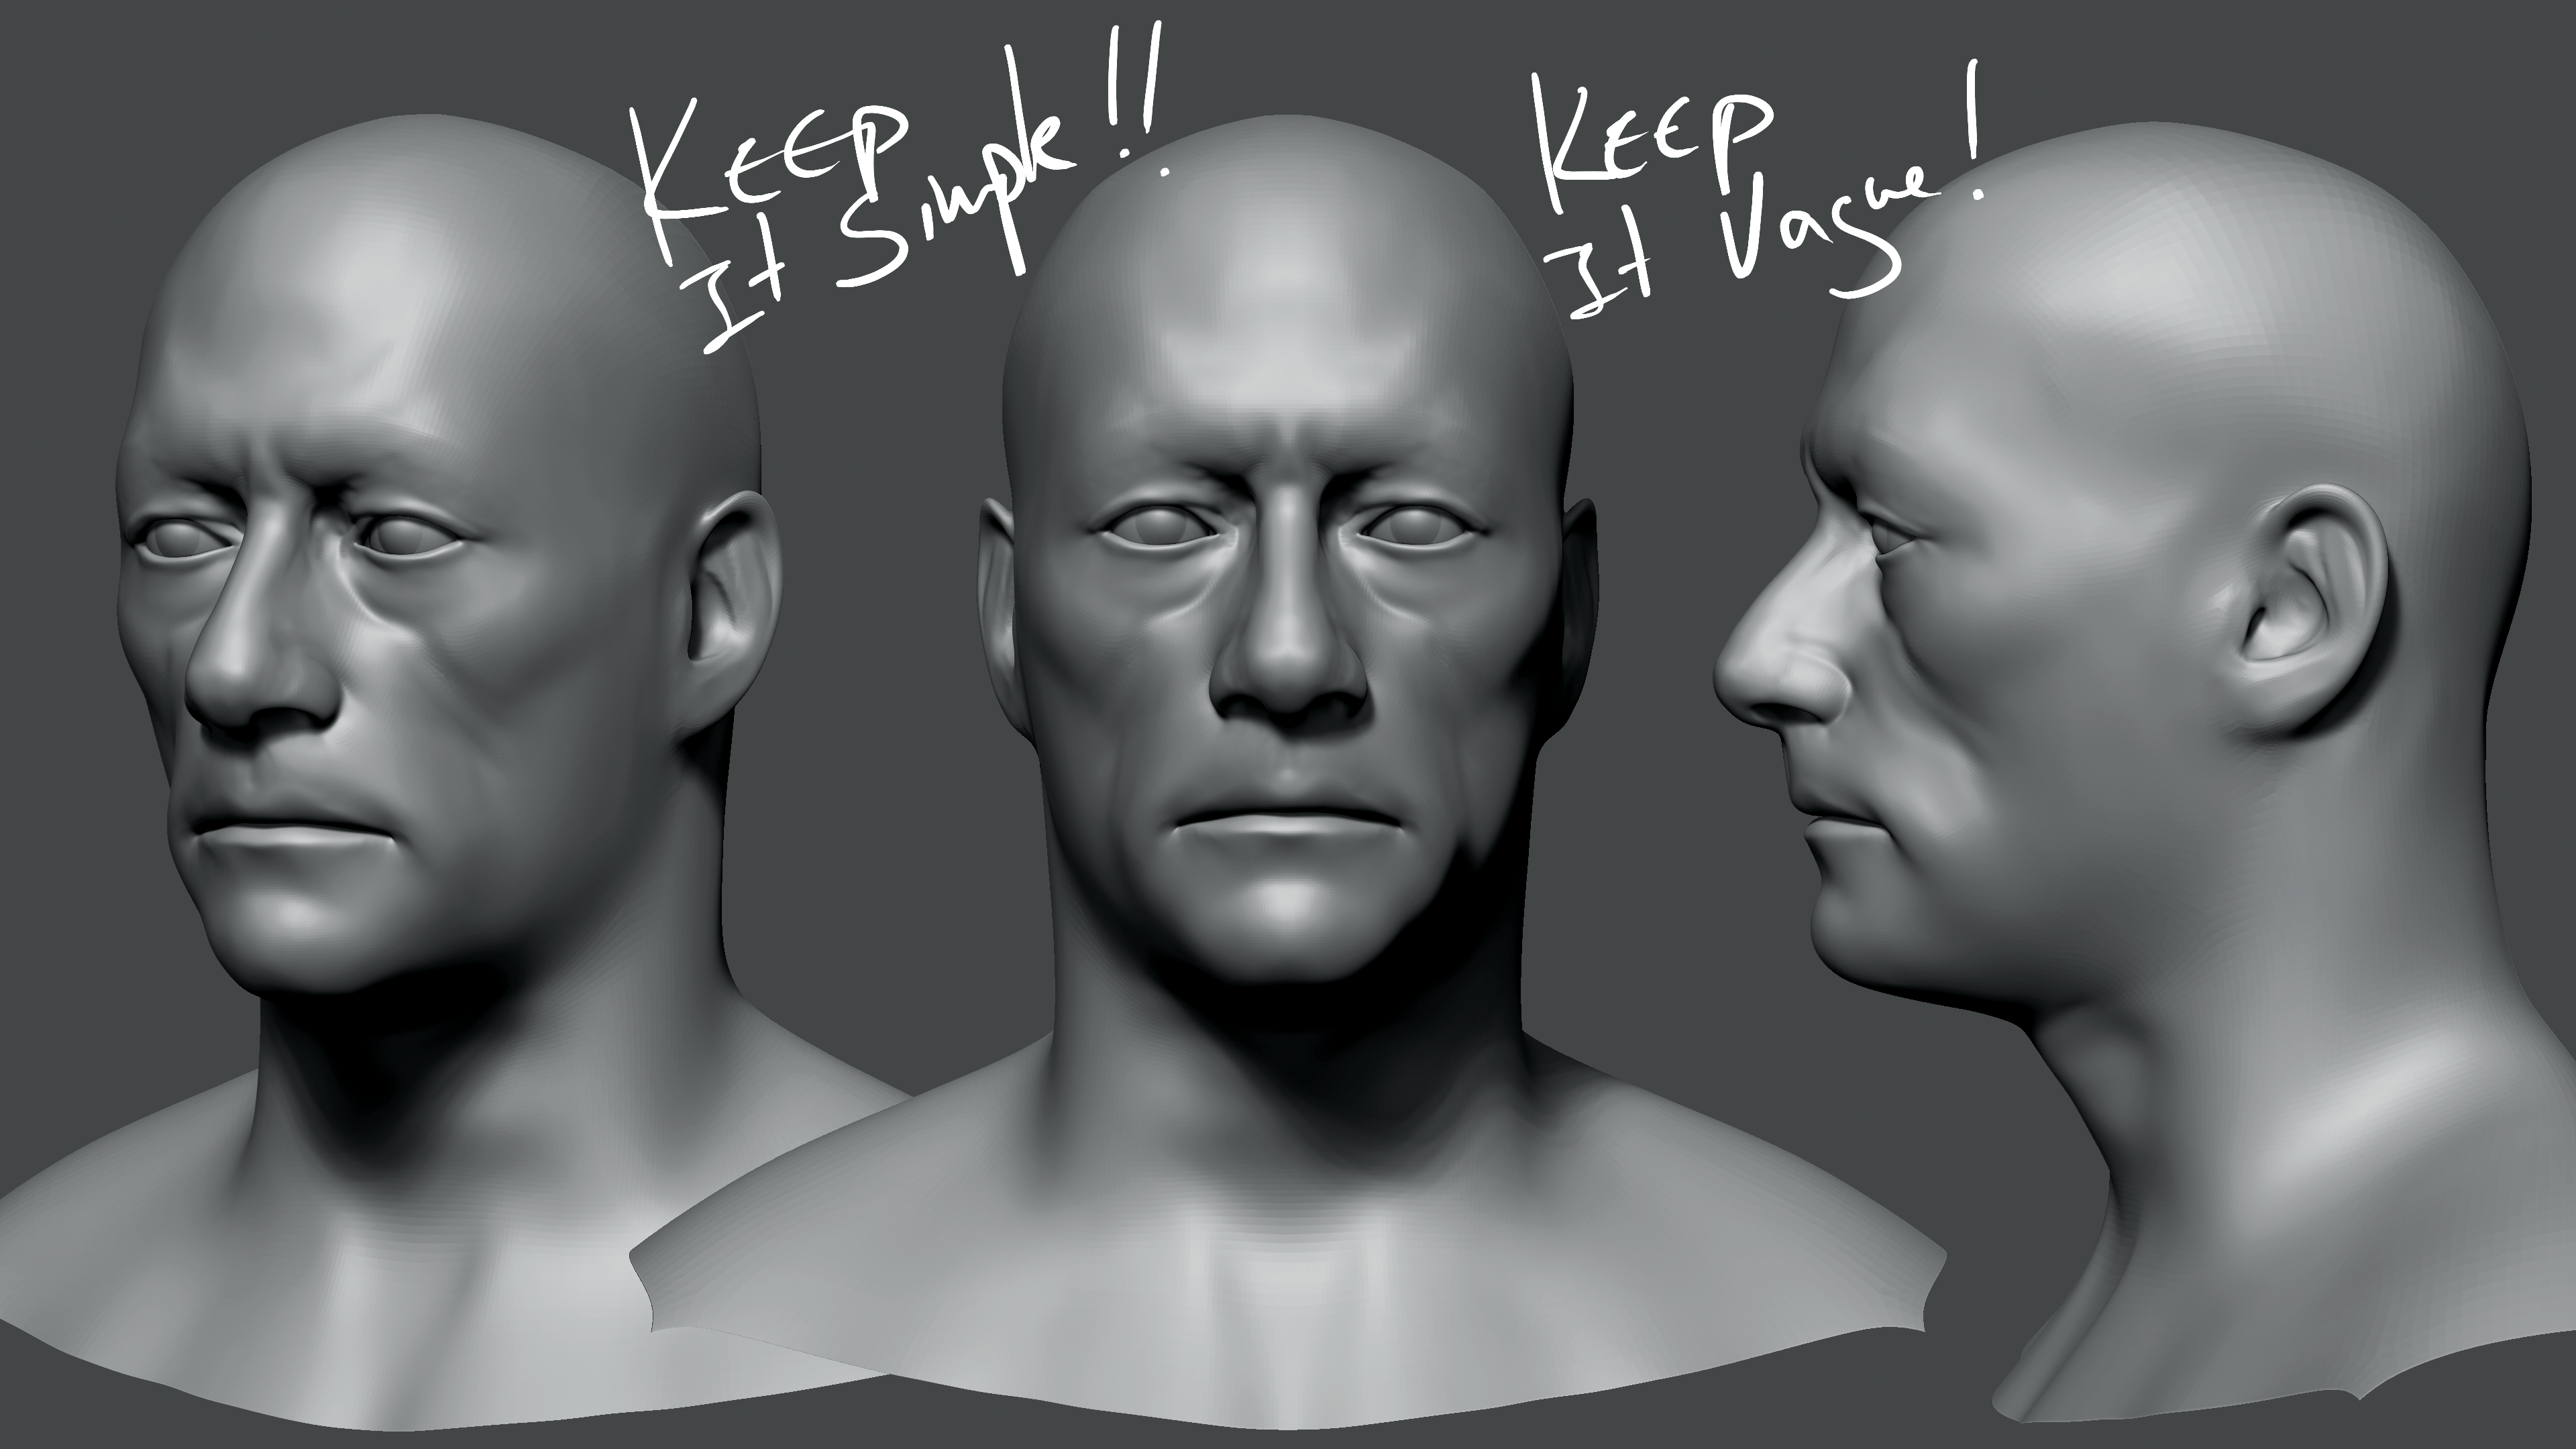
Start with specifics. What does the nose look like? Is the nose small or large? Does it droop down or lift up? Is the chin large and round, or small and pointy? Are the eyes small and beady or are they large and soulful? Is the face tall and thin or is it short and wide? Is the front of the face flat or does it project forward like a pyramid?
At this point your tools are Dam_Standard brush, the Standard brush and the Clay Buildup brush. The key to the Clay Buildup brush is to set Brush > Depth > Imbed to 5. Your goal is a soft generalisation that resembles your target but isn’t locked down yet.
07. Paint realistic eyes
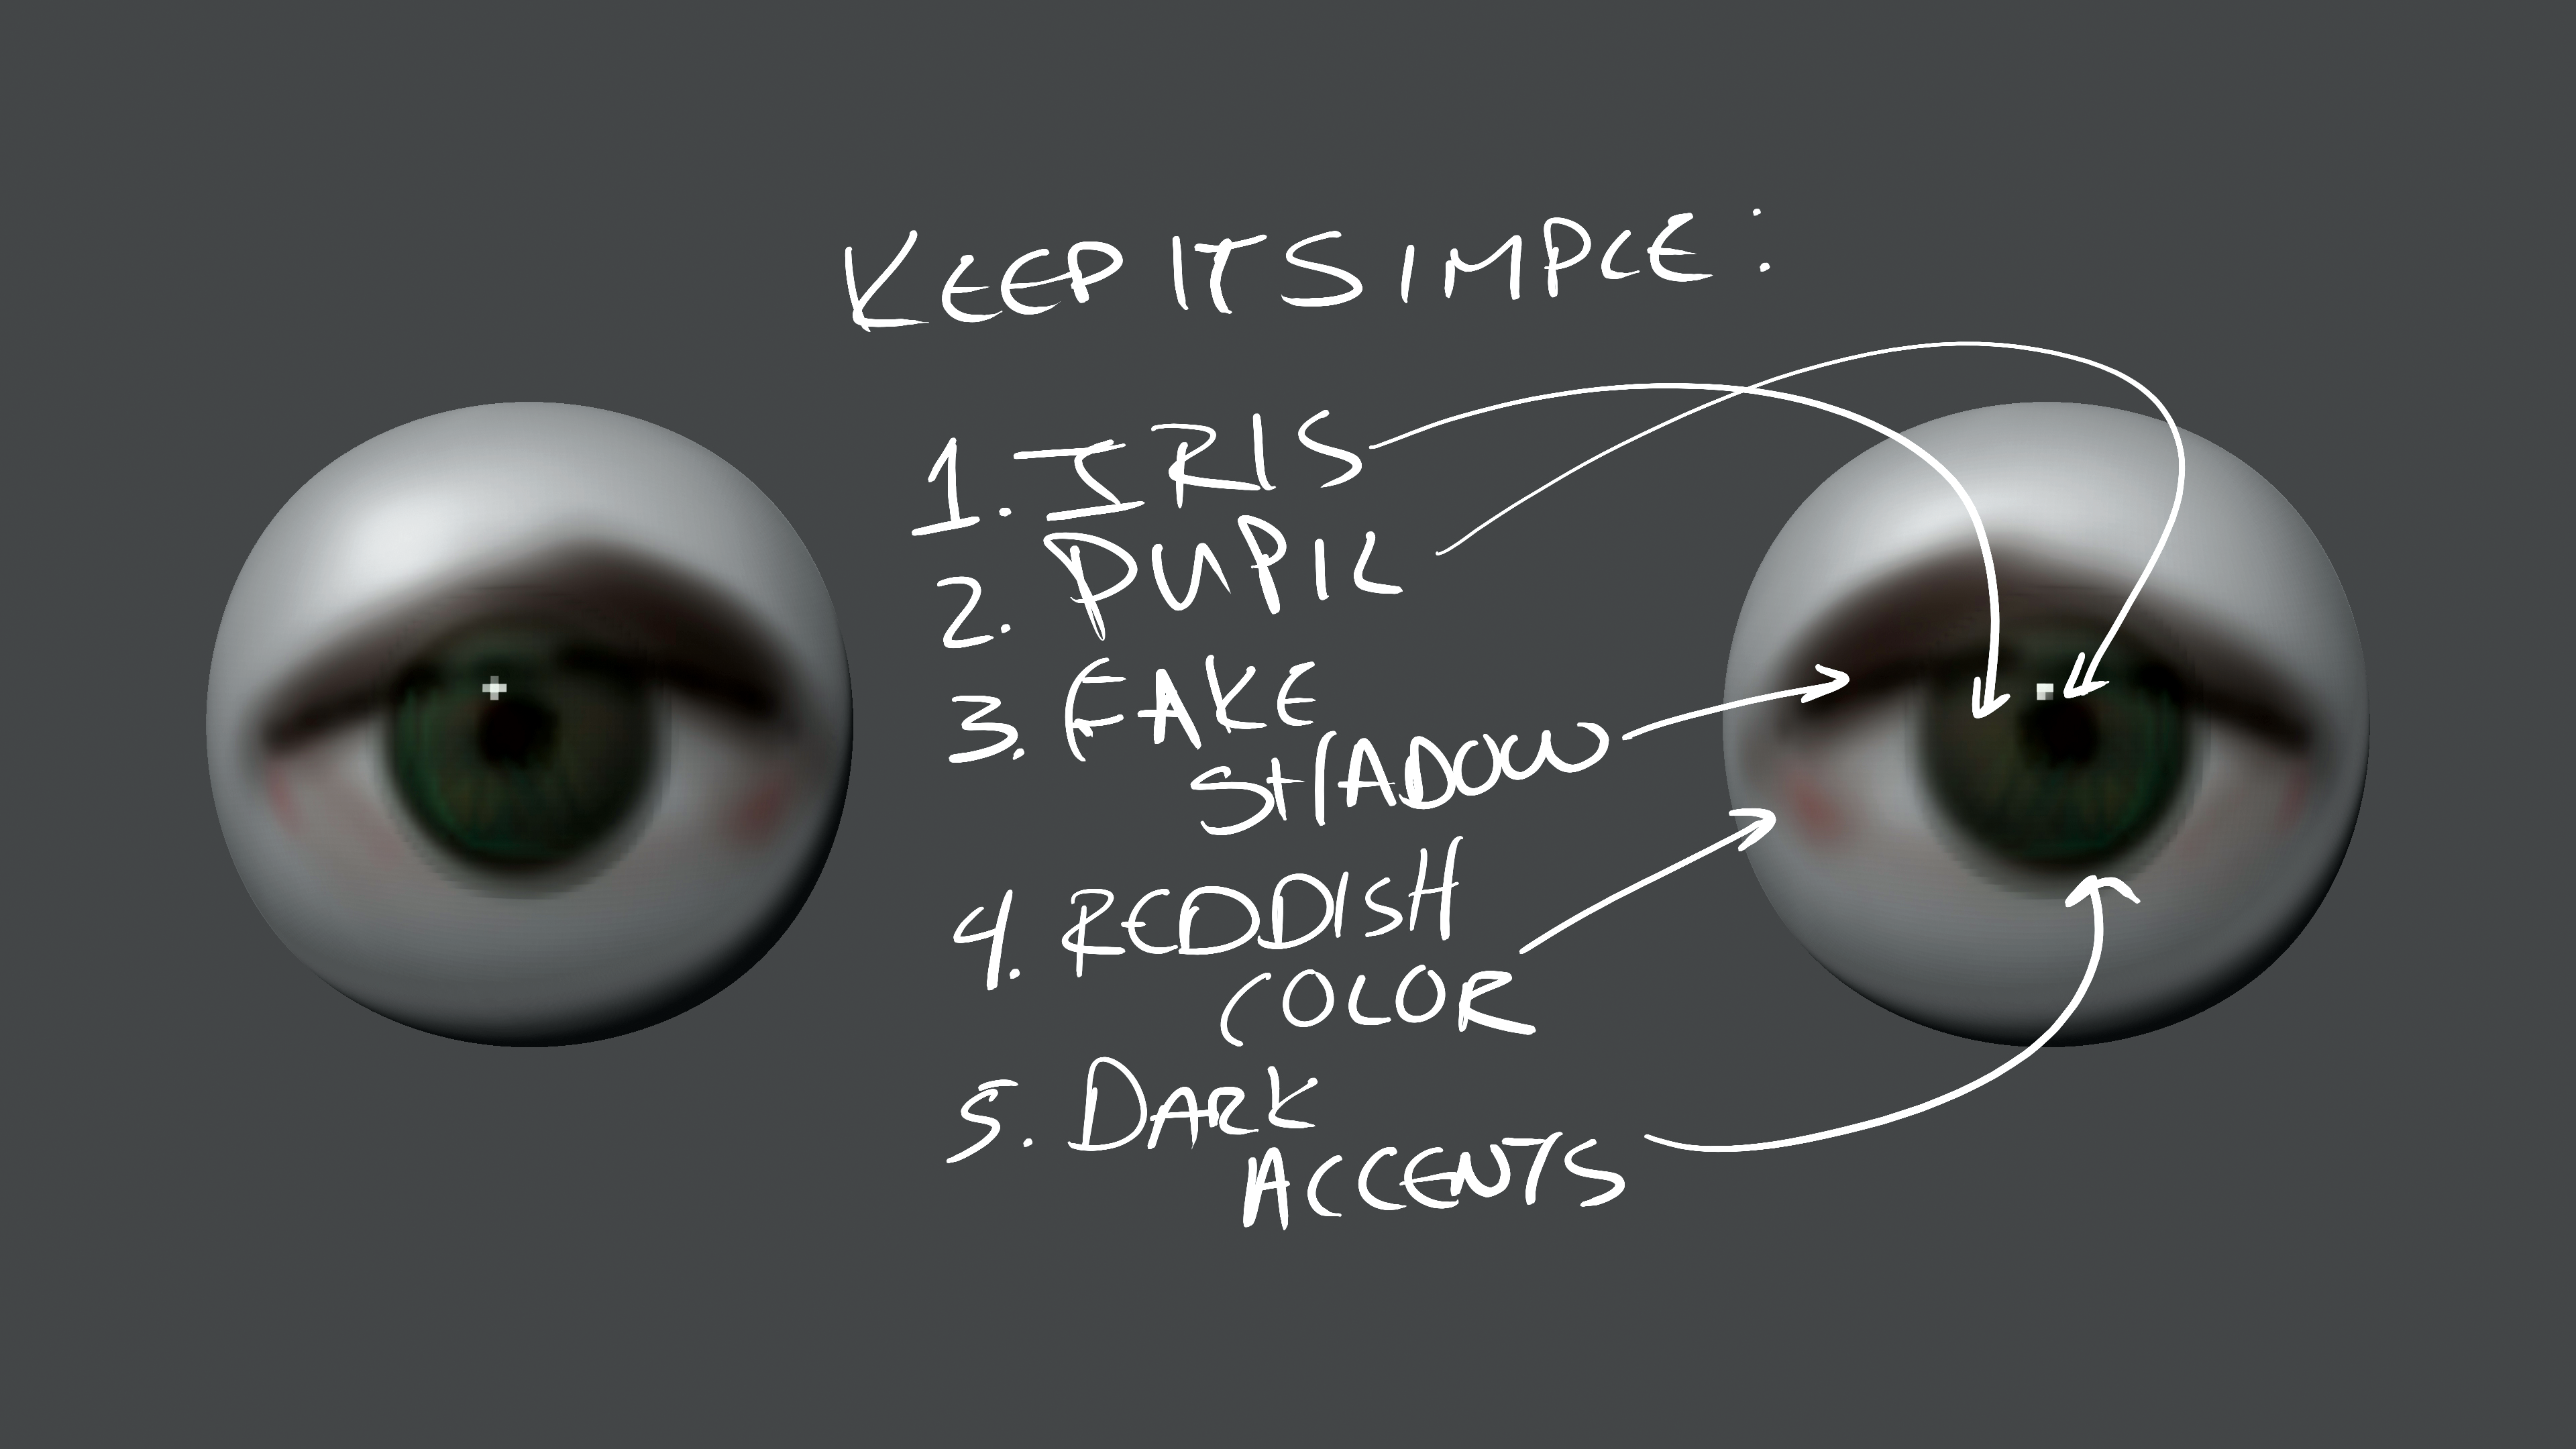
In order for the next few stages to work, we need to bring the level of realism up by painting the eyes. Use simple spheres in ZBrush and just paint the iris and pupil in using Polypainting. A great alpha to use to help paint the striation in the iris is Alpha 05 and Alpha 34. Then make sure to assign the Toy Plastic material to the eye subtool. Also, don’t forget to paint the caruncula lacrimalis.
08. Shift to the Rake brush
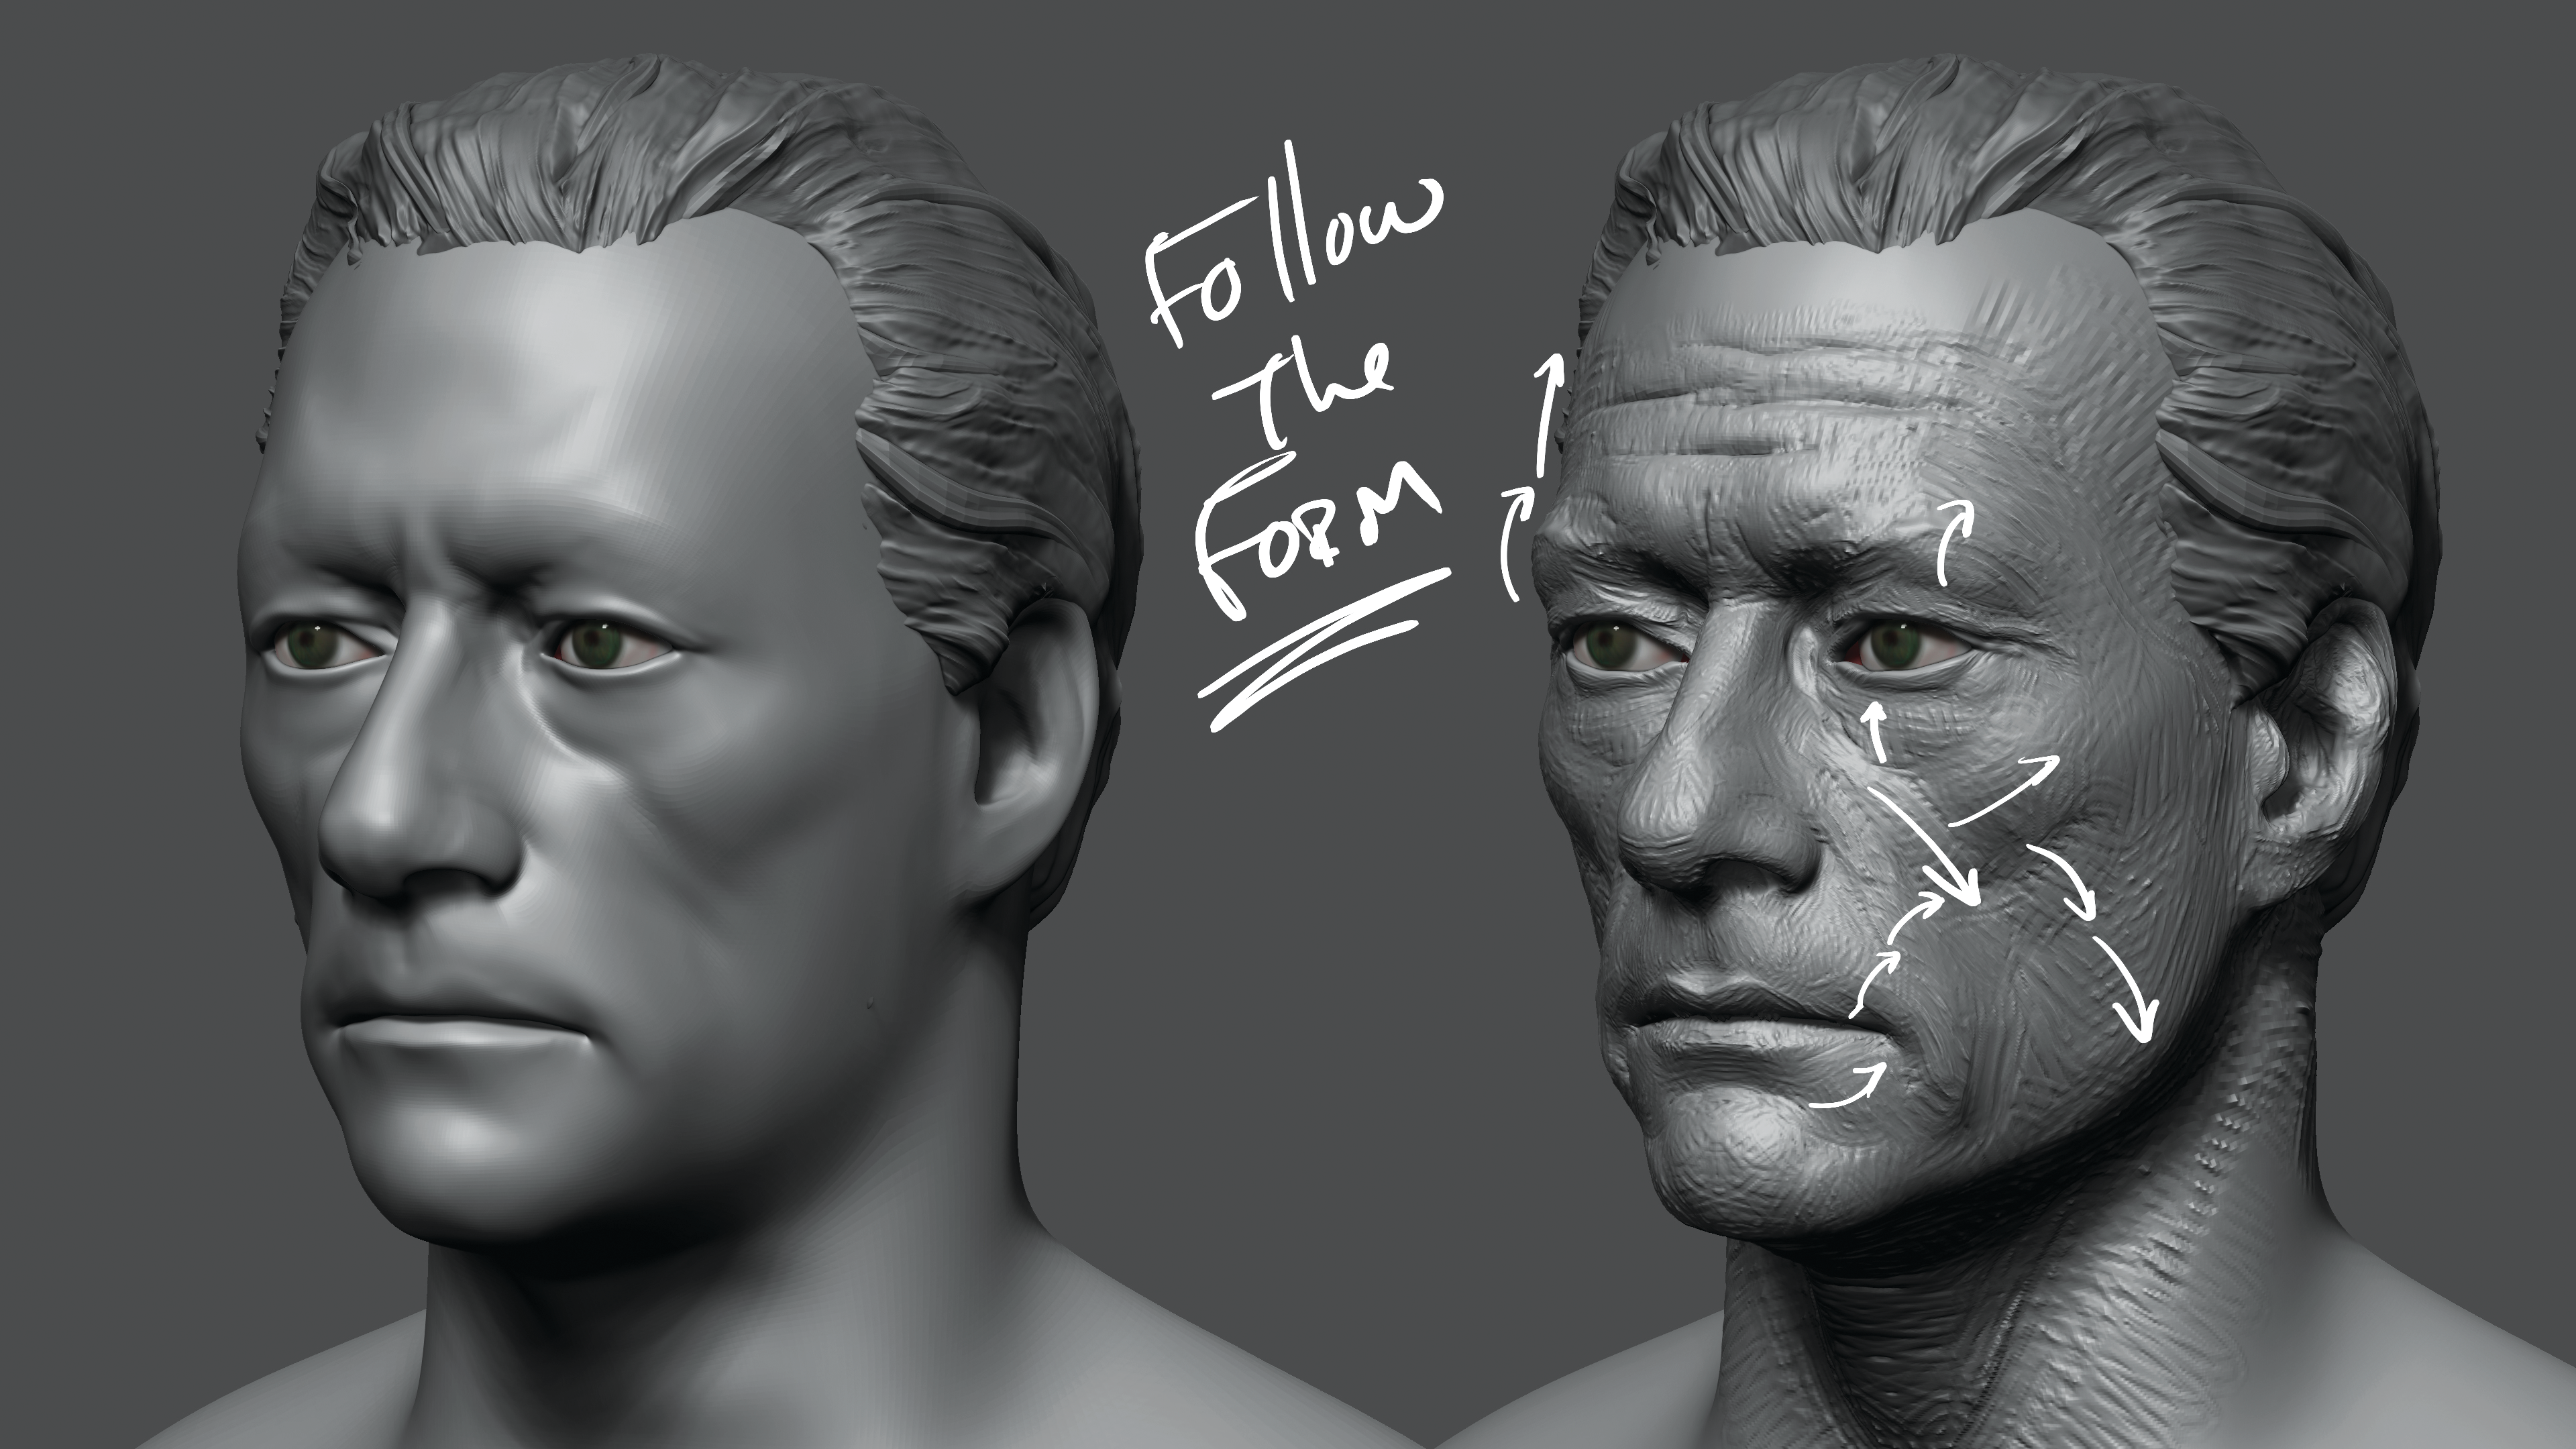
Now it’s time to shift to a different tool: the Rake brush. I had the good fortune of putting the Rake brush into ZBrush when I worked at Pixologic, but I have a new and better one at ZBrushWorkshops. In this stage your job is to crawl the surface of your model and work to create more of the specific ‘character’ of the face.
Instead of focusing on the cheekbone you’ll dive deeper to focus on the palpebromalar groove, the malar mound, the five different fat pads of the face, the eight lines of the face – whatever helps you create more ‘character’ and dive deeper into the specifics of the face.
09. Add the pores
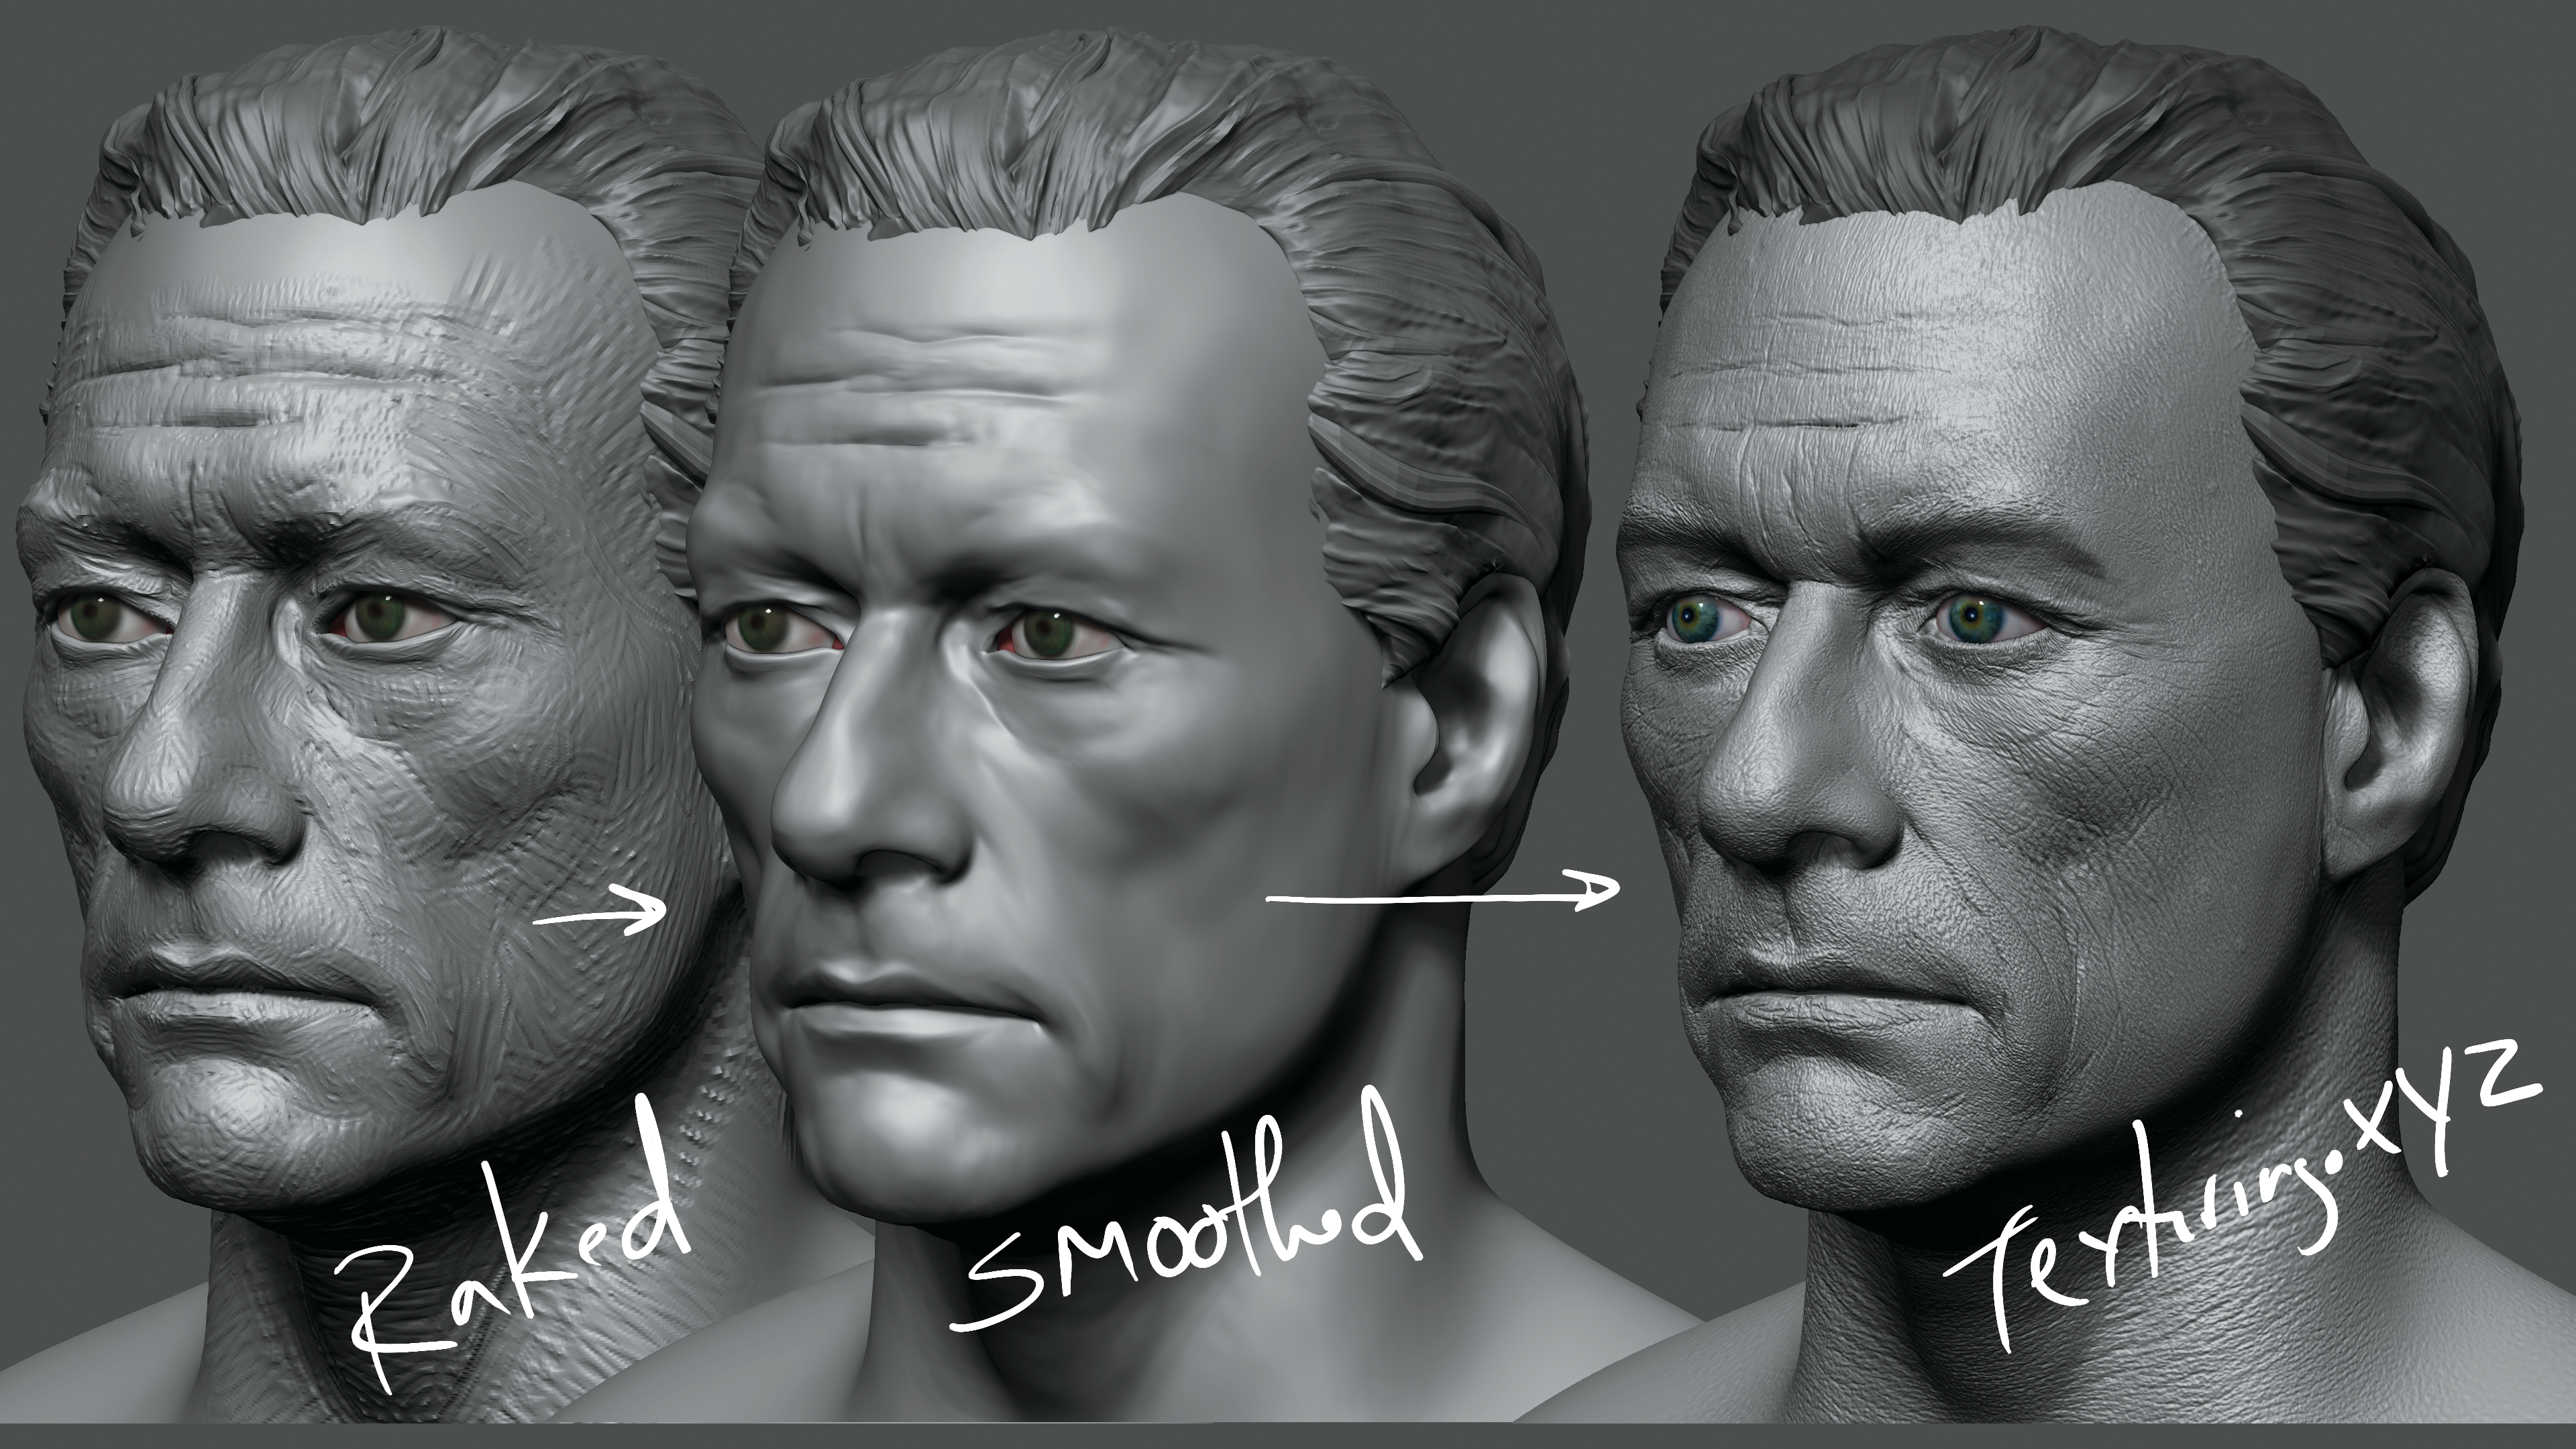
At this point, we’ve created a basic shape that has some of the specific character we want, and it’s now time to add in the pores. Make sure that you’ve crawled over the surface of the model with the rake brush before doing this. You want to have as much detail as you can in there before you go into tertiary forms like wrinkles.
For this sculpt, I used a process that’s documented on Texturing.xyz’s site under their multi-channel texture packs. It uses a really cool workflow and leverages Photoshop’s Puppet Warp feature to line up the Albedo and Displacement maps for fantastic results.
10. Power through the final push
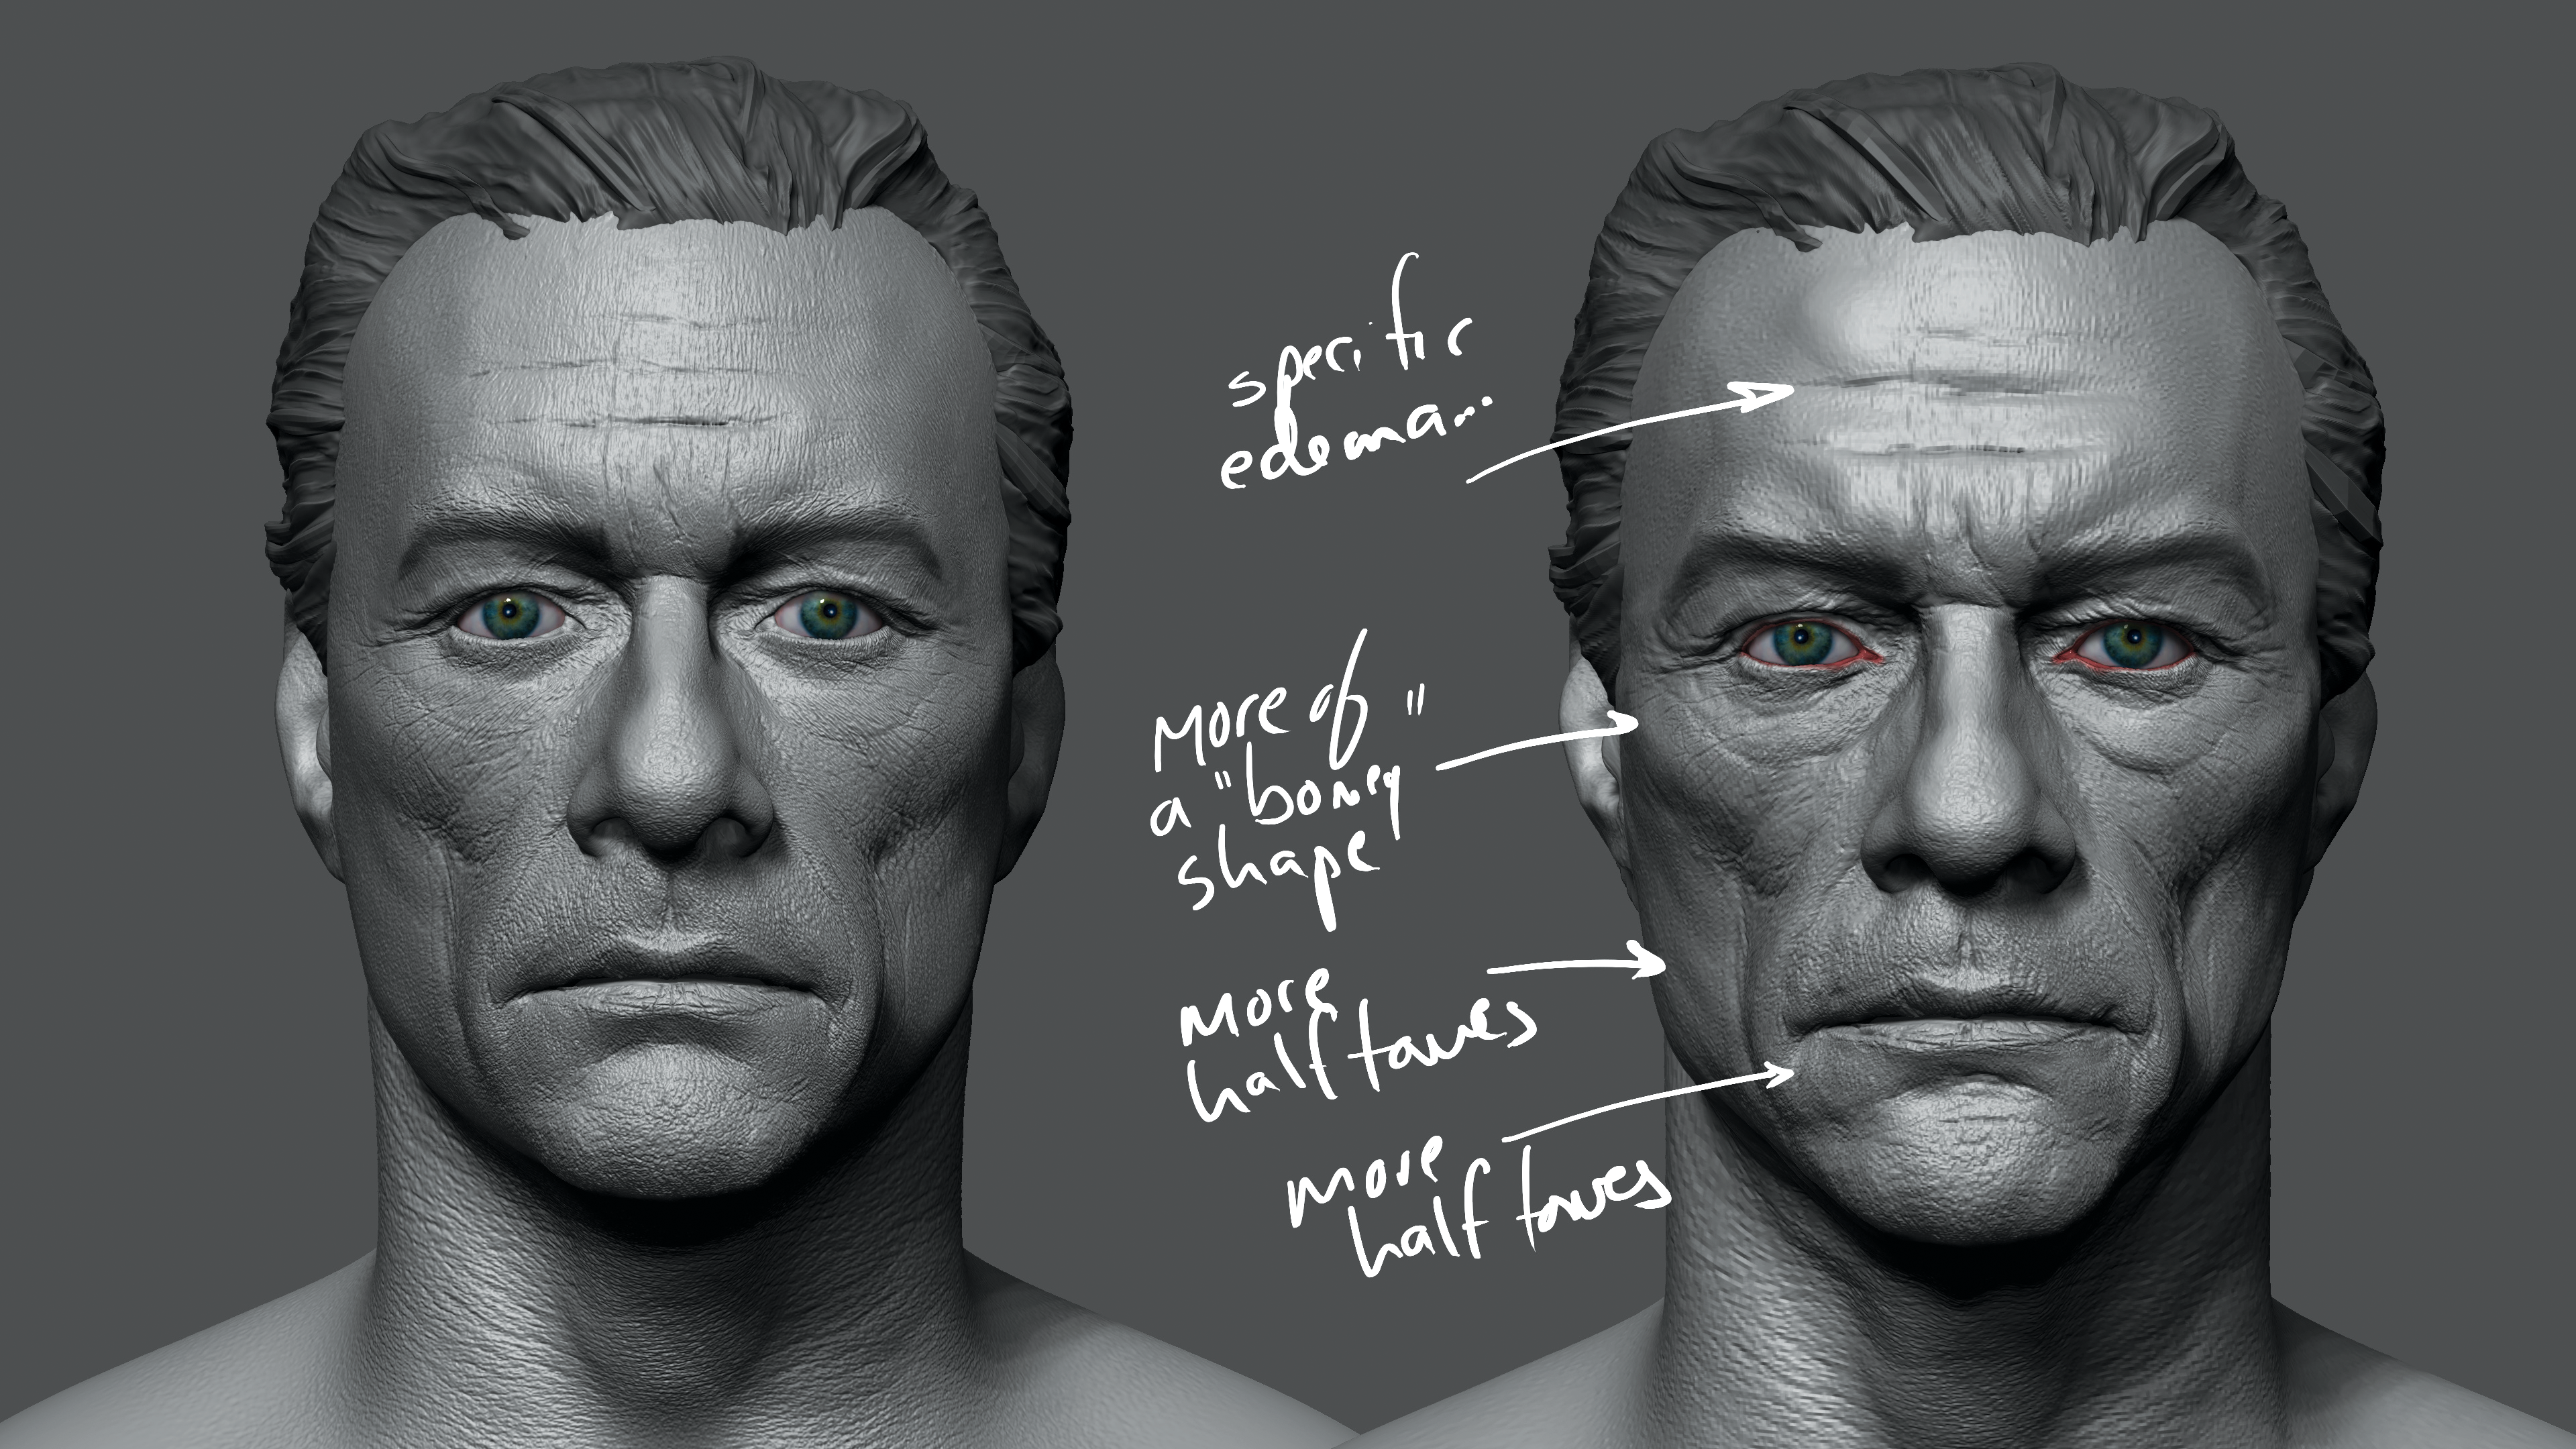
Finally, it’s time to push it! You’ve been staring at this thing for days, and that has made you too close to it. You’ve got to give it that last push and stretch into your discomfort zone. All your future growth is there. I looked for more specific lines and half-tones to establish a deeper, more authentic sculpt.
For example, in the final piece I added what I call the associate jugal groove and broke up the lateral cheek fat more. This final sculpt only had an hour of extra sculpting, but it looks a lot better. That’s what happens when you build the foundations right.
This article was originally published in issue 130 of 3D Artist. Buy issue 130 or subscribe to 3D Artist.
Related articles:

Thank you for reading 5 articles this month* Join now for unlimited access
Enjoy your first month for just £1 / $1 / €1
*Read 5 free articles per month without a subscription

Join now for unlimited access
Try first month for just £1 / $1 / €1
