Optimise Flash movies
Widen your website’s appeal by delivering its content more quickly. Paul Wyatt explains how to optimise Flash visuals without compromising on quality
In this miraculous 21st century with super-duper whizz-bang broadband connections, it may seem rather silly to worry about having to optimise Flash movies. But by not doing it you risk losing visitors to your site. There are some amazingly bloated Flash websites out there that stutter and start as they load, even on the fastest connections. The worst offenders are often film sites, and it seems common for developers to put huge, unoptimised images in Flash files, slap on a preloader and think they’re done. It goes without saying that by doing this they aren’t enhancing the user experience. If you optimise that Flash movie then the preloader won’t drag for so long, the movie will load quicker and your visitors will discover your content sooner.
Consider those visitors to your site who may be perfectly happy with their 56k dial-up modem. It’s a mistake to believe that everyone is as tech-savvy as you are. Many people have older equipment and much slower connections. Widen the appeal of your message by optimising your site as much as you can. Even 20kb trimmed from a movie is 20kb of Flash fat, which, when removed, delivers your site that bit quicker to your audience.
There are a number of ways to make your site lean and mean. We’ll look at these tips and tricks, which you’ll be able to apply to your own website or Flash banner creative. For those of you who have to produce the dreaded 35kb ad banners, and have clients who want everything but the kitchen sink in them, this tutorial will be hugely beneficial. Also on hand we have Matt Loomis, co-founder of Loomis & Jones Creative, to give us practical advice about planning website creative – including both the key considerations and some practical know-how.
The sample project is from the Paul Wyatt Portfolio website. This example uses 3D images exported from Cinema 4D as a PNG sequence. We’ll look at the best way to optimise these once they’ve been imported into Flash. We’ll also look at how Flash sound can be tweaked, the perils of embedding fonts, external file loading and optimal publish settings.
Define publish settings
There are times when you’ll be given a Flash document that’s been produced elsewhere and it’ll be your job to make some amends and publish it with optimal compression settings. Open website_preoptimise.fla from your tutorial files. An SWF produced from this file without adjusting any compression settings would result in a file of 262kb.
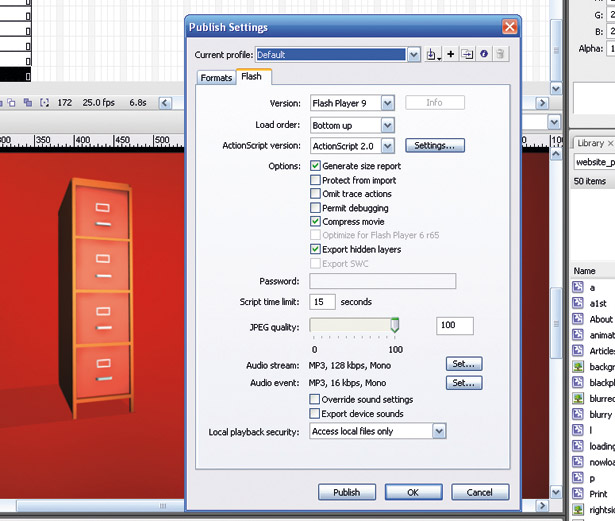
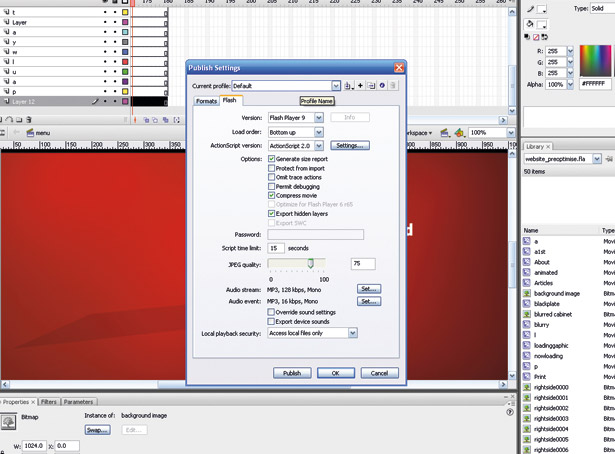
Select File > Publish Settings to bring up the Publish Settings pop-up box. From here, you can make changes to how the Flash movie is exported, and what levels are applied to the movie elements and sound contained within your exported SWF file. The options selected here are global. The amount of compression you set for sound and JPEG quality will be applied to all the sound elements and images within the file.
In the Publish Settings dialog box, select the Flash tab. The first option here is to select the Flash version to be exported to. If your movie is making use of Flash filter effects or advanced stroke options, make sure you’re publishing to the Flash Player version that supports these options – in this case, Flash Player 8 and above. You may notice that your Flash movies will be a few kb lighter when exported at a higher Flash Player version. Export the same movie at a lower Flash version and it will, most likely, add a few kb. If you’re creating online banner campaigns you could find, to your peril, that most companies serving these ads may want them outputted at a lower Flash Player version than the one you’ve used. This could push you over the 35kb limit on your banner by reversioning it. Always check the output Flash Player first before starting your creative work – it’ll save your sanity later on. For our file we’ve selected Flash Player 9.
Get the Creative Bloq Newsletter
Daily design news, reviews, how-tos and more, as picked by the editors.
In the Options section of the Publish Settings dialog, check the box to generate a size report for the movie. What this does is create a frame-by-frame report of the size of the movie. This will show you how many shape bytes each symbol contains, as well as information on how much file size is taken up by any embedded fonts. Be sure to check the box for Compress Movie. JPEG quality is set by using the slider to increase or decrease the amount of compression used on images within the movie. The more you decrease the compression percentage – as indicated in the box to the far right of the slider – the more colour information you’ll be taking from the image. We’ve dragged the slider to the 75 per cent compression setting.
Alter your audio
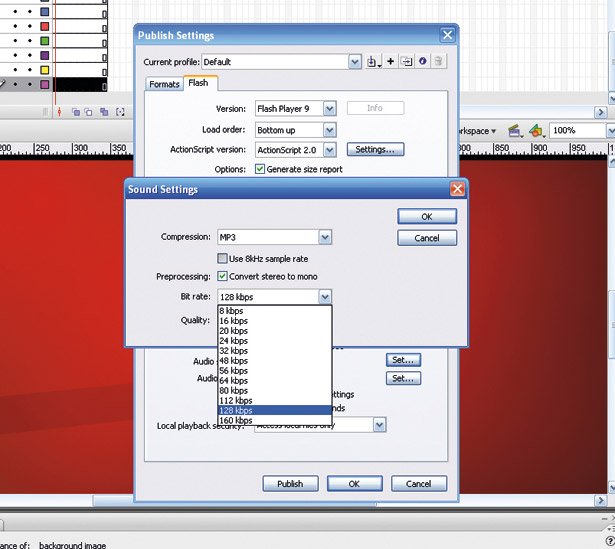
Finally, we have the global compression settings for sound files. Click the Set button next to the Audio Stream button to select options for the sound compression, bit rate and quality. A streaming sound will play as soon as there’s enough sound data downloaded for it to begin. Event sounds don’t play until they completely download first. A drop-down box gives you a number of options to assist in compressing the sound. The first is Disable, which will turn off all the compression options and export the file without any sound at all. ADPCM is a very slight form of compression. For the web it’s not the best, and you should be using the MP3 option for your work. Using this will result in small file-size audio files with exceptional compression. If your work is destined for enhanced CD or Kiosk output, select RAW, as this will apply no compression at all. Speech delivers optimised, clear sound files for voice-only recordings. There’s also a check box to convert stereo to mono.
For our example, we’ll select MP3 as the compressor and in the Bit Rate drop-down we’ll select 16Kbps. The higher the value here, the better quality the sound will be on export. Our sounds are short-burst sound effect samples, so we can go quite low with the export settings. For longer tracks, use a higher bit rate. What you can’t do within Flash is import audio files and export them at better quality than the original files. Don’t expect Flash to remaster your files! So, if your imported file has a bit rate of 80Kbps and you exported it as 160Kbps, it won’t suddenly increase the original’s quality. What you will get is a very peculiar sounding music file – one that may suffer from ‘clicking’, an audible click due to the mismatched export options.
One more audio optimisation in the Publish Settings box is Override Sound Settings. This check box will apply what you’ve just selected to all the audio files in your Flash document. It will override individual file settings.
Now you can begin to optimise individual elements. In the Formats tab of the Publish Settings pop-up box, check the box next to Flash. Use the folder icon to browse to your working folder and select this as the output for the Flash file. Instead of hitting the Publish button, hit OK instead. The compression settings you’ve just chosen will take effect when you preview the file from within Flash. You’ll also use the bandwidth profile to check its size. This is a lot simpler than publishing the movie, locating the file and right-clicking it to find out its size each time.
Before previewing, select Window > Output to bring up the output window. This will contain the size report you selected in Publish Settings.
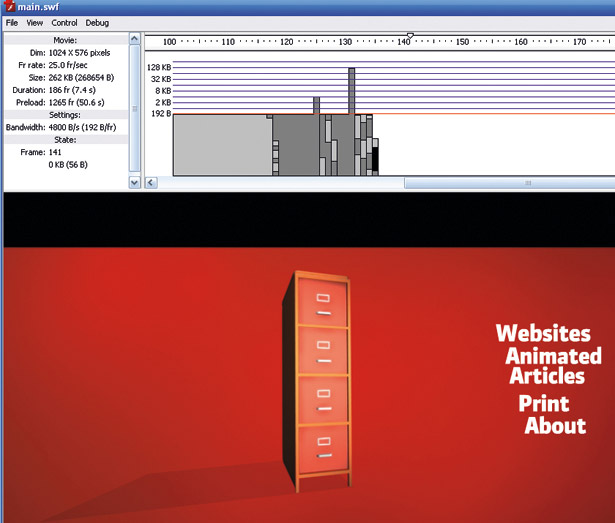
Hit Ctrl and Enter to preview the movie. Then, from the View menu of the SWF itself, select the Bandwidth Profiler. This gives you information on the movie’s dimensions, file size and duration. It also enables you to emulate a number of download settings. To the right of the movie, settings and state headings at the top of the profiler there’s a frame-by-frame guide to the data downloading into each frame. The red line running across this is the bandwidth limit. Anything under this line will be shown quite quickly. Any bars that stretch above this and cause ‘spikes’ can cause download problems. You should remember that optimising a Flash movie isn’t just about reducing its file size – it’s also about streamlining the demand on memory needed to redraw images. It’s quite likely you’ll have a sudden spike when a number of elements are loaded into a scene at the same time – usually at the start of a movie. Any spikes beyond this may be due to large graphic files or highly detailed vector drawings.
Streamline memory demand
Each spike can be clicked on to move to the frame in the movie that contains the offending elements. You can test your work by selecting Simulate Download from the View mode and then choosing a modem speed from the Download Settings. Let’s look at the information given in the output window to give you some idea of what you can optimise to reduce this. The background image is highly visible, so less compression can be applied to this element. To compensate for this, greater compression is added to less noticeable elements.
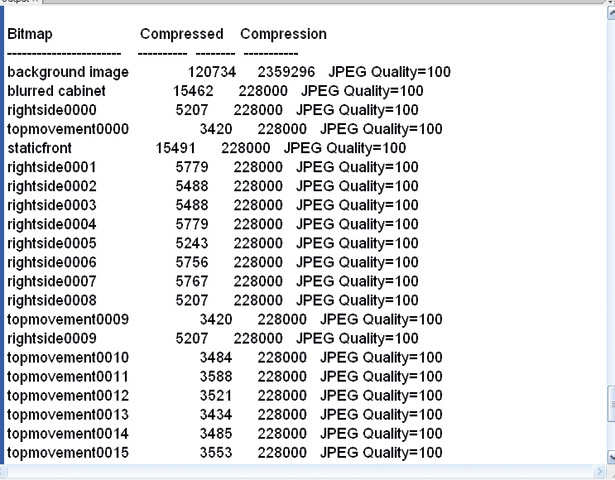
In the Flash library, select the PNG image blurred cabinet. This is the image of the filing cabinet, which is seen very quickly as it drops into the website. Due to its lack of visibility in the movie and how suddenly it appears, you can apply a heavier amount of compression to this element. Right-click on the library element and from the available selections choose Properties. This will bring up the bitmap properties. Your first check-box option is Allow Smoothing. Leave this selected, as it keeps the image really smooth if you’re rotating, squashing or rescaling it. By default, the image is taking the global compression settings you selected in the Publish Settings dialog box. Uncheck Use Document Default Quality to reveal a number of optimisation options for the image. Change the quality setting to 35 by entering this in the Quality Input box. Now hit Test.
The preview image on the far left of the dialog box shows the image with the new optimisation settings applied. Underneath the JPEG settings, Flash gives you a breakdown of what the original file size was and how much has been shaved off when compression has been applied. Experimentation with a number of settings is the name of the game when it comes to further optimising the graphic elements of your SWF movie.
By using the file size report generated from Flash and looking at spikes in the Bandwidth Profiler, you’ll find it easy to identify which elements of your Flash movie are fat and which need to be trimmed. Applying the techniques above reduced the file to around 60kb.
Our project example involved a mix of elements created in several programs – vector text in Flash, animations in Cinema 4D rendered out as PNG frames and backgrounds created in Photoshop. If, however, most of your design is to be produced in Photoshop CS3, you can take advantage of the new PSD importer feature.
This great function arrived with Flash CS3 and enables you to take a Photoshop document and bring it directly into Flash. The Photoshop layer structure is replicated in Flash and the individual graphic elements can be converted via the PSD importer into graphic symbols. On import you’re also given optimisation controls over each individual layer of the PSD file. This gives you a great deal of choice as to how each layer will be optimised.
However, you won’t be able to see what the graphic elements look like with the compression applied until you preview the movie – but you can also fine'tune these settings using the techniques we’ve explored in our project.

Thank you for reading 5 articles this month* Join now for unlimited access
Enjoy your first month for just £1 / $1 / €1
*Read 5 free articles per month without a subscription

Join now for unlimited access
Try first month for just £1 / $1 / €1

The Creative Bloq team is made up of a group of art and design enthusiasts, and has changed and evolved since Creative Bloq began back in 2012. The current website team consists of eight full-time members of staff: Editor Georgia Coggan, Deputy Editor Rosie Hilder, Ecommerce Editor Beren Neale, Senior News Editor Daniel Piper, Editor, Digital Art and 3D Ian Dean, Tech Reviews Editor Erlingur Einarsson, Ecommerce Writer Beth Nicholls and Staff Writer Natalie Fear, as well as a roster of freelancers from around the world. The ImagineFX magazine team also pitch in, ensuring that content from leading digital art publication ImagineFX is represented on Creative Bloq.
