Revolutionise your image editing workflow with Luminar AI
Achieve professional results with ease using artificial intelligence.

Every photographer wants to spend more time shooting and less time editing, but how can you achieve that while still producing eye-catching professional results? The simple answer is Skylum Luminar AI. It focuses on results rather than complex tools, thanks to powerful artificial intelligence that provides stunning results at the click of a button, with additional manual control available when you need it.
Luminar AI is designed for everyone who edits photos, whether you’re a beginner or a seasoned pro. Through the automation of complex and repetitive tasks, it enables you to produce your best images with no need to learn complicated and time-consuming techniques. It works flawlessly whether you shoot raw files or JPEGs.

Powerful artificial intelligence is at the heart of Luminar AI. Portraits can be gently sculpted using Body AI and Face AI; Iris AI brings eyes to life while Skin AI naturally softens skin; landscapes can benefit from greater depth and detail thanks to Atmosphere AI and Sky Enhancer; and Sky AI improves or even replaces skies, while Golden Hour and Sunrays enhance the light in the scene.
Luminar AI can be used stand-alone or as a plugin compatible with Photoshop CS5 and newer, or Lightroom Classic from Lightroom 6 and newer, as well as with Photos for macOS.
To get you started with Luminar AI, we’ll show you how to use Templates to apply great looks to your images in seconds before going deeper…
How to use Templates to start editing
01. Enter the Templates tab
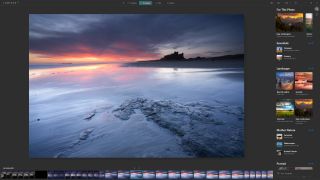
Import your image folders into Luminar AI, then select the image you’d like to work on before clicking on the Templates tab at the top of the interface. Luminar AI automatically suggests which Templates are most suitable for the image. Click on these to see the options available, or scroll down to look through all your Template options.
02. Select a Template
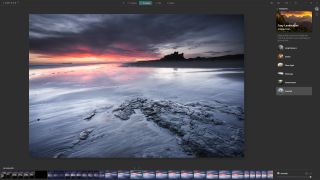
Once you’ve found a Template you like the look of, click on it to activate the effect. For this image, we used the suggested Easy Landscapes Collection; within this set, we selected the Snowfall option. This Template accentuated the mood of the shot by desaturating the scene and boosting the Structure setting, for a grittier look.
03. Customise the Template
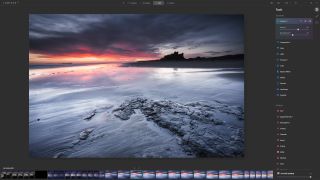
The Template is applied at a default setting, which is often perfect, but if you click on the Edit tab and then Enhance, you can adjust the results. Accent controls the strength of the effect, while Sky Enhancer controls sky detail (if the image has a sky). A slider in the bottom-right controls Opacity.
04. Apply manual edits
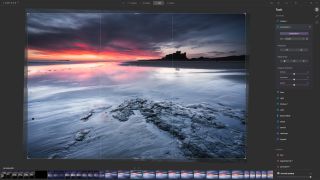
You can click on any of the adjustments on the right to expand the controls and take manual control. For this image, we expanded Composition and used the Crop Tool to straighten the horizon. All adjustments are non-destructive, so anything applied in Luminar AI can be rolled back: your original image files are untouched.
05. Control lighting
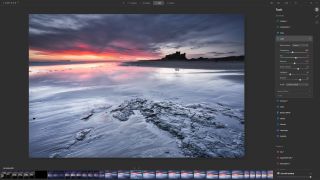
This image didn’t require much editing after we’d applied the Snowfall Template, but before exporting the image, we expanded the Light adjustments to tweak Temperature, Exposure, Shadows and Highlights. Smart Contrast was applied automatically as part of the Snowfall Template and the result looked great, so this was left at the setting selected by Luminar AI.
3 powerful effects applied using Templates
01. Burned Film


You can add realistic light leak effects to any image using the Burned Film Template. Applying this type of effect manually is time-consuming and complicated. But with Luminar AI, you’re just a few clicks away from achieving a popular retro photo effect. In this example, the Accent was increased to 100% to make the effect as strong as possible, but you can set a lower amount.
02. Quirky Moe


Simple images can produce the most striking results. Combined with the Quirky Moe Template, this shot taken in Japan is a great example. Quirky Moe is part of the Filmic Collection, and took the dull raw image to perfection with a single click and by increasing the Template Accent to 100%. The colour toning and added contrast are perfect for simple images like this.
03. Vignette


The Vignette Template applies a stylish vignette to images, alongside an increase of Smart Contrast. This Template works with both subjects that are in the centre of the frame or positioned at one side, adjusting itself to suit the composition. Thanks to the intelligent application of the template, even off-centre subjects look fantastic after the Vignette Template has been applied.
5 great tips for using Templates
Luminar AI Templates are easy to use despite the amazing effects they provide to all types of images at the touch of a button. Using them is so simple that you really can't go wrong.
Whether you’re an editing beginner or an expert with years of experience, Luminar AI will revolutionise your editing workflow by saving time and making the overall process easy and fun. Here are five tips that will help you get the best out of Luminar AI’s workflow, using Templates as a high-quality starting point for editing your shots.
01. Use Favorites for fast effects
If you regularly use the same Templates, you can save them as Favorites by clicking on the heart next to the name. You can access Favorites in the My Collection panel.
02. Control Templates with Masks
Within the Edit tab, you can mask in a specific area where the Template affects images using a Paint Mask, a Radial Mask or a Gradient Mask.
03. Zoom in to check finer details
To zoom into an image at 100% so you can see how a template is affecting the finer details, click on the image in the main image window. A second click zooms you back.
04. Edit first to reveal detail
While Templates offer a fantastic starting point for editing quickly in Luminar AI, for some images it’s worth applying a few basic edits first to reveal detail.
05. Export your images
Once a template and manual adjustments have been applied, these will be stored in the Catalog. To ultimately apply effects to an image, you’ll need to export it using the easy-to-use Export tab.
How to get your copy of Skylum Luminar AI
If you don’t have Luminar AI already, you can get it at www.skylum.com – it’s available for both macOS and Windows. Luminar AI will revolutionise your editing workflow by simplifying professional techniques and making complex tasks quick and fun. When you purchase Luminar AI, you can use the exclusive discount code DCW21* to save £10/$10 on the price of the software, which is available with single or dual computer licences.
*Cannot be used in conjunction with any other sale offer

Thank you for reading 5 articles this month* Join now for unlimited access
Enjoy your first month for just £1 / $1 / €1
*Read 5 free articles per month without a subscription

Join now for unlimited access
Try first month for just £1 / $1 / €1
Get the Creative Bloq Newsletter
Daily design news, reviews, how-tos and more, as picked by the editors.
The Creative Bloq team is made up of a group of design fans, and has changed and evolved since Creative Bloq began back in 2012. The current website team consists of eight full-time members of staff: Editor Georgia Coggan, Deputy Editor Rosie Hilder, Ecommerce Editor Beren Neale, Senior News Editor Daniel Piper, Editor, Digital Art and 3D Ian Dean, Tech Reviews Editor Erlingur Einarsson, Ecommerce Writer Beth Nicholls and Staff Writer Natalie Fear, as well as a roster of freelancers from around the world. The ImagineFX magazine team also pitch in, ensuring that content from leading digital art publication ImagineFX is represented on Creative Bloq.