Master on-demand animations with Animista
How to create engaging animations using CSS.

Motion plays a very important role in our lives. Our eyes and attention automatically shift focus towards moving objects; static content can't do this as effectively.
There's never been a more exciting time for CSS animation. It's become an invaluable tool for creating beautiful and engaging interfaces. But crafting motion properly is not a small task, so having some help can go a long way. This is where Animista comes in.
Animista is both a collection of pre-made CSS animations, and a playground where you can tweak and test them out. This speeds up the process of iterating different animation ideas considerably, which is one of the great things about incorporating Animista into your workflow.
Understand the UI
The Animista playground UI is split into three main sections. The animations are organised in logical categories, groups and variations, all located at the top of the screen.
If, for example, you are looking for suitable animations for a presentation, you'll most likely want to browse the Entrances and Exits categories. Say you then opt for a Slide-in, you will find additional variations like Slide-in-Left, Slide-in-Right and so forth just beneath it.
Clicking on the category, group or the variation will immediately play the animation on the main stage. Each category, group and variation is assigned their own URL, which makes it very easy to bookmark or share them.

The main stage is where all animations take place. There are three buttons in the top-right corner. The first is the Replay Animation button (circular arrow icon), followed by the Add to Favourites (heart icon) and Generate Code (curly braces icon) buttons.
Get the Creative Bloq Newsletter
Daily design news, reviews, how-tos and more, as picked by the editors.
The Options panel is where you tweak various aspects of the animation. The first one is a select object drop-down menu that enables you to swap the animated object with another one from a list of predefined objects. It is followed by a group of options that correspond to standard CSS animation properties. The best way to see how each of them affects the animation is to experiment.
Inject your code
Once you get familiar with the UI, you are ready to start integrating it into your workflow. Speaking of workflows, when it comes to Animista you can pick between two, depending on your preferences and requirements.
One at a time
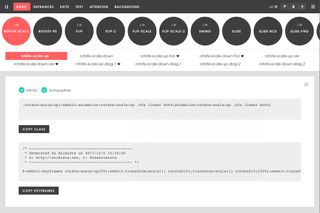
When you see the animation you like, simply click the Generate Code button. You will then be presented with the animation code panel.
At the top of the panel there are two checkboxes. The first one enables you to minify the code, saving some space in the process. The second one will improve compatibility with some older browsers by adding browser vendor prefixes to the code.

Immediately below, you will find the CSS code for the animation helper class named after the currently active animation. It is a one-liner containing the animation code with the animation options applied. Clicking the Copy Class button will copy the helper class code to your computer clipboard, so you can then simply paste it into your editor.
The last and the most important bit is the animation keyframes code block. It is where the entire sequence of the animation is described and is what you need in order to use the animation in your project. Upon clicking the Copy Keyframes button, the code is ready to be pasted into your CSS.
Animate in batches
In contrast to the previous approach, when you see the animation you like, add it to your favourites by clicking the Add to Favourites button.
The heart icon will appear next to the active animation in the animation variations list, marking it as a favourite. Repeat this as many times as needed until you are happy with your selection.
The download button at the menu bar’s right side takes you to the download page, at the top of which you will find a list containing all of your favourite animations. Here you will get a chance to review your picks once again. You can also make any last-minute changes by clicking the ‘x’ button found next to the animation name.
The last section contains the generated code for your entire selection of animations. Upon clicking the Copy Code button, a green notification will inform you that the action was successful and that the code is ready to be pasted into an editor of your choice. In case you are creating a new file, make sure it is saved with the correct extension, in this case .css.
Get animating
There are countless ways to use CSS animations and enrich your web projects. Animista makes the process more fun and a bit easier. New animations will be coming out soon – and in the meantime, happy animating.
This article originally appeared in net magazine issue 303. Buy it here.
Want more advice on which animation tools are best?

If you're into web animation, make sure you've picked up your ticket for Generate New York. Web animation expert, author and design evangelist at Adobe, Val Head, will be delivering a talk – Choose Your Animation Adventure – in which she will break down the long list of choices for making things move on screen.
She'll also show you which tools are best suited for things like state transitions, showing data, animating illustrations, and making animations responsive.
Generate New York takes place from 25-27 April 2018. Get your ticket now.
Related articles:

Thank you for reading 5 articles this month* Join now for unlimited access
Enjoy your first month for just £1 / $1 / €1
*Read 5 free articles per month without a subscription

Join now for unlimited access
Try first month for just £1 / $1 / €1
