Amazing tools take the hard work out of portrait editing
Effortlessly edit your portrait shots while achieving professional results with Luminar AI.

Portrait photography is important to every one of us. We all have a connection to other people that’s captured and celebrated through photography. But while most of us love shooting photos of family and friends, many of us don’t have the extensive editing skills needed to process our shots to make them look their best.
Editing portrait and fashion images is notoriously complicated, not to mention time-consuming. When some images require around three hours of editing, the idea of being able to process portraits to a professional level in just a few minutes is an incredibly exciting prospect. And with Luminar AI, this dream is a reality.
Luminar AI is packed with all the functionality you need to take as much, or indeed as little, control over portrait editing as you wish. Starting with Templates, you can give your images an instant makeover at the click of a button before taking more control with manual editing. Once the overall result is looking how you want it, you can then move onto Luminar AI’s powerful portrait controls, powered by artificial intelligence.
Face AI allows you to effortlessly control how slim faces look with natural-appearing results. Skin AI makes light work of skin smoothing, while Body AI can recognise models’ bodies in different poses and positions, and provides control over body shape and abdomen size. So, if you’re aiming to edit your portraits like a pro, but without spending years learning all of the editing techniques you would need, Luminar AI is exactly what you want.
Take the hard work out of portrait editing with Face AI
01. Use Templates
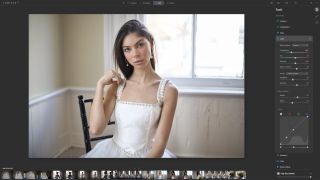
Choose an image to edit, then select a Template in the Templates tab to add an effect to the image. Here we chose High Key to lighten the backlit portrait and create soft pastel hues. Click on the Edit tab and apply any manual editing as required; Light will be the most likely section to expand. This portrait was lightened and warmed up.
02. Adjust face and eyes
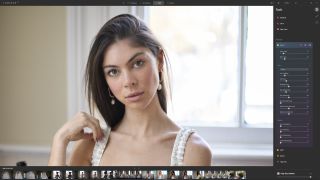
In the Portrait section, click the Face AI tab. The top two sliders control face lighting and slimness, and were set to 11 and 15 respectively. Under Eyes, the colour was changed from brown to green, with Iris Visibility reduced to 15 for a natural result. Enlarge Eyes was set to 30 and Eye Whitening to 20.
03. Adjust the mouth
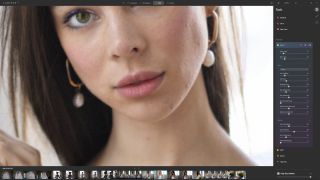
In the Mouth section, you can make adjustments to lip colour and lightness, as well as whiten teeth (not necessary here). Lips Saturation was set to 30, Lips Redness was set to 50, and Lips Darkening was set to 20. This increased the colour of the lips and darkened them, but all the while maintaining a completely natural look.
04. Smooth skin
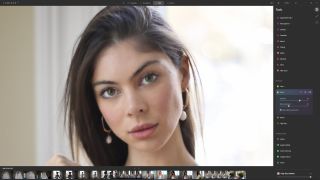
Click on Skin AI to expand the controls. The Amount slider controls the overall smoothing, Shine Removal makes the skin appear more matte, and Skin Defects Removal AI removes light blemishes. More prominent blemishes will need to be removed using the Clone Tool, which can be found in Luminar AI’s Professional section.
05. Alter body shape
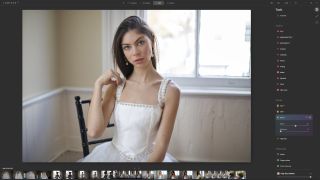
Body AI can recognise human bodies in different poses and positions, and provides control over body shape and waist size using just two sliders. These can be increased or decreased as desired, although subtlety is usually the best approach. The Abdomen slider, which is used to control stomach size, will only work when a stomach is detected. In this shot one wasn’t, so we just increased Shape to 10 to thin the model slightly.
Create your best portraits ever

Face AI is the portrait editing tool you’ll use the most, and provides a huge amount of control over facial features. We’ll look at this in detail with a brief look at the other portrait editing tools.
01. Face AI
Face AI provides adjustments for face shape and lighting, as well as extensive control over the eyes and mouth of people detected in photos.
02. Face controls
These two sliders provide quick and accurate methods of lighting faces and slimming faces, which are automatically detected by the software.
03. Eyes controls
Eight sliders and a dropdown menu allow you to change your subject’s eye colour in an instant, alongside multiple eye enhancements and retouching options.
04. Mouth controls
The mouth controls allow you to adjust the colour, saturation and redness of your subject’s lips, while the Teeth Whitening slider brightens and whitens teeth if Luminar AI detects them in your portrait.
05. Skin AI
Skin AI consists of two sliders and a checkbox: the sliders smooth skin and remove shine, while the checkbox takes care of light blemishes.
06. Body AI
Body AI recognises different poses and provides control over body shape and waist size, with the ability to increase or decrease either using two simple sliders.
3 portrait effects applied using Templates
01. Feather Light


The Feather Light Template is found in the Experimental Collection, a set of creative effects that can be applied to any image. This Template creates a bright image with areas of colour that look like light leaks or film fogging. There are six creative Templates in this collection; each of them will give your portrait shots an exciting look at the touch of a button.
02. Rembrandt


The Rembrandt Template is part of the Essence Collection, which is designed to give portraits and fashion images a high-end look and feel. The Rembrandt effect desaturates images slightly and adds a burst of Mood, which is one of the Tools available in the Edit tab. With five stunning Templates in the collection, you can be sure that your portraits will have a professional finish.
03. Soulful


The Soulful Template is one of five stylish black-and-white effects in the Monochrome Collection. Soulful creates a fantastic mono conversion that darkens images slightly; if you combine it with manual edits, you can achieve unique results, as you can with all of the Templates. With this image, Soulful creates an elegant look and feel for a timeless black-and-white image.
5 great tips for editing portraits
Editing portraits to a professional standard has never been quicker and easier: with Luminar AI you can achieve stunning results in just a few mouse clicks, with no previous editing experience required. Not only does this completely remove the laborious nature of portrait editing, which can take years to perfect, but it also means that you can spend more time behind the camera shooting your favourite subjects. So here are five tips that will help you to get more out of portrait editing in Luminar AI, while making your shots look their best.
01. White balance
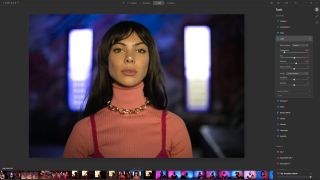
When you have a portrait image with a colour cast, click the Edit tab and correct white balance before applying a Template. Some Templates incorporate colours, so it’s easier to correct the cast first.
02. Face Light

Face Light lightens faces in images. This means that you can just lighten the faces in shots rather than the entire image; doing so requires nothing more than a single slider to control the brightness.
03. Body AI
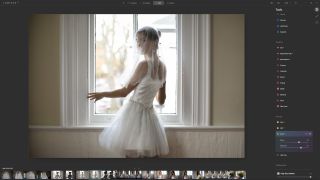
Body AI is a simple and effective set of tools for changing body shape. Shape is most commonly used to thin subjects, but can also make them wider. Abdomen reduces apparent stomach size.
04. Cloning
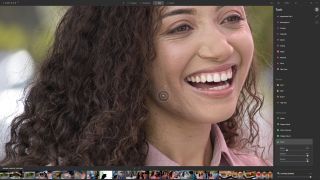
To remove blemishes, you’ll need the Clone Tool. Set Softness and Opacity to 100 and reduce the opacity if the blend is noticeable. Alt-click to set a sample point then click on the blemish.
05. Group shots
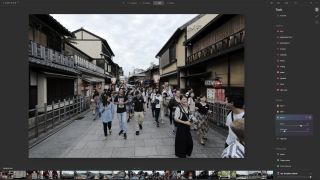
In group shots, controls such as Face Light and Shape can detect people and apply adjustments to all. To apply effects to a single person, click the Add Mask icon and paint where you want the effect.
How to get your copy of Skylum Luminar AI

If you don’t have Luminar AI already, you can get it at www.skylum.com – it’s available for both macOS and Windows. Luminar AI will revolutionise your editing workflow by simplifying professional techniques and making complex tasks quick and fun. When you purchase Luminar AI, you can use the exclusive discount code DCW21* to save £10/$10 on the price of the software, which is available with single or dual computer licences.
*Cannot be used in conjunction with other sale offer

Thank you for reading 5 articles this month* Join now for unlimited access
Enjoy your first month for just £1 / $1 / €1
*Read 5 free articles per month without a subscription

Join now for unlimited access
Try first month for just £1 / $1 / €1
Get the Creative Bloq Newsletter
Daily design news, reviews, how-tos and more, as picked by the editors.
The Creative Bloq team is made up of a group of design fans, and has changed and evolved since Creative Bloq began back in 2012. The current website team consists of eight full-time members of staff: Editor Georgia Coggan, Deputy Editor Rosie Hilder, Ecommerce Editor Beren Neale, Senior News Editor Daniel Piper, Editor, Digital Art and 3D Ian Dean, Tech Reviews Editor Erlingur Einarsson, Ecommerce Writer Beth Nicholls and Staff Writer Natalie Fear, as well as a roster of freelancers from around the world. The ImagineFX magazine team also pitch in, ensuring that content from leading digital art publication ImagineFX is represented on Creative Bloq.