How to upload a video to YouTube: Upload a video from phone and desktop
The best tips on how to upload a video to YouTube for the world to see.

In this article we'll show you how to upload a video to YouTube in eight easy steps. First - let's set the scene... So, you’ve finished your short film masterpiece, or set the world to rights in your latest vlog and you're ready to publish it for the world to see. Now you need to know how to upload a video to YouTube.
Well, you're in luck. In this guide, we'll take you through all the steps you need to get your work from your chosen video editing software, to the dominant popular social platform YouTube. But that's not all. We'll also provide a few handy tips on how to optimise your video’s page to draw in more and more viewers. You’ll be racking up likes and subscribers in no time.
Looking for a bit more in-depth video editing software options before you learn how to upload a video to YouTube? Have a look at these two trusted brands...
Premiere Pro: the best video editing software
Aimed at professional editors, Adobe's Premiere Pro is our pick of video editing software. This industry standard tool works on both PC and Mac, and offers everything you need.
Final Cut Pro X: the best choice for Mac users
Optimised for macOS, Final Cut Pro has a great reputation within the industry and is the best option for Apple users who want to make movies easily.
01. Preparation
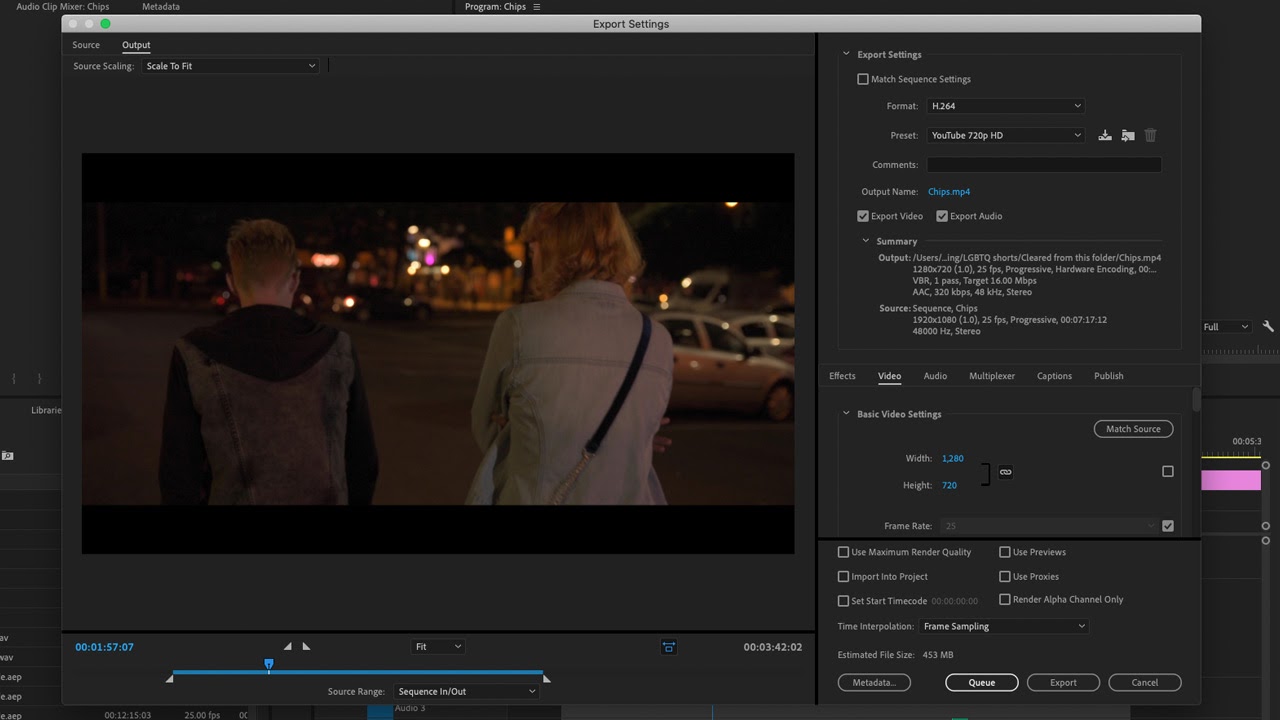
YouTube can work with several different video file types, but to minimize processing time and reduce the risk of visible compression, you’ll want to export from your editing software using something close to the recommended settings. Many editing applications have a YouTube preset that you can select when exporting (see our guide to the best video editing apps for YouTube), but if yours doesn’t, the important settings are: MP4 container; audio in AAC-LC codec, video in H.264 codec, with no interlacing and variable bitrate; and 16:9 aspect ratio.
The other thing you need before uploading is a Google account—YouTube is owned by Google, and you need one account for all Google websites. Click Sign In on YouTube’s main page to access your account. If you don’t already have one, there’s an option to Create Account. It doesn’t take long to fill in your details and get going, but it’s worth taking the time to add a profile picture, as this will show up on your channel and make it a bit more visual.
02. Add your video file
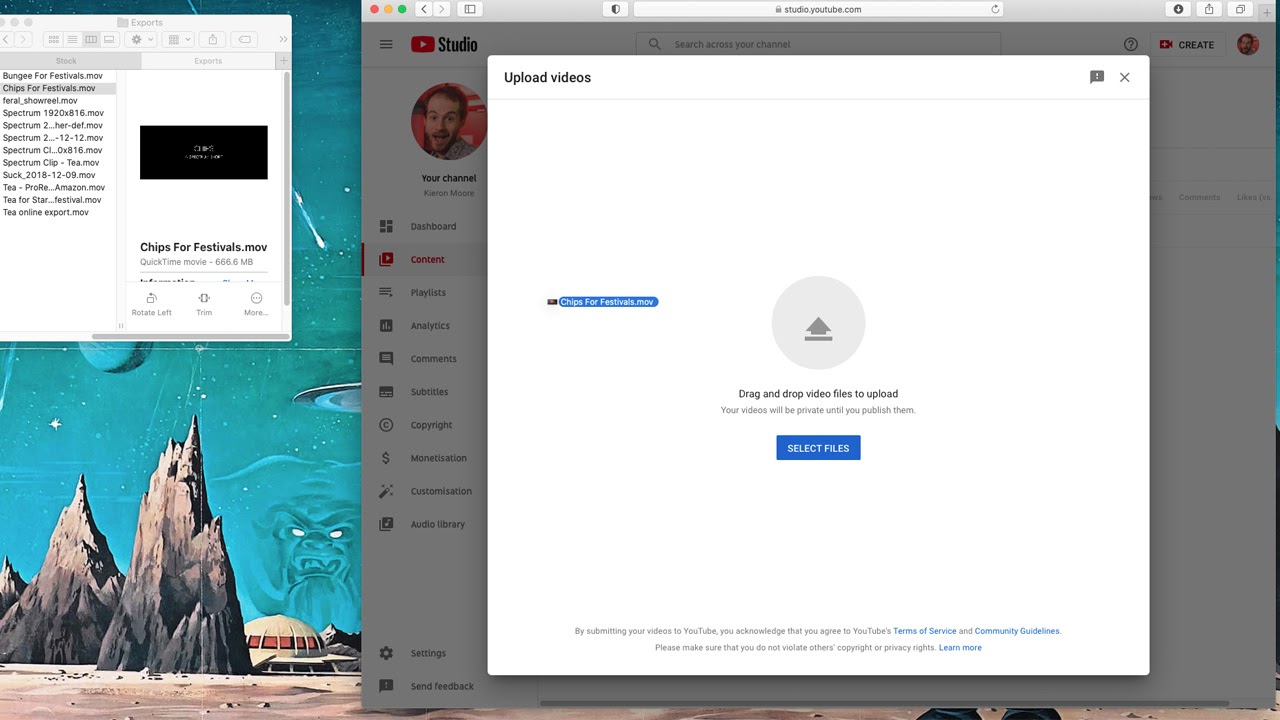
On the main YouTube page, click the Create icon in the top right corner—it’s the one shaped like a camera with a plus sign. This will take you to a page where you select the video file that you want to upload from your computer. Either drag and drop the file from a File Explorer window (or Finder on Mac), or click Select Files and use YouTube’s interface to find your video.
03. Add a description
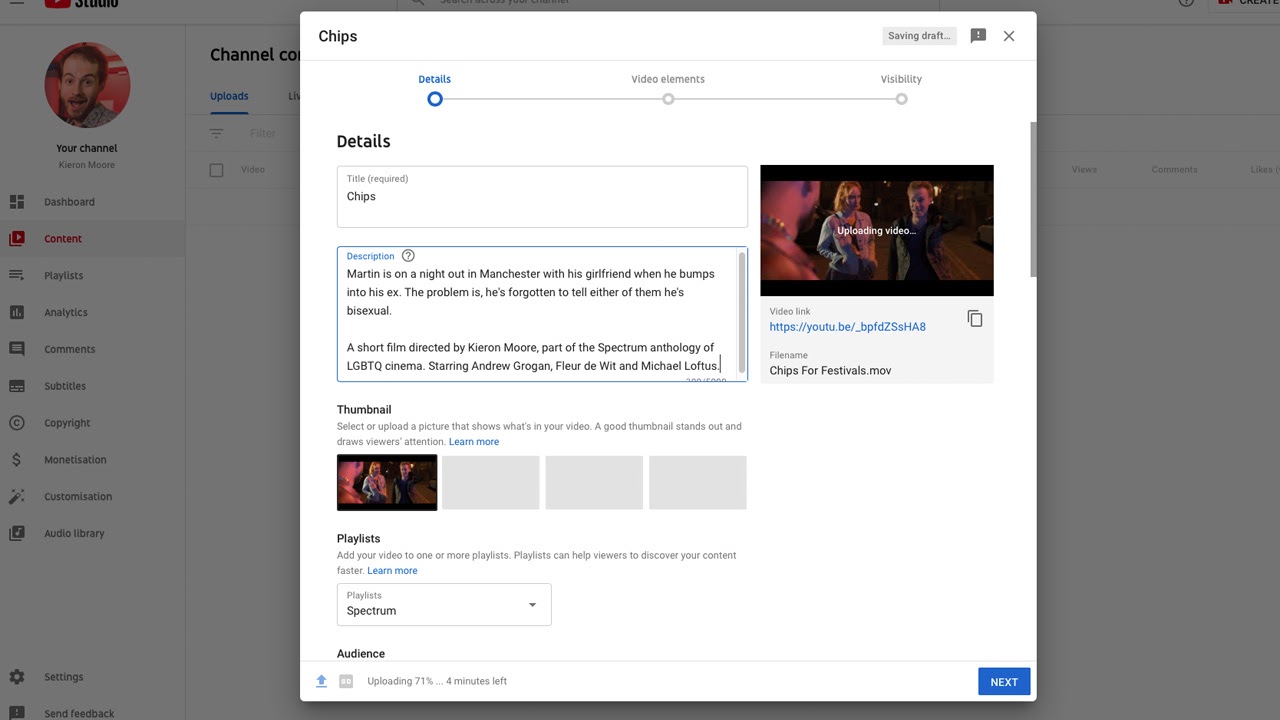
While your video uploads, there are three tabs where you can fill in information about it. On the Details tab, the first thing to do is to give your video a description. This is important, as it will form part of the metadata (the information that YouTube gives to search engines to help attract viewers). Try to sum up the video in an appealing but concise way, and include keywords that people might search for, such as names of people, products, or places involved.
Get the Creative Bloq Newsletter
Daily design news, reviews, how-tos and more, as picked by the editors.
04. Add an image
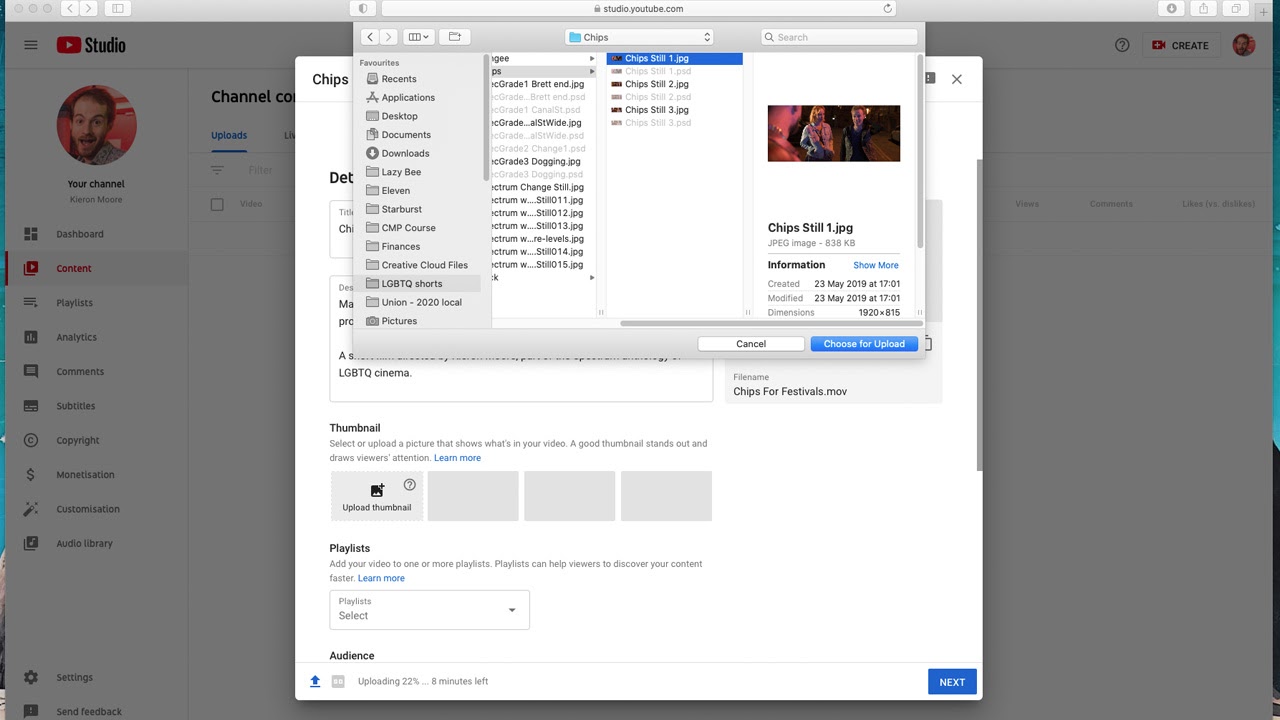
Your thumbnail image will appear alongside the video title in search results, so it should be eye-catching. It doesn’t have to be a simple screengrab; consider adding elements like text. Look at other thumbnails on YouTube and see what grabs your attention. For best results, your image should be in 16:9 aspect ratio and 1280 x 720 pixels, and there’s a maximum file size of 2MB. Once your image is prepared, click the Upload Thumbnail button on the Details tab and locate the image on your computer.
05. Add tags
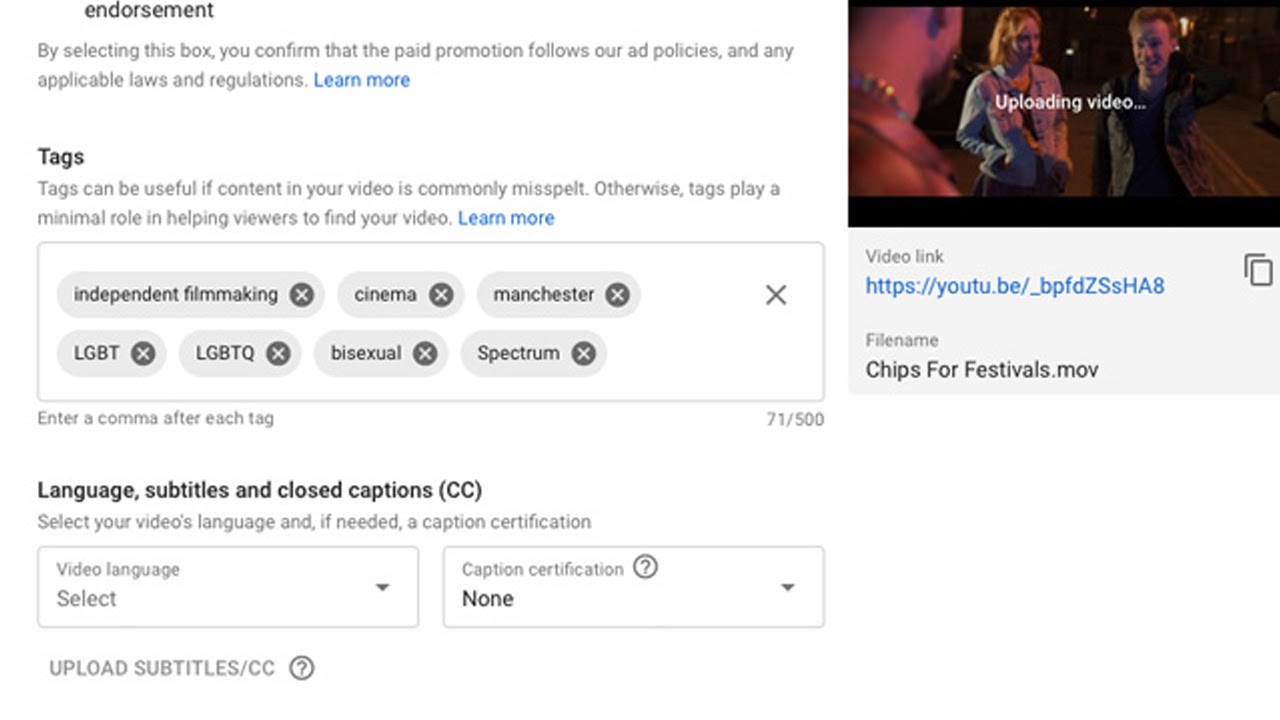
Next, add tags. Though not as important as the description, these are keywords that will go into the metadata and promote your video to people searching for the same words. List words and phrases related to the topic of the video that you think people may search for, especially ones you didn’t include in the description. Don’t use too many tags, though, as this can confuse YouTube’s algorithm and do more harm than good. Five to eight tags are ideal.
06. Check legalities
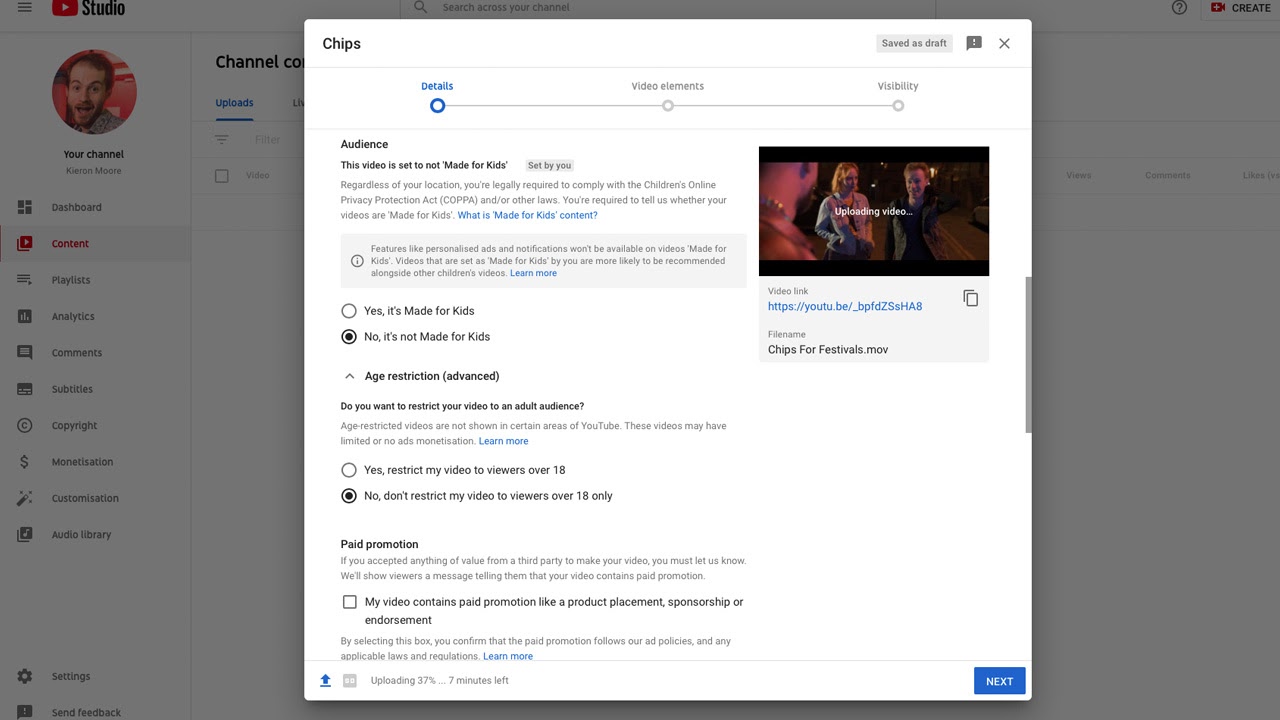
A few details need to be filled in for legal purposes. You must specify whether the video is made for kids, specifically those under 13 years old. You can then select whether to restrict your video to viewers over 18; this is optional, but if you don’t restrict it and your video is found to have content unsuitable for minors, such as violence or heavy profanity, the restriction will be imposed on you. Also, if your video contains any paid promotion, you must declare so here.
07. Select license and other details
There are a few more options for you to consider on the Details page. An important one is license. If you select Standard YouTube License, you are granting only YouTube the rights to show your video and not permitting it to be copied elsewhere. If you select Creative Commons, then you are granting anyone permission to reuse your footage. The rest of the options on this tab are self-explanatory, but make sure you fill in as much as you can, as it will all help with the metadata.
08. Add video elements
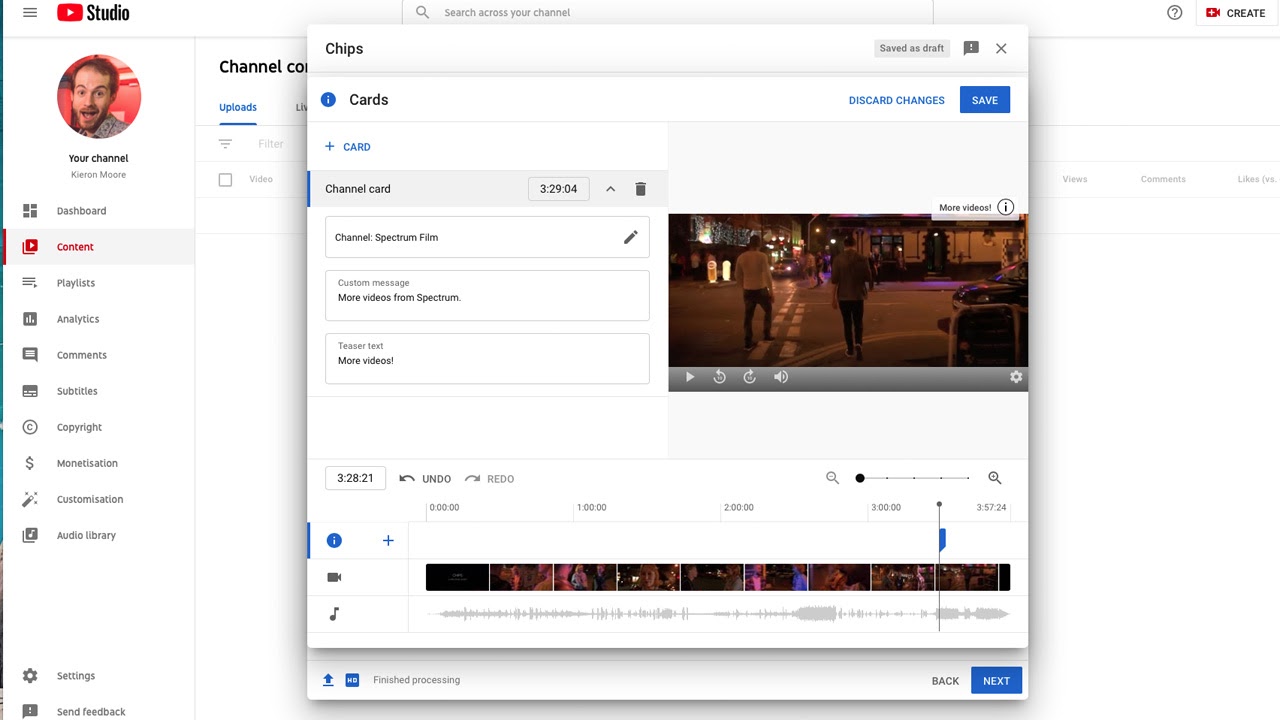
If you’re building a channel with multiple videos, you can use cards and end screens for cross-promotion. Cards are notifications that pop up on the video, at a time and location that you specify. When clicked on, they take the viewer to another video, playlist, or channel. End screens are a bit more complex; they appear at the end of the video and can link viewers to up to four more elements. You can add both using the second tab of the video upload page, Video Elements.
09. Select visibility settings
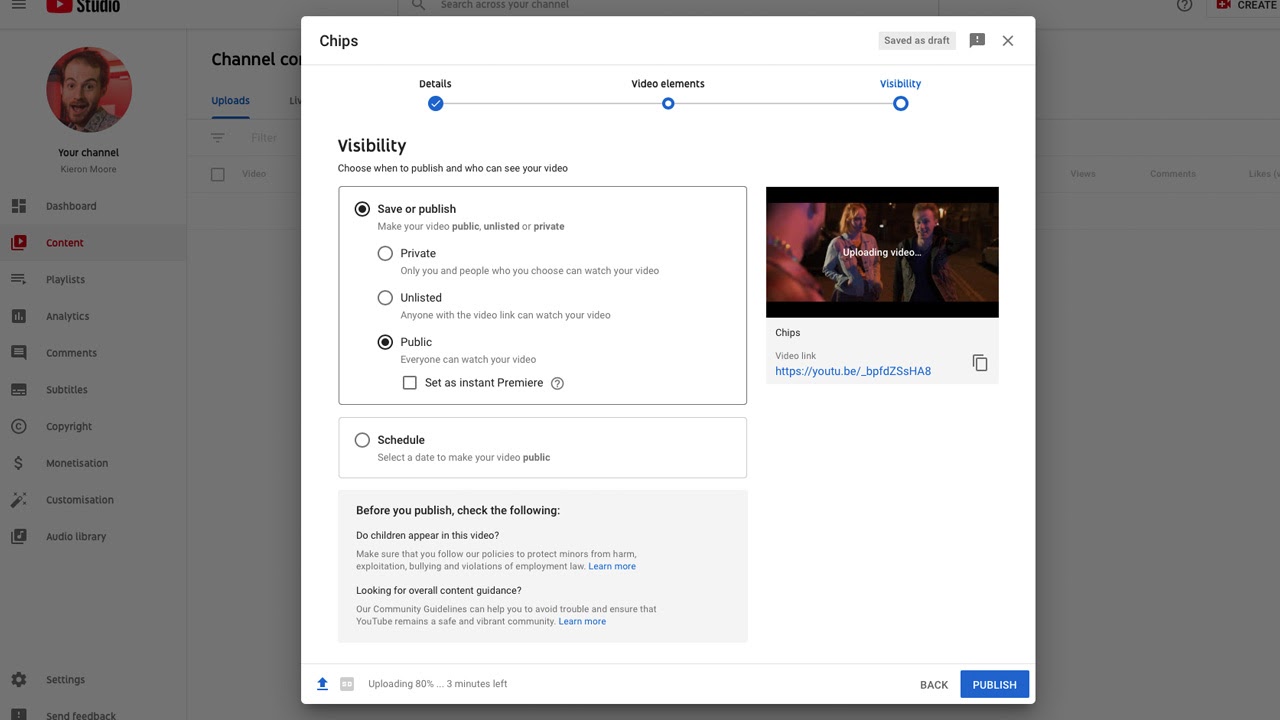
The final step in our guide on how to upload a video to YouTube is here! On the Visibility tab, you set who can see your video. The three main options are Public (anyone can search for and watch it), Unlisted (it won’t appear on searches but will be viewable to anyone with the link), and Private (only you and people you grant access to will be able to see it). You can also schedule your video to be published at a set time and date. Consider setting up a Premiere, so you build social media buzz leading up to the date, and viewers can watch and discuss it simultaneously.
Related articles:

Thank you for reading 5 articles this month* Join now for unlimited access
Enjoy your first month for just £1 / $1 / €1
*Read 5 free articles per month without a subscription

Join now for unlimited access
Try first month for just £1 / $1 / €1

Kieron Moore is a freelance writer based in Manchester, England. He contributes to Future sites including TechRadar and Creative Bloq, focusing on subjects including creative software, video editing, and streaming services. This work draws on his experience as an independent filmmaker and an independent TV watcher. He can be found on Twitter at @KieronMoore, usually when he’s meant to be writing.
