Wondering how to edit photos? Then you're in the right place. This guide will offer some key pointers to get you started, no matter what software you choose to use for the job. Maybe you're completely new to photo editing, or perhaps you've only ever learned how to edit photos in Instagram or other such platforms. Learning how to edit photos in a more sophisticated way, and more subtly, can really help your photos stand out, bringing life into flat images.
With the range of tools available today, editing photos isn't just for professionals or serious enthusiasts. There's a huge variety of tools to use, from free or cheap apps to professional programs, some with bigger learning curves than others. In this primer, we'll look at general considerations that apply whatever software you use.
For tips on what tools to use see our guide to the best photo-editing software, and you'll want to be sure the colours you see when you edit are accurate, so we'd also suggest using one of the best monitors for photo editing or best laptops for photo editing. And remember, you don't need a hugely expensive professional camera to take good photos these days, – you might even only have one of the best camera phones.
How to edit photos
Editing photos sometimes comes in for a bad rap because of egregious use of Photoshop and exaggerated Instagram filters. But while it's true that editing can create unnatural, artificial looks that cheat reality, editing isn't necessarily about trying to make things look more impressive than they actually were, but more about correcting images to make scenes look how you remember them.
Even the best cameras are no match for the human eye, and on a flat surface the photographs we capture sometimes just don't do justice to the scene we saw with our eyes. Editing can correct that. In the guide below we'll look at the main elements to consider.
01. How to edit photos: get to know the basic adjustments
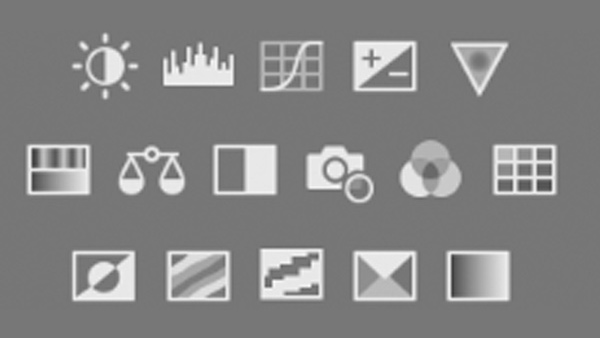
The first thing to have clear when learning how to edit photos is just what elements of an image you might want to adjust. Basic adjustments that even the most simple free editing tools will usually include are exposure (or brightness in some programs), contrast and colour.
Each of those areas comprises more specific adjustments depending on the software you use, while more basic programmes might allow you to adjust only brightness, contrast and colour saturation, more advanced software offers tools to adjust the levels in specific areas a shot, specific types of contrast, and the ability to adjust specific colours in terms of hue and luminance as well as saturation.
Get the Creative Bloq Newsletter
Daily design news, reviews, how-tos and more, as picked by the editors.
02. How to edit photos: understand the histogram
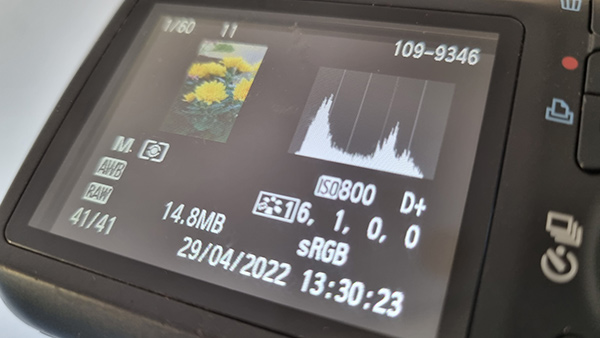
A key tool to get to grips with when learning how to edit photos – and how to take photos that can be edited well, is an image's histogram. This is a graph that you'll find on the display of many digital cameras and also in most of the more advanced editing programs. It might look like some kind of terribly complex seismograph reading from an earthquake, but the most important aspect of the histogram is actually fairly simple to understand.
The line represents the amount of different tones in your image. At the left of the histogram are the shadows, starting from true black, and the tones get lighter as you move to the right, ending in white. As a very general rule of thumb, you want to avoid the histogram touching either edge, since the presence of complete black or white causes clipping – a loss of detail in the image. It's often a sign that at least part of the image is either over or underexposed (there are exceptions – if you're aiming to capture a scene at night, you may want areas of true black).
Once you know how the histogram works, you can use it to help you expose correctly when shooting but also to refine your edit, pulling in overexposed whites or lifting up underexposed darks. In many programs, you'll also find another graph, the tone curve, which is similar but represents dark to light on the 'Y' axis rather than the quantity of each tone. Adjusting the tone curve lets you change the brightness of shadows, mid-tones and highlights. It's something to play around with to get feel for, but creating a slight S shape by pulling the shadow (left) part of the curve down and the highlights (right) up is often a quick way to make flat images pop.
03. How to edit photos: adjusting exposure
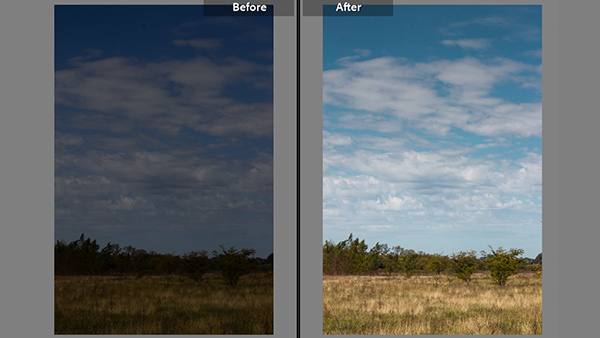
Exposure in photography is a measure of how much light you let reach your camera's sensor when you're taking a shot. Slowing down the shutter speed or opening the aperture lets in more light, creating a brighter capture.
Some photographers like to underexpose their shots and then lift out the detail by increasing the exposure when they edit, but even if you shoot RAW images, which retain more detail in dark areas, bringing back that detail up can create noise. It's usually best to expose shots towards the right of the histogram (without the line touching the extreme right). This allows you to capture the detail in a scene without blowing your whites, and then you can reduce the exposure in editing.
In some editing apps, you'll have a 'brightness' rather than 'exposure' control. This also brightens or darkens the image, but with less of an impact on highlights. Many editing tools will let you separately darken and lighten shadows and highlights to change the exposure of the darker and lighter parts of your image. This can allow you to lift the exposure of certain areas without blowing our areas that are already well exposed. Tweaking both to create bright highlights and rich shadows to expand the dynamic range of an image can give photos more depth and drama.
04. How to edit photos: adjusting contrast
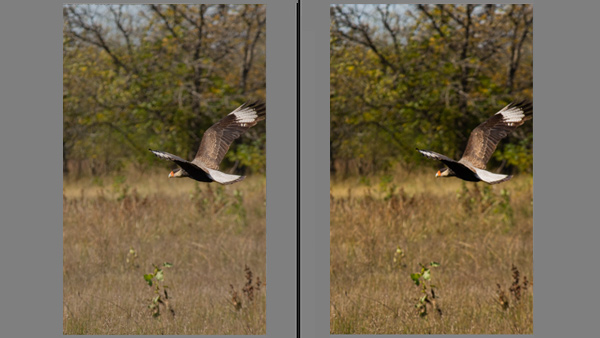
Contrast make darks darker and lights lighter. The first thing you'll often this is, isn't that the same as we did by increasing the highlights and decreasing the shadows above? It's certainly similar but the results are different because contrast adjustments affect the entire dynamic range while highlight and shadow adjustments affect a specific range of tones. Increasing contrast also increases saturation.
More advanced editing programs have more options than just 'contrast' alone, with localised contrast adjustments. Lightroom has a "Clarity" control that enhances mid-tone contrast and a more subtle "Texture" control which increases contrast on small details and a "sharpen" tool that adds contrast to edges. Even Instagram has versions of this, which it calls 'Lux', 'Structure" and 'Shapen', which can bring out texture on images to create an illusion of them becoming clearer. Just use it with moderation or it will create a really exaggerated effect, with harsh lines around the edges of objects (some programs will let you control the size of these lines using a Radius setting).
The temptation is to always increase all these tools, but remember that decreasing them also serves a purpose. Reducing clarity or midtone contrast in an image can create a soft-focus effect, great for adding mystery to an image. And reducing Texture in Lightroom can be used as a simple way to smooth skin.
05. How to edit photos: adjusting colour
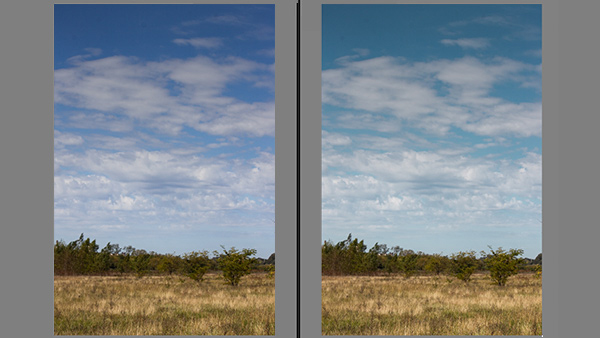
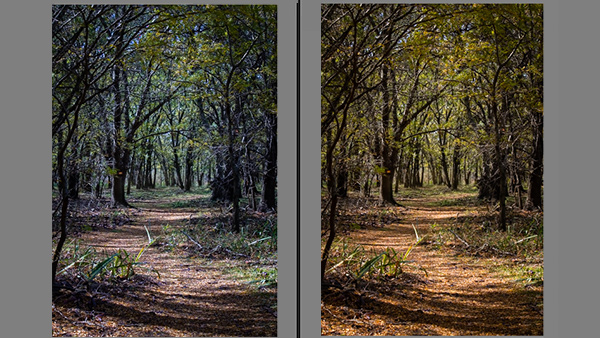
The most basic colour adjustment that you'll have on any editing app or software is saturation. This is the depth or intensity of colour in an image, and adjusting it can really effect the mood of a shot. If you’re looking for intensity in your image, increase your saturation. If you want a calmer, more subdued feeling, reduce it. Again don't go overboard. Oversaturating wipes out the more subtle variations in colour and makes shots look gaudy and unrealistic.
Some editing software will allow more selective adjustments than global saturation that avoids clipping the colours that are already highly saturated – in Lightroom this is called Vibrance. And most programs will allow you to adjust colour temperature. This is measured in Kelvin (K), with a lower 'colder' number looking more blue and higher 'warmer' light more orange or yellow. This can affect the emotion of an image hugely, making the difference between a cold, stark shot or a warm, welcoming feeling. While temperature goes from blue to yellow, 'Tint', if you have that option, runs from greens to magentas.
Like all adjustments, you can use this to recreate how you remember the feeling of the scene when you took the photograph, while many photographers also use it to create their own particular style.
In programs like Lightroom, you can also adjust each colour’s saturation, luminance and hue separately under the HSL panel. This is brilliant for tweaking just one colour, for example, tweaking the blue to adjust the sky to a more pleasing hue or taking the green and yellow in a landscape shot with a lot of vegetation to get the colour you're looking without affecting others. To learn more about colour in general, see our guide to colour theory.
06. How to edit photos: cropping
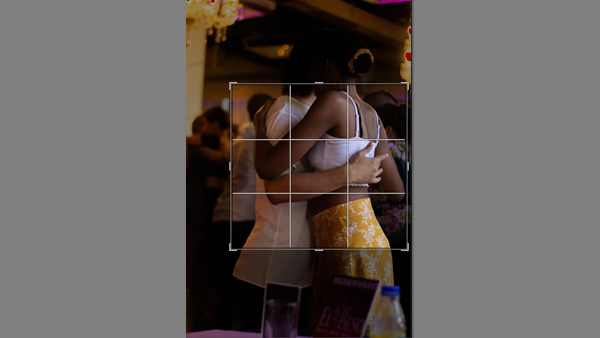
Cropping is another essential part of how to edit photos. It allows you to fit you image to a particular size and shape you might need, but can also improve composition if you took a shot quickly an didn't have time to study the scene properly. Often the most successful images are simpler, without too many elements in the scene. Details around the edge of an image, particularly details that spill off the edge, can be distracting and look cluttered, and cropping allows us to get rid of them and leave a cleaner composition.
Whether to crop before or after you apply the adjustments above usually best to crop your image after you've made all the adjustments above is a cause of debate among photographers. Cropping first can save you from wasting time editing parts of an image you don't use and means you're not influenced by highlights and shadows they may include. But cropping after gives you the flexibility to save different-sized final images for different uses.
06. How to edit photos: adding a vignette effect
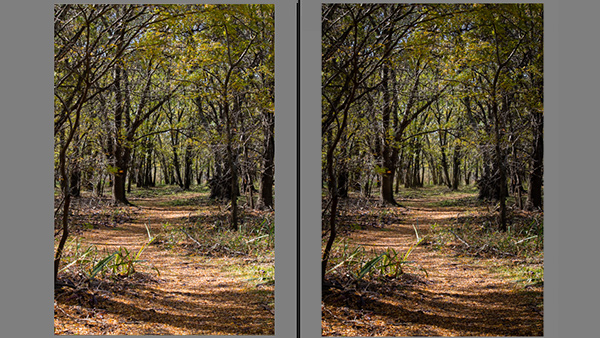
In art, a vignette is a picture that shades off gradually into the surrounding paper, avoiding a hard edge to the image. In photography, a vignette effect is usually achieved by lowering the exposure of the edge of the image around a certain radius. This has several uses, but most usefully even used very subtle it can help lead a viewer's gaze into the centre of an image. It's also handy when you have distracting elements that go off the edge of your composition.
Many photo editing tools provide a simple vignette tool with a fixed radius for the vignette. In more advanced tools, you can apply the radius as you choose, creating a vignette as subtle or harsh as required.
07. How to edit photos: fixing errors
Another important part of editing is fixing errors. Sometimes you can have a stunning shot that you just love and perhaps might not even need much editing at all, and then you notice there's a mark where there was a piece of dust or dirt on your lens or camera sensor. Most of the more simple mobile apps for editing photos can't do anything for you here, but more advanced programs let you remove unwanted elements from a shot.
We won't go into retouching or removing whole objects here, but in programs like Lightroom and Photoshop you can remove small objects and marks super fast using the Spot Removal Tool or Clone Stamp tool. With the former, just click on the blemish you want to remove, and the software will work it out.
With a clone stamp, you can choose the area you want to use to replace the blemish by clicking Alt/Option + click. For reducing the moiré effect that can occur in images with closely spaced thin dark lines, Lightroom has a simply named 'Moiré' tool and in Affinity Photo you can denoise the image or use a Gaussian blur. If you use Photoshop to retouch your images, you could probably make use of some of the best Photoshop plugins to save time.
08. How to edit photos: other editing techniques
Localised adjustments
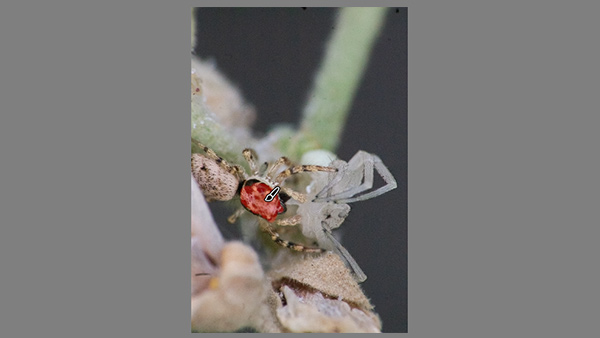
So far we've looked at making adjustments to the entire image – or to particular tones over an entire image, but with more sophisticated editing programs like Lightroom you can get more granular and adjust the exposure, saturation, contrast and other settings for specific areas through masking. You simply use a brush tool to paint over the area you want to adjust, and then all the features we looked at above can be adjusted just over that area. This gives you much more creative control, allowing you to work on specific under or overexposed areas without affecting the rest of a shot or to draw more attention to the main subject of your image.
High dynamic range (HDR)
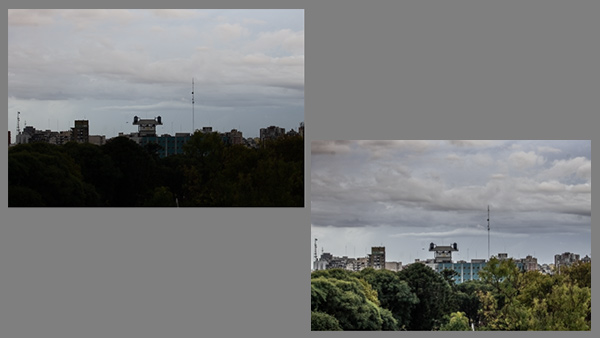
An advanced technique used by photographers is the creation of high-dynamic range shots by merging photos taken at different exposures. This is done to resolve the problems that arise when you have very different levels of light in different parts of a scene, for example a bright sky with a dark foreground. In these cases if you just take one photograph often the sky will be overexposed or the foreground underexposed, resulting in a loss of detail in one of them. Instead, you take two, or more photos, and then merge them together in an editing program in order to retain the detail from the correctly exposed parts of each image.
Focus stacking
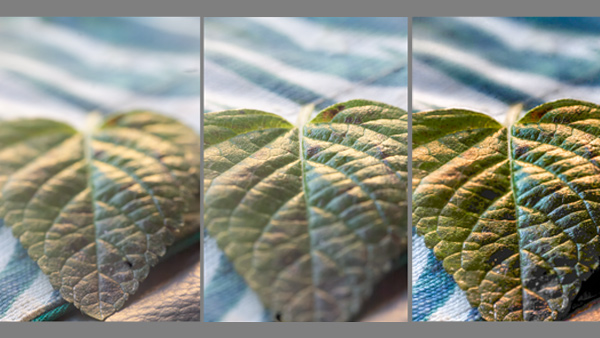
Something comparable can be done with focus. When working close to a subject, particularly in macro photography, it can be impossible to get the entire subject in focus in a single shot. To resolve this, we can take several photographs and then merge them (or stack them) retaining the area that is in focus from each shot. There are specialist editing programs like HeliconFocus dedicated specifically to this process.
09. How to edit photos: using and making presets
You'll often come across social media influencers and photographers selling their presets. What are these exactly? They're simply a bunch of adjustments made to all of the aspects we've looked at above, ready to go to achieve a desired effect, a little like the filters you might apply on platforms like Instagram. Many photographers create and use their own presets so they can apply a particular style to all of their imagery, creating their own 'look', be it through particular colours or tones or the level of saturation or brightness.
What you get when you buy a preset, or download a free one (we have a list of the best free Lightroom presets), is a zipped folder with .xml files that contain the slider values for a particular edit. Usually, when photographers are selling presets, they'll be for Lightroom, but you can create and use presets in other editing programs (note that presets aren't compatible across software though, because every program has different algorithms and colour handling for its adjustment controls).
If you're looking for a quick fix to improve the look of your own photos, it can be tempting to buy presets from a photographer you like, and this can be a great education too, allowing you to see how much they've processed their images, but it's good to learn to make your own presets. They can save you a lot of time if you find yourself always making the same adjustments to your photos.
Again, Adobe's Lightroom is the industry standard and it makes it very easy to create presets based on the adjustments you made to any image that you've already edited. Just click the + icon and 'Create preset' in the preset panel on the left when you're in Develop. In most cases, presets aren't the end of the edit, though. You'll apply the preset first to save time initially and then look at all the things we've already mentioned to fine-tune each image.
10. How to edit photos in Instagram
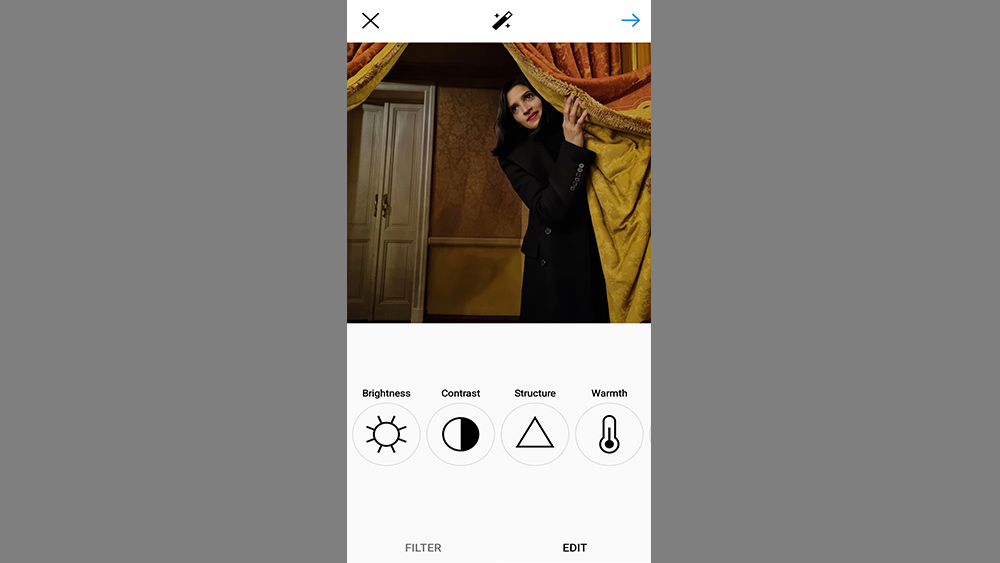
Instagram remains one of the most popular places to share photos, and while it's much-mocked for the sometimes over-enthusiastic use of its many preset filters, there are actually quite a lot of more subtle edits you can make in Instagram to improve photos without going overboard.
One of the most powerful for quick edits to give a bit of oomph to flat images is the 'Lux' tool which adjusts local contrast and boosts saturation – like most effects in Instagram, it's usually best used in moderation but it can make landscapes and cityscapes pop off the screen. When you post a photo, instead of choosing from the filters on the bottom, click on the magic wand icon at the top and adjust the amount of the effect you want to apply using the slide.
For more editing options, click 'EDIT' in the bottom right. There you can adjust brightness, contrast, saturation, warmth and highlights and shadows. Structure (midtone contrast) is one of the most useful for bringing out texture in flat images (when used in moderation). The Sharpen tool can bring out fine lines, and you can add a vignette too.
The colour options unfortunately don't allow you to edit individual colours but rather add a tinted overlay to the whole image, which has limited use. The 'Tilt shift' tool can be used to try to recreate the effect of a shallow depth of field, blurring the background, but there's no way to adjust the amount, and it tends to look unnatural. If you're looking to step up a level and use more sophisticated tools to edit photos, see the best current prices for Adobe's photography plans below.
For tips on getting the most out of a smartphone camera, see our guide to how to take pro photos with iPhone and our iPhone Pro camera tips. We also have a beginner guide to how to edit video and how to edit video for Instagram.

Thank you for reading 5 articles this month* Join now for unlimited access
Enjoy your first month for just £1 / $1 / €1
*Read 5 free articles per month without a subscription

Join now for unlimited access
Try first month for just £1 / $1 / €1
Joe is a regular freelance journalist and editor at Creative Bloq. He writes news, features and buying guides and keeps track of the best equipment and software for creatives, from video editing programs to monitors and accessories. A veteran news writer and photographer, he now works as a project manager at the London and Buenos Aires-based design, production and branding agency Hermana Creatives. There he manages a team of designers, photographers and video editors who specialise in producing visual content and design assets for the hospitality sector. He also dances Argentine tango.
