Dreams on PS4: All you need to know to get started
Create beautiful artwork on Dreams for PS4 from the comfort of your sofa.
Users of Dreams on PS4 can create anything, from art and movies to music or games. The video game/game creation system Dreams is from the makers of hit game LittleBigPlanet which was a big sandbox for budding game creators and creative souls. The scope of that game was limited to the visual style set by the team, a problem that Dreams seeks to overcome.
Dreams, by Media Molecule, is a young platform which is currently in early access. Your export options are limited to video and photos, but the developers have promised more options in this regard once the program launches for real. PSVR support is also planned for release.
This tutorial will give you some hints and tips for using Dreams on PS4. Or for more 3D art-based learning, you can check out our pick of the best Blender tutorials on the web.
01. Get started with the interface
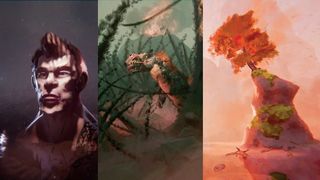
In Dreams, the first thing you should do is to walk through as many of the introductory tutorials as you can. They cover the basics well, and I was ready to create straight after going through them. Dreams is based around a smart use of shortcut buttons and gestures, along with a, in my view, revolutionary UI. The fact that Media Molecule has gotten so much depth into a ‘game’ is astounding. I also recommend highly that you use motion controllers. You can sculpt and paint with the dualshock controller, but you lose quite a lot of fidelity.
02. Understand Dreams PS4
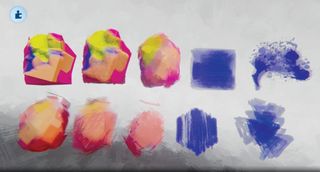
All surfaces in Dreams consist of something called ‘flecks’. These are basically small splashes of texture that you can manipulate into a tighter or looser surface. even a highly detailed, hard-surface model made in Dreams consists of these ‘flecks’, which you’ll see when you get close enough. this means that you’ll never see polygons or pixels in Dreams. this is what gives Dreams scenes their distinct, painterly look – but you can also avoid this look if you don’t like it.
03. Carve detail
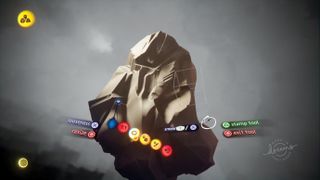
Here, I'm adding detail to a rock. To switch to subtract mode, bump the top of your left-hand controller to the bottom of your right-hand controller. This will switch you over to subtract mode and vice versa. Subtract mode works in the same way as add mode, so you can switch between stamp mode and smear mode, you can use soft blend and looseness, and you can edit the tool shape. If you hit the circle button (exit tool) on your right hand, you’ll be able to go in and delete or move individual strokes. this is true for all elements in your scene, allowing for a close to completely non-destructive workflow.
04. Add colour
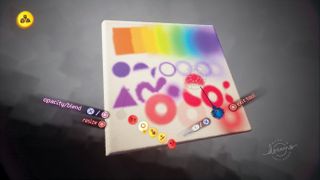
When you’re sculpting, bump the top of your right-hand controller to the bottom of your left controller. this will open a colour wheel in which you can pick exactly the colour you need. You can also access the colour palette through the tool menu, but I usually find that just opening the colour wheel is a lot quicker. As an alternative to sculpting with colour, you can use the spray paint tool from the tool menu. In both sculpting mode and spray paint mode, changing the tool shape can be useful when trying to achieve different colour looks.
05. Add atmospheric effects
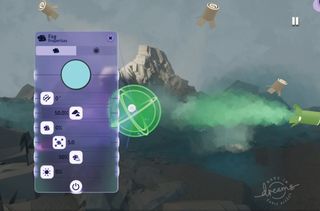
You have a few different ways to add atmospheric effects in Dreams. The most obvious way is to use the sky tint and horizon definition under the ‘sun and sky’ gadget, and to use the ‘fog’ gadget. You can also manually make elements like clouds, fog volumes, smoke and fire by drawing brush strokes and animating them through the surface properties. For my scene here, I use a rather high amount of sky tinting to give the scene a sense of depth and a dawn-like appearance.
06. Optimise your scene
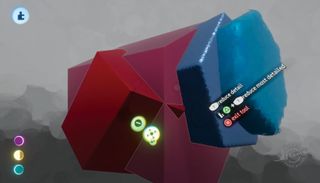
Even though Dreams by default is very well optimised, you might end up in a situation where the ‘thermometer’ starts warning you about poor performance. You can turn on the thermometer through the ‘show/hide’ menu. this will then show you if you need to start optimising gameplay, graphics or audio in your scene. it can even help point you to areas that need to be tweaked.
An easy way to optimise your scene and improve performance is with the ‘sculpture detail’ tool you’ll find in the tools section of your tool palette. This shows your scene elements in red or blue tones, depending on their detail level. You can then increase or decrease this level (including all clones).
07. Add finishing touches
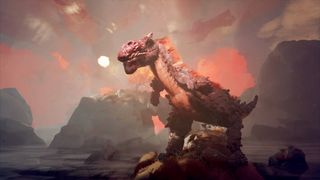
Dreams can be animated, and everything can be used to trigger effects or actions. So, you could set up a trigger zone to activate a sequence of animations when the camera passes the zone. At the time of writing, Dreams is still in early access and some features are still lacking, like export of assets to regular 3d formats, and support for Playstation VR. these things will probably be a part of the finished product. We’ll see!
This article was originally published in issue 133 of 3D Artist. Buy issue 133.
Read more:
Get the Creative Bloq Newsletter
Daily design news, reviews, how-tos and more, as picked by the editors.

Thank you for reading 5 articles this month* Join now for unlimited access
Enjoy your first month for just £1 / $1 / €1
*Read 5 free articles per month without a subscription

Join now for unlimited access
Try first month for just £1 / $1 / €1

Martin is a freelance illustrator living in Denmark, with more than 17 years of professional art and illustration experience. He holds a BA and MA in Digital Design from The Royal Danish Academy of Fine Arts Schools of Architecture, Design and Conservation. Martin's client list includes: Media Molecule, The UN, Sony, Facebook, LEGO, DR (Danish state TV), TV2, Adobe, WACOM, Nestlé, B&O, Spigo, MasterpieceVR, Oculus and various small and large companies.