Whiskytree’s CG supervisor J.P. Monroy reveals the studio’s process for generating realistic battle scars on fighter planes.
(Image credit: J.P. Monroy / Whiskytree)
Creating the effect of battle damage on a 3D asset often takes the skill of multiple VFX artists, but is by all accounts a relatively straightforward process to work on. However, that simplicity can be misleading when faced with complex sequences involving multiple assets. Plus, most jobs will require you to iterate quickly, match your work to a plate, and handle production-level hero assets with hundreds of UDIMs from different VFX vendors.
This was the case for us at Whiskytree on a high-profile TV show our team recently worked on. While tools like Houdini and Blender’s Geometry Nodes would usually be the port of call for procedural tasks, we needed a workflow that would allow for render-time damage without affecting the underlying shaders or geometry of the asset.
To solve this creative problem, we considered manually sculpting damage for several sequences – a workflow that would tie up multiple artists for weeks with slow iterations – or developing a scalable and adaptable workflow that allowed us to make ongoing changes and feedback. Naturally we went for the latter, utilising our lighting and scene assembly tool, Gaffer, to facilitate the procedural aspects and stay responsive to the show’s ever-changing art direction.
For this tutorial, I’ll provide an overview of the approach we took to tackling this challenge at Whiskytree, including how we created assets for the Boolean operations in Maya, positioned these assets onto a model, explored the procedural aspects, and layered in comp. We used the trio of Gaffer, Maya and Nuke in our process, but you should still be able to apply these same steps to whichever tools you want to use in your own personal VFX production pipeline.
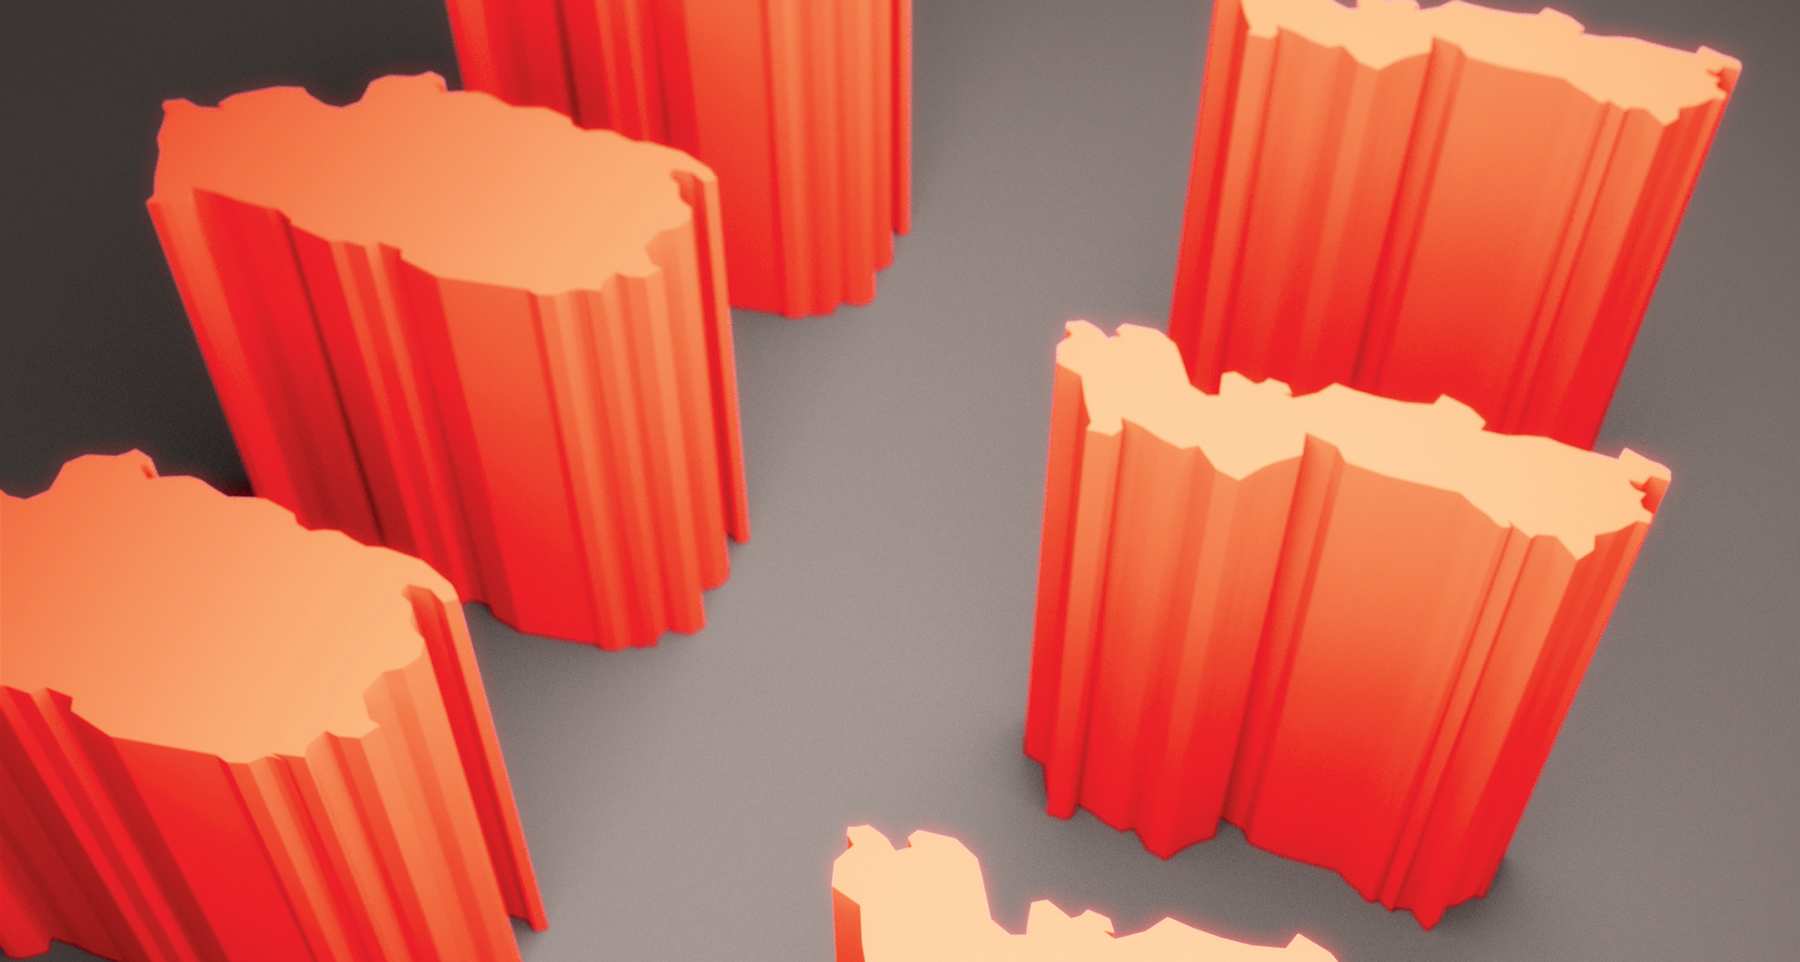
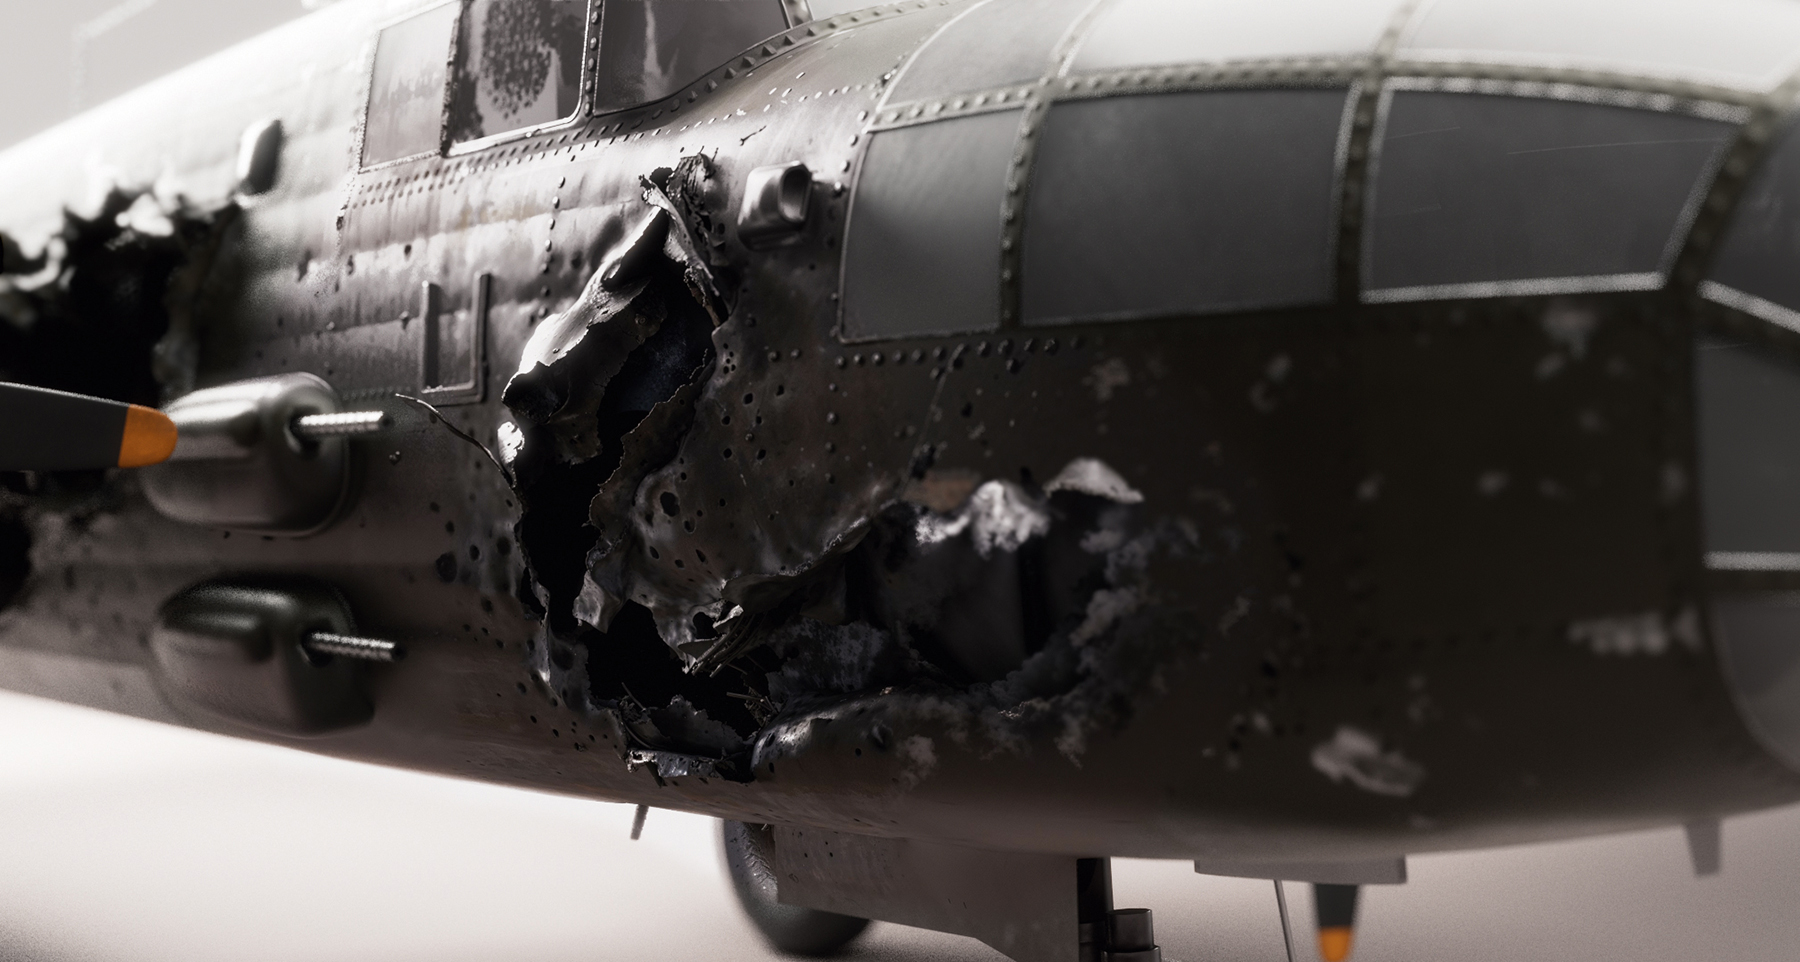
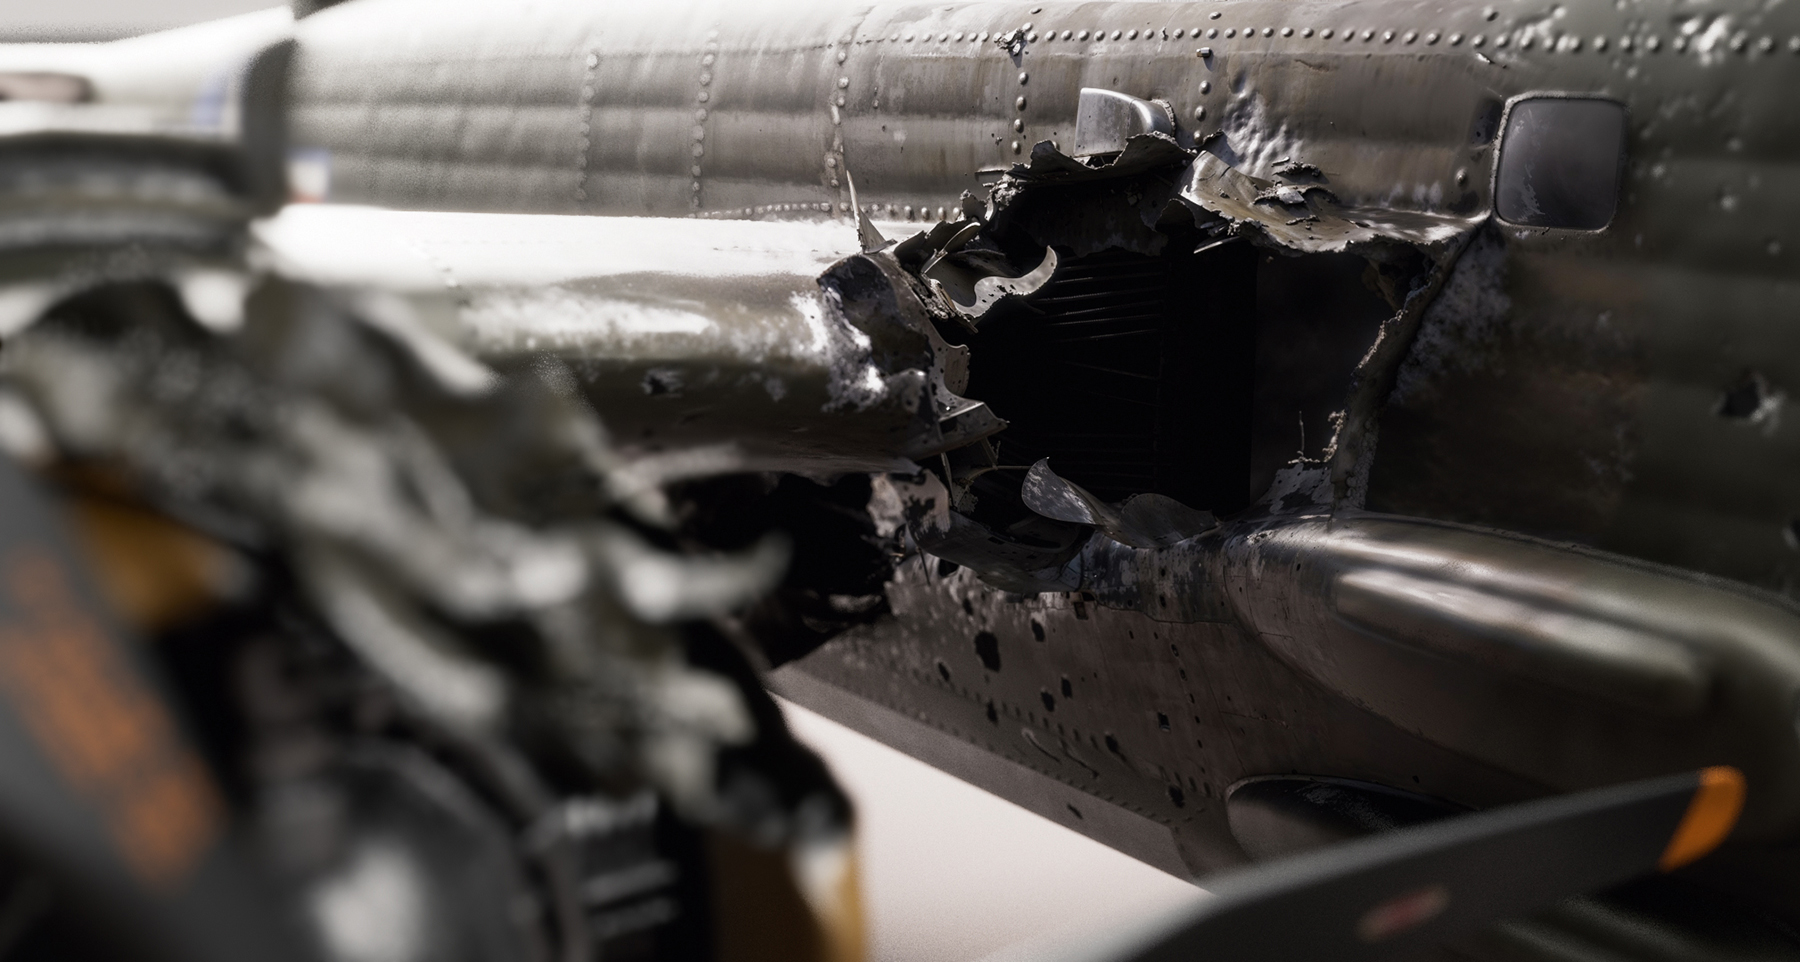
Begin by designing basic cookie-cutter shapes in your preferred digital content creation (DCC) tool, ensuring they have irregular edges that mimic damage more realistically. Once you’re satisfied with the outlines, extrude these shapes to create solid 3D forms. These extruded shapes need to be elongated enough to adequately cover any curved or unusually shaped areas on your model where you intend to apply damage.
Next, craft a set of distorted shrapnel pieces as shown in the examples here. These should be versatile in size and capable of being scaled up or down without revealing their scale through too much detail. You have the option to create pieces with a fixed scale as well. In our experience, the most effective pieces can be rotated and repositioned along the damaged areas. Include pieces that suggest the direction of damage, such as any that taper to a point to imply entry or exit points.
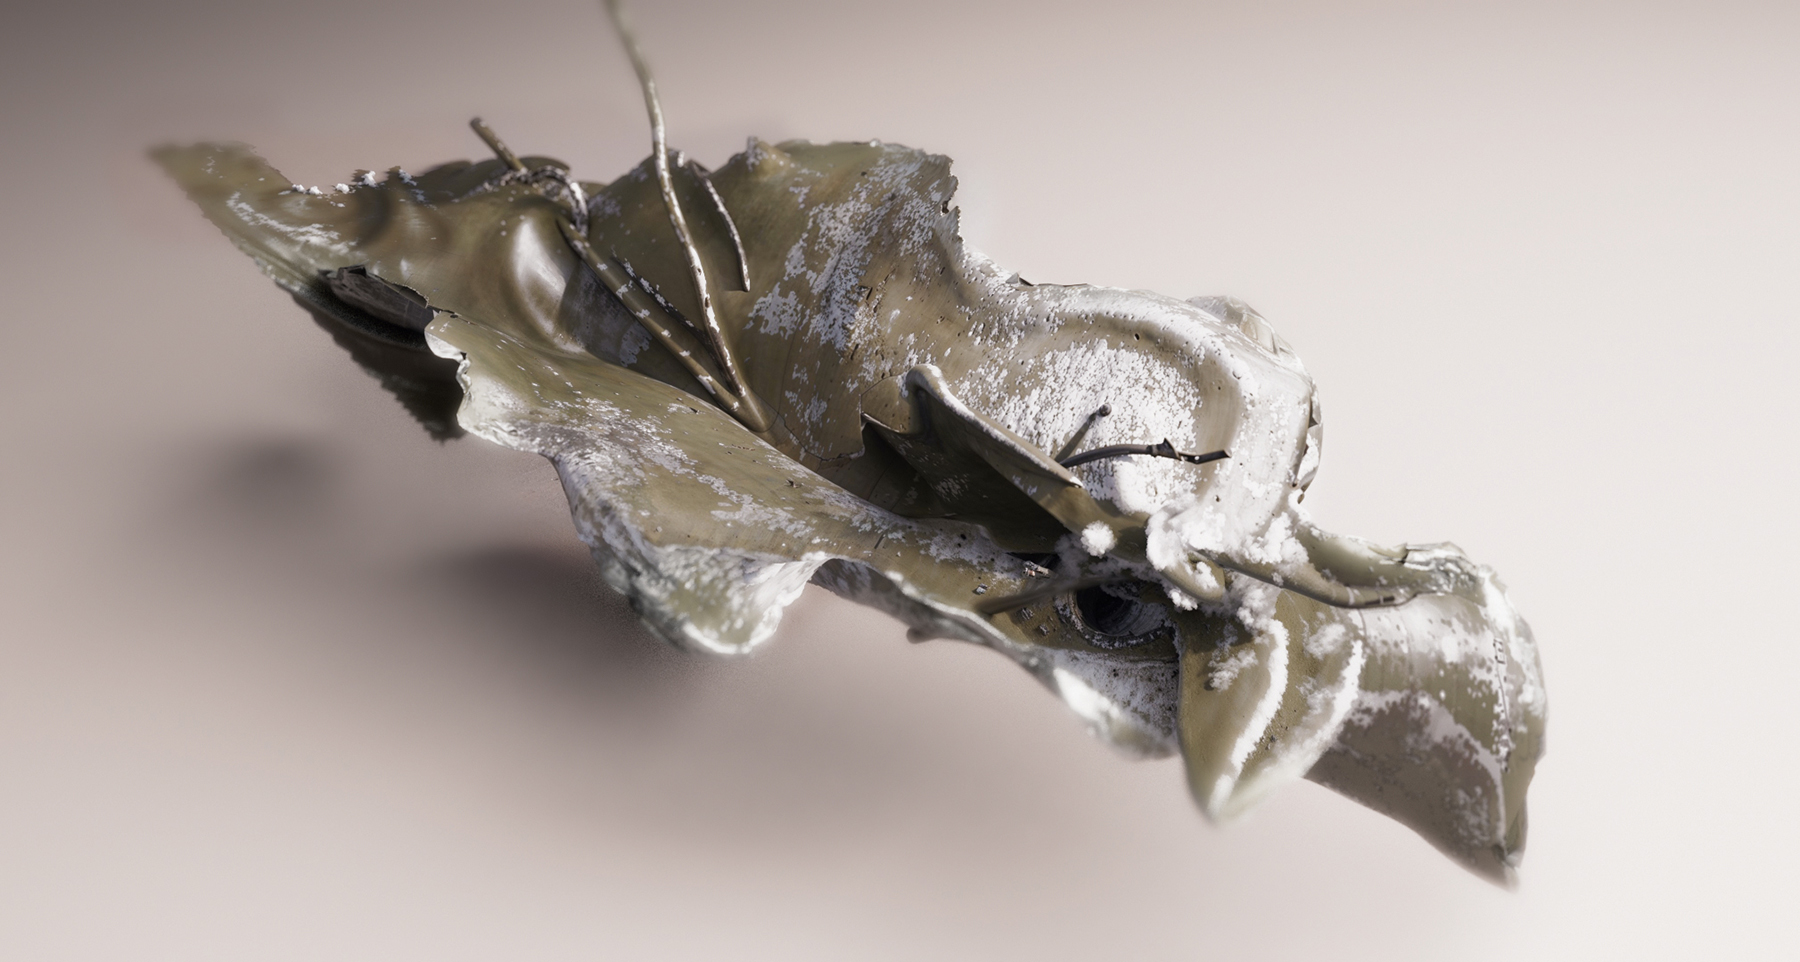
Construct a series of small, pebble-like models to represent bullet impacts. The scaling for these should generally be smaller than that of the damage outlines, but large enough to simulate the effect of bullet penetration. Initially, model a variety of sizes to experiment with, and determine which dimensions will best replicate bullet holes after your testing.
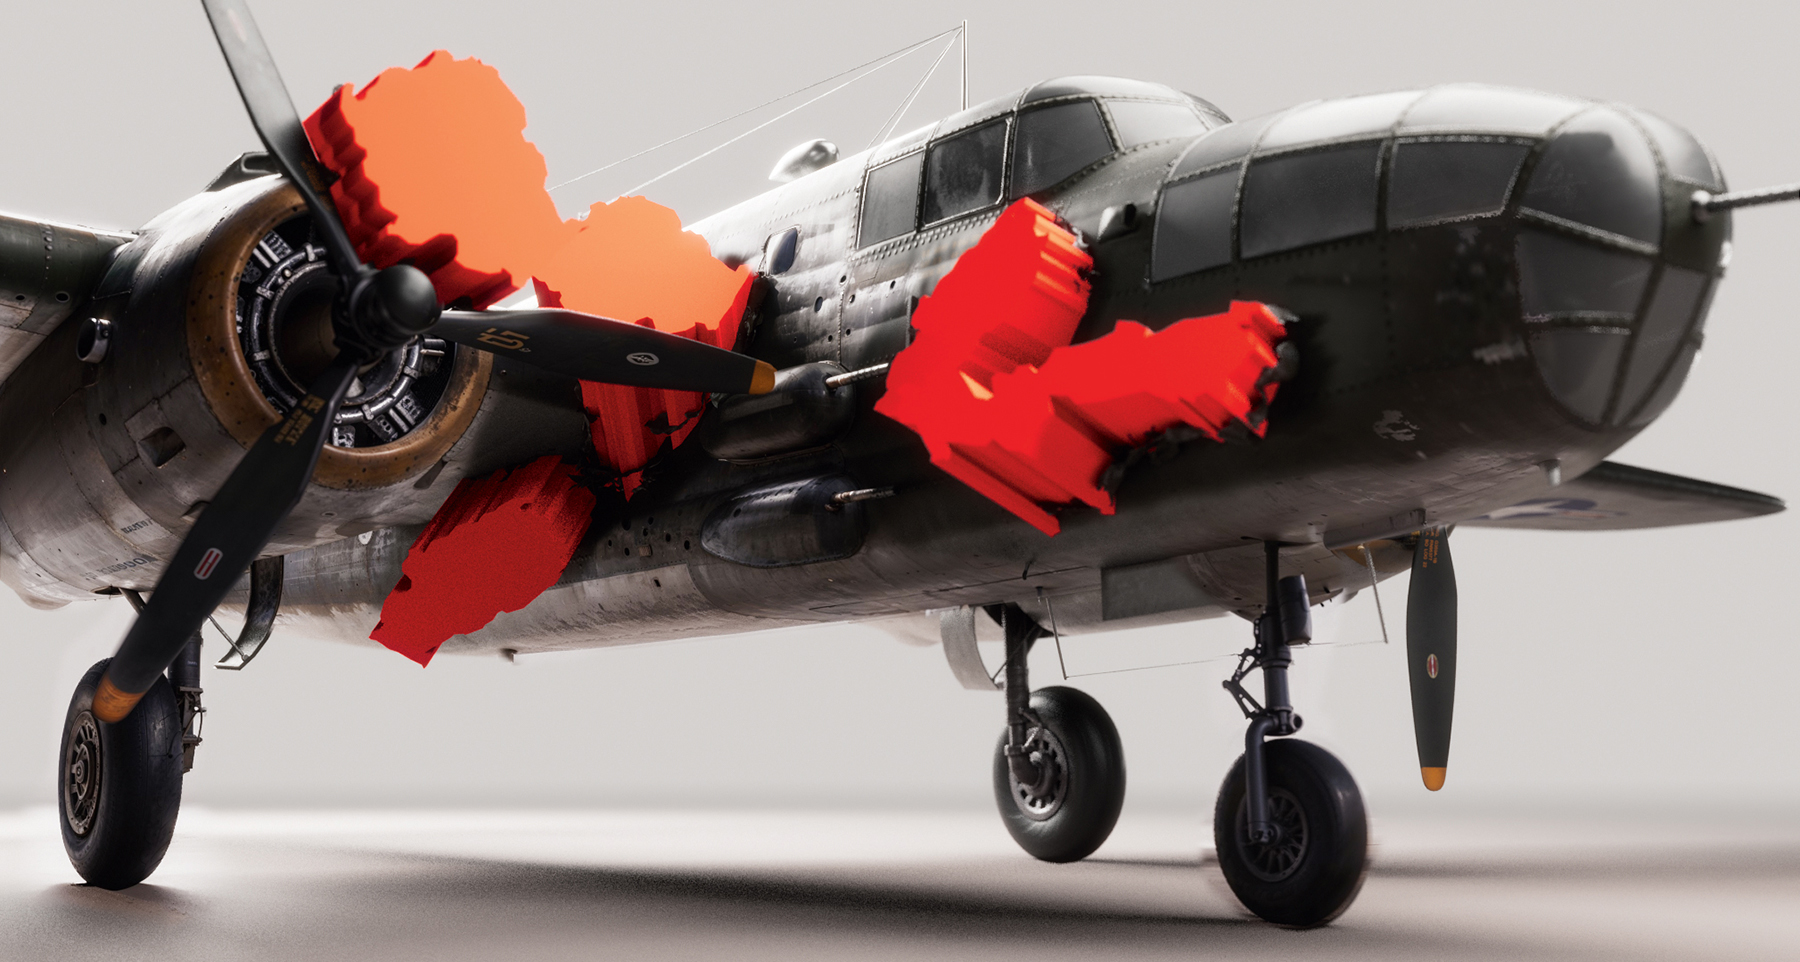
This step is where the assembly process begins. Start by positioning the large damage Booleans where you want the most significant impact to show; common effective areas include the main hull and the corners of the wings and engines. The advantage of this workflow is its flexibility. You can arrange the elements based on the camera’s perspective, focusing on angles that maximise visual impact. It’s helpful to consult references to get an accurate idea of the damage, then adapt and expand upon these for your specific creative vision.
With the major damage in place, use your preferred scattering tool to distribute the smaller bullet holes. A useful technique for this is to concentrate more bullet holes around major damage areas, then sporadically add more across the rest of the hull to create a balanced yet realistic pattern.
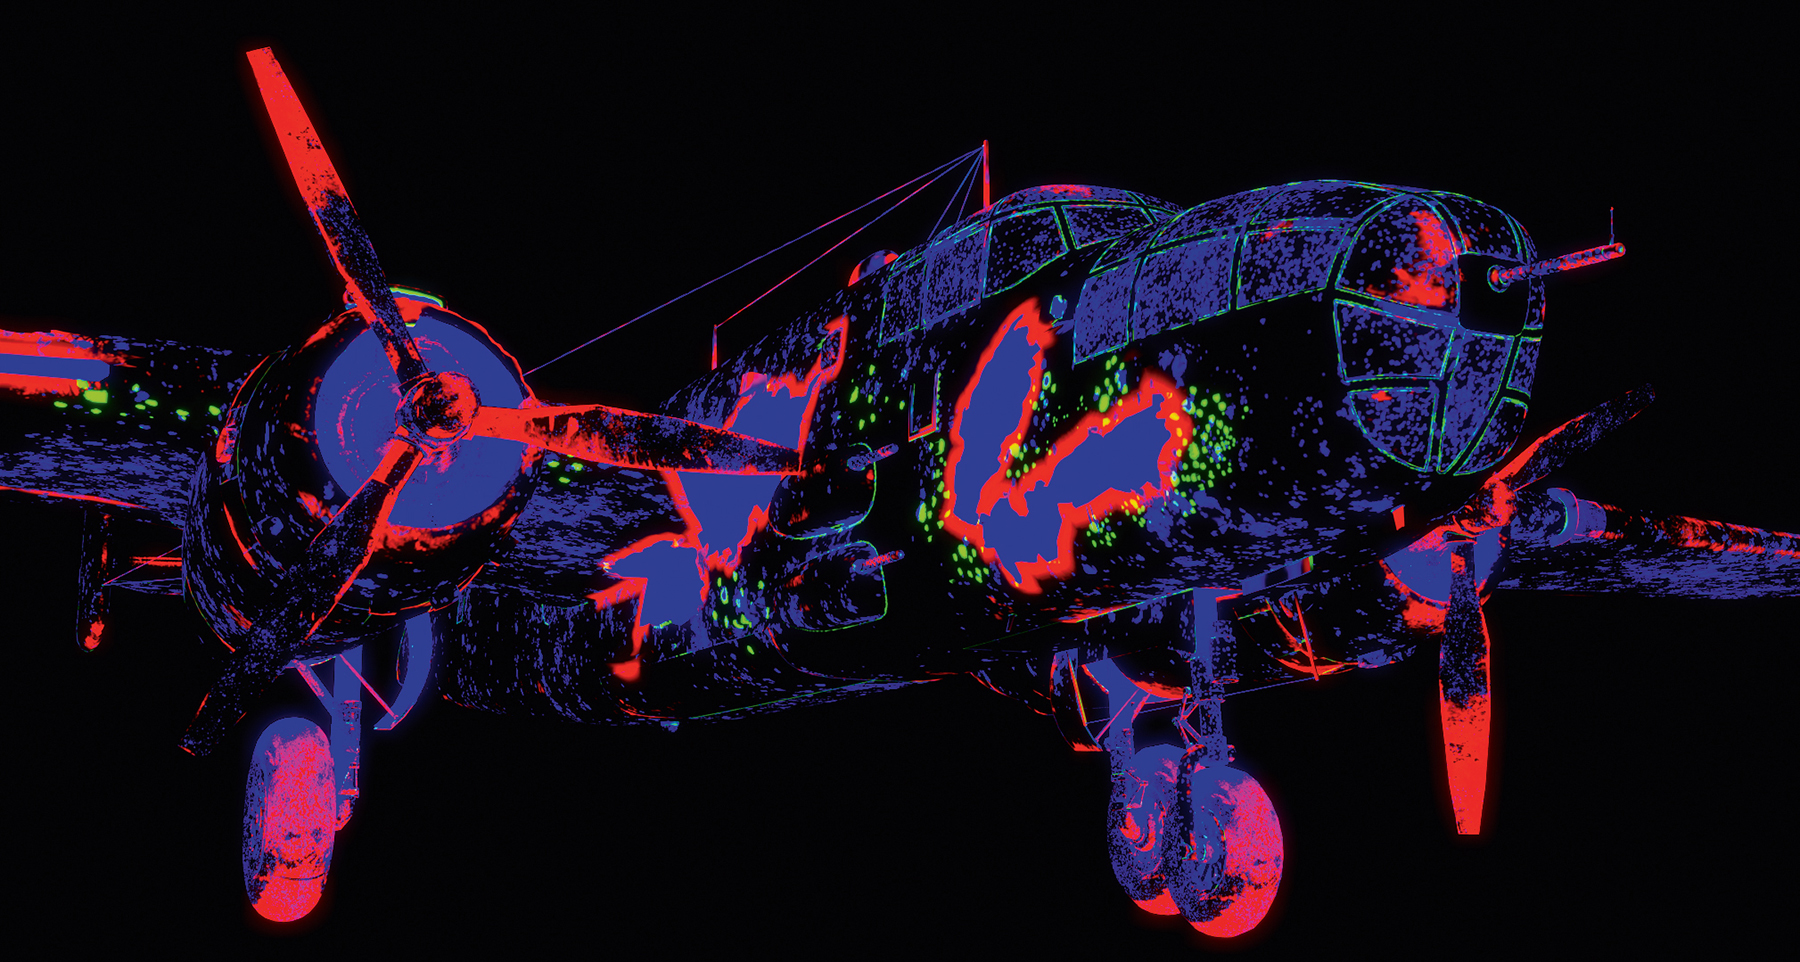
In your preferred lighting or scene assembly tool, load the arranged Booleans, mangled damage and bullet holes alongside the target asset. Assign each element a unique tag for distinct render-time operations.
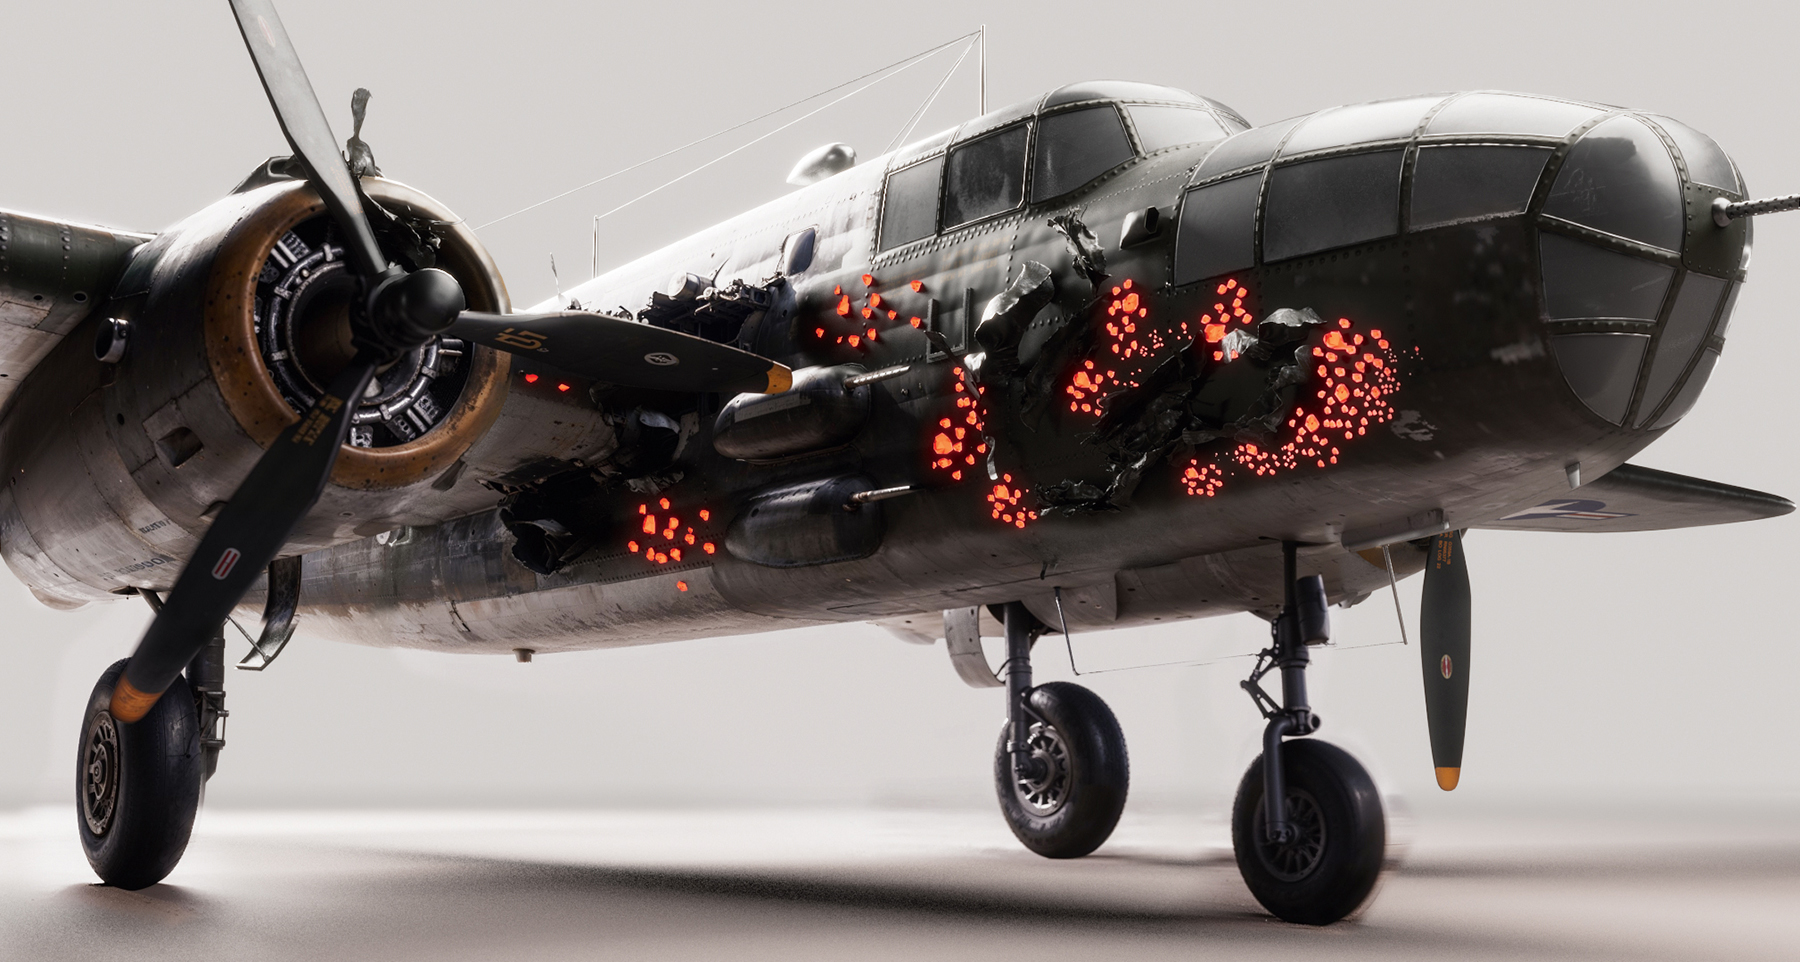
First, the Booleans generate high-resolution cutouts and proximity maps. Second, these maps are dynamically reimported, enabling adjustments to curvature masks and the paint-to-bare metal ratio mask. Third, they help isolate and displace the edges of the Boolean cuts, all controlled by the same threshold-adjusted proximity mask.
One of the major benefits of this workflow is that it uses the assets’ original shaders and textures without needing to create duplicates or alter the originals.
When finished, the setup should enable the creation of multiple masks for compositing. These include a softened proximity mask for seamless blending with plates, a bare metal versus paint mask, a curvature mask, and masks for the holes created by the Booleans and bullet holes. All these are derived from the initial proximity mask of the Boolean, with thresholds adjusted as necessary.
After the damage locations are approved, you have the option to add destructive modelling for final details. Using sculpting tools such as ZBrush or Blender, you can refine the areas around the Boolean edges to more carefully enhance your details beyond the procedural approach. Doing this is especially beneficial for close-up views of significant damage, but is generally unnecessary for wider shots. (Read the round-up of the best ZBrush tutorials on Creative Bloq for more insights.)
After rendering your passes, use a tool like Nuke to combine the masks and beauty renders with the original plate. Be mindful of layering, as it can become complex if different elements of the plane overlap in the frame. Planning your foreground (FG), midground (MG), and background (BG) layers in advance is crucial.
10. Rinse and repeat
Once you've successfully applied this process to an initial shot, ideally one that falls between the most straightforward and the most challenging you’ll encounter, it's time to apply the same steps to other shots. After the initial setup, you should be able to adjust the Booleans and damage while the other elements largely manage themselves. Ultimately, using this setup prepares you to handle multiple shots efficiently.
There are many kinds of damage to depict and this technique is versatile enough to do them all. This damage can then be effectively applied to other models, including buildings, structures and other vehicles. The key is to carefully analyse the style of damage you aim to replicate. Once understood, you can adapt the Booleans and mangled damage components to fit.
Sharing heavy production-level assets across vendors is standard practice in production environments, but modifying them can be time-consuming and complex. However, in this scenario our approach worked well, as it allowed us to adjust the asset without delving into its complexities. Our technique might not be as effective with assets created in-house, where there’s more control over development, enabling advance planning and specifically tailored procedural tools.
Get the Creative Bloq Newsletter
Daily design news, reviews, how-tos and more, as picked by the editors.
Thank you for reading 5 articles this month* Join now for unlimited access
J.P. Monroy is an experienced Art Director with a demonstrated history of working in the motion pictures and film industry. He is skilled in most industry-standard Digital Content Creators with a focus on visual effects art direction, realistic environment creation, and concept development. Strong arts and design professional with a over a decade of industry experience.
You must confirm your public display name before commenting
Please logout and then login again, you will then be prompted to enter your display name.