Learn to paint a rocket trail
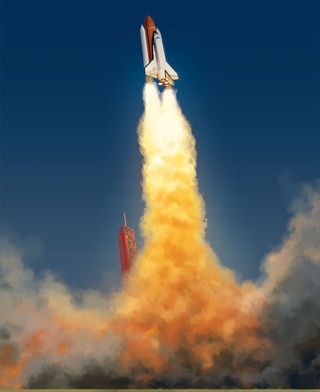
Creating realistic smoke is all about correct use of light. We walk you through the process of creating this awesome rocket trail illustration in four steps.
Words: Paco Rico Torres
The key to painting a realistic smoke trail is to combine the internal and external light of the smoke. What I call the external light is all the light that’s seen on the surface of the smoke (light from the sun) and the internal light is the light that comes from within the smoke itself (the light coming from, for example, the heat from a rocket’s flame).
A rocket flame produces a high amount of light that’s usually yellow and orange. That light goes down the smoke trail and illuminates it from the interior until the light fades away.
This creates a bright orange pillar of smoke right under the rocket that gradually blends to grey. The external light illuminates that grey part, so it should be affected by any light source surrounding it.
Furthermore, the smoke isn’t totally transparent, so even if it’s illuminated from within, the parts where the smoke is thicker won’t let all the light from the flame through, which means you would see them as grey or at least slightly darker.
Knowing that, and using a proper brush to depict the smoke itself, painting a rocket trail is relatively straightforward.
01. Paint the key elements
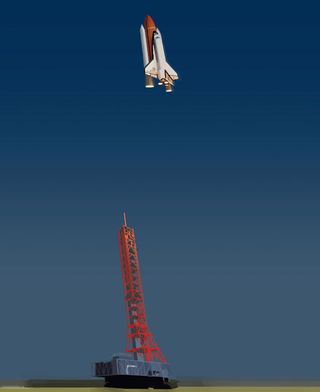
I start by painting the key elements in the scene: the space shuttle and the launch tower. I want to show the top of the launch tower, so I paint the entire length of it, but because it’s going to be hidden by the smoke I don’t put too much detail into the structure.
Notice that even if the flame isn’t painted yet, the top of the tower is illuminated as if it were there.
02. Paint the smoke

I start to paint the grey smoke, which is illuminated by the external light. I create a base by tapping the brush (a special brush with irregular edges), which produces a nice smoke texture on the canvas. Then over that texture I define the smoke shapes more accurately. Remember that smoke has highlights and shadows, just like any solid object.
03. Add the flame

Over that base I add the flame and the smoke that’s illuminated from within. Because the flame is the brightest part of the image
I paint it white. Indeed, it should be the only pure white part on the painting. I then blend it to yellow and orange, and paint the smoke extending the white into the yellow, the yellow into the orange, and
so on.
04. Add more layers

After adding more detail, I simply create a new layer, set the mode to Soft Light, and paint a blurred orange stain over the flame and the smoke that’s illuminated by it. I repeat the process in a new layer, using light yellow instead and set the layer mode to Overlay. That introduces more saturation to the colours and makes the flame look brighter and more intense.
Paco Rico Torres is a freelance illustrator living in Spain who has produced art for several card games, magazines, books and roleplaying games.
FREE: Check out ImagineFX magazine
This tutorial first appeared in our sister title ImagineFX, the world's leading magazine for fantasy and sci-fi digital artists. Each issue contains an eclectic mixture of in-depth workshops from the world's best artists, galleries and interviews, features, community news, software and hardware reviews, and the latest sci-fi and fantasy films and comics. You can get a free sample issue here!

Thank you for reading 5 articles this month* Join now for unlimited access
Enjoy your first month for just £1 / $1 / €1
*Read 5 free articles per month without a subscription

Join now for unlimited access
Try first month for just £1 / $1 / €1
Get the Creative Bloq Newsletter
Daily design news, reviews, how-tos and more, as picked by the editors.
The Creative Bloq team is made up of a group of design fans, and has changed and evolved since Creative Bloq began back in 2012. The current website team consists of eight full-time members of staff: Editor Georgia Coggan, Deputy Editor Rosie Hilder, Ecommerce Editor Beren Neale, Senior News Editor Daniel Piper, Editor, Digital Art and 3D Ian Dean, Tech Reviews Editor Erlingur Einarsson and Ecommerce Writer Beth Nicholls and Staff Writer Natalie Fear, as well as a roster of freelancers from around the world. The 3D World and ImagineFX magazine teams also pitch in, ensuring that content from 3D World and ImagineFX is represented on Creative Bloq.
