How to paint a realistic armoured character
"If you imagine the armour as a collection of bent mirrors attached to each other, you'll have a good starting point," says Tony Foti.
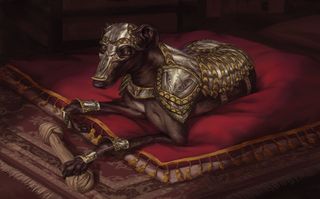
Painting armour is all about light and how it reflects off the metal plates. When you look at characters in polished, shining armour, those highlights are all reflections of the environment around them. If the surface is buffed to a mirror sheen, it's basically like taking an actual mirror and bending it around the wearer.
Hone your Illustrator skills with these brilliant tutorials
Sky, trees, the person pointing the camera and anything else around can all be found in the reflections. It is for this reason, though, that light doesn't fall across polished metal the same way that it does on most surfaces.
If you place a lamp above a mannequin in cotton robes, the portions of the cloth that face the light will be the brightest. With a polished helmet, however, the brightest point won’t be on top, but at the exact point where the light reflects off the steel and back towards your eyes.
Imagine shooting an imaginary laser or anti-gravity billiard ball off the helmet to hit the lamp. You wouldn’t want to graze the top, because then if would just glance off at almost the same angle and end up far behind the armour.
Shoot it straight forward, and it'll bounce back towards you. Aim between the top and the straightforward position, though, and you'll have an angle the bounces right up towards the light. That's the spot where the lamps's reflection will be, and where you should place the highlight. The colour, shape and intensity of the reflection will all match the light source if it’s standard silver plate mail.
01. Detailed planning
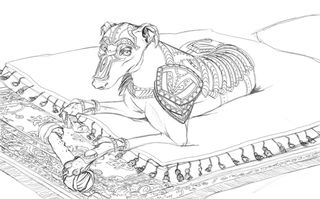
When painting from life or with perfect photo reference, it makes sense to figure out the details as you go. When designing armour, though, I suggest a thorough sketch first. If the line work is tight enough, you can even use some of it in the finished painting. Just be sure to work the drawing into the illustration so it doesn't stand out.
02. Reflect
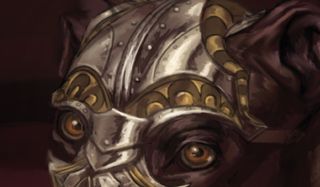
One aspect of rendering armour that differs from most is the sharp transitions between high and low values. Instead of having light and shadow areas, reflections on polished metal create high contrast all over the place. Seeing bright highlights peppered among dark shadows is a cue to the human eye that it's looking at something reflective.
03. Dull it down

Combining the properties of a mirror reflection and the way light hits cotton is how you find the middle ground for semi-polished armour.
The duller the surface, the more diffused highlights will be across it. You wouldn't be able to make out reflections of the environment in only slightly shiny armour, but the highlight will still be on the top.
Artist's secret: Edge light
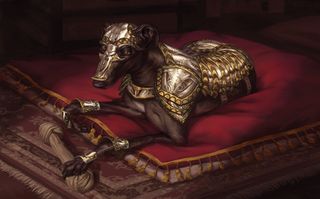
When a reflective surface bends on armour, the edge faces significantly more directions than the rest of the metal. As such, they're prone to highlights. That doesn't mean you should rim light every inch, but if a bend faces light, paint it.
Words: Tony Foti
Tony is a freelance illustrator living in California who creates art for books, card and video games, and Fantasy Flight Games' Star Wars and Lord of the Rings lines. This article originally appeared in ImagineFX magazine issue 117.
Like this? Read these!
- How to create great fantasy art every time
- How to create a classic D&D style character
- Free Photoshop brushes every creative must have

Thank you for reading 5 articles this month* Join now for unlimited access
Enjoy your first month for just £1 / $1 / €1
*Read 5 free articles per month without a subscription

Join now for unlimited access
Try first month for just £1 / $1 / €1
Get the Creative Bloq Newsletter
Daily design news, reviews, how-tos and more, as picked by the editors.
The Creative Bloq team is made up of a group of design fans, and has changed and evolved since Creative Bloq began back in 2012. The current website team consists of eight full-time members of staff: Editor Georgia Coggan, Deputy Editor Rosie Hilder, Ecommerce Editor Beren Neale, Senior News Editor Daniel Piper, Editor, Digital Art and 3D Ian Dean, Tech Reviews Editor Erlingur Einarsson and Ecommerce Writer Beth Nicholls and Staff Writer Natalie Fear, as well as a roster of freelancers from around the world. The 3D World and ImagineFX magazine teams also pitch in, ensuring that content from 3D World and ImagineFX is represented on Creative Bloq.
