How to find your own voice as an artist
Find an art style that's all your own. ImagineFX cover artist Jennifer Healy explains how.
The key to being a successful artist is to take in the beauty and aspects that you admire from other artists or even from life itself. Nature, birds or flowers are a given, but dirt, spiders or alligators – things that you normally wouldn't call beautiful – can be just as useful to an artist's muse. Everything has beauty. The trick is to keep that inspiration inside of you and use it to your advantage. To use that inspiration as motivation.
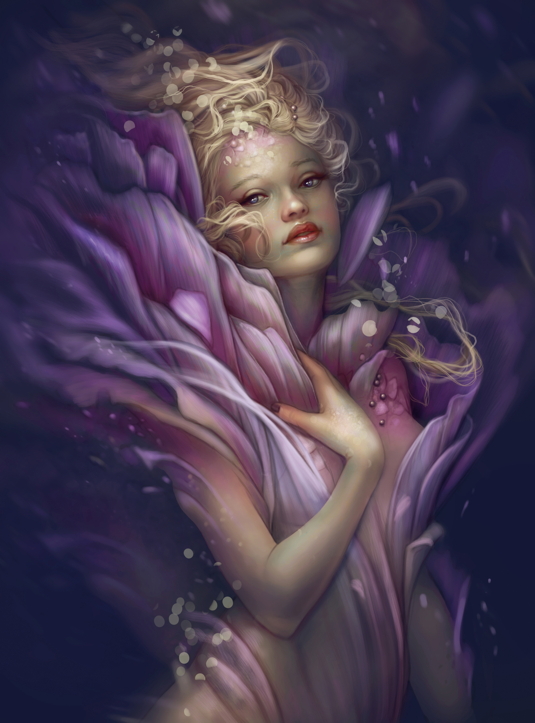
As a girl I saw the work of surrealist painter Johanna Pieterman. She sparked something inside me and I took it upon myself to become an artist. Her artwork inspired me to pick up a pencil and start drawing and creating things. The key is to keep pushing yourself along your journey to find your artistic voice and blossom into the artist you're striving to be. Keep practising! Even when you think you've made your masterpiece, keep going. You'll develop your own style over time.
I like to get lost in the thrill of creating and this is where you can find your own style. Discovering your own artistic voice will take time, but the journey is a fun and satisfying one. My painting process contains a lot of playing around, and with any luck will inspire you to do some of your own experimenting once I'm done. With this workshop I hope I can help you learn some tips and tricks with layers, skin, hair, brushes and filters to speed you along your way!
01. Begin with a sketch
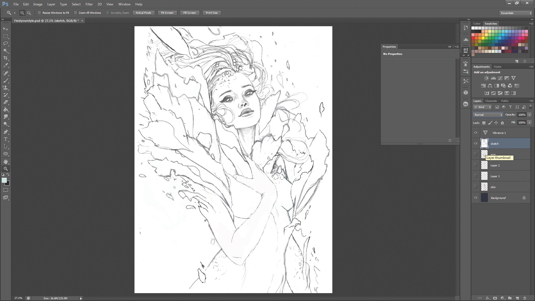
I always start with a couple of sketches. I sketch out the concept to get an idea of the general composition and where specific objects should be placed, such as her arm and her head. These elements may change in due course, but at least for now I have an idea in place before I begin painting.
02. Starting the skin
Once the sketch is finished I begin painting the skin. I set my sketch on Multiply so I can see the layers beneath it. I block in the bulk with a Soft Round brush set on 6 per cent Opacity, layering multiple times until I feel it's right. The Lasso tool enables me to keep the soft brush from straying into unwanted areas.
03. Blocking in the hair
For this stage I want to use a dotted brush with the Space Setting set to 2 per cent (access this via the Brush Tip Shape option). This creates a nice, hair-like effect. I choose a medium to dark colour to block in the first layer of hair and then add a couple of thinner strands of even lighter shades on top of this layer.
04. Begin blooming...
Here I continue to use the hair brush to begin work on the petals. I find the texture is a better fit for the petals than the Soft Round brush. I also need to keep in mind where I want my lighting to be. This needs to stay consistent throughout the painting. I like to work from dark to light, and so while working on a low Opacity I softly build up layers of lighter colours.
Get the Creative Bloq Newsletter
Daily design news, reviews, how-tos and more, as picked by the editors.
05. ...and keep blooming
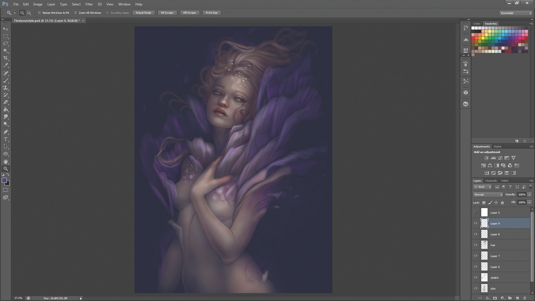
I add layers upon layers of paint to fill out the petals that are blooming and flaking from her skin. I'm starting to add more details to the petals, such as lines of creases, to help define them better. I add more hair strands here, as well as flakes on her chest and face, and continue to keep my sketch layer visible so I can blend this in later.
06. Blur and colour
Now it's time to use a blur filter. I do this by copying the whole painting and pasting it on the very top layer. Then I click Filter>Blur>Motion Blur. Adjusting the dial determines how strong the blur effect is. Now I add a new layer set to Color and start adding in colour on top of the petals.
07. Sparkles and light
I decide it's time to add in some sparkle and glimmer. I use a Round brush with the Brush Tip Shape Spacing set to 56 per cent. Scattering is checked, Scatter is set to 1,000 per cent and Count is set to 3. The Dual brush option also helps to provide some interesting textures to my brushes. After this I add a layer of brightness and contrast to help push out some of the highlights and make the image become more dramatic.
08. Facial details
I go back to the face to add in more details and definition around her mouth, nose and eyes. I also decide to apply some subtle sparkles to her skin to help illuminate it. Placing another Color layer on top and painting her skin gives it more life. To do this I use a soft brush set on a low Opacity setting.
09. More hair definition
As well as refining more of her face and introducing more colours and definition, I'm starting to add even more hair strands. I'll need to depict thinner, detailed strands, ensuring that the ends taper off so I don't create big chunky ends when I paint. I can do this by pulling up the brush settings and making sure the Shape Dynamics box is checked and that Size Jitter is set to Pen Pressure.
10. Refining the hand
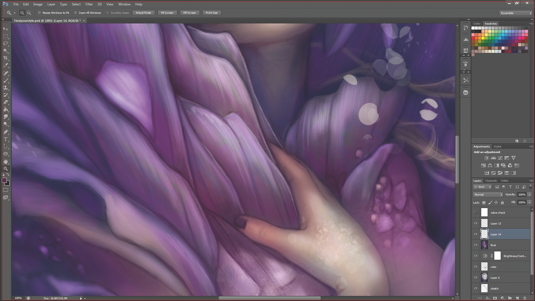
I start shaping the thumb area and add more highlights and contrast to the petal areas. I use a more rounded brush, which gives me more control, to add the finer details, such as the creases on the petals and the shadows around the hand.
11. Layer, layers, layers
Here I want to keep applying more details all around the image. I'm adding definition to her face, her hair and the petals. I introduce more layers of colour and intensify the colours that are already on the Canvas with the Vibrance option (Image>Adjustments>Vibrance). At this point I also decide that I need to cover up her body a bit more, through the addition of more petals.
12. Even more strands
Now it's time for more strands to be added to her hair. I continue to use my hair brush that I used for the details previously. The smaller the strands, the lighter the shade. I'm using a Soft Round Eraser brush on a low Opacity to erase the ends so that they look natural and blend in evenly with the rest of her hair.
13. More coverage
I want to continue incorporating the petals around her body. I go back to the hair brush for this, so that the texture matches the rest of the petals and helps keep them unified. I want to maintain the colours and flow so that everything has a pleasing, organic feel to it. I also flip the image, to ensure that I'm seeing the painting with a fresh eye
14. Details, details, details
I paint small pearls on her hair and shoulder, then decide that I need to use the Transform tool to move her petal coverage over her shoulder slightly, because I don't like where it sits. I do this by selecting the Lasso tool, right-clicking the image and selecting Free Transform. Once in Transform mode I right-click again and select Warp.
15. Final checks
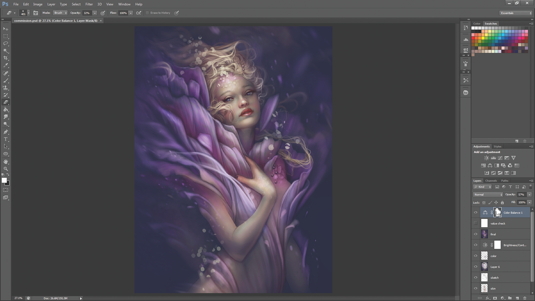
Almost done! I give the image another look over and add in all my last details and refinements. More colours, strands of hair, highlights, sparkles and so on. Now I want to add a touch of warmth to the overall image so I click Image>Adjustments>Color Balance and choose a yellowish colour to help pull out the yellow and golden tones. This helps to complement the purples throughout the painting. And now I have blossomed...
Words: Jennifer Healy
Jennifer works in traditional and digital mediums, and loves them both. She enjoys adding strange ethereal surrealism to her art whenever she can. This article originally appeared in ImagineFX magazine issue 104.
Like this? Read these:
- Free Photoshop actions to create stunning effects
- Illustrator tutorials: amazing ideas to try today!
- Great examples of doodle art

Thank you for reading 5 articles this month* Join now for unlimited access
Enjoy your first month for just £1 / $1 / €1
*Read 5 free articles per month without a subscription

Join now for unlimited access
Try first month for just £1 / $1 / €1

The Creative Bloq team is made up of a group of art and design enthusiasts, and has changed and evolved since Creative Bloq began back in 2012. The current website team consists of eight full-time members of staff: Editor Georgia Coggan, Deputy Editor Rosie Hilder, Ecommerce Editor Beren Neale, Senior News Editor Daniel Piper, Editor, Digital Art and 3D Ian Dean, Tech Reviews Editor Erlingur Einarsson, Ecommerce Writer Beth Nicholls and Staff Writer Natalie Fear, as well as a roster of freelancers from around the world. The ImagineFX magazine team also pitch in, ensuring that content from leading digital art publication ImagineFX is represented on Creative Bloq.
