How to create your own comic
Discover the tips, tricks and drawing techniques that artist PJ Holden uses to produce a comic with Manga Studio.
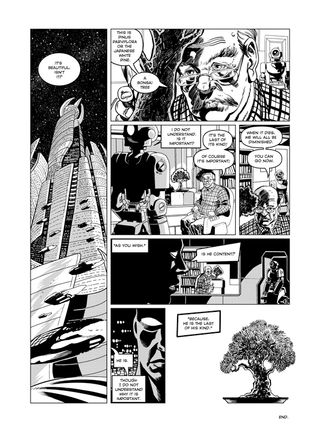
All comics start with a script, and this was no exception. I had written a one-page, self-contained Future Shock-style story that I thought would enable me to show off some of the techniques a comic artist is often required to use. Things like an establishing shot, silhouettes, panel-to-panel transitions and so on.
The Last of its Kind is a simple bait and switch-style future shock story about an old man and his bonsai tree, and the robot who takes care of him.
The story has the old man describing the bonsai tree and how it's the last of its kind, and how important that is to – we assume – humanity, and, in the final panel we reveal that the old man doesn't realise it, but he's also the last of his kind.
Drawing comics is a peculiar skill, one that requires expertise in anatomy, costuming, lighting, architecture, drawing vehicles and many other techniques, but they're all subservient to the single demand of telling the story.
As a consequence, one of the dangers is getting lost in the minutiae of a single drawing. You'll often find yourself falling in love with a panel or a face or a figure, but in the context of the story it just doesn't work.
Sometimes a correction can be as simple as flipping the panel, moving a figure more off centre, or cropping something in the panel differently. Even removing the panel borders can help enormously. It can be the smallest of things.
01. Read the script!
It always starts here – reading the script once to get a grasp of the story. I'll read the script a number of times to become familiar and comfortable with it, until I'm ready to start drawing the thumbnails. Since my job is to communicate the script to the reader, making sure I understand it is vital!
02. All thumbs
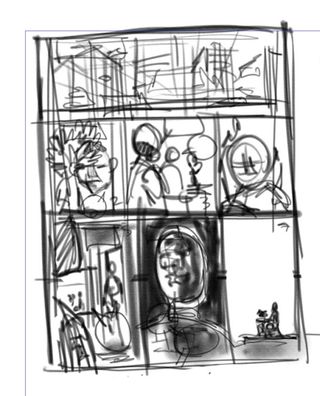
Breaking the script into a thumbnail drawing is essential. At this stage I'm trying to work out where characters are placed in a panel, how the panels will flow together, and whether the writer's instruction for "large panel" is out of step with the other panels' dialogue requirements.
Typically, the more dialogue on a panel, the larger it needs to be. I draw the thumbnail using my Pencil Side On tool. I don't want to get lost in the details and it's well suited for this.
03. Layout options
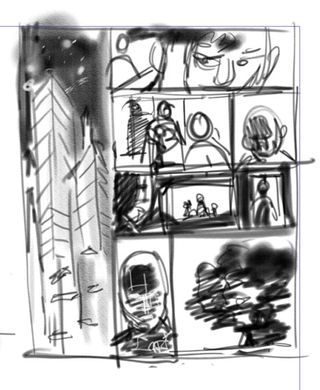
I decide to take another stab at the thumbnail. The layout is a little dull, and much more like the middle of a story in terms of its panel rhythm.
I need a page that looks like a standalone unit. Taking the establishing shot and putting it as a single tall panel allows it to dominate the page at a distance. However, experience tells me that after reading it, the panel will quickly recede into the background.
04. Character designs
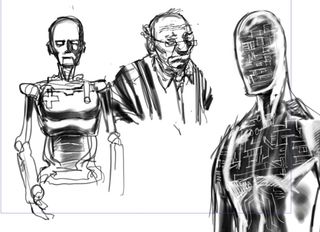
Usually character designs come after the script reading. However, because this is a single page story, with characters that are only appearing here the once, there's no need to overthink them. I scribble out a rough idea, but really, I'll design them as I draw the page.
05. Creating the page
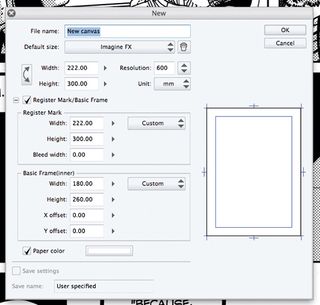
I create a new page in Manga Studio, to the sizes as required by my editor. Never guess these sizes! If you're not sure, ask (I've been burnt before!).
I set the resolution to 600DPI: this is often higher than is required, but you can never be sure where or how work will be republished, and technology moves so quickly that anything lower than 600DPI could be a gamble!
Shortcut: Rotate the page Shift+ Space (PC only) Hold down these keys and use the mouse/pen tablet to rotate the page. Very handy for line art and sketching.
06. Rough stuff
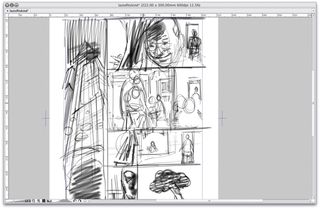
I tend to pencil in a couple of stages. The first stage is when I roughly block in everything I think I want on the page. I divide the page into the panels required and starting with panel one, work my way through.
I'm still thinking about the script at this stage, as well as where the captions will go and if there's enough room for everything!
07. Slice 'n' dice
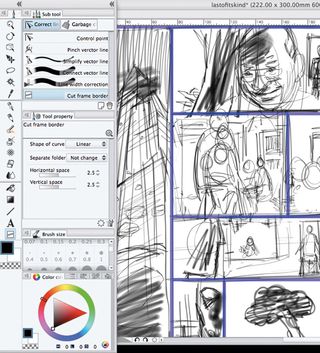
Using my thumbnail as a guide, I create a new Frame Folder in Manga Studio, and slice each frame using the Cut Frame tool.
This divides the page up into comic panels (Manga Studio uses the term Frame, but UK and US comics tend to refer to them as panels).
Each panel then has its own frame folder, capable of having multiple layers all masked off to fit. I set the frame's border to 0.7mm because I prefer a solid panel border.
08. The establishing shot
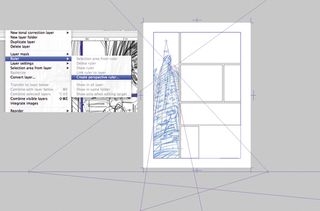
This is part of the grammar of comics, and is essential in grounding the reader in the world.
Having decided to make panel one a page-high column, I start to build a city: roughing a perspective grid is fast using Manga Studio's perspective rulers.
I pencil in a couple of unusual-looking flying vehicles to further push the strip into 'the future'.
09. The Old Man and the Tree
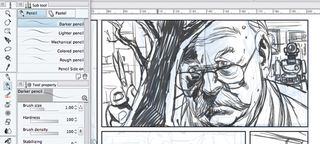
The focus here is the old man's expression. The tree helps to frame his face, while his head and shoulders help to frame the robots behind him.
I make sure that at least 25 per cent of the panel is, effectively dead space, an area where the art is relatively unimportant and clear for adding text and captions. That's a good rule for every panel.
Next page: 10 more top tips for creating your own comic

Thank you for reading 5 articles this month* Join now for unlimited access
Enjoy your first month for just £1 / $1 / €1
*Read 5 free articles per month without a subscription

Join now for unlimited access
Try first month for just £1 / $1 / €1
Get the Creative Bloq Newsletter
Daily design news, reviews, how-tos and more, as picked by the editors.
The Creative Bloq team is made up of a group of design fans, and has changed and evolved since Creative Bloq began back in 2012. The current website team consists of eight full-time members of staff: Editor Georgia Coggan, Deputy Editor Rosie Hilder, Ecommerce Editor Beren Neale, Senior News Editor Daniel Piper, Editor, Digital Art and 3D Ian Dean, Tech Reviews Editor Erlingur Einarsson and Ecommerce Writer Beth Nicholls and Staff Writer Natalie Fear, as well as a roster of freelancers from around the world. The 3D World and ImagineFX magazine teams also pitch in, ensuring that content from 3D World and ImagineFX is represented on Creative Bloq.
