Once upon a time, being an illustrator required the best pencils, paints, brushes, tools, canvases, ventilated space, free time and enough of all of those things to be sufficiently trained in a complex skillset.
Much in the same way that home digital recording has changed the face of entertainment for the YouTube generation, Photoshop has brought all the tools of a professional artist to anyone who can get their hands on it. This is something that is evident from the hundreds of Photoshop resources now available, including Photoshop tutorials and Photoshop brushes.
If you're a newcomer to the software, you'll find the following an indispensable guide to getting started and on your way to painting like the pros…
01. The Tools window
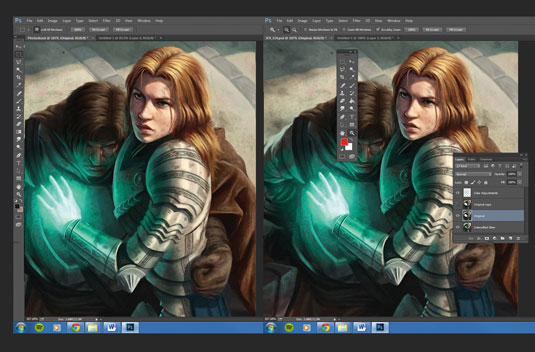
Our first and most frequented stop is the Tools window. This should open by default on the left side of the screen – if it doesn't, just go to the Window drop-down menu at the top of the screen (this list enables you to turn any window on or off) and click Tools.
Selecting a Tool icon will change the mode your cursor is in: Brush, Eraser, Shapes, Selections and so on. Right-click any of the icons to reveal extra options, click the double triangles at the top for two rows, and you can drag the bar off the frame if you prefer it to be free-floating.
02. Blending Modes
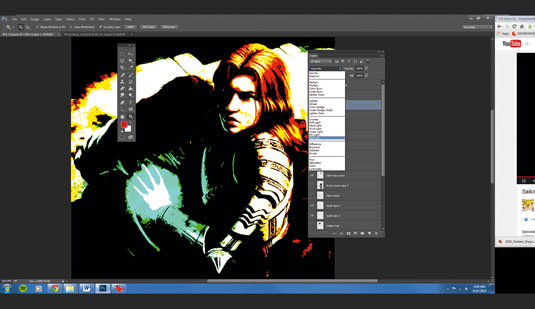
The Blending Modes menu can be found in the Layers window above where it says Lock (by default, the mode will be Normal). Try creating a new layer above an image, painting over it, and then scrolling through the options in the drop-down menu.
Each selection will blend the top and bottom layers together in a different kind of way. Darken, for instance, lets only the pixels in the top layer that are darker than those in the bottom layers stay visible.
03. Add textures
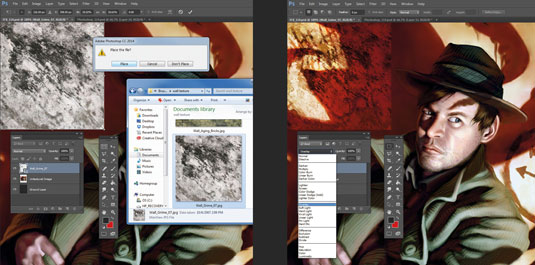
There are several options in the Blending Modes menu for adding texture. Explore Overlay, Hard Light and Soft Light, which give precedence to the lightest and darkest pixels in the blending layer, leaving most of the middle values translucent.
Try dragging a photo with a texture into your file, place it over the layer you want to add texture to, and switch the Blending Mode to Overlay. You can then erase away the layer to leave texture only where you want it.
04. Layer Masks
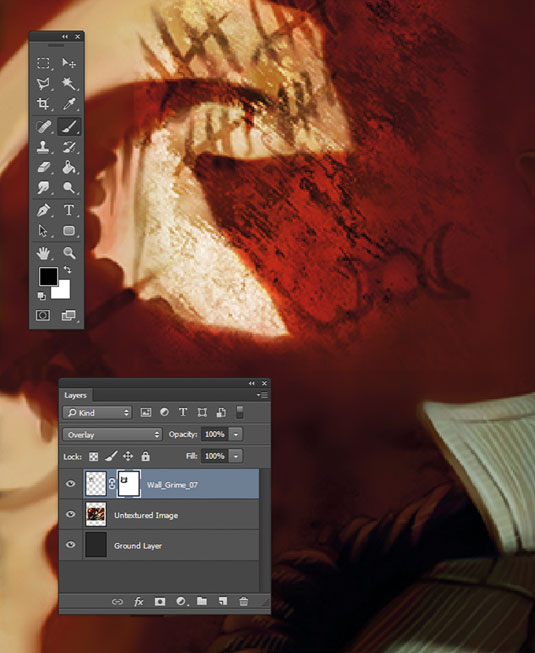
Layer Masks are a way of controlling translucency that's more nuanced than simply adjusting the Opacity of an entire layer (which you can do with the Opacity slider in the Layers window).
Clicking the white rectangle with a circle in the Layers window creates a mask on the selected layer. Painting with dark pixels will make that section of the layer translucent, while painting with white will make it opaque again.
05. Selection tools
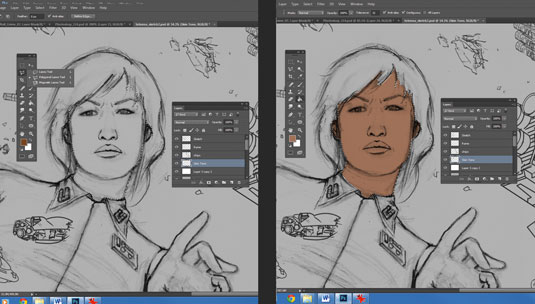
Photoshop offers several ways for you to select parts of an image, all of which can be found in the Tools window. The Rectangular and Elliptical Marquee tools are on the top left: just right-click the icon to reveal every option.
Once a tool is selected, dragging the cursor in an area will create a – surprise! –rectangular or elliptical selection. Now you can only paint or erase in that particular place. The Lasso tool and its extra options can select more specific areas.
Polygonal Lasso gives you control over the borders by creating connecting points, while the Magnetic Lasso attaches itself to whatever shaped edges are closest as you drag the cursor around the canvas.
06. Free Transform
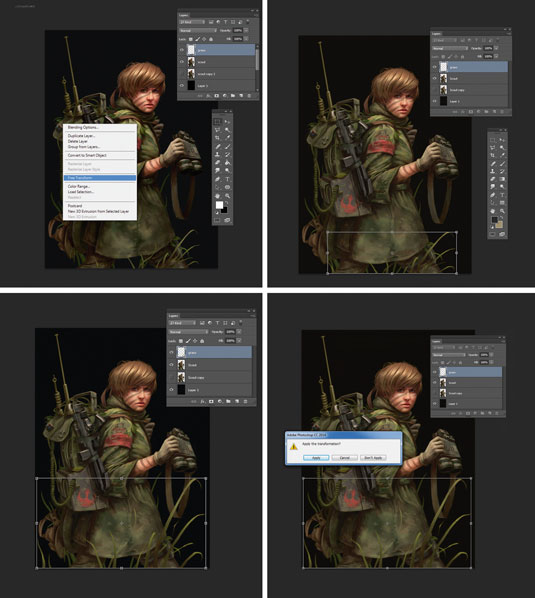
The Free Transform option can be accessed by right-clicking the canvas while using any selection tool. If you use it while an area is selected, only that area will be manipulated. If you don't have anything selected, the whole layer is affected.
Once in Free Transform mode, right-clicking again will bring up a new menu. Scale changes size throughout (click the linked chain icon at the top to keep the height and width relative), Skew (along with Distort and Perspective, but in different ways) will lengthen or shorten the edges of a selection, and Warp will bulge and constrain areas as you move the border frame.
07. Shape tools

That single grey rectangle with the white outline in the lower third of the Tools window is the Rectangular Shape tool. Right-clicking it will reveal the additional Ellipse, Rounded Rectangle, Polygonal, Line and Custom shape tools.
Dragging the cursor with one of these selected will create the specified shape, and holding down Shift as you drag will keep all the edges equal in length. With a shape created, you can select a Fill colour (this fills in the whole shape) or Stroke (this creates a line over the border) using the Properties bar at the top of the screen.
08. Using text
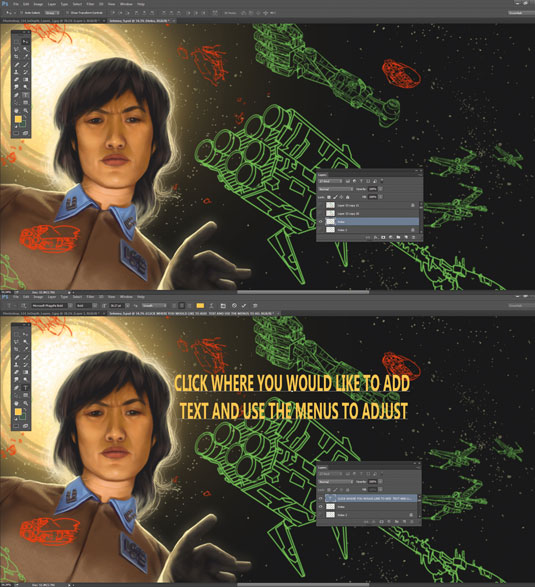
The Text icon is that capital T in the lower half of the Tools Window, and right-clicking it enables you to change the orientation. The Properties bar at the top of the screen gives you size, shape, justification and font options so you can customise your text.
Any fonts installed on your computer are accessible in Photoshop, although having too many can slow down the program (which is also a downside to having too many brushes).
Text can be altered with the Free Transform process mentioned previously (right-click the layer and rasterize it first) and clicking the warped T over a curved line (in the Properties bar once again) will open up some useful preset warping options.
09. Clipping Masks
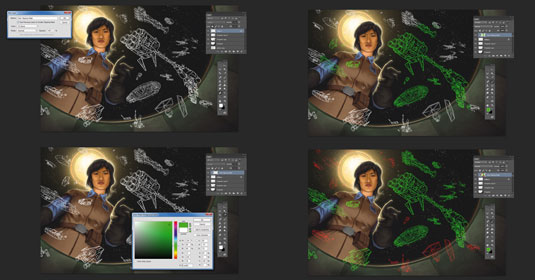
When painting an object on a transparent layer, try creating a new one above it, right-clicking the layer and selecting Create Clipping Mask. Now when you paint, brush strokes will only show up where there are pixels in the layer below.
So if part of the lower layer is clear, your brushes won't work there on the upper one. This is helpful when you want to try out some new colours in an area you've already painted, because turning off the layer visibility enables you to flip back and forth between the new and original image.
10. History states
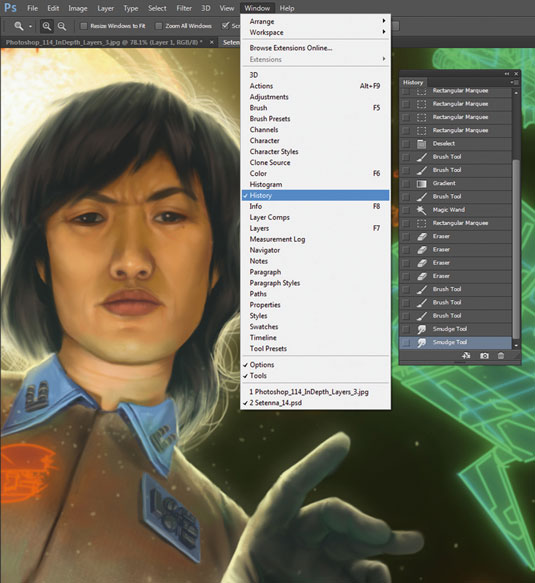
One of the most magical aspects of painting in Photoshop is the History feature. Click 'Window > History' in the top menu bar to open up a descending timeline of your past actions.
Every time you paint a line, erase a smudge, make a selection, or do pretty much anything, the History window makes a note of it. Clicking the image at the top of the window will take you all the way back to the file's original state when you opened it (this is blank if it's new), while checking a box to the left of any history state will save it so you can go back whenever you need to.
This is helpful when you're happy with how a painting is developing, but want to experiment without fear of ruining anything.
This article originally appeared in ImagineFX magazine issue 114.
Like this? Read these!
- Illustrator tutorials: amazing ideas to try today!
- Check out this collection of top Photoshop tutorials
- Discover the 5 best pencils for artists and designers
- How to choose the right drawing tools
- Read our guide to choosing the best photo editor

Thank you for reading 5 articles this month* Join now for unlimited access
Enjoy your first month for just £1 / $1 / €1
*Read 5 free articles per month without a subscription

Join now for unlimited access
Try first month for just £1 / $1 / €1
Get the Creative Bloq Newsletter
Daily design news, reviews, how-tos and more, as picked by the editors.
