Maximise your shape building in Illustrator
Essential shape-building tips using the pathfinder tools.
Adobe Illustrator CC can sometimes seem like a daunting tool to use if you’re dipping your toe in the graphic design water for the first time. It’s certainly not as forgiving as Photoshop CC – often there is a specific way to achieve a certain task in Illustrator rather than being able to fudge or force your way through it, which is often possible in Photoshop.
The pathfinder panel forms the backbone of all shape building within Illustrator, and once you get your head around this you’ll find it far less daunting.
Through the next several steps we’ll run through some essential pathfinder techniques for creating basic graphics and icons, including teardrop shapes, an expand button, a chevron-like pattern, an eye icon and a camera shutter icon. These tips should be useful to both fledgling Ai users and more experienced designers alike.
And don't forget, we have 100 amazing Adobe Illustrator tutorials for you on this site, to spark further inspiration and show you how to achieve great designs.
01. Create a simple teardrop shape
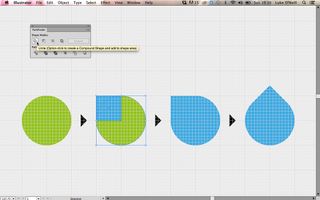
We'll begin with the basics of the pathfinder tool and how it can be used to create simple shapes from separate drawn vectors.
Start by drawing a perfect circle using the ellipse tool by holding shift with 'snap to grid' selected from the view menu.
Create the circle to fill four of the larger grid squares and draw a perfect square that fills one of the larger grid squares, as shown above. Select both shapes and use the unite function from the pathfinder to combine both shapes into one vector. Now hit R and rotate the shape to look like a teardrop.
Get the Creative Bloq Newsletter
Daily design news, reviews, how-tos and more, as picked by the editors.
02. Create an expand button
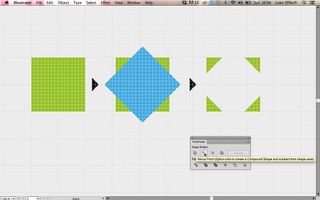
Start by drawing a square, then copy and use the cmd+F shortcut to paste it in place on top of the existing square. Hit R to bring up the rotate tool and rotate the top square by 45 degrees by holding shift.
Now with both squares selected, use the 'minus front' pathfinder function to subtract the top square from the bottom one, creating four corner triangles and a simple expand button in the process.
03. Create shapes from strokes
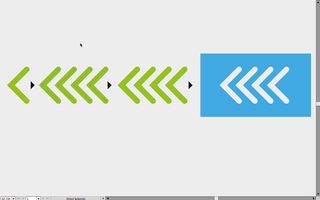
Use the pen tool with 'Snap to grid' turned on to begin creating some simple vector strokes, in this case a basic arrow shape. Increase the stroke weight to 25 and choose 'Round cap' from the stroke panel. Now holding alt and shift, drag the shape to duplicate it, then hit cmd+D to continue duplicating it a number of times.
Select all the shapes and navigate to Object > Path > Outline Stroke. Now the stroke is outlined it will function as a shape, so you can use the pathfinder with other shapes. In the example above we've knocked all the arrows out from a rectangle using the minus function.
04. Create a simple eye icon
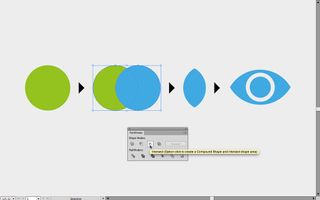
Begin by drawing a perfect circle and then hold alt and shift to drag and duplicate it. The area where the two circles overlap will form the eye shape, so use your judgment here.
Next, with both shapes selected use the intersect function to create a shape from the overlapping areas of the circles. Rotate the shape so that it looks like an eye and then use the technique from step 03 to knock out an outlined stroke circle.
05. Create a camera shutter icon
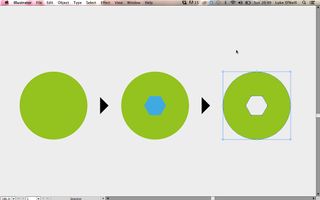
Now we're going to combine a couple of techniques to create a graphic camera lens icon. Begin by drawing a perfect circle, then draw a polygon using the polygon tool and place it over the top of the circle.
With both shapes selected, use the align panel to align the horizontal and vertical centres. Now simply use the minus front pathfinder command to subtract the polygon shape from the circle.
Now turn off Snap to grid and horizontal line along the top edge of the pentagon extending beyond the circle bounds. Hit R to bring up the rotate tool and hover over the central grid point of the polygon, hold alt and click.
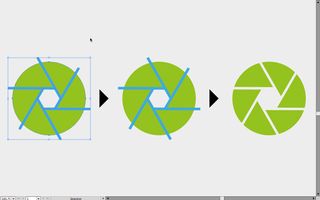
Enter the fraction 360/6, hit the copy button and press OK. Now simply hit cmd+D to duplicate the lines.
Repeat the technique shown in step 03 to outline the strokes and then subtract them from the circle to create your camera icon.
Read more:

Thank you for reading 5 articles this month* Join now for unlimited access
Enjoy your first month for just £1 / $1 / €1
*Read 5 free articles per month without a subscription

Join now for unlimited access
Try first month for just £1 / $1 / €1
Luke is a creative director, visual designer and digital artist, who works at THG Studios in Manchester as creative director of beauty. He previously worked for Future Publishing, where he was art editor of leading magazines such as Guitarist, T3 and Computer Arts.
