10 time-saving Photoshop tips
Mark Murphy quizzes fellow designers to come up with a brilliant list of Photoshop productivity shortcuts.
Deadline looming? Clients and bosses breathing down your neck? Are you wondering just where all that time went and how in the name of the holy CS you're going to get this project out the door by 5:30pm? Of course there's no excusing your habitual procrastination and frankly cavalier attitude to Facebook breaks, but we all know that when you're racing toward zero hour, every second counts. It's times like this when every element of your work needs to flow together efficiently, minimising 'hover' time between tasks while still allowing you to keep the bigger picture in mind.
It was with this in mind that creating a basic but invaluable cheat-sheet for Photoshop CS6 made so much sense. After quizzing designers across the Precedent digital design agency and mixing in some of my own favourites, I gathered a comprehensive list of our collective top tips for using any Photoshop from CS3 onwards.
Whether you're a Photoshop Padawan or an Adobe aficionado, there's sure to be at least one tip in here that will ratchet up your workflow and save you time and hassle.
01. Paste in place
- Shortcut: Cmd+Shift+V
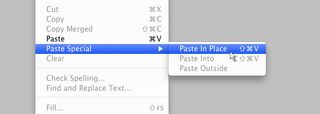
An obvious but no less valuable place to start, paste in place isn't a default setting when copying elements across multiple Photoshop documents. Some designers have been witnessed pushing pixels trying to match up elements to perfection from a source document. Avoid the unnecessary risk of human error and save time to boot!
02. Quick group multiple layers
- Shortcut: Cmd+G
Good housekeeping is crucial to use layers effectively. This becomes critical when creating PSDs with many (potentially hundreds) of layers. With states, styles and sections of the design grouped and clearly labelled this will also aid the poor developer when he or she is at the receiving end of your design. To create groups quickly and avoid the confusion that comes with many selecting similar layers, simply select the layers you wish to group and, once highlighted, hit Cmd+G. There you have it! All layers selected are now in that group.
03. Alt-click layer marquee
This is most effective when joining different shaped elements across layers for a mask. Holding Alt whilst hovering over the vector or layer thumbnails will change the cursor into a hand with a marquee. When clicked, a marquee will automatically be applied to the perimeter of that shape or object. In addition, holding Shift will allow you to select and join multiple marquees: great for quick masking.
Tip provided by Pal, senior designer, Precedent London
Get the Creative Bloq Newsletter
Daily design news, reviews, how-tos and more, as picked by the editors.
04. Create a layer blending shortcut
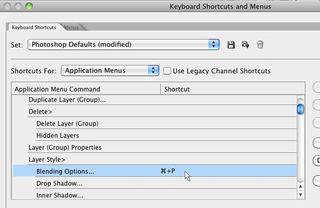
The first thing I do when installing an oven-fresh Photoshop instance is set up a shortcut for blending options. This isn't a shortcut as standard but can be easily configured and you can choose any combination of keys you deem fit. Using this shortcut to open the blending dialogue saves an enormous amount of time cumulatively when editing layer styles rather then laboriously selecting blending options from the layer dropdown.
Tip by Ed, senior designer, Precedent Cardiff
05. Snap element to grid
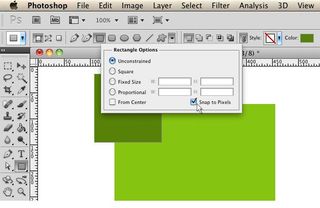
This little number has got to be the worst kept secret for anyone using Photoshop to create web elements. If you're aspiring to pixel perfection with buttons, navigation or other vector elements, select this lesser known 'snap to pixel' check box from the vector shape dropdown. Bingo, no more fiddling with anchors to remove pixel bleed.
Tip by Andrew, designer, Precedent Perth, Australia
06. Auto select with the move tool
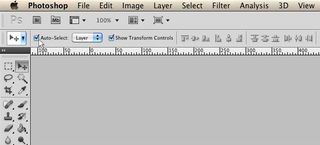
Another little timesaver that's not selected by default is auto-select using the move tool (V). Enabling this allows a single left click to select layers, or additionally drag a rectangular marquee with this tool and select all layers within the said marquee. Using this technique together with quick layer grouping is a great way to organise other less well-kempt PSDs (which I frequently have the pleasure of doing!).
07. Convert Point text to Paragraph text

Need to convert that point text into a paragraph but don't want to have to copy and paste out all that content? No problem! It's amazing how many people still don't know that Photoshop can convert point text to paragraph text (and visa versa) at the drop of a hat.
Simply select the point text layer in question and select 'Convert to point text'. Hey presto! Converted without any messing around whatsoever. This feature comes into its own when editing content heavy/editorial designs, and don't forget you can also do this with multiple text layers selected.
Tip by Sophie, designer, Precedent Edinburgh
08. Layer move
- Shortcuts: use Cmd+[ to demote layer, Cmd+] to promote layer, Cmd+Shift+[ to promote layer to top of layer stack, Cmd+Shift+] to demote layer to bottom of layer stack
Selected layers can be quickly shifted to the top/bottom of layer stacks.
This is another good housekeeping rule to remember if layers and groups are in clear hierarchical order. This can be particularly tricky to remember when a design is changing rapidly. This is a technique best used to constantly assess and rearrange layers as you go. This might seem another headache to deal with whilst designing but once it's adopted its amazing how much time is saved later when there is minimal layer searching to contend with.
Tip by Mark, senior designer, Precedent Edinburgh
09. Live editable text boundary
- Shortcuts: Shape tool: U, Text tool: T, Pen tool: P, Direct select tool: A
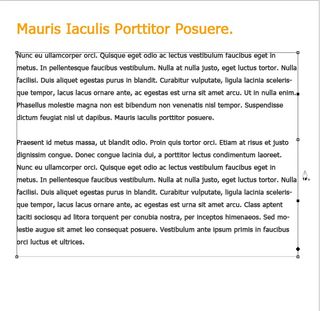
Using Photoshop when working with text can sometimes be a cumbersome affair. Add another dimension of control by using shape and pen tools to create a versatile text area that can wrap text around images and other objects.
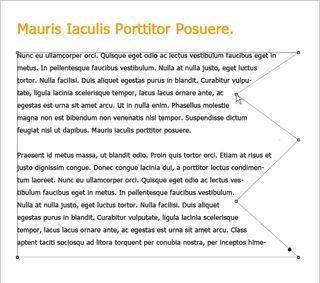
Create a rectangle or other vector shape. Now select your type tool. You'll notice with the type tool selected the cursor will change when hovering over shape created. Left-click within the shape, text will now be inputted within the shape. It's now a simple case of using the pen tool to edit the boundaries of the shape to create the dimensions you desire. Finally knock the opacity down to 0% for the container shape to become transparent.
This is a great way of styling up text on the fly, and can also be easily edited later if amendments are required.
10. Screen grab
- Shortcut: Shift+Cmd+4
This is great for grabbing colours, buttons, styles from websites and media. Never underestimate the latent versatility of the humble screen grab! I still use this daily to grab colours, patterns, textures and other inspiration. Not only that, but capturing a portion of the screen using Shift+Cmd+4 displays a crosshairs which handily displays the height and width in pixels of the area selected. This is great for ascertaining grid widths, images and other elements quickly.
Tip by Emma, designer, Precedent London
There you have it! Hopefully, these tips will contain some insight to Photoshop veterans and newbies alike. Don't forget that every fraction of a second saved counts toward the much bigger calmative effect over time. This not only allows you to create faster but also makes you a hotter prospect for clients and peers alike!
Words: Mark Murphy

Thank you for reading 5 articles this month* Join now for unlimited access
Enjoy your first month for just £1 / $1 / €1
*Read 5 free articles per month without a subscription

Join now for unlimited access
Try first month for just £1 / $1 / €1
The Creative Bloq team is made up of a group of design fans, and has changed and evolved since Creative Bloq began back in 2012. The current website team consists of eight full-time members of staff: Editor Georgia Coggan, Deputy Editor Rosie Hilder, Ecommerce Editor Beren Neale, Senior News Editor Daniel Piper, Editor, Digital Art and 3D Ian Dean, Tech Reviews Editor Erlingur Einarsson and Ecommerce Writer Beth Nicholls and Staff Writer Natalie Fear, as well as a roster of freelancers from around the world. The 3D World and ImagineFX magazine teams also pitch in, ensuring that content from 3D World and ImagineFX is represented on Creative Bloq.
