4 tools for automatic CSS testing
Introduce some automated CSS testing into your workflow for more time making and less time checking. Simon Madine explains how to get started
This article first appeared in issue 240 of .net magazine – the world's best-selling magazine for web designers and developers.
When you’ve got a small, static, single-page website, you’d think that you would spot anything wrong with the layout or the design fairly easily. Maybe a two-page microsite would still be OK. Add in a couple of hover states and that’s probably fine, too. Keep adding things, keep building and, before you know it, you’ve got a multi-page site with a shiny responsive design, subtle hover states and a great vertical rhythm. It’s perfect. Still sure you can’t spot anything wrong? On any page?
As the websites we develop get larger and more complex, we need to rely more and more on testing. Automated testing is exactly what you’d guess from the name. Rather than the developer or QA checking a list of pre-defined actions on the website to make sure everything works as expected, you have an automated system run the tests instead.
All aspects of web development can benefit from automated testing and the sheer number of testing frameworks available for JavaScript alone is enough to show how important it is. Unfortunately, unlike JavaScript, the number of CSS testing tools is limited. The reason is that, fundamentally, CSS is hard to test because it isn’t instruction-driven like JavaScript or PHP. Don’t despair, I didn’t say it was impossible. Below, I’ll run through a few areas that can be tested, mention some tools to use and give a few examples of them in action.
Syntax checking
It seems like such a trivial thing but, when you’ve been struck by a case of code-blindness, it’s handy to have something to point out that displat: block is not a real CSS rule, even if it should be. Most code editors provide inline syntax checking (either built-in or via an installable plug-in) but if you want to truly automate this, you need to be able to run it on the command line. For this, we turn to probably the most well-known CSS testing tool, CSS Lint, because, aside from everything else it does, it also provides a command line syntax check.
CSS Lint
The easiest way to install it is as a global Node.js module. If you have Node.js and Node Package Manager (NPM) on your system, simply run this on your command line:
$ npm install -g csslintThen, all you need to do to check your CSS is to tell CSS Lint where to look:
$ csslint [site folder]/styles/*.cssHere’s a sample file and the output from CSS Lint:
body {
color: #red; background:white;
}
1: error at line 2, col 9 Expected a hex color but found '#red' at line 2, col 9.
color:#red;
CSS Lint is quite a polarising tool. You either love it or hate it depending on your opinion of Object-Oriented CSS. However, what’s important to bear in mind is that it’s completely configurable. Even if you never want to use any of the linting rules it provides, you can still benefit from the syntax checking. Read detailed instructions here.
Get the Creative Bloq Newsletter
Daily design news, reviews, how-tos and more, as picked by the editors.
Image diffs
Most CSS testing tools have focused on one of two main techniques available. The first of these is Image Diff(erence) Comparison. Image diff tests are essentially repeating exactly what the developer would do when checking changes on a website by looking at them. When you finish making your page for the first time, you take a screenshot of it.
After each change, whether it’s on this page or another, you take another screenshot and compare the two. If they are the same, everything’s good. If there’s a difference, you check closer to see if it’s something expected or if a rogue style has stepped out of line. These tools automate this process by managing the screenshot-taking, version-comparing bits and just giving you a thumbs-up or thumbs-down.

PhantomCSS
Another CSS testing tool is by James Cryer, which is built on top of the extremely powerful PhantomJS project. What PhantomJS provides is a version of WebKit that can run from the command line and be controlled via JavaScript – not just the usual in-page JavaScript like ‘pop open an alert box’ but browserlevel control such as, ‘Open a new tab, go to www.netmagazine.com, click on the tutorial’s link’. PhantomCSS harnesses this to perform image diff testing. In between PhantomCSS and PhantomJS, there’s actually another layer designed to either simplify things or complicate them, depending on your point of view. That layer is CasperJS, an abstraction layer and testing tool that sits on top of PhantomJS. Fortunately, that comes bundled with PhantomCSS.
Getting started
We’re going to write a simple image diff test that checks the page looks the way we expect it to when we interact with it. To get started, download the tutorial files or get the latest version of PhantomCSS from GitHub. Once you have PhantomJS installed and PhantomCSS downloaded, the PhantomCSS/demo/testsuite.js file is a good place to start.
The default demo file shows the most important features:
casper.start('http://localhost:8080/')
  .then( function (){ css.screenshot('body'); } )
  .then( function (){ casper.page.sendEvent('click', 10, 10); } )
  .then( function (){ css.screenshot('body'); } )
  .then( function (){ css.compareAll(); } )
  .run( function (){ phantom.exit(css.getExitStatus()); });
First we start by loading the page we want to test, then take a screenshot, then interact with the page (eg clicking on a link), then take another screenshot, then we compare the screenshots against any taken in previous test runs and finally finish.
The first time this runs, we receive a message that there are no previous examples to compare against. From the command line, run:
$ phantomjs demo/testsuite.js Must be your first time? Some screenshots have been generated in the directory ./screenshotsOpen the PhantomCSS/screenshots/ directory to see saved screenshots. Run the same test again and, because we have reference images, everything passes:
$ phantomjs demo/testsuite.js PhantomCSS found: 2 tests.
None of them failed. Which is good right?
Now, every time we make a change to the styles of the project, we can run those same tests and be confident that, as long as they pass, everything looks the same. If they fail, we can check that the only difference is whatever it was we just changed – a predictable difference. If so, we delete the old test cases, generate new ones and carry on as before.
But what happens if our colleague accidentally replaces all instances of the word ‘pink’ in our project with the word ‘plank’?
Change the styles in PhantomCSS/demo/testpage.html to include this:
border: 2px solid hotplank; color: hotplank;Now run the same test again:
$ phantomjs demo/testsuite.js
PhantomCSS found: 2 tests. 2 of them failed.
In the old days before we had all this cool automated CSS testing stuff, we may have missed this. Thank goodness for technology. We get rid of the accidental ‘planks’ and the day is saved.
It’s also important to note that we aren’t limited to testing local files. If we change the beginning of the test to load from a full URL, we can ensure our production code behaves itself, too. Try changing the test to see the generated screenshot.
casper.start('http://csste.st/')More tools
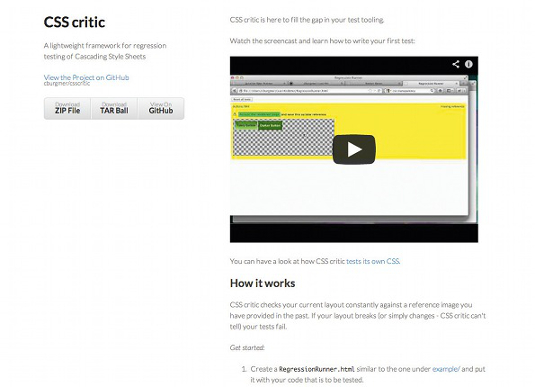
There are a few other tools in the image diff area but I’ll just mention one more here. CSSCritic by Christoph Burgmer is slightly easier to get the hang of than PhantomCSS if you’re new to automated testing, especially if you’re working on local templates. This project doesn’t have any extra dependencies; it’s simply a HTML file you open in the Firefox web browser. (Note: CSSCritic only works in Firefox at the moment.)
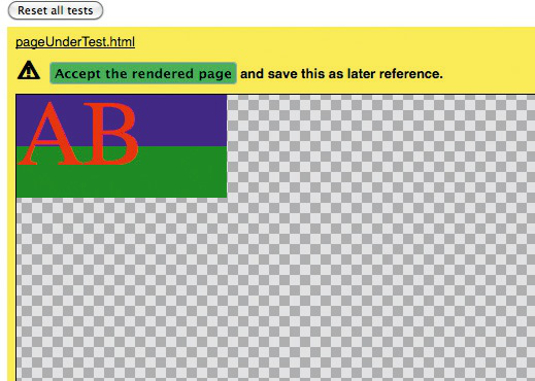
Open the file CSSCritic/example/RegressionRunner.html to see a standard test case.
window.onload = function() {
csscritic.addReporter(csscritic.BasicHTMLReporter());
csscritic.compare('pageUnderTest.html');
};
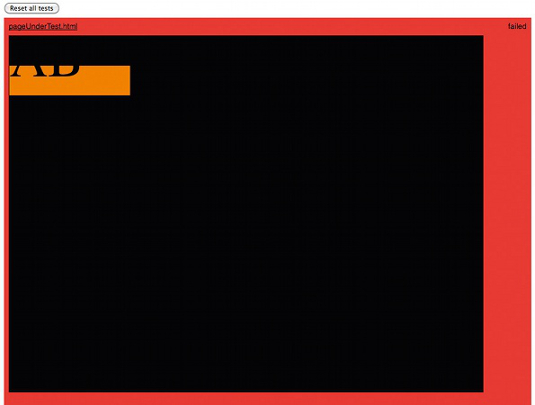
This will, as with PhantomCSS, create reference images the first time you run it by opening it in the browser. Run it again now and the pageUnderTest. html test will automatically pass. However, if the unexpected happens and a subtle change sneaks in, the test will let you know with a bright red background and an image showing the error.
In this case, the background colour is changed and the generated image shows the exact pixel difference between the previous version and the current one.
There is a limitation with CSSCritic in that it needs to be run on the same domain as the files it’s testing, but it’s very clear about what it’s doing and what the problems are.
Frozen DOM and computed styles
The second main technique available for CSS testing is a Frozen DOM comparison. As before, you create your page or template and make it look exactly the way you want. However, this time, rather than taking a screenshot as your future reference point, you use JavaScript to measure what styles are applied to the elements you want to test. This JavaScript object becomes your test case. When you make a change to the CSS, you again measure the styles that are applied to that element and compare them to the expected ones.
There are fewer tools available for this kind of testing, but there are still some options.
GhostStory
The Ghost Story project aims to make it easy for developers to create Cucumber-style story files to test the CSS. Cucumber is a technology to allow you to write test cases as simple, plain-text files that can be shared between everyone involved in the project – developers, designers, product owners – so everyone agrees on what is being made. GhostStory combines Node.js, PhantomJS, CasperJS and SpookyJS to provide an interface between these test files and Frozen DOM testing.
The easiest way to install GhostStory is to install this version of SpookyJS, which has GhostStory integrated from the command line using Git:
$ git clone --recursive https://github.com/thingsinjars/SpookyJSThis will not only install SpookyJS but also the GhostStory steps and PhantomCSS (mentioned above). PhantomCSS is included because it’s also possible to use GhostStory to Cucumber-ify your image diff testing.
Once that’s been completed, you will then need to update the Node module dependencies:
$ cd SpookyJS/ $ npm installThe example project is available by running:
$ make ghostAs we did with PhantomCSS, the easiest way to get familiar is to modify the example test. Open the GhostStory folder and look at the file css.feature. The contents are the same you would have seen on the command line after running the previous make ghost command:
Scenario: Frozen DOM test Given I go to "/index.html" Then the "Main title" should have "font size" of "32px" And the "Main title" should have "color" of "rgb(0, 0, 0)" And run
Scenario: Image Diff Test Given I go to "/1.html" Then the "Page body" should look the same And run
First, we specify the page to test (Given I go to). This page can be a local template or a remote URL. SpookyJS has a built-in server to make it easier to test local files so the index.html we are testing here is found in SpookyJS/tests/fixtures/index.html.
After the Given line, we list the CSS properties we measured in our original, completed template that we expect to find in our newly updated one. Again, if nothing is wrong with the page, we don’t get told about it and our automated build system will just continue to the next stage.
If you modify the CSS of the index.html file, you can see the outcome of a failing test:
(::) failed steps (::) Failed: Main title should have color of "rgb(0, 0, 0)" (measured: rgb(255, 0, 0))To test the styles applied to a live, remote website we could change the Given line to:
Given I go to "http://csste.st/"Why automate tests at all?
Unless you’re checking every aspect of every page every time a change is made, it’s guaranteed that eventually someone will write a style that overwrites something in the website. This is exactly the situation automated testing is great for. You can set up a system to run your tests for you and it’ll just do it every time, and without getting bored. If you test your projects, you have room to make mistakes. However, if you automate your tests, you’ll have more time to make those mistakes – and more time to fix them.
Simon Madine is a senior web developer and evangelist.

Thank you for reading 5 articles this month* Join now for unlimited access
Enjoy your first month for just £1 / $1 / €1
*Read 5 free articles per month without a subscription

Join now for unlimited access
Try first month for just £1 / $1 / €1

The Creative Bloq team is made up of a group of art and design enthusiasts, and has changed and evolved since Creative Bloq began back in 2012. The current website team consists of eight full-time members of staff: Editor Georgia Coggan, Deputy Editor Rosie Hilder, Ecommerce Editor Beren Neale, Senior News Editor Daniel Piper, Editor, Digital Art and 3D Ian Dean, Tech Reviews Editor Erlingur Einarsson, Ecommerce Writer Beth Nicholls and Staff Writer Natalie Fear, as well as a roster of freelancers from around the world. The ImagineFX magazine team also pitch in, ensuring that content from leading digital art publication ImagineFX is represented on Creative Bloq.
