Create a Tron-inspired light cycle effect in Blender
Tron: Legacy is out in the UK today! Learn how to create a light cycle effect similar to the effects in the new movie.
Open start.blend from this Q&A’s project files. Select View > Top, then select Add > Curve > Path. Press [Alt]+[G] and select Clear location. Select the Ipo Curve Editor; switch IPO type from Object to Path, then press [Delete] and choose Erase selected to remove the default animation curve. Return to 3D View and press [Tab] for Edit Mode.
Edit the Path until you like the shape by pushing points around, extruding or subdividing. The arrows on the Path indicate its direction. Select the first Point on the Path; press [Shift]+[S] and choose Cursor -> Selection, then press [Tab]. In the Editing Context of the Buttons Window, select Curve and Surface tab > Center Cursor. Return to the 3D View.
Without moving the 3D Cursor, select Add > Mesh > Cube. Choose View > Front. Press [Tab] for Edit Mode. Model a cube or select a pre-prepared object.

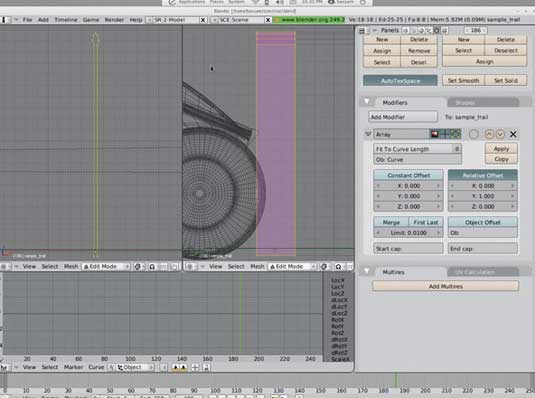
Select Object Mode. In Editing Buttons, click Add Modifier and add an Array. Set Fixed Count to Fit To Curve Length and Ob: to Curve. Set Relative Offset X to 0 and Y to 1, then click Apply. Add a Subsurf Modifier and set its type to Simple Subdiv.
In the 3D View, select Top View and press [Tab] for Edit Mode. Select Add > Plane, press [S] and scale it down slightly, then press [G] and move it to the front of the Path. Ensure all its Points are on the ground level by setting Median Z in Transform Properties to 0, then press [X] and select Only Faces. Select the two front Points, press [Alt]+[M] and select At Center to form a triangle. Add the back two Points to the selection. Press [Shift]+[S] and select Cursor -> Selection to snap the 3D Cursor to this location.
Press [Tab], then Add > Empty. In the Editing Buttons, change Empty’s Display to Cube. [Shift]-select the triangular mesh then, in Edit Mode, press [Ctrl]+[P] and choose Make vertex parent. Return to Object Mode. Select Add > Empty then select the Empty and press [Ctrl]+[Alt]+[C] and choose Copy Location.
Press [Ctrl]+[Alt]+[C] again and choose Copy Rotation. Position the LightCycle so it appears to be emitting the trail. Select the LightCycle followed by the new Empty, then press [Ctrl]+[P] and select make parent.
Get the Creative Bloq Newsletter
Daily design news, reviews, how-tos and more, as picked by the editors.
Select the trail. Add a Curve Modifier; set Ob: to Curve, then enable Y. Press [S] then [Y] and scale the trail on its Y axis to create the trail effect. You can animate this value.
Words: Bassam Kurdali
Bassam is an animator and filmmaker. He is currently working on the animated short Tube: www.tube.freefac.org
Do you have a tip or tutorial you’d like to share with the world? Email enquiries@3dworldmag.com

Thank you for reading 5 articles this month* Join now for unlimited access
Enjoy your first month for just £1 / $1 / €1
*Read 5 free articles per month without a subscription

Join now for unlimited access
Try first month for just £1 / $1 / €1

The Creative Bloq team is made up of a group of art and design enthusiasts, and has changed and evolved since Creative Bloq began back in 2012. The current website team consists of eight full-time members of staff: Editor Georgia Coggan, Deputy Editor Rosie Hilder, Ecommerce Editor Beren Neale, Senior News Editor Daniel Piper, Editor, Digital Art and 3D Ian Dean, Tech Reviews Editor Erlingur Einarsson, Ecommerce Writer Beth Nicholls and Staff Writer Natalie Fear, as well as a roster of freelancers from around the world. The ImagineFX magazine team also pitch in, ensuring that content from leading digital art publication ImagineFX is represented on Creative Bloq.
