Create a dissolving shape with Modo
Mike Griggs demonstrates how to use Modo 701’s particle system to create an image of a shape dissolving.
The new particle system in Modo 701 has the power, when combined with the existing replicator toolset, to create complex imagery in minutes that could take hours in competing programmes. The major strength of the particle system in Modo is the caching speed alongside the deformers that can transform particle systems in beautiful ways exceptionally quickly.
For this example, let’s to create an image of a representation of a sports car dissolving. Select the car mesh Courage 01.lxl from the automotive meshes that come with Modo via the Layout tab, and then press [Ctrl]+[Tab] to bring up the Setup window to start working on your particle system.
Create a new mesh and create a six-polygon cube a couple of millimetres in size to act as your particle. Your particle can be whatever mesh you want, but for general speed the lower the particle’s polygon count is, the better.
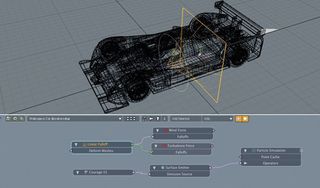
Select the Particles menu in the Commands tab on the left of the screen, where you can add a surface emitter; this adds a Particle simulation object to the item list. Whenever I create an object, I drag it to the Node view to have a better look at what is going on with my simulation. Attach the Courage 01 car mesh to the Surface emitter, which is already connected to the particle simulation. In the early stage of simulation work, I always click the Run Simulation At Present Time button (a lined green triangle at the bottom of the setup screen) to give myself a sense of how the simulation is performing. You need the particles to remain rooted to the car mesh so that you can use forces to pull them away from the mesh, so zero out all the velocity properties in the surface emitter. It’s now time to dissolve the car. As you do the initial particle animation, keep the emitter’s emission rate reasonably low so that you can iterate the simulations quickly.
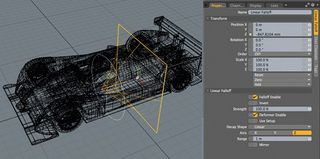
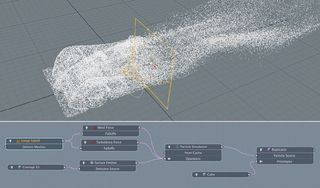
Add Turbulence and Wind force to disperse the particles away from the car shape, which you can add to the node view along with a Linear Falloff. Before you connect the nodes, animate the Falloff passing through the car from back to front. After you have done this, attach the Falloff to both the Wind and Turbulence forces, which you then attach to operators of the particle simulation node. Once you’ve adjusted the properties of both forces, start to increase the emitter rate. Rather than run the simulation, use the ‘Computes channels and caches the results’ button – a green arrow over a square at the bottom of the setup screen – to cache your simulation, until you have enough particles that you can use with a replicator object, which you can attach the cube mesh to. Finally, attach the Particle simulation to the replicator.
01 LINEAR FALLOFF

To dissolve the car, add a Linear Falloff and animate moving from the back of the car mesh to the front.
02 WIND AND TURBULENCE FORCES

Attach the Linear Falloff to the two forces that you have added to the scene, which you can then attach to the particle simulation.
Get the Creative Bloq Newsletter
Daily design news, reviews, how-tos and more, as picked by the editors.
03 REPLICATOR OBJECT

You can then hide the car mesh and add a replicator to the simulation, which has a cube as a prototype to give yourself an object you can render.
Mike Griggs is a freelance 3D, VFX and motion graphics artist, and a regular 3D World contributor. Meet him on Twitter.
Discover 20 top free 3D models

Thank you for reading 5 articles this month* Join now for unlimited access
Enjoy your first month for just £1 / $1 / €1
*Read 5 free articles per month without a subscription

Join now for unlimited access
Try first month for just £1 / $1 / €1
The Creative Bloq team is made up of a group of design fans, and has changed and evolved since Creative Bloq began back in 2012. The current website team consists of eight full-time members of staff: Editor Georgia Coggan, Deputy Editor Rosie Hilder, Ecommerce Editor Beren Neale, Senior News Editor Daniel Piper, Editor, Digital Art and 3D Ian Dean, Tech Reviews Editor Erlingur Einarsson, Ecommerce Writer Beth Nicholls and Staff Writer Natalie Fear, as well as a roster of freelancers from around the world. The ImagineFX magazine team also pitch in, ensuring that content from leading digital art publication ImagineFX is represented on Creative Bloq.
