How to set up your own photo studio
Can you create professional-quality photography in a small photo studio? Yes you can – here’s our guide to all the equipment you need to get expert results
Why waste your precious time on physical photography when you can do so much in Photoshop? Well, because experimenting with physical tools – lights, gels, diffusers, backdrops and reflectors – can create crisp effects that are very difficult to fake well digitally. Professional commercial photography combines physical and digital elements. It’s often quicker and more intuitive to set up a scene physically, instead of trying to fake it in Photoshop – and it’s easier to tidy up a scene in Photoshop if you start with a clean, well-lit source image.
The first question to ask is whether you want to concentrate on people or objects. Portraits and product shots require different skills and styles. If you concentrate on one or the other, you might need to select different equipment.
The secret of good product shots is even lighting and absolute cleanliness. Look at any professional magazine or catalogue shoot and you’ll immediately see that it’s spotless. There is no dust, no blemishes, no fingerprints or imperfections. You can fake that look in Photoshop with methodical cloning and spot healing, but it’s faster to start with an object that’s physically uncontaminated. Simple and cheap cleaning tools – small paintbrushes, air blower aerosols, and a disposable cloth – aren’t glamorous but are essential.

The other key element with photography is even lighting. Products are often shot ‘on white’ with a clean, white background and no hard shadows. On-camera flash is useless for this look, because it creates too much front-back contrast and excessively sharp shadows.
A simple and very cheap trick is to cut off a couple of sides around a cardboard box, leaving a floor and sides. Line the walls with photocopier paper, and light them with almost any convenient light sources. For a horizon-free curved backdrop, tape some A3 or A4 to the top of the box and bend it under the object on the floor. With careful placing you can bounce the lights off the paper to create a smooth look.
For a more professional approach, use a light tent: a bag or box made of white material that helps diffuse light around an object, giving a smooth and sophisticated even glow. Light tents usually have a hole in one side for shooting, while the other sides act as a diffuser. Prices start from around £25, and you can find many examples online. The more sophisticated models include single-colour detachable backdrops for a wider range of effects.
Portrait and larger-scene photos are more challenging, and you need more equipment to do them well. Where products need even lighting, model portraits are more varied, and smooth lighting is only one of many possible starting points. For maximum flexibility you need at least two independent light sources. Professional studio lights – from £200 upwards – simulate daylight. They also come with several attachments including umbrellas – the light bounces backwards off the inside – and soft boxes, which are giant diffusers.
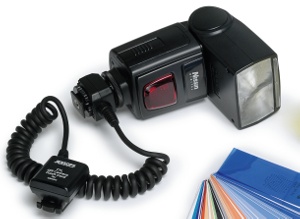
Point source lighting on-camera flash is almost useless for portraits, so don’t think of diffusers and reflectors as extras. It’s difficult to get good results without them but, if you’re on a budget, you can fake similar results with a good handheld flash on a cable that can be pointed away from a model to bounce light off walls, the ceiling or the floor. You can also use a handheld reflector to control flash bounce in a more deliberate and intense way, although you may need an assistant to help, and you’ll almost certainly need to experiment to get a good result. Subtle side- or uplighting is often used to make models look more glamorous and stylised.
What to go for and what you should pay
The camera
You’ll get creamy-smooth results with a mid or high-end SLR, but almost any camera that costs £350 or more is fine for photo studio work, as long as you can run images through a noise reduction filter in Photoshop, such as
.
Get the Creative Bloq Newsletter
Daily design news, reviews, how-tos and more, as picked by the editors.
The lights
Professional photo studio lights cost from £200 and are daylight-balanced for clean output. For a cheap alternative, try a couple of builder’s lights from any DIY store for around £10 each, and fix the balance in Photoshop. You could also grab one of the best ring lights, many of which are highly affordable now.
The set
Backdrops can be plain white, textured or coloured. For advanced effects you can also use reflectors to focus light or colour on a specific spot. Backdrops come on rolls, and a rack of rolls is a standard feature in professional studios. For a cheaper result when shooting small objects, you can use white, coloured or textured paper.
Bright studio lights can be hot and distracting, so professionals often use high-powered studio flash instead. Combined with diffusers and reflectors, studio flash is a professional solution and costs accordingly. Expect to pay around £400 for a reasonable entry-level package, and then more if you want advanced extras, such as light, sound or even WiFi-controlled triggers. Check out an equipment manufacturer like Calumet Photographic for a full range of professional photo kit.
With large units, portability and movement become an issue. Static studio lights and studio flash need to be positioned carefully, both vertically and horizontally, for maximum creative potential. You can also set up two or more light units to produce different levels of light output for deliberate control of light and shade. Most lights include basic stands, but professional studios use a track and pulley system that makes it possible to place the light where you need it. You probably won’t need to invest in the full system unless you spend most of your time doing photography. But it’s useful to know that it’s a possibility, and also to know how to use it if you book someone else’s professional studio for a shoot.
For close-ups, a useful extra is a ring flash, which fits around your camera’s lens and produces smooth but bright face-on lighting. Ring flash isn’t cheap – prices start around £200 – and you need to find a model that fits the lens on your compact or SLR. But if you find yourself being commissioned to do a lot of work that needs head and shoulder or full-face shots, it should soon pay for itself. And the difference in quality is unmistakable.
The bottom line with creative photography is that while pro-level kit is expensive but powerful, you can have a lot of fun and produce some impressive results with much cheaper kit. Apply some imagination and inventiveness to your projects, and there are almost no limits on what you can achieve.

Thank you for reading 5 articles this month* Join now for unlimited access
Enjoy your first month for just £1 / $1 / €1
*Read 5 free articles per month without a subscription

Join now for unlimited access
Try first month for just £1 / $1 / €1

The Creative Bloq team is made up of a group of design fans, and has changed and evolved since Creative Bloq began back in 2012. The current website team consists of eight full-time members of staff: Editor Georgia Coggan, Deputy Editor Rosie Hilder, Ecommerce Editor Beren Neale, Senior News Editor Daniel Piper, Editor, Digital Art and 3D Ian Dean, Tech Reviews Editor Erlingur Einarsson, Ecommerce Writer Beth Nicholls and Staff Writer Natalie Fear, as well as a roster of freelancers from around the world. The ImagineFX magazine team also pitch in, ensuring that content from leading digital art publication ImagineFX is represented on Creative Bloq.
