Why you can trust Creative Bloq

As a break in tradition, let’s start this review with the things that haven’t been added to Cinema 4D R15. We still don’t have an interactive renderer or a nodal texturing system (although a third-party plug-in is in development), and once again BodyPaint and UV mapping remain untouched.
However, this does make us suspect that the app is heading for a big release (R16?) where the sculpting, UV mapping and texture painting get melded into one mega-toolset, hopefully with Ptex support. Despite the app’s great strides in recent years, there are still plenty of holes to be filled in future releases.
What's new?
So what’s new in this latest update? For starters – and long overdue – the Global Illumination function of the Advanced Renderer now extends to the Prime edition, so everyone gets some GI goodness. At the other end of the product spectrum, Studio gets enhancements to its sculpting system, with a handful of new brushes, a Symmetry tool for equalising your mesh, and some cool line/lasso drawing tools.
It also gains a mesh projection system, which enables you to project your high-res detail onto a mesh with better topology, ready for deforming or animation. The meshes don’t necessarily have to be perfectly identical in shape and size, but you can get corrupted geometry if they’re too dissimilar.
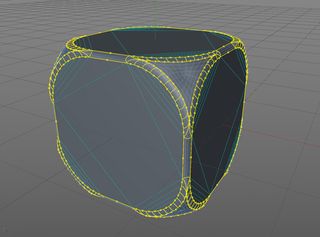
The new Bevel function is one of the key additions to Cinema 4D’s toolset, and is extremely flexible – able to work on polys, edges and points, and with real-time feedback. The Shaping function is great, enabling you to have convex or concave chamfers, or even describe your own with a spline curve.

Bevel can cope with a wide variety of topology, but it’s not a miracle worker and some users may become frustrated that it can’t simply bevel everything and make a good job of it. You’ll still need to ensure your geometry is clean and optimised, and take care in making your initial selections. It’ll take some trial and error to get the result you’re after, however, for most bevelling and chamfering tasks it’s a huge improvement over its predecessor.
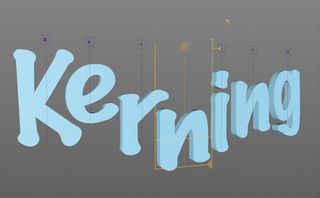
Still in modelling mode, the new Kerning tool will be a godsend for anyone doing logos and titles, and although simple in its execution, it’s brilliantly done. You simply check the Kerning feature and, the on-screen widget lets you move individual letters, scale them horizontally and vertically, and baseline shift them up and down.

And if you [Shift]-click all the letters, you can scale and stretch them en masse. Really, the only thing the Text tool doesn’t do is let you apply fonts per-letter, but that’s a rare need and easy enough to do by hand.
Rendering improvements
R15 introduces a series of enhancements to its rendering engine, using Intel’s Embree kernel to speed up raytracing, adding an improved Irradiance Caching system and introducing Light Mapping. The latter enables you to crank up the number of light bounces without the accompanying jumps in render times.
The GI solution now offers primary and secondary solutions, enabling you to mix and match QMC (Quasi-Monte Carlo), IR and LM to suit your purposes. The variety of possible combinations can be confusing, so there are presets for use with previews, interiors, exteriors and product shots. They may not be perfect for your specific scene, but they do provide a useful starting point, and you can add your own.
With raw QMC scenes R15 is actually slower than R14, but QMC does tend to generate noisy results. Switching to the updated Irradiance Caching produces a much smoother output, and with our test scene R15 produced a superior image in around two-thirds of the time.

The addition of Light Mapping produces brighter, richer images, while adding little render overhead. Our results were generally very good and very quick; there’s certainly nothing in R14 to match it. The combination of Irradiance Caching and Light Mapping produces really nice results, and with high sample settings, generated GI animation that was nigh on flicker-free.
These latest additions also work with Team Render, Maxon’s new distributed rendering system, which enables you to make use of spare CPUs. You simply install the client, and then enter the new machine’s IP address and security token. That machine is then available to assist in rendering – either to the picture viewer, where it adds additional render buckets, or to render an animation where CPUs are given individual frames.
It’s easy to set up and when we tried Team Render, it worked without any fuss. However, because C4D has to copy across geometry, textures, HDRs and so on, you may find that for single images (or with fewer machines), it’s not worth the effort – we added a dual-core laptop only to find render times actually increased.
But for animations, once the scene files are copied over, Team Render will just churn through the frames – and the longer the sequence and the more CPUs you have to add to the mix, the more effective the system becomes. What’s more, you can also employ both PCs and Macs in a mixed-OS render farm.
Weak links
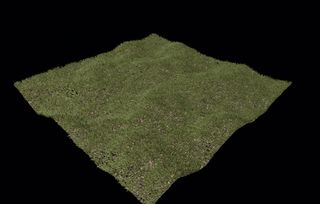
Other practical additions include the Edge Slide tool and Texture Manager, but there are one or two weak links in the package. Things like the Grass Shader and Camera Crane Object aren’t really anything you couldn’t achieve with the existing tools, and feel rather light to be termed ‘features’.
The grass is quite basic when initially applied, and while it’s designed with speed in mind, it’s a shame it doesn’t just have a few more features to quickly add variety, like clumping and bare patches. However, we will concede that if you load a real image of grass and use that to texture the scene, you can get some pretty realistic results.

Like previous C4D upgrades, this is a mixed bag, with a little of something for everyone. Following R14 – with its sculpting system, camera calibration, improved dynamics and so on – was going to be a difficult act, but R15 has enough on offer to justify the upgrade, and swaps fancy new features for solid benefits.
Verdict
Cinema 4D R15
Score: 8/10
An evolutionary rather than revolutionary upgrade, but it brings a variety of useful speed and workflow enhancements.
Uppers
- Bevel tool is handy
- Excellent render enhancements
- Great Text Kerning tool
Downers
- Some features are a bit lightweight
- No update for BodyPaint
- Modelling is still a weak point
Steve Jarrett has been into CG for many years. He’s a regular contributor to 3D World and edited the magazine for a period of two years.
- This article originally appeared in 3D World issue 176 - on sale now!

Thank you for reading 5 articles this month* Join now for unlimited access
Enjoy your first month for just £1 / $1 / €1
*Read 5 free articles per month without a subscription

Join now for unlimited access
Try first month for just £1 / $1 / €1
The Creative Bloq team is made up of a group of design fans, and has changed and evolved since Creative Bloq began back in 2012. The current website team consists of eight full-time members of staff: Editor Georgia Coggan, Deputy Editor Rosie Hilder, Ecommerce Editor Beren Neale, Senior News Editor Daniel Piper, Editor, Digital Art and 3D Ian Dean, Tech Reviews Editor Erlingur Einarsson and Ecommerce Writer Beth Nicholls and Staff Writer Natalie Fear, as well as a roster of freelancers from around the world. The 3D World and ImagineFX magazine teams also pitch in, ensuring that content from 3D World and ImagineFX is represented on Creative Bloq.
