Create realistic depth of field effects
Ben Thomas shows you how to use the new Physical Render engine in Cinema 4D to produce depth of field
Over the last 12 months, 3D software has fast become one of my most used tools. I’m always blown away when people tell me they haven’t looked into it or find the prospect too daunting: it isn’t necessarily a walk in the park, but for me the prospect of being able to create almost anything out of nothing, and use realistic lighting and depth of field, is irresistible.
In this walkthrough, we’ll skim over lighting and texturing, and will focus (forgive the pun) on particles, basic physics and achieving depth of field effects using the new physical renderer. Once you’ve mastered the techniques here, you can experiment with them in your own projects. If you haven’t got C4D, you can download a demo.

01 Create a plane, set the width and height to 10,000 and name it ‘Floor’. Create a platonic shape (Create>Object> Platonic). Duplicate this twice and change Type for the second and third to Hexa and Octa. Now create a new plane measuring 4000x4000cm. Rotate H by -45 and B by -90. Next set the Position coordinates to X:790, Y:2000 and Z:-620, and name the layer ‘Light’. Lastly we need a disc with an outer radius of 20cm.

02 Select all three of the platonic shapes at the same time. In the Object Properties panel set Radius to 50cm. Create a particle emitter (Simulate>Particles> Emitter). Next, select the emitter and under the Particle tab set both Birthrate fields to 100. Uncheck the Tangential box and check Show Objects. Now change Rotation to 180 and its Variation to 100%. Set the End Scale Variation to 50%. Duplicate the emitter.

03 Drag the platonics into the first emitter. This will pump out our main objects for the scene. Now for the duplicated emitter: this is basically going to throw out lots of the little discs. We just want them to be small, like falling sparks. Items like these in the foreground and background will appear as small blurry details to add interest. Drag our disc shape into the emitter.
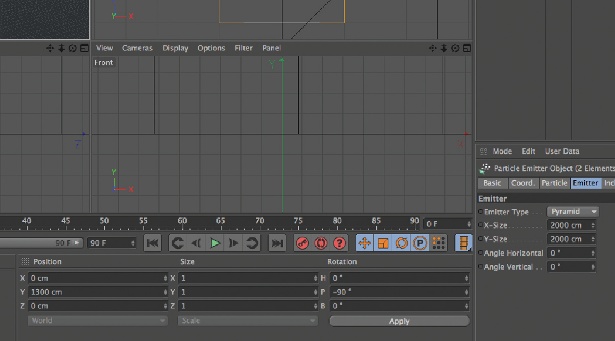
04 Let’s scale up the particle emitters. With both emitters selected, click the Emitter tab in the Properties panel and change the X-Size and Y-Size to 2000. Now set Y Position to 1300, and X and Z to 0. Set P Rotation to -90. We’ve now got the basic scene setup: it’s time to start adding some physics tags.
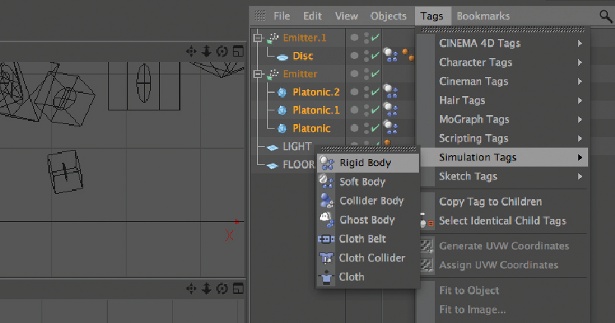
05 Unless we add physics tags, the objects will just come out of the emitter and go through the floor. So we need to tell C4D that the objects stop at the floor and then bounce around. Select all the platonic shapes and the disc. In the Objects pane go to Tags>Simulation Tags>Rigid Body. Repeat for the Floor plane, but add a collider body tag. You’ll see blue and white icons next to the shapes, and blue next to the floor.
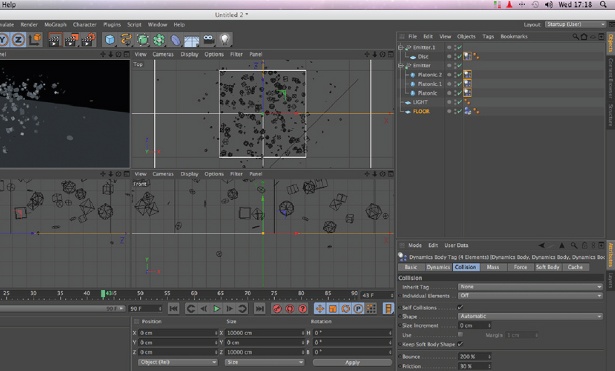
06 Select all the rigid body tags on the platonics and disc. Under the Collision tab in the Object Properties panel set Bounce to 200%. This will make the shapes bounce very hard off the floor and each other. We want them flying off in all directions for the depth of field. Select the rigid body tag for the disc and under the Mass tab change Rotational Mass to 300%. Select the Perspective Viewport and hit the play button (F8) to preview the simulation.
Get the Creative Bloq Newsletter
Daily design news, reviews, how-tos and more, as picked by the editors.
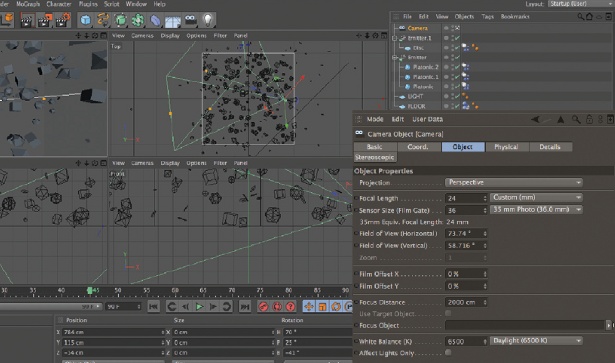
07 Now go to Create>Camera>Camera. In the Coordinates Manager set H Rotation to 70, P to 25 and B to -41. Set the X Position to 784, Y to 115 and Z to -14. Now in the Camera Attributes panel go into the Object tab. Set Projection to Perspective and the Focal Length to 24mm. In the Perspective Viewport go to Cameras>Use Camera>Camera.
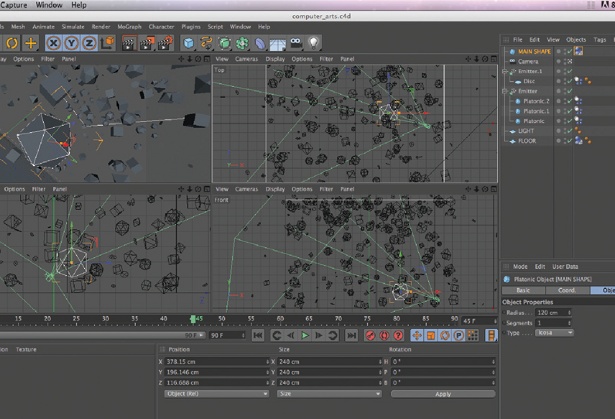
08 Let’s add another platonic to focus on. Set the Radius to 120cm and add another physics tag, this time make it another collider body. Move the shape about one third away from the front of both particle emitters. It should be fairly prominent in relation to the view of the camera. Name it ‘Main Shape’.
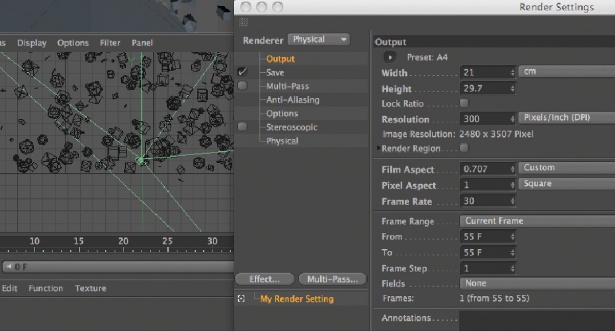
09 Keep hitting the Play button until you get a frame that works. We want some items in the foreground so that they’re blurry. Go into the Render Settings panel. Under the Anti-Aliasing tab set Anti-Aliasing to Best. Change Renderer to Physical. In the Physical tab turn Depth Of Field on, change the Renderer to Adaptive and Sampling Quality to Medium. Under the Output tab, set Output to Portrait A4.
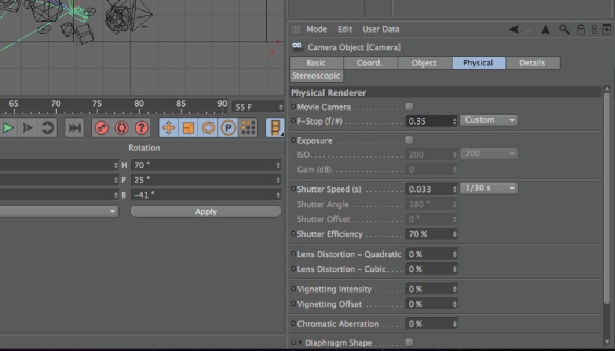
10 In the scene, select the camera and in the Camera Attributes click the Physical tab, and change the F-Stop to 0.35. Without going too deep into the physics of photography, the lower the f-stop figure, the shallower the DOF will be. High numbers mean more of the image will be in focus. In real life, lenses don’t go below f0.95, but in C4D there is no limit, so you can get some really beautiful selective focus effects.
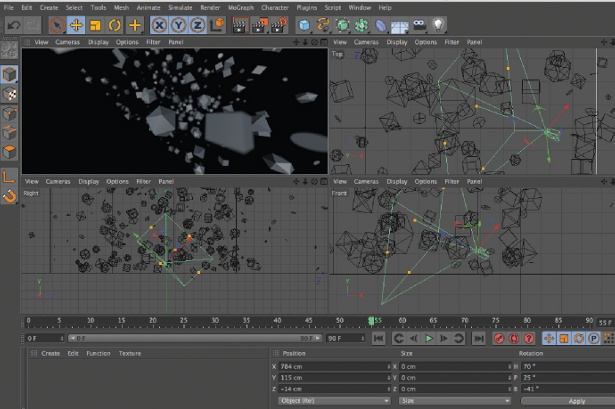
11 Let’s set the focus. With the camera selected, drag the middle yellow dot (target point) of the camera and move it to the front of the Main Shape object. Select the Camera Viewport and hit Ctrl/Cmd+R to render. Keep moving the target point and rendering a preview until you’re happy.
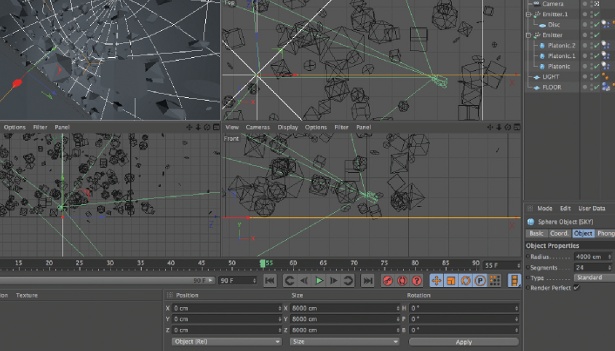
12 Create a sphere (Create>Object>Sphere), set the Radius to 4000 and rename it to ‘Sky’. On your disc you’ll find a selection of textures. In the Textures tab, click Create/Load textures and point to the library on your disc. Each texture is named appropriately, so drag them to the corresponding objects.
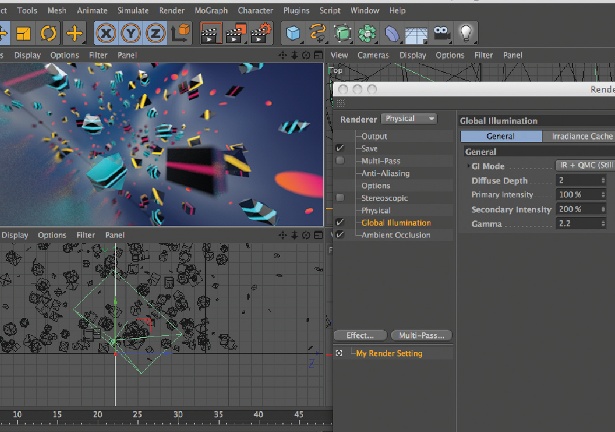
13 Now head back into the Render Settings panel. Under the Effect tab, add Global Illumination. Set GI mode to IR+QMC, Diffuse Depth to 2, Secondary Intensity to 200% and, depending on the gamma of your screen (Mac users are 2.2, most others are 1.8) set Gamma to 2.2. Now add Ambient Occlusion, leave the default settings and set Contrast to 40%. Go to Render>Render To Picture Viewer and save it as a TIFF.
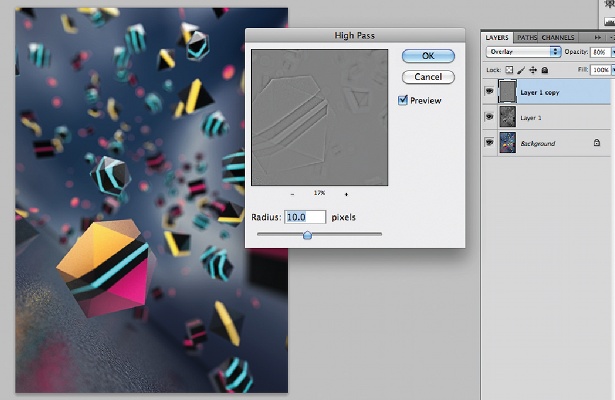
14 Open up the final render in Photoshop: we’re going to add some finishing touches. Duplicate the background layer and desaturate it (Ctrl/Cmd+Shift+U). Set the blending mode to Overlay and Opacity to 80%, duplicate the layer twice, go to Filters>Other>High Pass and apply a 10px radius to the top layer. Set up a layer mask on the High Pass layer and brush out the areas that are out of focus. We only want the texture to pop in the areas in focus.
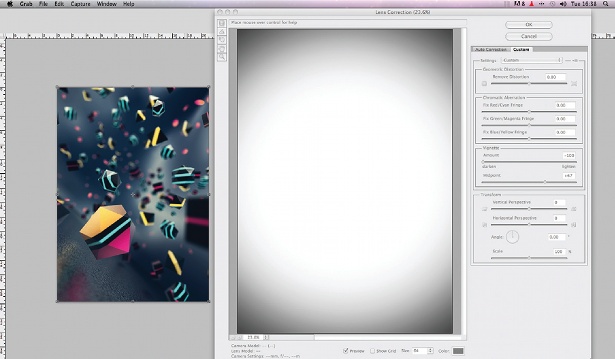
15 Let’s add a vignette to further pull focus on our main object. Create a new layer and fill the layer with white. Set the blending mode to Multiply and go to Filters>Lens Correction. In the Custom tab set the Vignette Amount to -100 and the Midpoint to +67. Lastly add a new Levels adjustment layer. In the blue channel set Output Levels to 15 and 230, and use 12, 1.00, 255 in the red channel.

Thank you for reading 5 articles this month* Join now for unlimited access
Enjoy your first month for just £1 / $1 / €1
*Read 5 free articles per month without a subscription

Join now for unlimited access
Try first month for just £1 / $1 / €1

The Creative Bloq team is made up of a group of art and design enthusiasts, and has changed and evolved since Creative Bloq began back in 2012. The current website team consists of eight full-time members of staff: Editor Georgia Coggan, Deputy Editor Rosie Hilder, Ecommerce Editor Beren Neale, Senior News Editor Daniel Piper, Editor, Digital Art and 3D Ian Dean, Tech Reviews Editor Erlingur Einarsson, Ecommerce Writer Beth Nicholls and Staff Writer Natalie Fear, as well as a roster of freelancers from around the world. The ImagineFX magazine team also pitch in, ensuring that content from leading digital art publication ImagineFX is represented on Creative Bloq.
