Become a sound mixing master: 5 pro tips
Guy Readman offers a rough guide to mixing on your digital audio workstation.
Whether you've used your digital audio workstation to record your band in your home studio, or create your own composition, your track will not be finished until you have mixed it. This doesn't just involve balancing the volumes; it involves manipulating every track so that it sits comfortably with the others. Sound daunting? Here are a few tips to help you along.
01. Capture it right
While this is not a mixing tip per se, it is worth a quick mention. Before you start to record your tracks, research recording techniques and microphone placement. A well captured instrument will save you a lot of time, energy and frustration. Pay heed to the old adage, 'you cannot polish a turd'! For a definitive guide to mic placement, look no further than 'The Recording Engineer's Handbook' by Bobby Owsinski.
02. Use EQ and panning right

With every sound source in your mix jostling for bandwidth and space, it is important to make effective use of EQ and panning. Decide where in the stereo field you want to place your sound source, ideally with the most important i.e. vocals at the centre, and pan accordingly. See this article for more detail.
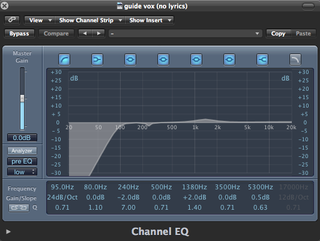
Modern DAWs come with a range of parametric EQ plug-ins allowing you to meticulously shape your sounds. Before you start applying EQ, however, it is important to consider what space you want to allocate to your instruments. For example, there is not much worth keeping in a vocal below 100hZ and you might want to consider applying a high pass filter, leaving this space clear for the bass, kick drum etc.
Problem frequencies
One of the many benefits of using parametric EQ in your mix is the ability home in on 'problem' frequencies. Use a high Q setting on one band, boost the signal and slowly 'sweep' up and down until you find the source of the problem, then, simply pull that frequency out. This can also be a useful way of training your ears.
There are a myriad of EQ plug-ins out there for you to experiment with. Each EQ will have its own unique characteristics that you may feel add something to your mix. Ultimately, it is down to you to decide what works for you.
03. Avoid acoustic overload
DAWs have a large range of built in reverb and delay plug-ins. Before you even start looking at third party plug-ins, you may be tempted to try a different reverb on every instrument. Imagine hearing ten musicians performing in ten different size halls, all at the same time. This is the kind of acoustic overload you are letting yourself in for. Your mix will lose all sense of space and clarity.
Get the Creative Bloq Newsletter
Daily design news, reviews, how-tos and more, as picked by the editors.
Instead, consider using a bus to send your signal to an auxiliary channel. You can then apply your desired effect to that auxiliary, achieving the same outcome as applying it to the individual instrument. The advantage of doing this is that now, instead of having a separate effect for each instrument, you can bus each channel to your effect. Not only does help maintain clarity and a sense of space in your mix, it also saves on processing power.
04. Harness the power of automation

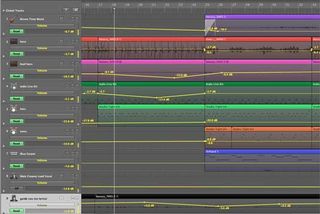
Creative use of automation can really enhance your mix. DAWs provide a massive scope for those wanting to use automation, with nearly every parameter in every plug-in available to automate. Let's keep it simple for now and talk about automating the volume of your instrument.
There are two ways of doing this: The first, is to do it in real time by setting your channel to 'write' and hitting 'play'. This enables your DAW to record real time fader movements, as if you were operating a real mixing desk.
Visual map
The second way is a lot more visual and allows you to accurately map changes over time using a series of 'nodes' to manipulate a linear path. Simply open up the automation window in your arrange page, make sure the volume parameter is selected in the automation lane on your selected track, create a node by clicking on the line and then drag to the desired level. A good tip for creating nodes when working this way is to create them in groups of three. This allows you to adjust parameters over an area without effecting the whole track.
As a final note on automation; remember to mix with your ears, not your eyes. It is tempting to get carried away when using automation lanes so make sure you have a clear idea of what you want to achieve before you set out. For more information on automating, see this article.
05. Use compression wisely

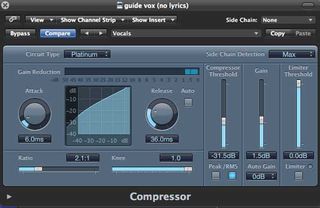
Here's the scenario. You've recorded your vocal and are in the process of mixing it but it just won't stay out of the red in those choruses. You could either automate it by painstakingly pulling down all of the peaks manually or, you could add a compressor. You will find compressors in the 'Dynamic Processors' section of your plug-ins.
A compressor reduces the dynamic range of a signal by bringing down the volume of the peaks. This in turn allows you to boost the overall volume without it peaking. The more compression you apply, the smaller the dynamic range.
Set your goal
Before you compress, think about the sound you want. A higher ratio will give your sound more of an impact and a lower ratio will sound warmer and more subtle. You can find a good guide to compression here http://productionadvice.co.uk/using-compression.
As a general rule of thumb, compression should be applied to a signal before you add any other processing, including EQ. This is because every time you make an adjustment such as a boost or cut in EQ, you are effecting the strength of the signal and consequently, you will have to reset your compressor.
Finally, try not to over compress your track. This can leave it sounding flat and lifeless. If you find this is the case, strip back your compressors and think to yourself, 'what instruments genuinely need to be compressed?'
You may wish to add to this list over time as it is by no means definitive. However, it should hopefully point you in the right direction to unlocking the potential of your digital audio workstation. Good luck!
Delivered in conjunction with ZED!
This content was produced in collaboration with HP & Intel as part of ZED - a Pop-Up Studio for the Creative Community held in Soho, London. For more information about ZED and any future events see here.

Thank you for reading 5 articles this month* Join now for unlimited access
Enjoy your first month for just £1 / $1 / €1
*Read 5 free articles per month without a subscription

Join now for unlimited access
Try first month for just £1 / $1 / €1
The Creative Bloq team is made up of a group of design fans, and has changed and evolved since Creative Bloq began back in 2012. The current website team consists of eight full-time members of staff: Editor Georgia Coggan, Deputy Editor Rosie Hilder, Ecommerce Editor Beren Neale, Senior News Editor Daniel Piper, Editor, Digital Art and 3D Ian Dean, Tech Reviews Editor Erlingur Einarsson, Ecommerce Writer Beth Nicholls and Staff Writer Natalie Fear, as well as a roster of freelancers from around the world. The ImagineFX magazine team also pitch in, ensuring that content from leading digital art publication ImagineFX is represented on Creative Bloq.
