Get started with multicam editing in Adobe Premiere Pro
There's no need to be intimidated by multi-camera tools. Jonathan Walton of My Little Eye TV explains how to use Adobe's software to edit multicam footage like a boss.
There still seems to be many video editors who are wary or reluctant to use multicam editing tools. The aim of this article is to show how quick and easy multicam editing can be in Premiere Pro, and how it should be an important tool in the arsenal of any editor.
At company, My Little Eye, we specialise in editing multi-camera music productions for our broadcast and record label clients. Adobe Premiere Pro's multi-camera editing mode has become an essential tool in our day-to-day workflow, saving us time and allowing us to edit more efficiently in the face of increasingly demanding client deadlines. So how do you go about it?
What is multicam editing?
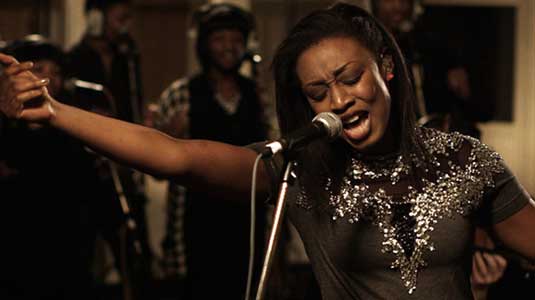
Any event, performance or scene you have filmed with two or more cameras is a potential multi-camera project. From a two-camera interview with Paul Weller to a five-camera performance by will.i.am (above), we use multi-camera editing to synchronise our individual cameras together in one clip.
Then, very much like a live gallery edit (without the nerves), you get to see all your footage simultaneously on screen and then select which shot you see in the final edit at any given time.
Why use Premiere Pro?
Before multi-camera modes existed in NLE softwares, the traditional way to cut a performance shot on multiple cameras would be to layer each camera up on a separate timeline track, watching each stream separately and choosing your favourite shots from each track.
However, because you were unable to see all the angles at the same time and compare shots, this was a very inefficient way of working and seldom guaranteed you were producing the best edit.
Next I'll take you through the basic process behind editing multicam footage in Premiere Pro, then follow that up by revealing some tips and tricks of the trade.
Get the Creative Bloq Newsletter
Daily design news, reviews, how-tos and more, as picked by the editors.
The editing process
01. Get started
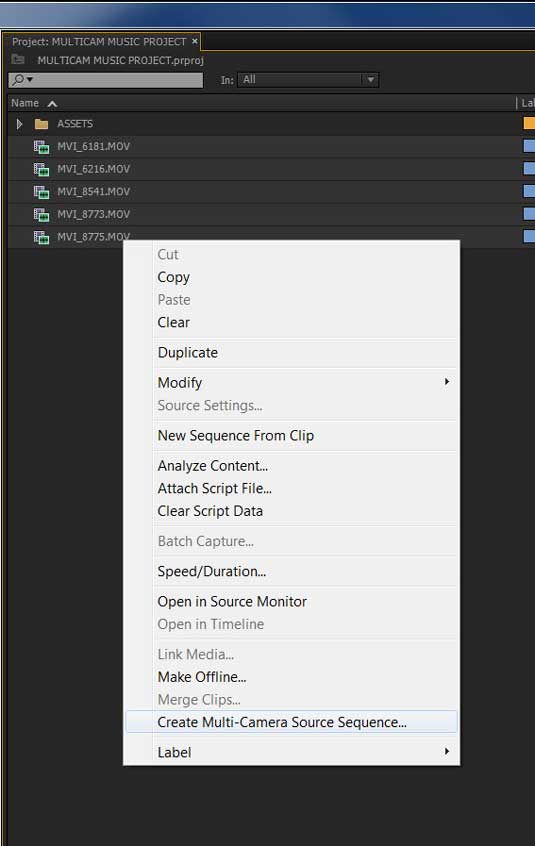
The process for creating a multi-camera clip in Adobe Premiere CC is fairly simple. You begin by selecting all the clips in your bin that you wish to combine. With the clips selected, you simply right click on one of the files and from the pop-up menu, choose Create Multi-Camera Source Sequence.

A pop-up window then appears, offering five methods of synchronisation: in points, out points, timecode, clip markers or audio.
02. Sync points
Syncing via in and out points is reliant on you selecting a matching in or out point on each clip. Syncing by timecode is normally only an option if you're working on a high-end production where all the cameras are locked to the same timecode - a multi-camera live concert, for example.
Something more common in my line of work is that we receive footage which shares no common timecode, meaning we have to find sync points manually. If you have any input in the pre-production stage, you can request that the camera crew employ a clapperboard system - either the old fashioned manual clapperboards or one of the various digital ipad apps on the market like MovieSlate.
Failing that, a simple onscreen hand clap works just as well. This visual synchronisation point can then be marked with a clip marker on each camera feed, to be used to sync your multi-camera clip.
With the release of Premiere Pro CC, Adobe also introduced the ability to sync clips by audio, in much the same way that previous third party apps such as PluralEyes function. This is obviously reliant upon all your individual cameras recording reference audio, again something which you need to request at the pre-production stage.
03. Create a new clip
Once you've chosen which sync option best suits your needs, simply click OK and Premiere Pro creates a new clip in your project window with the suffix 'multicam' after the file name. In essence this is a nested clip, containing all the camera angles you selected in one clip.
04. Start editing
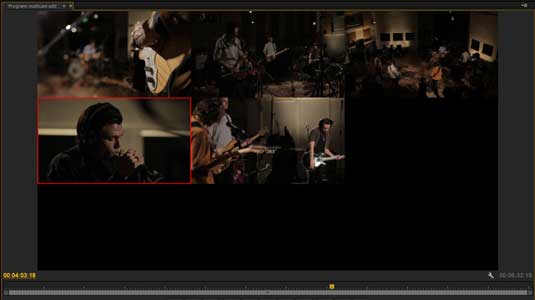
You can now drop this in to any sequence and begin editing in multi-camera mode, using either your mouse to click on which angle you want to select, or programming the number keys on your keyboard to select angles, for example number key 1 selects camera 1, key 2 selects camera 2 and so on.
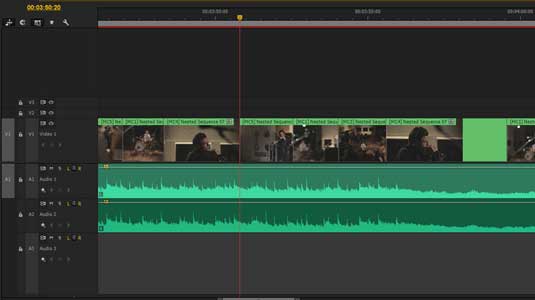
As you play the footage through, making your decisions of when and where to switch angles, you will notice the red outline box in the Program monitor switch from one angle to another, indicating your choices. Whichever angle is marked red, indicates the live angle in the edit. The next time you pause or stop playback, you will notice these selections have now been made into physical edits within the timeline.
Editing tips
With the basic techniques of multicam editing covered, it's now important to understand how an editor should be using this tool. Here are some tips based on the benefit of my experience.
01. Don't expect perfection
For me, multi-camera editing is not a fine tuning tool to produce polished edits with. Anyone who's ever used multicam mode will tell you that the moment you select the camera angle you want to see, sod's law dictates will be the moment the camera operator reframes or refocuses. It's almost impossible to do a run through with the multicam tool without making any mistakes, so you should regard it as a device to deliver your first rough cut.
02. Trust your instincts
When using multicam to edit music I always try to treat it like a live edit, never stopping or pausing playback even if I feel I’ve made a mistake – sometimes those mistakes can create happy accidents which work. That first run through is always a very rough edit, but by letting the track play I’ve gained a sense of the track as a whole.
I’ve allowed myself to react instinctively to the music – a first impression that will become more and more diluted the more you watch and polish your edit. It’s important to allow that initial reaction to shape your cut at this early stage, otherwise you risk losing the spontaneity and energy of the live performance.
03. Save time fine-tuning
Only after I’ve finished that first run through, do I then stop and go through fine tuning the edit with the roll tool. I may do this process as many as five or six times, until I feel like I have the best edit.
The multi-camera mode then comes into its own in the reviewing process. If there is a shot in the edit which the director or the client is not happy with, all the editor has to do is click on that clip in the timeline and we get access to all the other camera angles available at that time. By clicking on any of the other non selected angles, we have changed our shot choice and this amendment will update directly in the edited sequence.
This is a massive time saver for any editor who has client attended edits. It allows the editor to show the client all the choices immediately and decisions can be taken quickly without having to scour through the rushes to find a replacement.
04. How many angles?
In general, one tip I would give any newcomers to multi-camera editing, is never give yourself too much to do.
According to Adobe there is no limit to how many cameras you can group together, but the playback will depend on your system's capabilities. But as a personal preference I tend to never work with more than six angles in a multicam at any one time. I believe no matter how good the editor is, it's almost impossible for your eye and brain to take in all that information at the same time.
I know some editors who work with anywhere between seven and 20 angles at once, but I would question their ability to evaluate all the available options and produce the best edit with such a large amount of visual information to absorb. To get round this, if I'm cutting a seven- to 12-camera concert, I will create two multicams and edit each separately, combining them afterwards.
05. Keep an eye out for new updates

It's important to note that multicam is one of the essential features in Premiere Pro CC which Adobe is constantly evolving and improving. The changes between CS6 and CC have been dramatic, with the addition of syncing by audio, and the ability to flatten a multicam clip in your sequence in preparation for the online process.
With the release of the next update to CC in October 2013, Adobe is again adding new features, including the ability to turn on and off specific angles and rearrange the order of the clips.
This commitment to multi-camera editing was one of the main factors in my decision to move my business over from FCP7 to Premiere Pro back in October 2012, and I haven't looked back since. In that time we've cut several broadcast shows in Premiere and the experience has been amazing, saving us time on a daily basis and making the working environment more fun and less stressful.
Words: Jonathan Walton
Delivered in conjunction with ZED!
This content was produced in collaboration with HP & Intel as part of ZED - a Pop-Up Studio for the Creative Community held in Soho, London. For more information about ZED and any future events see here.

Thank you for reading 5 articles this month* Join now for unlimited access
Enjoy your first month for just £1 / $1 / €1
*Read 5 free articles per month without a subscription

Join now for unlimited access
Try first month for just £1 / $1 / €1

The Creative Bloq team is made up of a group of art and design enthusiasts, and has changed and evolved since Creative Bloq began back in 2012. The current website team consists of eight full-time members of staff: Editor Georgia Coggan, Deputy Editor Rosie Hilder, Ecommerce Editor Beren Neale, Senior News Editor Daniel Piper, Editor, Digital Art and 3D Ian Dean, Tech Reviews Editor Erlingur Einarsson, Ecommerce Writer Beth Nicholls and Staff Writer Natalie Fear, as well as a roster of freelancers from around the world. The ImagineFX magazine team also pitch in, ensuring that content from leading digital art publication ImagineFX is represented on Creative Bloq.
