How to convert a scene to stereo 3D
3D is taking over the industry. Here's how to create your own.
Win a trip to Los Angeles!
This feature is brought to you in association with Masters of CG, a new competition that offers the chance to work with one of 2000AD's most iconic characters and win £4000 plus a trip to the SIGGRAPH conference. Find out more at the end of this article...
Love it or hate it, stereoscopic 3D is everywhere and it’s only a matter of time until every TV, monitor and mobile device is able to support 3D content.
If you don’t have a 3D display to work with, you can use an age-old method called anaglyph to achieve the same results used in today's high end stereo 3D production for a fraction of the price.
This achieves the illusion of 3D by wearing glasses that apply a red and blue filter to each eye, tricking each eye in to seeing a different image. There’s never been a better time to learn all about stereoscopic 3D and futureproof your skillset!
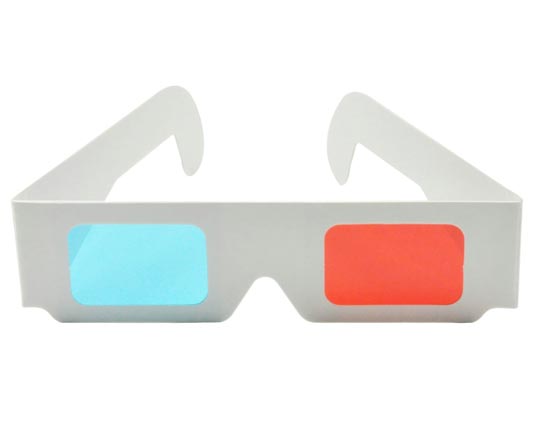
When we view stereo 3D content our eyes individually see 2 slightly different images, hence the name stereo, meaning two.
Each of our eyes is seeing a subtly different view of the same image, similar to how our eyes view the world in real life.
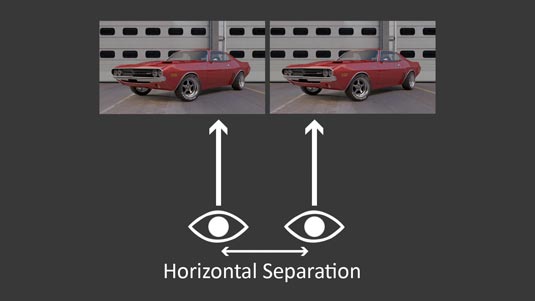
Because each eye is seeing the content from a slightly different perspective the illusion of 3D is achieved, which is a result of the eyes horizontal separation or 'parallax'.
Get the Creative Bloq Newsletter
Daily design news, reviews, how-tos and more, as picked by the editors.
Positive and negative parallax
Positive and negative parallax is key to generating content within a 3D space. It is basically the area in front of or behind where our viewport planes meet and converge.
This positive and negative separation is what tricks our brain in to thinking an image is 3D.
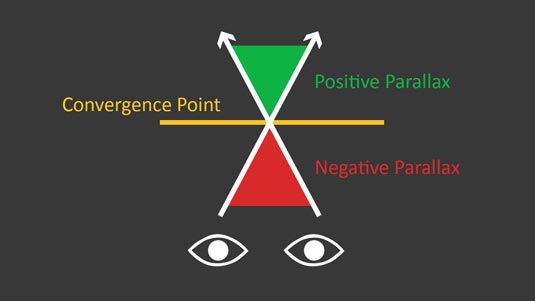
If we place our object in the green space it is known as positive parallax. Objects here will appear to be pushed back in to the screen, away from the viewer.
Negative parallax is the opposite of this, so anything in a negative parallax space jumps out of the screen, closer towards us.
An object that is neither in a negative or positive parallax would be at the convergence point and would sit at screen level with no depth at all.
Comfort zones
It is important to keep our objects within the comfort zones, which are the areas where the 3D image does not break apart and cause ghosting.
If we measure the distance between our convergence point and the camera and halve this amount, this is will give us the safe area for our negative parallax to take place in.
Any objects that are up to the maximum limit of this area will be as far out of the screen as is possible without the image breaking apart and causing a ghosting effect.
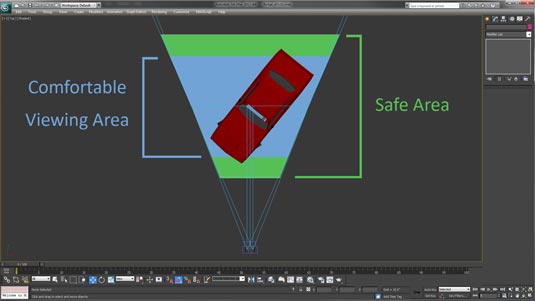
The same rules apply to positive parallax, which is the depth going in to the screen. Although we can sometimes push our positive parallax slightly further I recommend keeping within 70% of this space and only going to 100% when absolutely necessary and not for long periods of time.
It’s also best not to cut objects off of the side of our shot when in negative parallax as cropping breaks the 3D effect, causing discomfort when viewing.
At screen level it’s not a problem but at the extreme of negative parallax you should try to avoid cropping anything if possible.
Camera setup
There are two ways you can set up cameras to generate a stereo image, 'toed in' and 'parallel'.
I prefer to use the parallel setup whereby the cameras sit side by side and both point straight, not pointing inwards at all. As the cameras don't point inwards there is no convergence point, and therefore no 3D. To solve this we need to adjust the camera's horizontal offset so both our left and right camera converge at the same point.
With a V-ray camera you have a horizontal offset setting, whereas to achieve the same effect with a standard camera you need to apply a skew modifier on top of the camera in the modify panel.
Create an anaglyph image
To create an anaglyph image from your renders in After Effects and test your stereo scene, add your two images to a new composition with the left image at the top and apply a Hue/Saturation effect and desaturate the images so they are black and white.
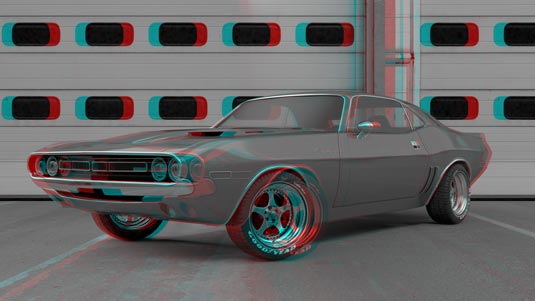
Then apply a Channel Mixer to the left layer, which is under Colour Correction, and make sure the green and blue values are set to 0, with the red value remaining at 100.
Apply the same effect to the right layer but this time set the red channel to 0 and the green and blue values to 100.
Next just add a Difference mode to the left image and your anaglyph is ready to view. You can test your anaglyph directly in After Effects or render out your images.
Words: Jason Harding
Win £4,000 and a trip to Los Angeles!
Masters of CG is a competition for EU residents that offers the one-in-a-lifetime chance to work with one of 2000AD's most iconic characters: Rogue Trooper.
We invite you to form a team (of up to four participants) and tackle as many of our four categories as you wish – Title Sequence, Main Shots, Film Poster or Idents. For full details of how to enter and to get your Competition Information Pack, head to the Masters of CG website now.
Enter the competition today!

Thank you for reading 5 articles this month* Join now for unlimited access
Enjoy your first month for just £1 / $1 / €1
*Read 5 free articles per month without a subscription

Join now for unlimited access
Try first month for just £1 / $1 / €1

The Creative Bloq team is made up of a group of art and design enthusiasts, and has changed and evolved since Creative Bloq began back in 2012. The current website team consists of eight full-time members of staff: Editor Georgia Coggan, Deputy Editor Rosie Hilder, Ecommerce Editor Beren Neale, Senior News Editor Daniel Piper, Editor, Digital Art and 3D Ian Dean, Tech Reviews Editor Erlingur Einarsson, Ecommerce Writer Beth Nicholls and Staff Writer Natalie Fear, as well as a roster of freelancers from around the world. The ImagineFX magazine team also pitch in, ensuring that content from leading digital art publication ImagineFX is represented on Creative Bloq.
