How to composite a CG character into video footage
Lance Evans explains the basics of bringing your pixellated creations into the video world, in the latest of a series of articles sponsored by HP ZED.
Compositing of any sort is both a challenge, and also a lot of fun (okay, not so much fun when it's being a challenge/PITA, and you're also on a deadline). There are a few key points to keep in mind as you move along the production pipeline from the beginning, to the end where you're thanking the Academy. Let's see if we can cover this in, oh, say four steps?
01. Set up your model

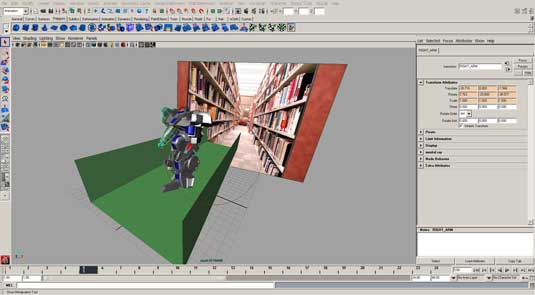
Obviously you will need to have your CG character all modeled, textured and raring to go. Most mid-range and higher end 3D applications allow you to bring in either a still image or an animation, and load it up as a background layer in some way.
Often this is loaded as some type of backplate into the recording camera. Since you are going to be animating to fit your CG character into the video, there will be a fair amount of back-and-forth tweaking to get it right - have fun!
In our example, we are just working with a still image for expedience. But we will still need a bit of animation, as you will see.
02. Add some shadows

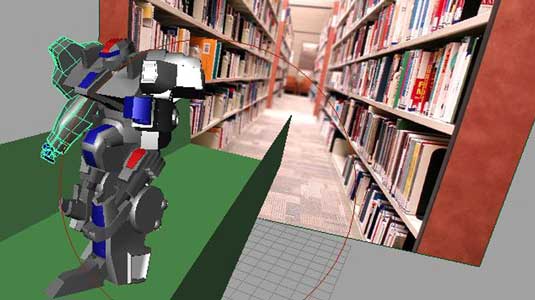
If your program of choice has the built in ability to 'catch' shadows then you are good to go. If not, it's still easy enough to do, but will require an extra step of compositing in post. Either way, the first step is to create shadow catching geometry. This generally needs to mimic the environment in the video image. This can get a bit hairy if the video has a lot of movement across varied terrain. Planning your project well will help minimize some of this.
In our example, the robot is in hot pursuit down the isle of a library. A library generally has a lot of overhead lighting, so I created that with a spot light. But didn't like the spreading angle of the shadows, so I changed it to a directional light which tightened the shadow a bit. In this case a raytraced shadow looked much better than the depth map option. But in a fast moving video/animation, nobody will notice much difference.
I created a simple plane to catch the shadow on the floor. But there was additional shadow spilling over onto both book cases, left and right. So I modified the plane to come up on each side so the shadows falling on it would be hitting upright objects, like the bookcases.
Get the Creative Bloq Newsletter
Daily design news, reviews, how-tos and more, as picked by the editors.
Doing it manually
If your program doesn't have built in shadow catching, do this. Set up the scene the same way, and find some way to turn off the model's visibility while still allowing it to cast a shadow, most apps have this ability. Adjust the lighting to make sure the catching geometry renders very white, except where the shadow is cast, which should render very dark. Use this render to composite the shadow onto the back plate, but below the CG layer.
03. Add some motion blur

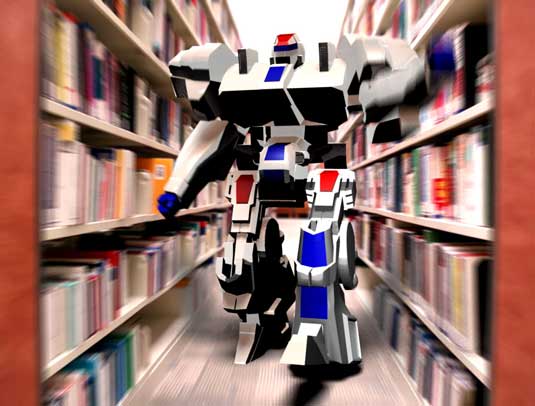
Not always, but frequently when adding CG characters to a video, the content is fast moving and high energy. If that is the case, consider adding motion blurs all around. In our example you see the background image had a bit of zoom blur added in Photoshop. And even for a still image, I animated the robot's arms a bit to be able to get the motion blur you see a bit in the right, and heavy blur in the left arm.
Blurs can also be added to your video footage as well. There's no reason to stand on ceremony just because your footage didn't come with any. Often, background footage is shot carefully, which sometimes translates to mean the camera is moving slowly and not creating blur. So feel free to change the speed of the clip in post, and add motion blur.
Here's another important item to keep in mind. You are shooting the background footage and naturally want it in good focus. But when composited with the 3D, your CG characters will be the focus of the shot. And I mean that both subject-wise as well as photographically. So you may want to add Gaussian or a similar blur to the video footage.
04. Composite everything together

I put this together in Maya, which allowed just about all my work to be done in that one program. So no need to composite anything in post. This is a nice advantage and time saver, at least in theory.
Compositing in post, say in Adobe After Effects, enables me to address many mistakes and saves me having to re-render 3D. If I composite in Maya, I'm going to have less fixing and tweaking wiggle room later on. Your call!
Words: Lance Evans
Lance Evans is creative director of Graphlink Media. He has written books on 3D, and produced the 3DNY Seminars for Apple and Alias.
Win a trip to Los Angeles!

Masters of CG is a competition for EU residents that offers the one-in-a-lifetime chance to work with one of 2000AD's most iconic characters: Rogue Trooper.
We invite you to form a team (of up to four participants) and tackle as many of our four categories as you wish - Title Sequence, Main Shots, Film Poster or Idents. For full details of how to enter and to get your Competition Information Pack, head to the Masters of CG website now.
Enter the competition today!

Thank you for reading 5 articles this month* Join now for unlimited access
Enjoy your first month for just £1 / $1 / €1
*Read 5 free articles per month without a subscription

Join now for unlimited access
Try first month for just £1 / $1 / €1

The Creative Bloq team is made up of a group of art and design enthusiasts, and has changed and evolved since Creative Bloq began back in 2012. The current website team consists of eight full-time members of staff: Editor Georgia Coggan, Deputy Editor Rosie Hilder, Ecommerce Editor Beren Neale, Senior News Editor Daniel Piper, Editor, Digital Art and 3D Ian Dean, Tech Reviews Editor Erlingur Einarsson, Ecommerce Writer Beth Nicholls and Staff Writer Natalie Fear, as well as a roster of freelancers from around the world. The ImagineFX magazine team also pitch in, ensuring that content from leading digital art publication ImagineFX is represented on Creative Bloq.
