Animate a logo reveal in Cinema 4D
3D animation meets graphic design as Tim Clapham shows you how to animate and composite a pro-quality logo sequence.
- Download the support files and over 90 minutes of video training.
The world of motion graphics is continually evolving, with techniques constantly progressing as work becomes more advanced and complex. 3D animation is an essential part of the motion designer’s arsenal if you hope to pioneer new techniques and stay ahead of the times. With the release of the MoGraph module for Cinema4D, Maxon unleashed a powerful toolkit to assist in the creation of elaborate design-based animation. MoGraph 2 adds the power of a rigid body dynamics simulation system to the mix.
In this tutorial, I’ll take you through the process of creating a dynamic motion graphics animation using Cinema 4D and After Effects. By taking elements that an everyday designer might use and adding a combination of graphic shapes to this, you’ll use the Cinema4D MoGraph module to create a logo made from thousands of objects.
Once the model is created, you’ll add custom colours and shaders to each of the individual models. This will be achieved by using the MoGraph Shader Effector to enable simple and painless adjustments to shaders over vast numbers of objects.
Adding functionality from the MoGraph 2 module, you’ll transform the logo into a dynamic formation. Hidden collision objects will crash through the construction as you attempt to force the objects to stay coherent. During the animation, the dynamics forces will eventually cause the logo to collapse into a chaos of colourful motion.
I’ll then show you how to take this project further by importing multiple render passes into After Effects. Here, the renders will be reversed so you can see the structure forming instead of collapsing. The different passes will be enhanced using various methods of colour correction and graded with exposure adjustments and lens blur.
This tutorial will offer you a solid understanding of motion graphics techniques to enhance your workflow and increase your skill set. This tutorial uses an HDR image from HDRIMaps.com, courtesy of Mark Wisniowski. Thanks to Mark Allin for his help with concept design and creating the audio on the final animation.
Stage 1: assembling the logo
To begin, you’ll take a simple spline of a logo and use this to generate geometry via an Extrude NURBS object. The MoGraph Cloner Object is then used to clone multiple copies of a selection of various objects over the surface of this geometry. Make sure to tick the Render Instances checkbox on the cloner: this makes the Cinema 4D preparation much shorter and more memory-efficient. You’ll then create a simple gradient material, which is used in combination with a Shader Effector to colour each object individually. First, you’ll need to download the support files.
Get the Creative Bloq Newsletter
Daily design news, reviews, how-tos and more, as picked by the editors.
01. Create a 3D object
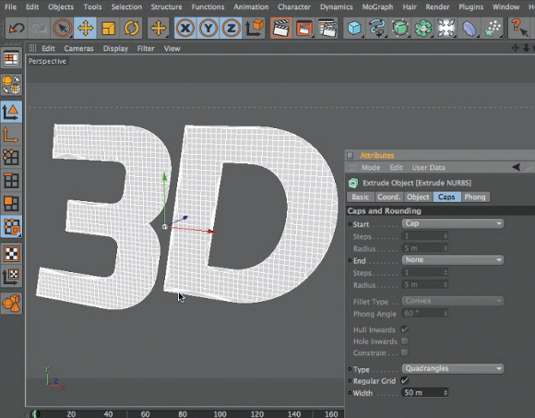
Open Start.c4d. Select the spline in the Object Manager. [Alt]-click NURBS in the toolbar and add Extrude NURBS: it should appear as a parent to the spline. In Attributes, set Movement Z to 0. In the Caps tab, set End to None and Type to Quadrangles. Enable Regular Grid and set Width to 50. Select the spline. Change Intermediate Points to Subdivided and Maximum Length to 50.
02. Create geometry to clone onto
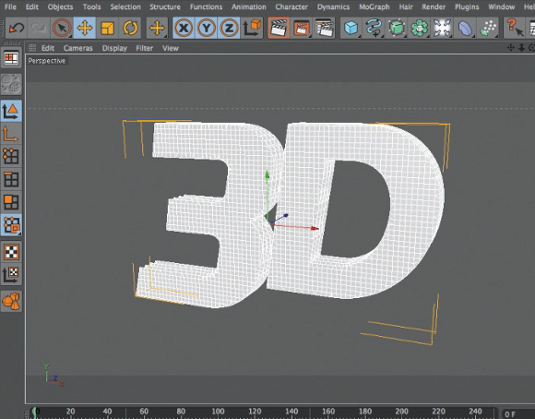
Select Extrude NURBS. Press [C] to convert it to a polygon object. [Ctrl]-drag Extrude NURBS in the Object Manager to duplicate it. In Attributes’ Coord. tab, set Position Z to 100. Create two further duplicates, setting Position Z to 200 and 300 respectively. Select all four objects. Right-click and choose Connect + Delete. Rename the remaining object 3D Polygons. Select MoGraph > Cloner Object.
03. Clone onto the 3D object
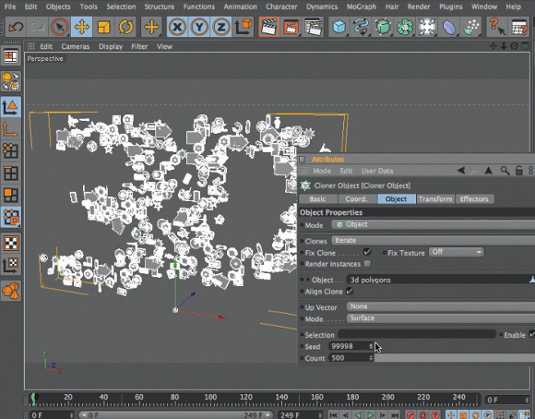
Open ObjectsMaster.c4d from the project files. Copy and paste all the objects into the main scene. Drag the objects to become children of the Cloner Object. Select Cloner Object; in Attributes’ Object Tab, set Mode to Object. Drag the 3D Polygons object into the Object field, then set Mode to Surface and Count to 500. Enable Render Instances. Double-click 3D Polygon’s visibility dots to hide it.
04. Create a gradient material
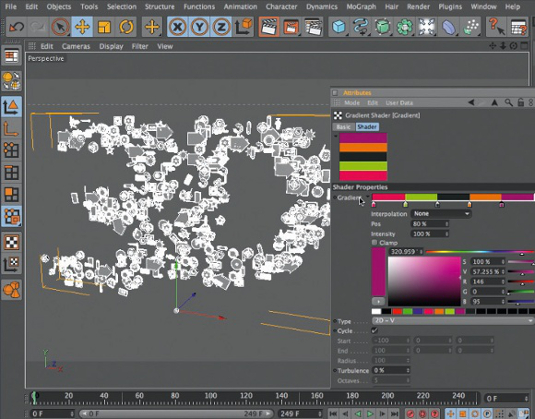
Create a material. In its Color tab, add a Gradient via the Textures pop-up. Click Gradient to edit it. Set Type to 2D-V. Select the first gradient knot. Set the colour to R 240, G 0, B 83. Add three knots with the settings: Pos 20%, R 150, G 240, B 35; Pos 40%, R 34, G 38, B 37; and Pos 60%, R 227, G 108, B 0. On the final knot, set Pos to 80%, R to 146, G to 0 and B to 95. Set Interpolation to None.
05. Map the gradient to 3D Polygons
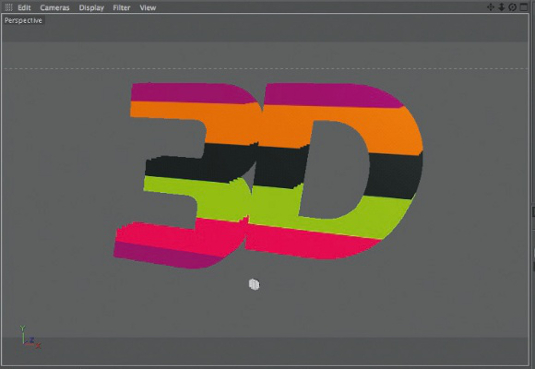
Disable Cloner Object and unhide 3D Polygons. Drag the gradient material onto 3D Polygons. In Attributes, set Projection to Flat. With 3D Polygons and its Texture Tag selected, select Tags > Fit to Object from the Object Manager menu. The Gradient should now be mapped over the 3D letters. Hide 3D Polygons and enable Cloner Object.
06. Add a Shader Effector
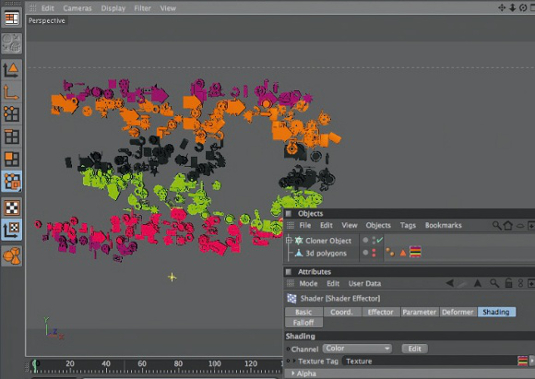
Select Cloner Object, then choose MoGraph > Shader Effector. In Attributes’ Parameters tab, disable Scale and Use Alpha/ Strength. In the Shading tab, set Channel to Color. Drag the Gradient Texture Tag from the 3D Polygons object to the Texture Tag field.
07. Enhance the colour
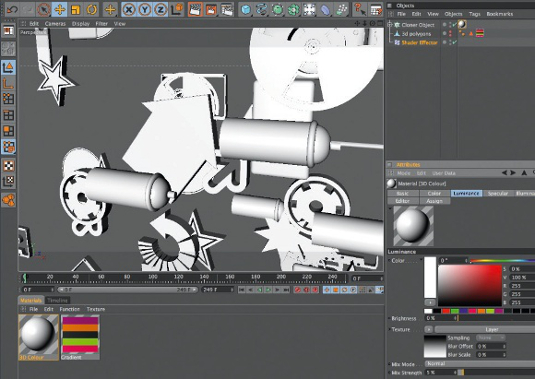
Create a material named 3D Colour. Via the Color tab’s Texture pop-up, choose Mograph > Color Shader. Under Basic, enable Luminance, Reflection and Specular Color. Via Luminance’s Texture pop-up, first add Mograph > Color Shader then Layer. Click Layer to edit it. Click Shade and select Fresnel. Set its mode to Multiply. Return to the Luminance channel. Set Brightness to 0 and Mix Strength to 5%.
08. Reflection and specular
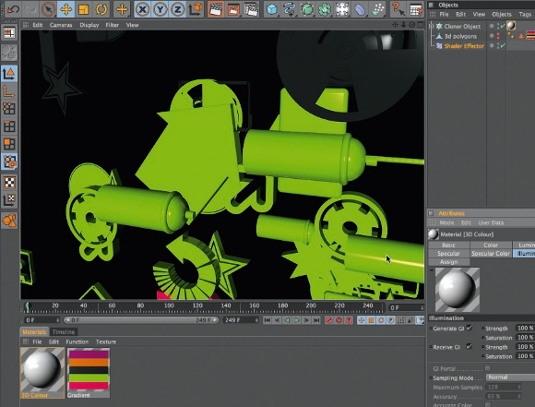
In the Reflection tab, add a Fresnel shader via Texture. Set Brightness to 5% and Mix Strength to 15%. In the Specular tab, set Width to 15% and Height to 110%. In the Specular Color tab, add Mograph > Color Shader. Set Mix Strength to 50%. Under Illumination, set Model to Oren-Nayar, Diffuse Falloff to -10% and Roughness to 25%. Drag the material onto Cloner Object in the Object Manager.
09. Create a sky for the reflection
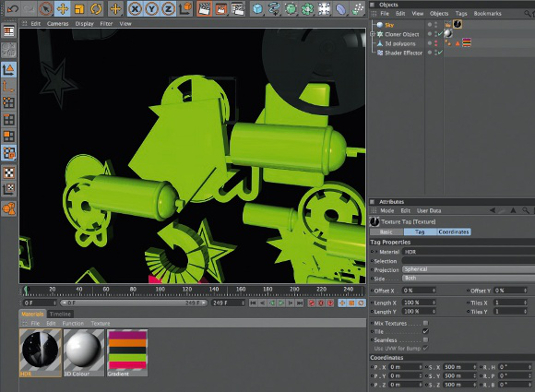
Click Add Light Object in the toolbar and select Sky. In Objects, select Tags > Cinema4D Tags > Compositing. In Attributes, disable Seen by Camera. Create a material named HDR. Under Color, click the blank Texture button; select BuildingMarble-Sphere- FREE_con.hdr from the files on the web. Add a Filter shader. Inside the shader, set Saturation to -100% and Contrast to 20%. Drag the material onto Sky.
Stage 2: adding dynamics to the setup
Next, you’ll add dynamics to the setup using the MoGraph Dynamics Rigid Body Tag. You’ll create static objects that use this tag to become collision objects: these are hidden and placed around the logo. The 3D logo will use the Rigid Body Tag to become fully dynamic. By keyframing the Follow Animation parameter, you can control when the Dynamics simulation takes over. The addition of the collision objects will add further visuals as the logo is crashed into by invisible objects while trying to stay coherent. Eventually the Follow Animation parameter will be keyed down to zero, and the dynamics will cause the objects to drop down to the floor.
10. Create a dynamic collider object
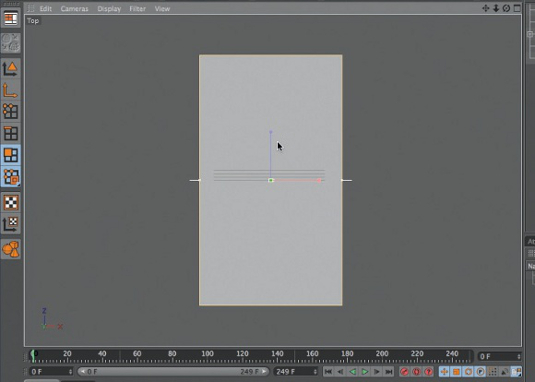
Disable Cloner Object and unhide 3D Polygons. Add a Cube. In Front view, resize the cube so it’s larger than 3D Polygons. Press [C] to make the cube editable. In Perspective view, use the Polygon Tool to delete the cube’s front and back polygons. Switch to Top view. With the mouse over the viewport, press [Ctrl]+[A] to select the polygons. Scale the cube to about 40 times deeper in Z.
11. Alter the cube shape
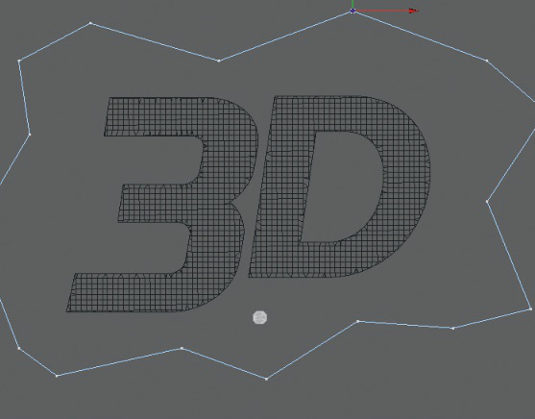
Switch to Front view and choose the Point Tool. Select Structure > Knife. Drag across the cube, creating cuts through all the edges at random places. (Refer to the video at 35:40.) Activate Live Selection and untick Only Select Visible Elements in Attributes. Using the Move Tool, select points from the cuts you just made and pull the shape of the cube so it’s a more irregular shape.
12. Add cylinders for extra collisions
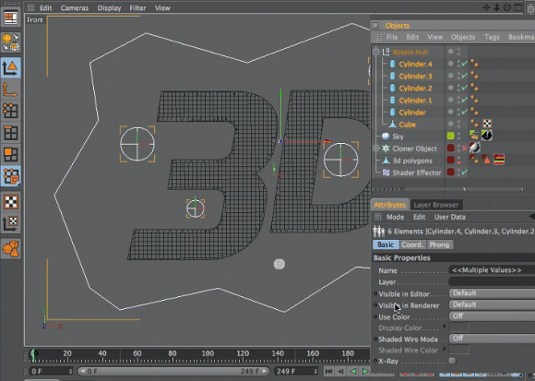
Add a Cylinder from the Primitives menu. Set Radius to 100, Height to 3500 and Orientation to +Z. Position the cylinder inside the cube area, but not intersecting with 3D Polygons. Make four duplicates of the cylinder. Position them all around 3D Polygons but within the cube area. Select Objects > Null Object. Rename it Rotate Null. Drag the cube and the five cylinders to be children of Rotate Null.
13. Create the dynamic objects
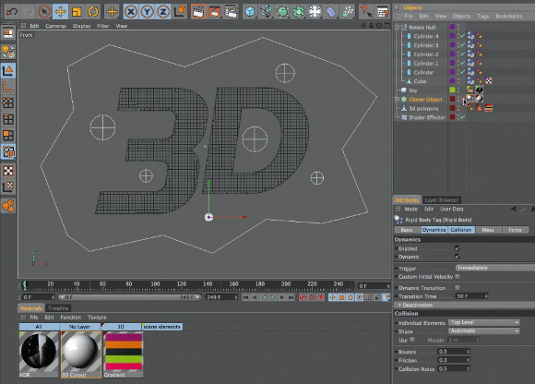
With the cylinders and cube still selected, select Tags > MoGraph Tags > Rigid Body: they automatically become dynamic collision objects. Select Cloner Object and choose Tags > MoGraph Tags > Rigid Body: this becomes a Dynamic Generator. The Rigid Body Tag shows a white object to indicate this. Leave Cloner Object disabled for now.
14. Rotate the collider group
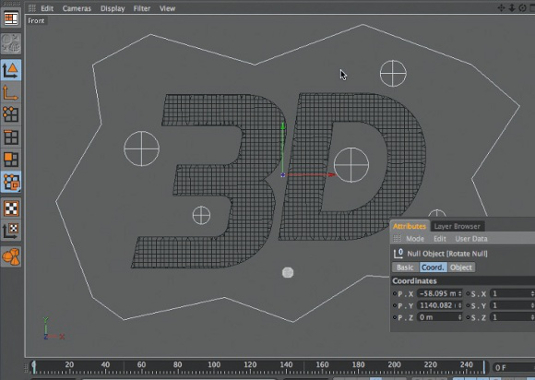
Select Rotate Null. In Attributes’ Coord. tab, [Ctrl]-click the small circle next to R.B to add a keyframe. (The circle turns red to show that the keyframe is added.) Move the time marker to the final frame of the scene (249). Set R.B to 360° and [Ctrl]-click its circle to add another keyframe. Next, select the Cloner Rigid Body Tag...
15. Animate Follow Animation
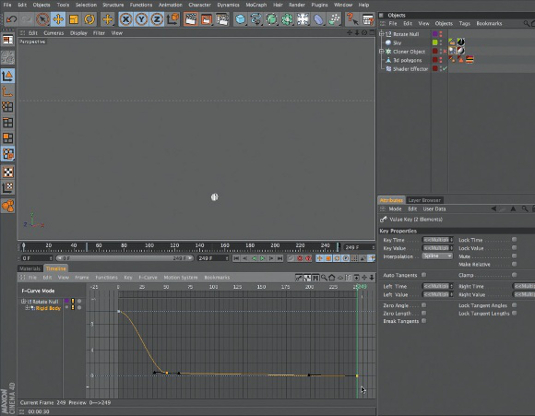
In Attributes’ Force tab, set Follow Animation to Position And Rotation. At frame 0, set Strength to 10 and add a keyframe. At frame 50, set Strength to 0.5 and keyframe. At frame 249, set Strength to 0 and keyframe. In the Timeline, select Rigid Body, hold [Ctrl] and switch to F-Curve Mode. Adjust tangents to straighten the line between the middle and final keys. (Refer to the video at 46:44.)

Thank you for reading 5 articles this month* Join now for unlimited access
Enjoy your first month for just £1 / $1 / €1
*Read 5 free articles per month without a subscription

Join now for unlimited access
Try first month for just £1 / $1 / €1

The Creative Bloq team is made up of a group of art and design enthusiasts, and has changed and evolved since Creative Bloq began back in 2012. The current website team consists of eight full-time members of staff: Editor Georgia Coggan, Deputy Editor Rosie Hilder, Ecommerce Editor Beren Neale, Senior News Editor Daniel Piper, Editor, Digital Art and 3D Ian Dean, Tech Reviews Editor Erlingur Einarsson, Ecommerce Writer Beth Nicholls and Staff Writer Natalie Fear, as well as a roster of freelancers from around the world. The ImagineFX magazine team also pitch in, ensuring that content from leading digital art publication ImagineFX is represented on Creative Bloq.
