Create a stylish animated GIF in Photoshop
Get to grips with how to create an animated GIF for uploading to the web. Arthur Carey explains the fastest methods using a few simple steps.
GIFs are back, and many designers – as well as the Tumblr generation – are using them in highly original and creative ways to produce conceptual animated content at very low file sizes. By the end of this tutorial you will be equipped with the know-how to quickly combine images into a single animated GIF file.
The order, pace and rhythm will be set by you, as well as the file size, allowing for ultra-fast loading time when hosted on a blog or your website. Ultimately, the content is up to you; this is more of a primer on how to quickly produce a GIF using common tools – Bridge and Photoshop.
Step 01
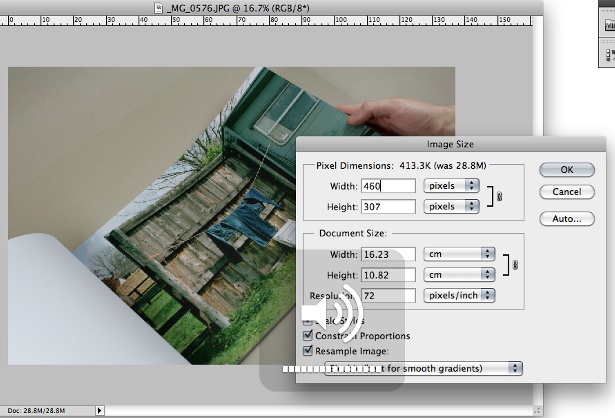
To begin, you need to locate all the images you wish to combine into your animated GIF and resize them in Photoshop, making them 72dpi, and all the same width and height. For my file, the images are 460 x 307 pixels.
Step 02
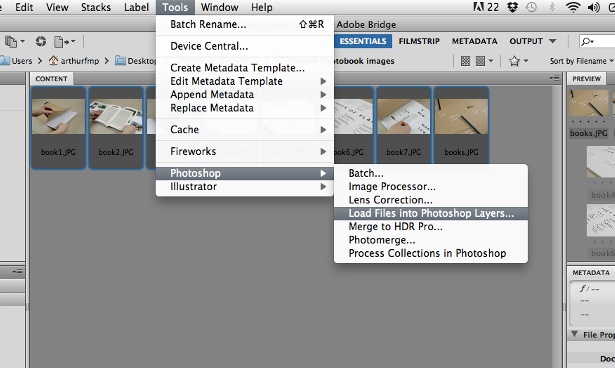
Ensure all your resized images are closed and saved in the same location. Next, click File>Browse in Bridge. Locate your folder and select all the images you want, then click Tool>Photoshop>Load Files into Photoshop Layers.
Step 03
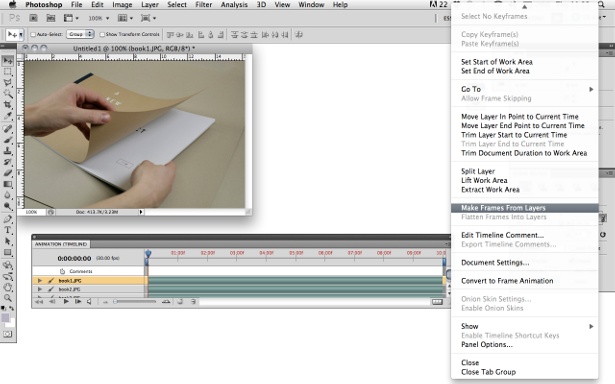
The images will open as one file with layers. Change the Photoshop workspace to Motion from whatever yours is usually set to. The Animation panel will appear. Click the flyout menu in the top-right of the panel and select ‘Make Frames From Layers’.
Step 04
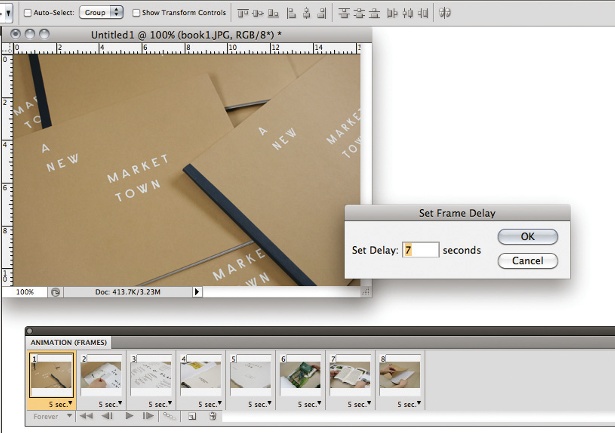
In the Animation panel’s flyout menu choose ‘Make Frames from Layers’. Now, you can specify the number of seconds that each image will appear for in the animation (below each frame), giving you complete control over the sequence. Similarly, you can reorder the sequence by dragging the thumbnails around. Select the Forever option in the Looping drop-down at the bottom-left of the Animation panel.
Step 05
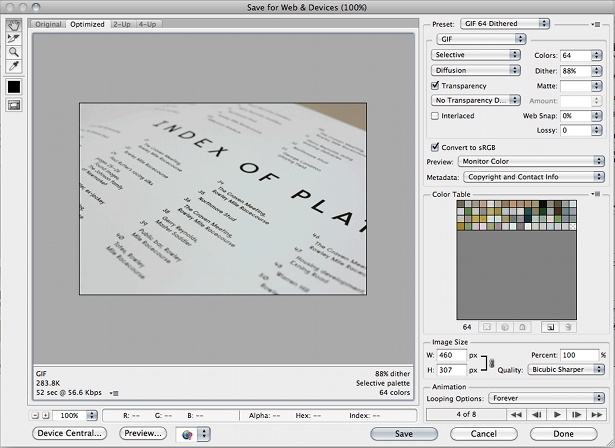
When you’re happy, click File>Save for Web & Devices. A dialog box appears – you might wish to lower the number of colours from 256 down to 64, as I have. If this is not detrimental to your images, doing so will hugely decrease loading time for online delivery. If you find that at this stage Photoshop is taking a long time to load, check you have resized all your images to the exact pixel size you require (as in step one). Chose a file location and click Save.
Find more Photoshop tips and Photoshop CS6 info over at Creative Bloq.
Get the Creative Bloq Newsletter
Daily design news, reviews, how-tos and more, as picked by the editors.

Thank you for reading 5 articles this month* Join now for unlimited access
Enjoy your first month for just £1 / $1 / €1
*Read 5 free articles per month without a subscription

Join now for unlimited access
Try first month for just £1 / $1 / €1

The Creative Bloq team is made up of a group of art and design enthusiasts, and has changed and evolved since Creative Bloq began back in 2012. The current website team consists of eight full-time members of staff: Editor Georgia Coggan, Deputy Editor Rosie Hilder, Ecommerce Editor Beren Neale, Senior News Editor Daniel Piper, Editor, Digital Art and 3D Ian Dean, Tech Reviews Editor Erlingur Einarsson, Ecommerce Writer Beth Nicholls and Staff Writer Natalie Fear, as well as a roster of freelancers from around the world. The ImagineFX magazine team also pitch in, ensuring that content from leading digital art publication ImagineFX is represented on Creative Bloq.
