Create animated layouts
InDesign expert David Cooke shows you how to get your layouts moving with CS5's new interactive tools
Ever since the launch of InDesign, Adobe has worked hard to make it the first choice when designing for print. However, the creative world has evolved at an unprecedented rate since then and, as many of us have found, clients are frequently commissioning work for screen rather than print.
Adobe hasn't been napping though, and with CS5 it has introduced a wealth of tools for adding rich media to your layouts, which can be exported to both Flash and PDF. The real bonus is that the workflow will be intuitive to any InDesign veteran, and even newcomers can get to grips with the tools quickly.
In this tutorial, we'll go through the basics of animating objects, creating buttons and making them trigger an action. We'll only be scratching the surface of what these new tools can do, but once you've got the basics you'll be free to explore all the options.
Click here to download the support files (3.85MB)
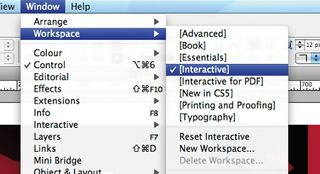
01 One of InDesign CS5's handiest features is the ability to quickly change your workspace. We're going to be mainly using the suite of interactive tools, so go to Window>Workspace>[Interactive], then go back to the same menu and click on Reset Interactive. This resets the workspace to its original defaults so that there are no extra menus open to distract you.
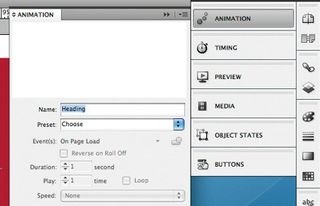
02 Open up shakespeare.indd in the Shakespeare_Folder in the support files. Let's kick off by first adding some movement to the headline text. Select the grouped text 'Shakespeare's sonnets' and open up the Animation panel. If you look at the Name field, you'll see that InDesign has automatically called it 'Group'. It's advisable to get into the habit of naming your elements, otherwise things can become very confusing, especially if you have many different ones to manage. Type in the name 'Heading'.
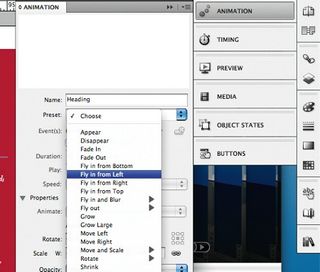
03 Click the Preset menu to reveal the array of preset animations Adobe has provided. Once you become experienced at working with these you can create your own, but for now we'll pick 'Fly in from Left'. Check that Event(s) is set to On Page Load. InDesign automatically chooses this, which can be confusing, but in this case it's the one we want. Leave the rest of the settings at their defaults.
Get the Creative Bloq Newsletter
Daily design news, reviews, how-tos and more, as picked by the editors.
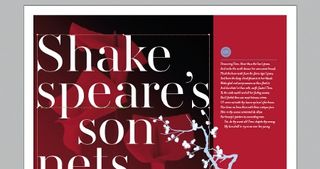
04 Notice there's now a green line attached to the object. This is the motion path, and shows the direction the animation will follow. Thankfully, you don't have to export the file every time you want to check your animations. Open the Preview panel and you'll see a small preview of your file. To make the animation run, press the Play triangle icon in the bottom left-hand corner of the Preview pane. You should see the text move in from the left. The default Preview pane is very small, so grab the bottom left-hand corner and drag it out to get a decent sized window.
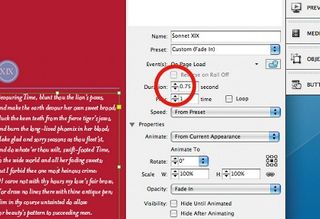
05 Now we're going to make another animation and create a button to trigger it. Select the text frame holding the sonnet, and open up the Animation panel. Check it's named 'Sonnet XIX', and choose Fade In from the Preset menu. De-select On Page Load by clicking on it in the Event(s) menu - we're going to create our own trigger this time. Then reduce the Duration to 0.75 seconds.
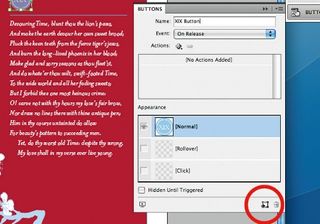
06 Next, using the Selection tool (black arrow), select the circular icon with the number XIX inside. This is going to be our button. Open up the Buttons panel, and at the bottom click on the 'Convert Object to a Button' icon. You'll see the [Normal] state becomes loaded with the icon. Click on [Rollover] to create a second state.
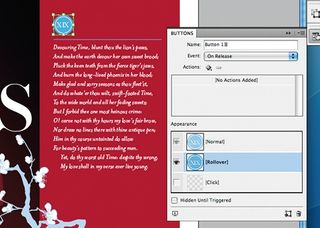
07 We want the reader to be able to distinguish between the two states, and InDesign couldn't have made this easier. With the [Rollover] state still highlighted, change the button's Opacity to 100%. Clicking between the two states should now show a button that changes opacity on rollover. To get a better idea of how this will look when it's exported, have a look with the Preview panel.
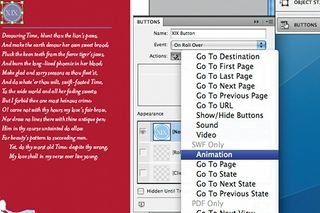
08 Now that we have our button, we need to give it something to do. Back in the Buttons menu, below the Name field, you'll see the Event menu. These are the instances that will trigger an event. If you're familiar with designing for web, you'll recognise the various options. Select On Roll Over, and click on the little Plus symbol beneath it to see the Actions menu.
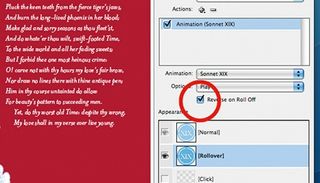
09 This menu is broken into three categories. Some of the actions will only export to Flash, some only to PDF and some to both. In this instance we're exporting to Flash, so go ahead and select Animation. In the Animation drop-down menu that appears, pick the Sonnet XIX animation that we created and leave Play as the Option. Tick the 'Reverse on Roll Off' box.
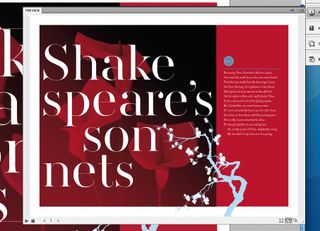
10 Now launch the Preview panel to ensure all your animations are correct. The headline text should fly in from the left, the button should highlight on rollover and the sonnet should fade in and out when you roll on or off the XIX button. If you're happy with everything, then let's export the file to Flash.
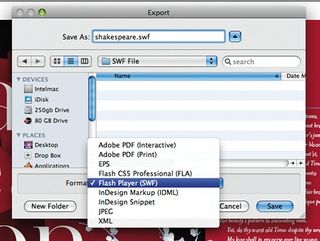
11 Go to File>Export. You'll see two Flash options in the Format drop-down menu that appears: FLA and SWF. FLA should be picked if you're handing the files onto a Flash developer: it would dump all the animations we just added, but the files could be imported into Flash for further work. The SWF option will create a single Flash file that can be played in most browsers or the standalone Flash Player. This is the option that we want.
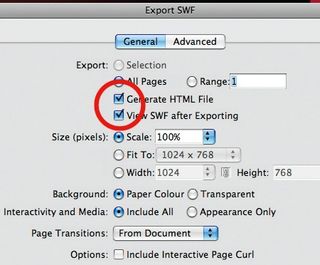
12 Click Save and you'll be presented with the Export SWF panel. Make sure Export is set to All Pages, and tick both the 'Generate HTML File' and 'View SWF after Exporting' boxes. Leave the rest of the defaults, but in the Advanced panel make sure that Text is set to Flash Classic, and that the Image Handling Resolution is set to 72ppi. Click OK and your default browser will launch with the Flash file ready and waiting. Congratulations: you have now created a moving layout.

Thank you for reading 5 articles this month* Join now for unlimited access
Enjoy your first month for just £1 / $1 / €1
*Read 5 free articles per month without a subscription

Join now for unlimited access
Try first month for just £1 / $1 / €1
The Creative Bloq team is made up of a group of design fans, and has changed and evolved since Creative Bloq began back in 2012. The current website team consists of eight full-time members of staff: Editor Georgia Coggan, Deputy Editor Rosie Hilder, Ecommerce Editor Beren Neale, Senior News Editor Daniel Piper, Editor, Digital Art and 3D Ian Dean, Tech Reviews Editor Erlingur Einarsson, Ecommerce Writer Beth Nicholls and Staff Writer Natalie Fear, as well as a roster of freelancers from around the world. The ImagineFX magazine team also pitch in, ensuring that content from leading digital art publication ImagineFX is represented on Creative Bloq.
