How to animate your art with SketchBook Pro
Learn the basics of the fledgling animation flipbook feature in SketchBook Pro 7 and how to prep your art for animation.

SketchBook Pro 7's animation Flipbook feature can be considered a bit of an experiment from the program's developers. It's best to see the tool as a work-in-progress project, because while the brush tools and user-friendly functions are impressive, this new feature is still limited. But it's worth spending a little time investigating.
You can't export your animation as a video file and the layers system is very basic, but to be fair, this is the beginning of a feature that could very well lead to the next generation of tradigital animation tools. For this month's article I'll guide you through the animation side of SketchBook Pro, reveal how to animate with the Flipbook, and explain how to handle the new layers system.
Set up your project
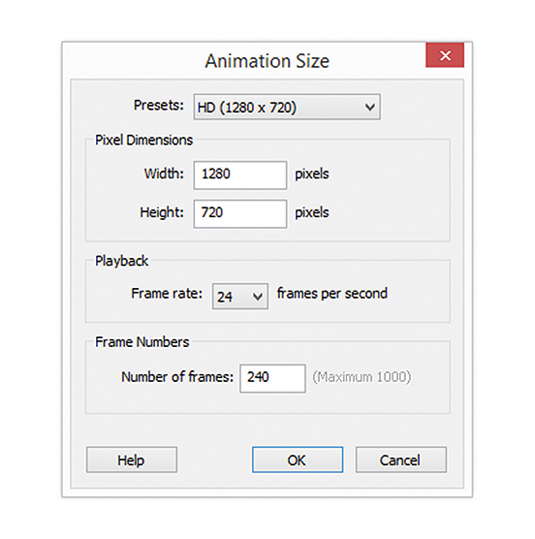
Select File from the main toolbar and choose New Flipbook. The project panel will appear with a range of properties to choose from. The presets are the pixel dimensions of your project, and you can also input the dimensions to create your own custom size.
The next option is the frame rate or how many frames per second your animation will be. The final option is to decide how many frames your scene will consist of.
The animation timeline

The Timeline is a series of frames from 0 up to the amount of frames that a scene consists of. The animation is played back frame by frame along the timeline at the frame rate that you selected in the previous step. On the left of the timeline are the keyframe options to add and delete a key. On the right are the playback controls.
The Flipbook layers system
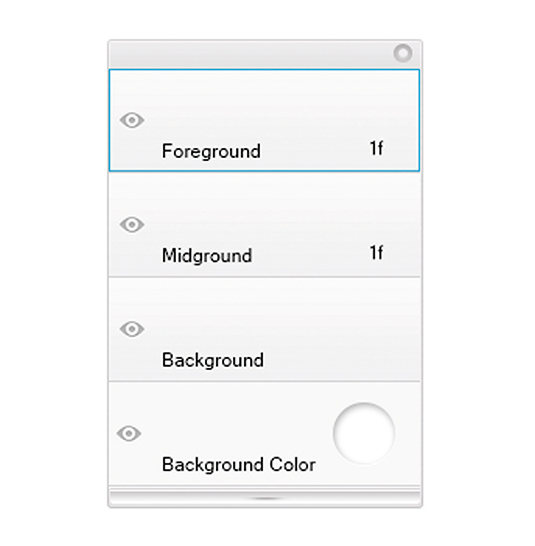
The layers system is very different from what you'll find in any other software. You can't add or delete a layer, but you do have three specific layers to use for your Flipbook animation. The background layer is a static layer across the timeline for you to draw and paint the environment of your scene. The fore- and mid-ground layers are related to each frame on the timeline.
Prepare your art for animation
01. Planning your scene
Plan out your sequence beforehand on paper. This will help you to figure out the timing and spacing of your scene. I like to sketch out thumbnails and keep this stage very rough and loose, which means I can focus on the poses and the silhouettes. You'll also be able to work out how many frames a sequence will consist of.
02. Sketching

Because the layer system is very limited, select the mid-ground and start sketching out the rough animation along the timeline. Always refer back to your thumbnails and try to stay as loose as possible. Once you've completed the rough animation, take the Soft Eraser and gently erase 50 per cent of each frame to reduce its opacity.
03. Cleaning up and colour
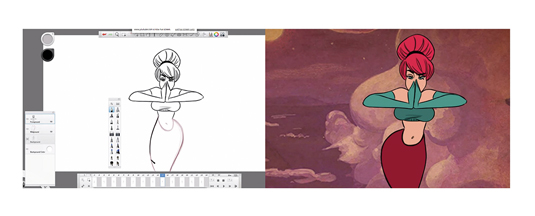
Tidy up the rough animation by selecting the foreground and going over every keyframe along the timeline. This stage can take time and effort to keep the lines consistent: if you rush it, the forms will either expand or shrink. Once you've cleaned the frames, erase every keyframe on the mid-ground and add your chosen colours.
Words: Paris Christou
Paris Christou is a 2D animator, cartoon illustrator and teacher. He is also the founder of ToonBoxStudio.com, a site that offers detailed cartoon courses. This article originally appeared in ImagineFX magazine issue 123.
Like this? Read these!
- The 12 best animations of the past 20 years
- Free Photoshop brushes every creative must have
- How to promote your art online

Thank you for reading 5 articles this month* Join now for unlimited access
Enjoy your first month for just £1 / $1 / €1
*Read 5 free articles per month without a subscription

Join now for unlimited access
Try first month for just £1 / $1 / €1
Get the Creative Bloq Newsletter
Daily design news, reviews, how-tos and more, as picked by the editors.

The Creative Bloq team is made up of a group of art and design enthusiasts, and has changed and evolved since Creative Bloq began back in 2012. The current website team consists of eight full-time members of staff: Editor Georgia Coggan, Deputy Editor Rosie Hilder, Ecommerce Editor Beren Neale, Senior News Editor Daniel Piper, Editor, Digital Art and 3D Ian Dean, Tech Reviews Editor Erlingur Einarsson, Ecommerce Writer Beth Nicholls and Staff Writer Natalie Fear, as well as a roster of freelancers from around the world. The ImagineFX magazine team also pitch in, ensuring that content from leading digital art publication ImagineFX is represented on Creative Bloq.
