Create dripping metal sparks in After Effects CS6
Sometimes you need heavy sparks to drip from the ceiling. Christopher Kenworthy shows the shortcuts to perfecting this particle effect
One of the most common movie effects you see is dripping sparks. In the aftermath of a disaster, or on a failing spaceship, sparks fly. Many users resort to third-party plugins to create complex particles to achieve this effect, but there’s no need. Although plugins can be useful, it’s often their presets that make them look impressive. You can apply the same principles to the basic After Effects CS6 plug-ins to create a strong effect.
To generate these sparks you need to adjust the settings of Particle Systems II, so that the particles flow fast and freely, but with some resistance from the air. By reducing colour, rounding their shape and making them small, you get the right look. By using the Add Composite Mode you create extra hints of sparkle and glow. When you animate showers of sparks, by increasing the velocity and birth rate for a fraction of a second, it creates an extremely realistic look. Finish this by adding motion blur, and the effect is ready to be composited into your scene. You don’t need to make this effect noticeable for it to be useful. Dripping sparks work best when they’re barely noticed, just to add texture to a scene, so don’t be too heavy handed.
See the finished effect at the end of this tutorial.
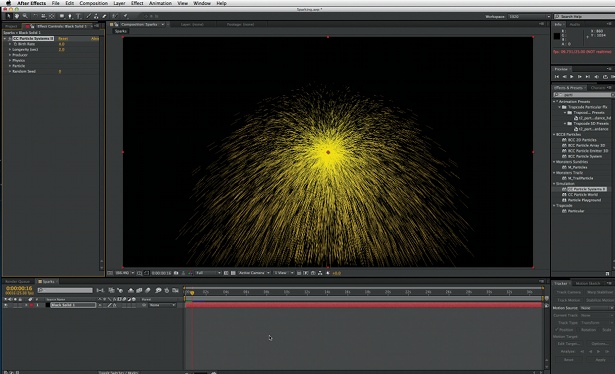
01 Create a new composition and go to Layer>New>Black Solid. Apply CC Particle Systems II to the black solid. By default this filter looks so basic as to be unusable, but it can be tweaked to great effect.
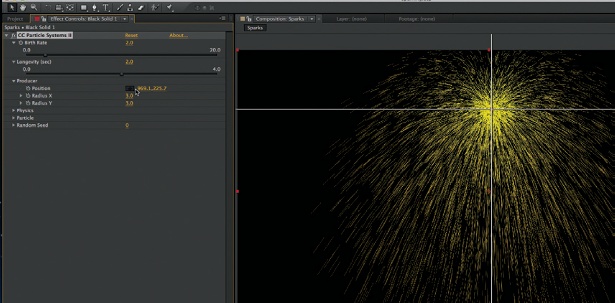
02 Change the filter’s birth rate to 2. In the Producer settings, click on the Position crosshair and then click high up in the image. You may animate this position later, but to check the effect as it develops, position it near the top of the screen.
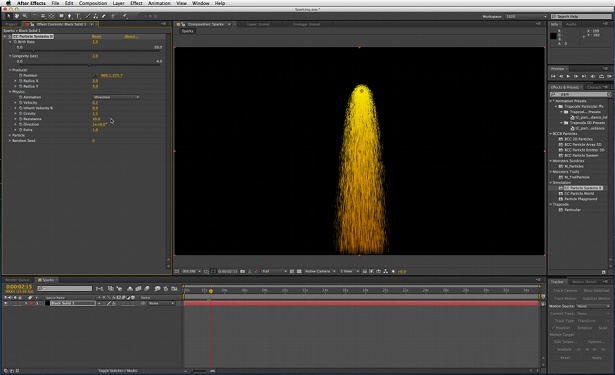
03 Under Physics, change the Animation drop-down from Explosive to Direction. Set the velocity to 0.2, gravity to 1.5 and resistance to 10. To create custom sparks, these are the settings you can experiment with.
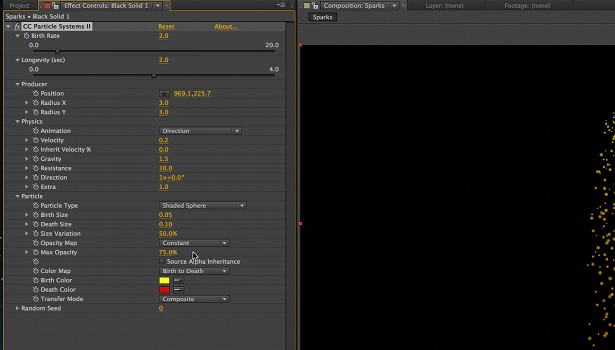
04 Under Particle, change the Particle Type drop-down to Shaded Sphere, the birth size should be set to 0.05, with death size as 0.10. If you prefer your particles to fizzle out, reverse these settings. Change the Opacity map drop-down to Constant.
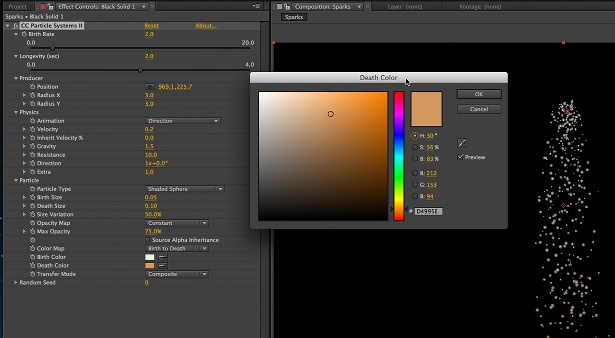
05 Set the maximum opacity to between 75 and 100%. Click on the Birth Color box and set it to white. Click on the Death Color box and set it to a slightly yellowish off-white. Change the Transfer Mode drop-down to Composite.
Get the Creative Bloq Newsletter
Daily design news, reviews, how-tos and more, as picked by the editors.

Thank you for reading 5 articles this month* Join now for unlimited access
Enjoy your first month for just £1 / $1 / €1
*Read 5 free articles per month without a subscription

Join now for unlimited access
Try first month for just £1 / $1 / €1

The Creative Bloq team is made up of a group of art and design enthusiasts, and has changed and evolved since Creative Bloq began back in 2012. The current website team consists of eight full-time members of staff: Editor Georgia Coggan, Deputy Editor Rosie Hilder, Ecommerce Editor Beren Neale, Senior News Editor Daniel Piper, Editor, Digital Art and 3D Ian Dean, Tech Reviews Editor Erlingur Einarsson, Ecommerce Writer Beth Nicholls and Staff Writer Natalie Fear, as well as a roster of freelancers from around the world. The ImagineFX magazine team also pitch in, ensuring that content from leading digital art publication ImagineFX is represented on Creative Bloq.
