Premiere Pro to DaVinci Resolve: 9 tips for a smooth transition
Switching from Premiere Pro to DaVinci Resolve is easier than you think.
There was a time when I could ask a group of aspiring editors what editing software they use, and the answer would have more than likely have been Premiere Pro. Some would have replied with Final Cut Pro or Avid, but usually, it would have been Premiere. However, in 2023, the landscape is vastly different. Increasingly, DaVinci Resolve is the answer I'm receiving.
This revolutionary video editing software has taken the editing world by storm over the past several years, offering a sleek and user-friendly interface, lightning-fast performance, and a wealth of advanced features that will make your life as a video editor much easier. If you have recently been thinking about switching from Premiere Pro to DaVinci Resolve, but feel you are somewhat tied to Premiere with historical knowledge, let me run you through what I consider the Premiere Pro to Resolve cheat sheet. For more about each different software, see our Premiere Pro and DaVinci Resolve reviews.
This video will not teach you how to edit within DaVinci Resolve. Instead, think of this as a cheat sheet to help you understand all the things you are familiar with in Adobe Premiere and where those things are in DaVinci Resolve.
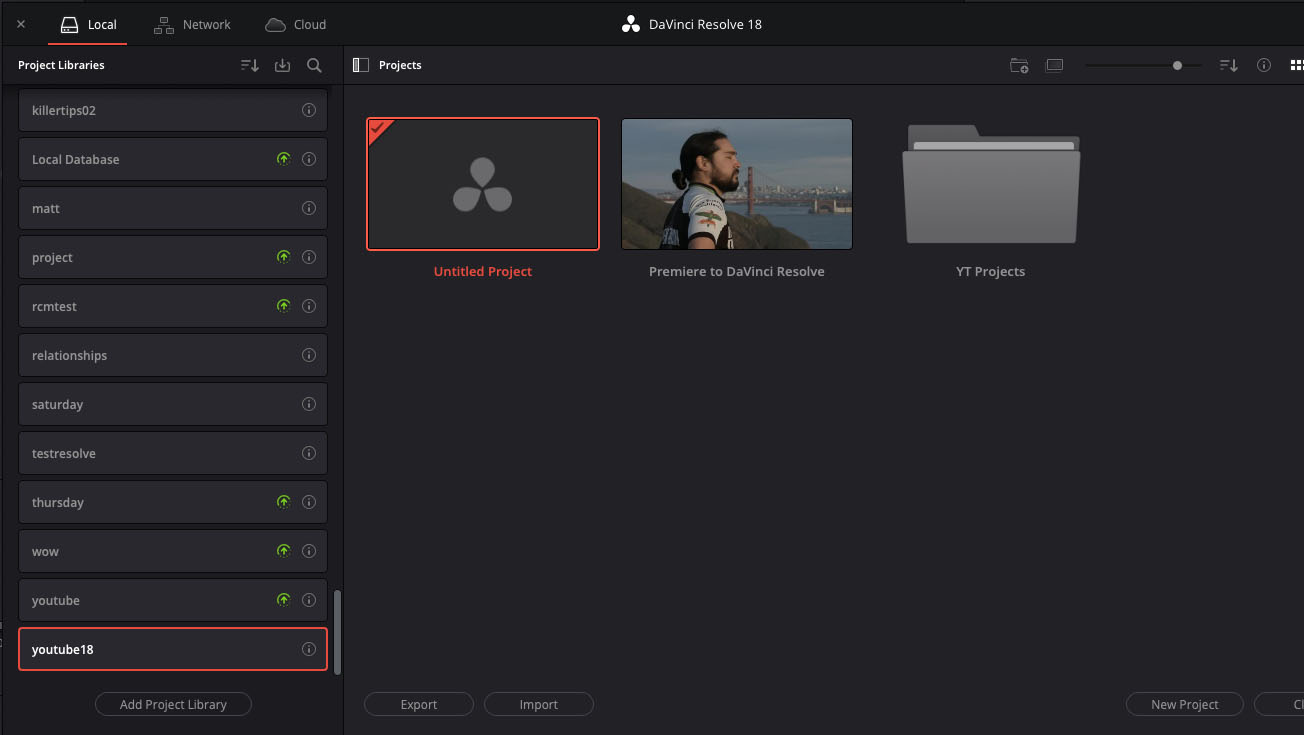
Upon launching DaVinci Resolve, you will be presented with this start-up window where you can create a new project file or continue working on existing projects. However, it is necessary to create a project library, which serves as a container for multiple projects.
You can have several projects within a single project library, organised according to the client, month, or any other method you choose. While this allows you to manage your edits efficiently, you could keep one project library and have 100 individual projects within. The choice is yours. After creating the library, select New Project.
02. Importing media into DaVinci Resolve
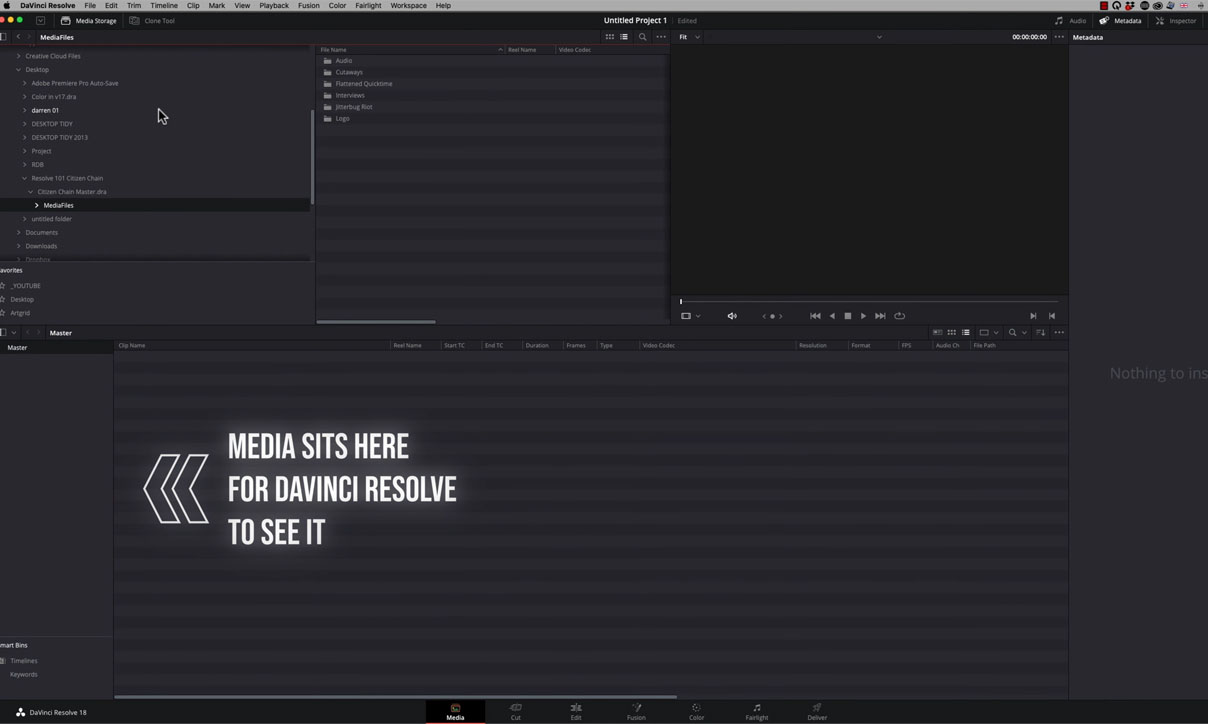
In Adobe Premiere and DaVinci Resolve, media can be imported into the program through the import function or by simply dragging and dropping the files from the file explorer. In DaVinci Resolve, there is also a dedicated page where media is brought in called the Media Page.
On the media page, the top half displays all attached drives and networks, while the bottom half serves as the location for imported media. To import media, one can drag and drop the files from the top half to the bottom half. It's important to note that this creates a link rather than copying the files. And therefore, if you were to move the original file location or disconnect a drive, the media would need to be relinked.
When a folder is dropped onto the bottom half of the Media page, a prompt will appear asking if the user wants to change the project frame rate. Similarly, when a clip is dragged onto an empty timeline, a prompt asks if the user wants to change the timeline settings. DaVinci Resolve will analyse the clips automatically and adjust the settings accordingly. Although, this only occurs at the start of a new project.
03. Where to find Preferences in DaVinci Resolve
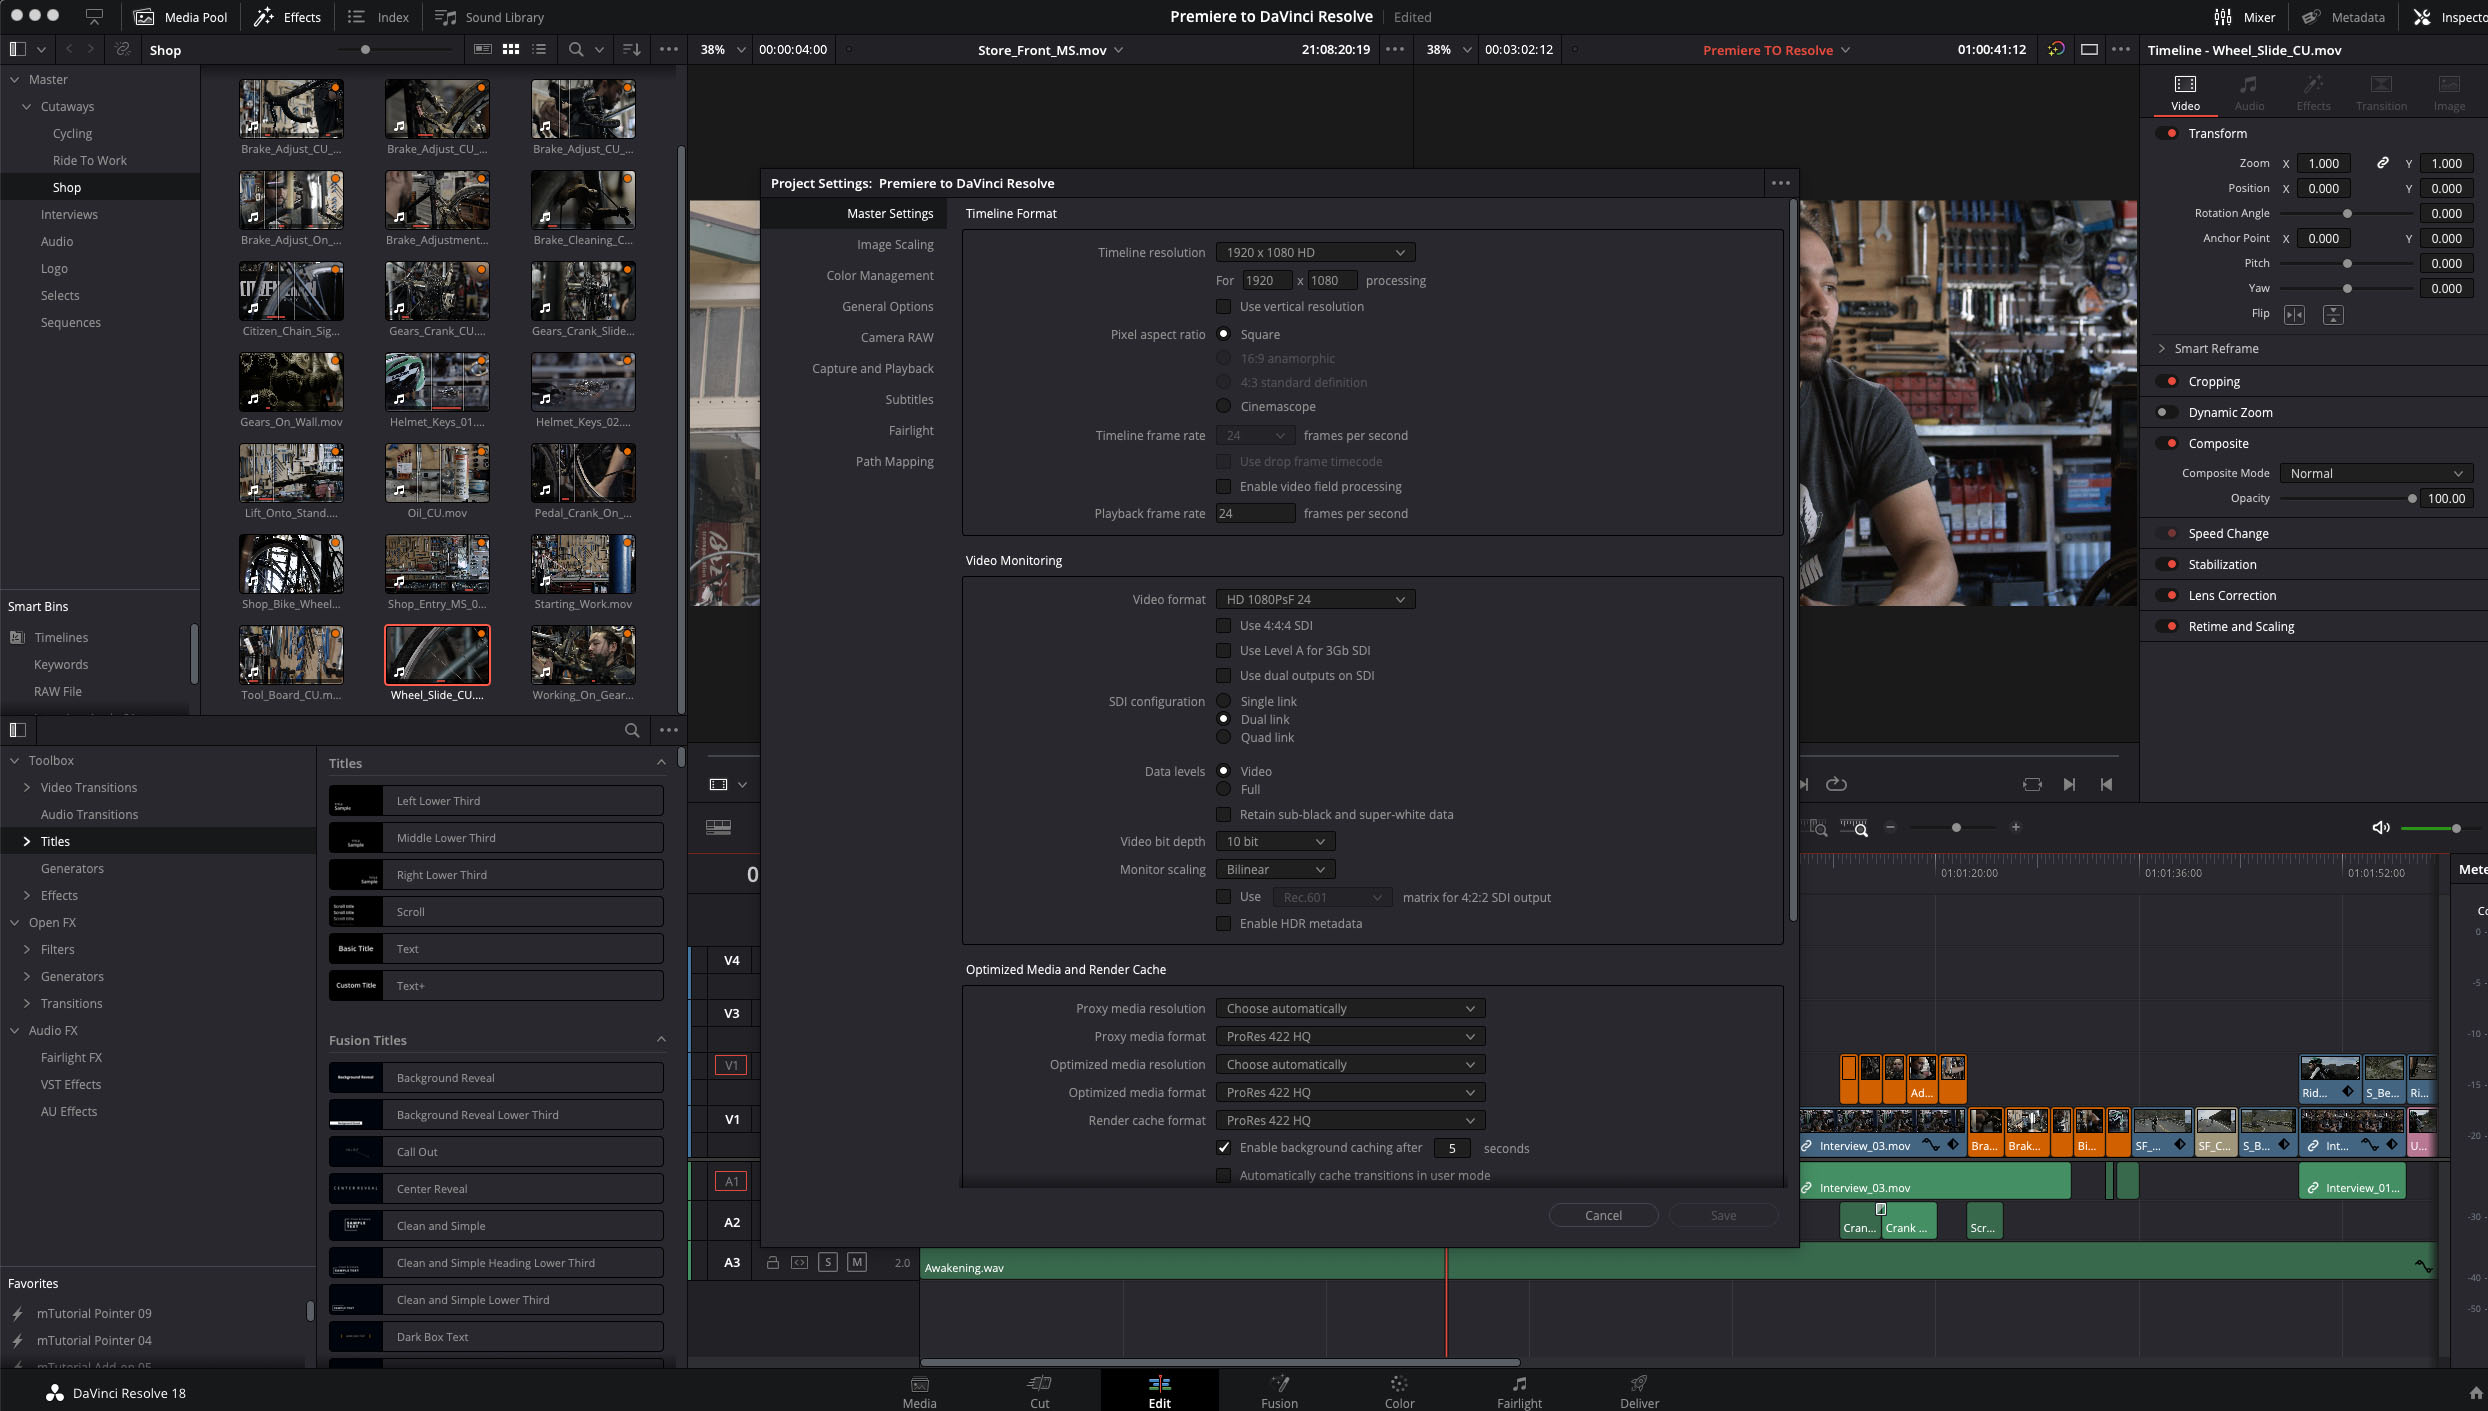
In Adobe Premiere Pro, the User Preferences can be accessed through the general option in the left-hand menu bar. These preferences include settings for hardware, pre-roll options, and other personalised settings. In Resolve, equivalent settings can be found in the cog icon at the bottom right across all pages.
The cog icon provides access to the Settings, including the Master Settings, which can be used to set the timeline resolution and playback frame rate. If you're switching from Premiere Pro to Resolve, at this time, I would suggest that it's only necessary to focus on the master settings area of the panel. The video monitoring section in the master settings sets the video monitoring settings, such as editing in 4K while monitoring in HD, how you want your proxy media generated, and where the cache files should be stored.
A different set of settings can also be found under the DaVinci Resolve top menu. It's aptly titled Preferences. This menu will allow you to adjust the system and user-related settings, such as memory and GPU allocation, connectivity to external accounts, and auto-save preferences.
04. Understanding the different pages in DaVinci Resolve
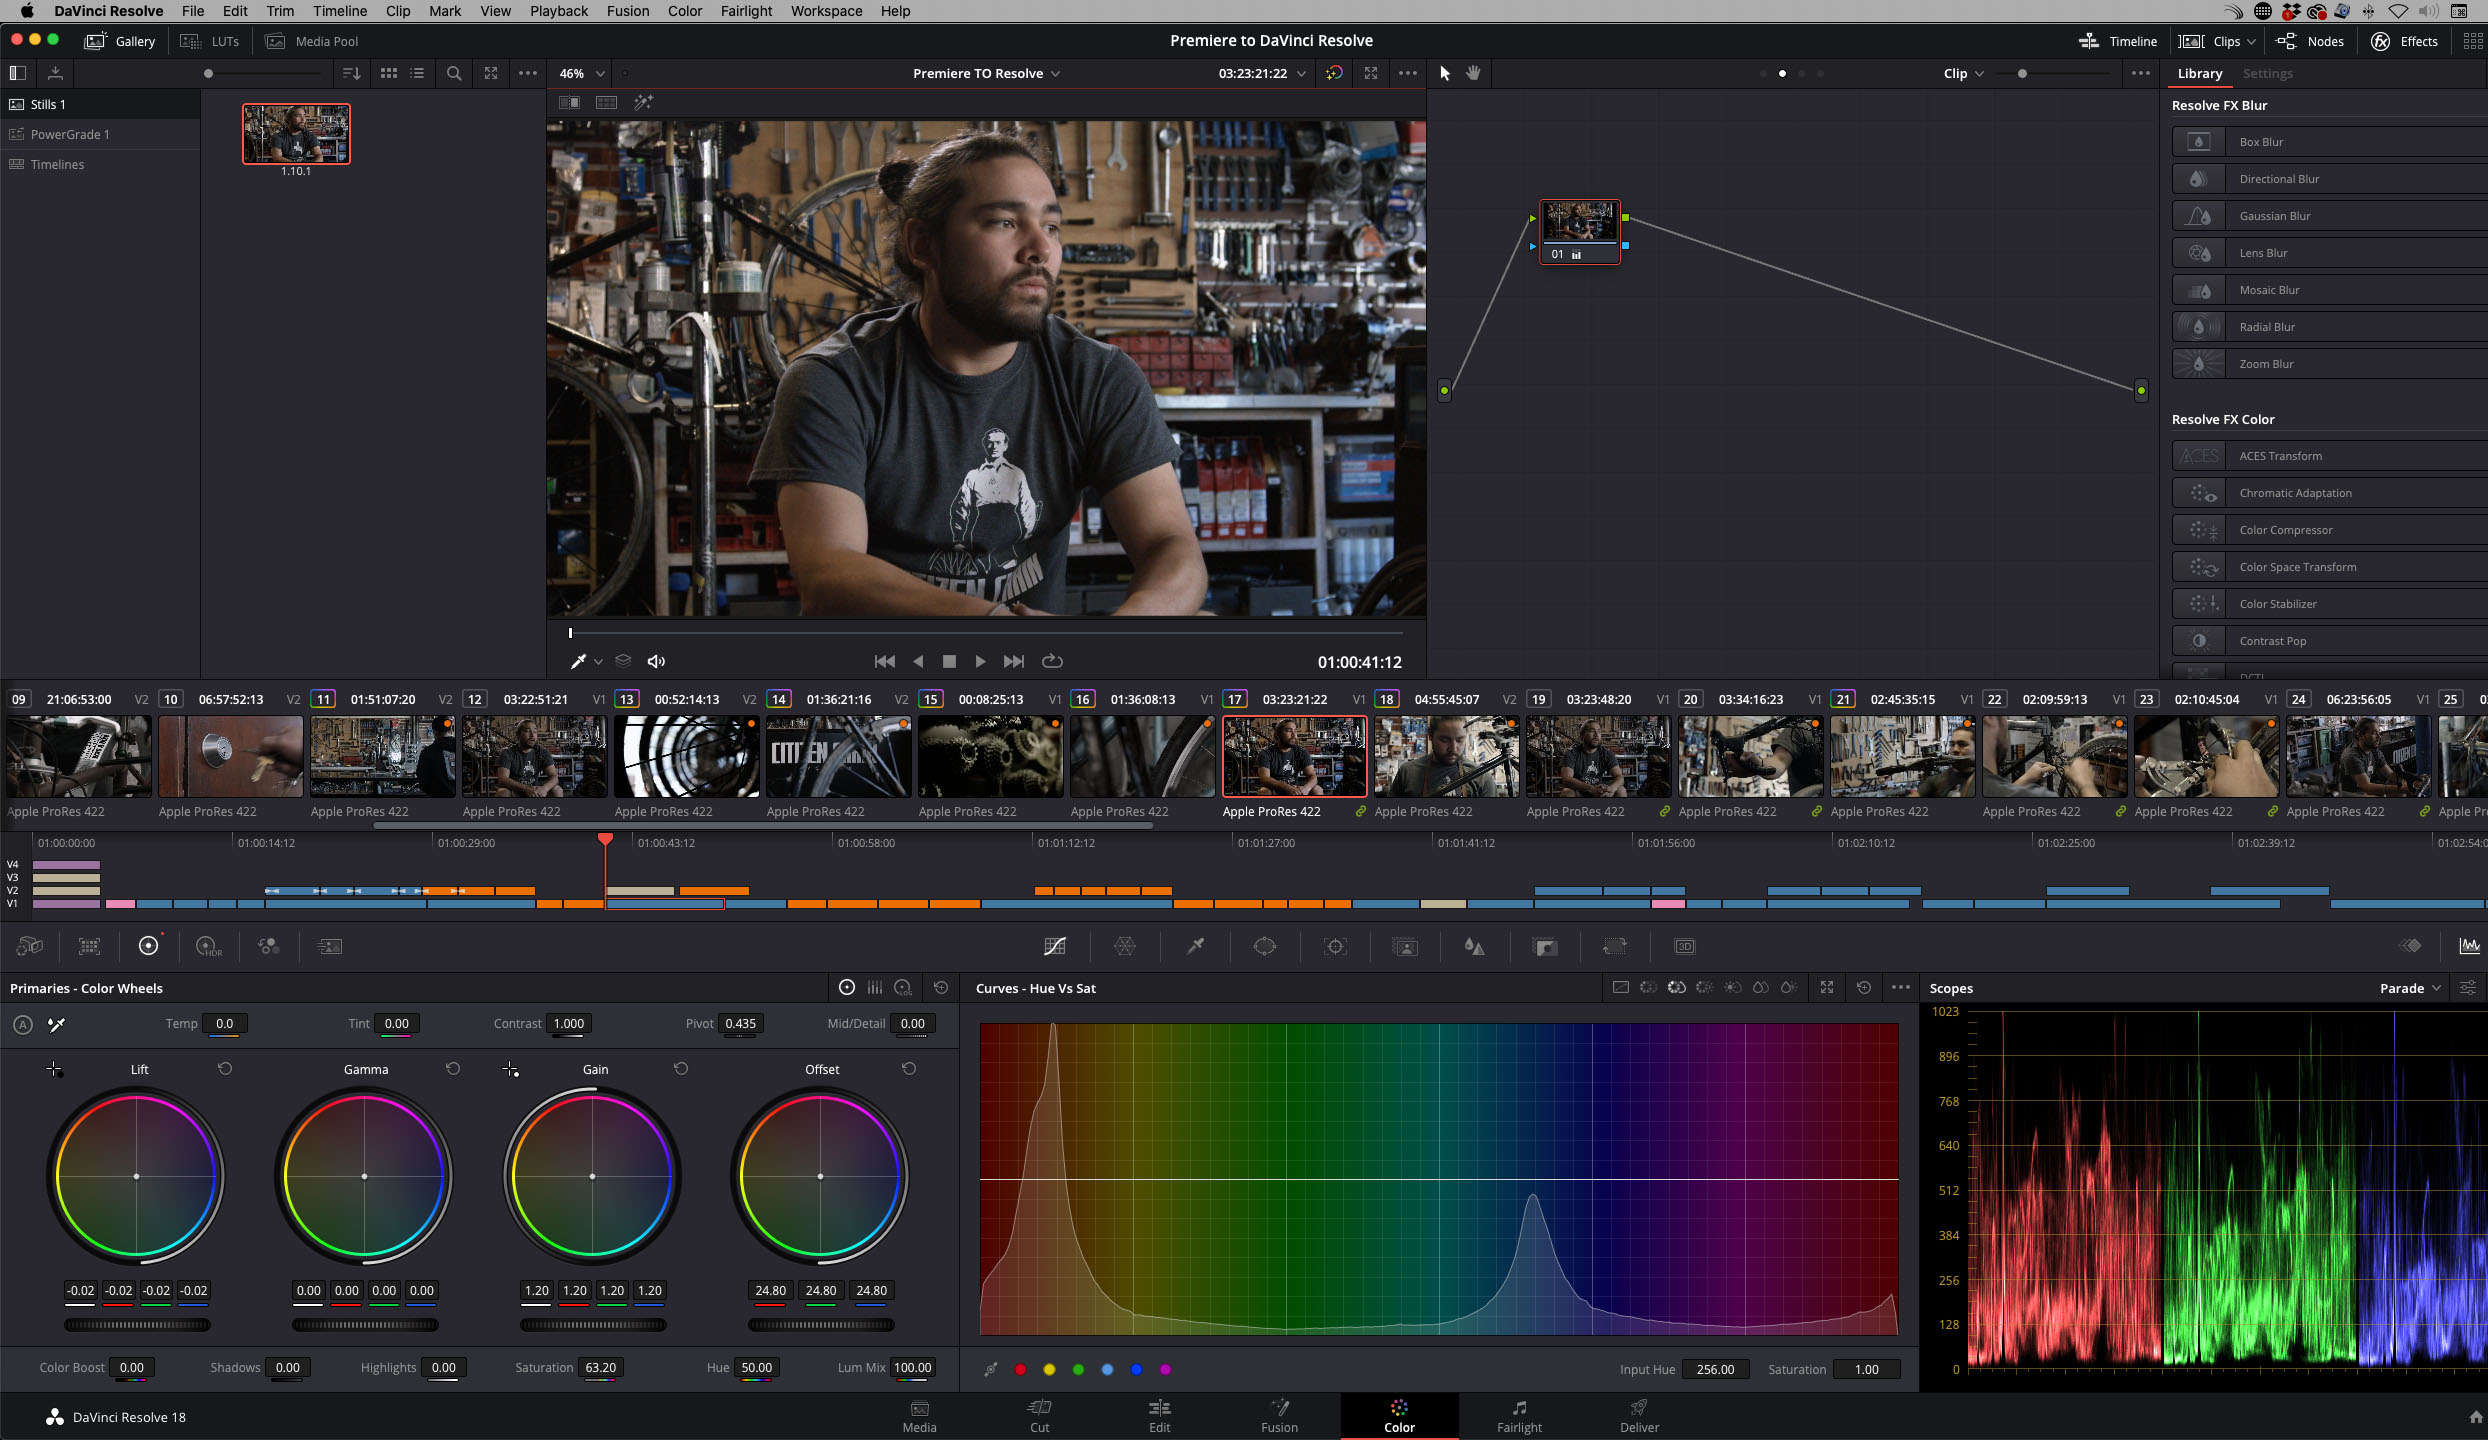
In DaVinci Resolve, editing can be performed on the Cut or Edit page. The Cut page is similar to Final Cut Pro, and the Edit page is similar to Adobe Premiere. The Fusion page provides compositing capabilities like After Effects, and the Color page is dedicated to colour grading, similar to Lumetri, but more advanced.
The Fairlight tab is used for audio mixing, comparable to Adobe Audition, and the Deliver page is equivalent to Media Encoder.
I've just listed a lot of different software from Adobe, yet all of these functions are integrated into one program with Resolve, and updates made on one page are reflected on the others.
05. Understanding the Edit page
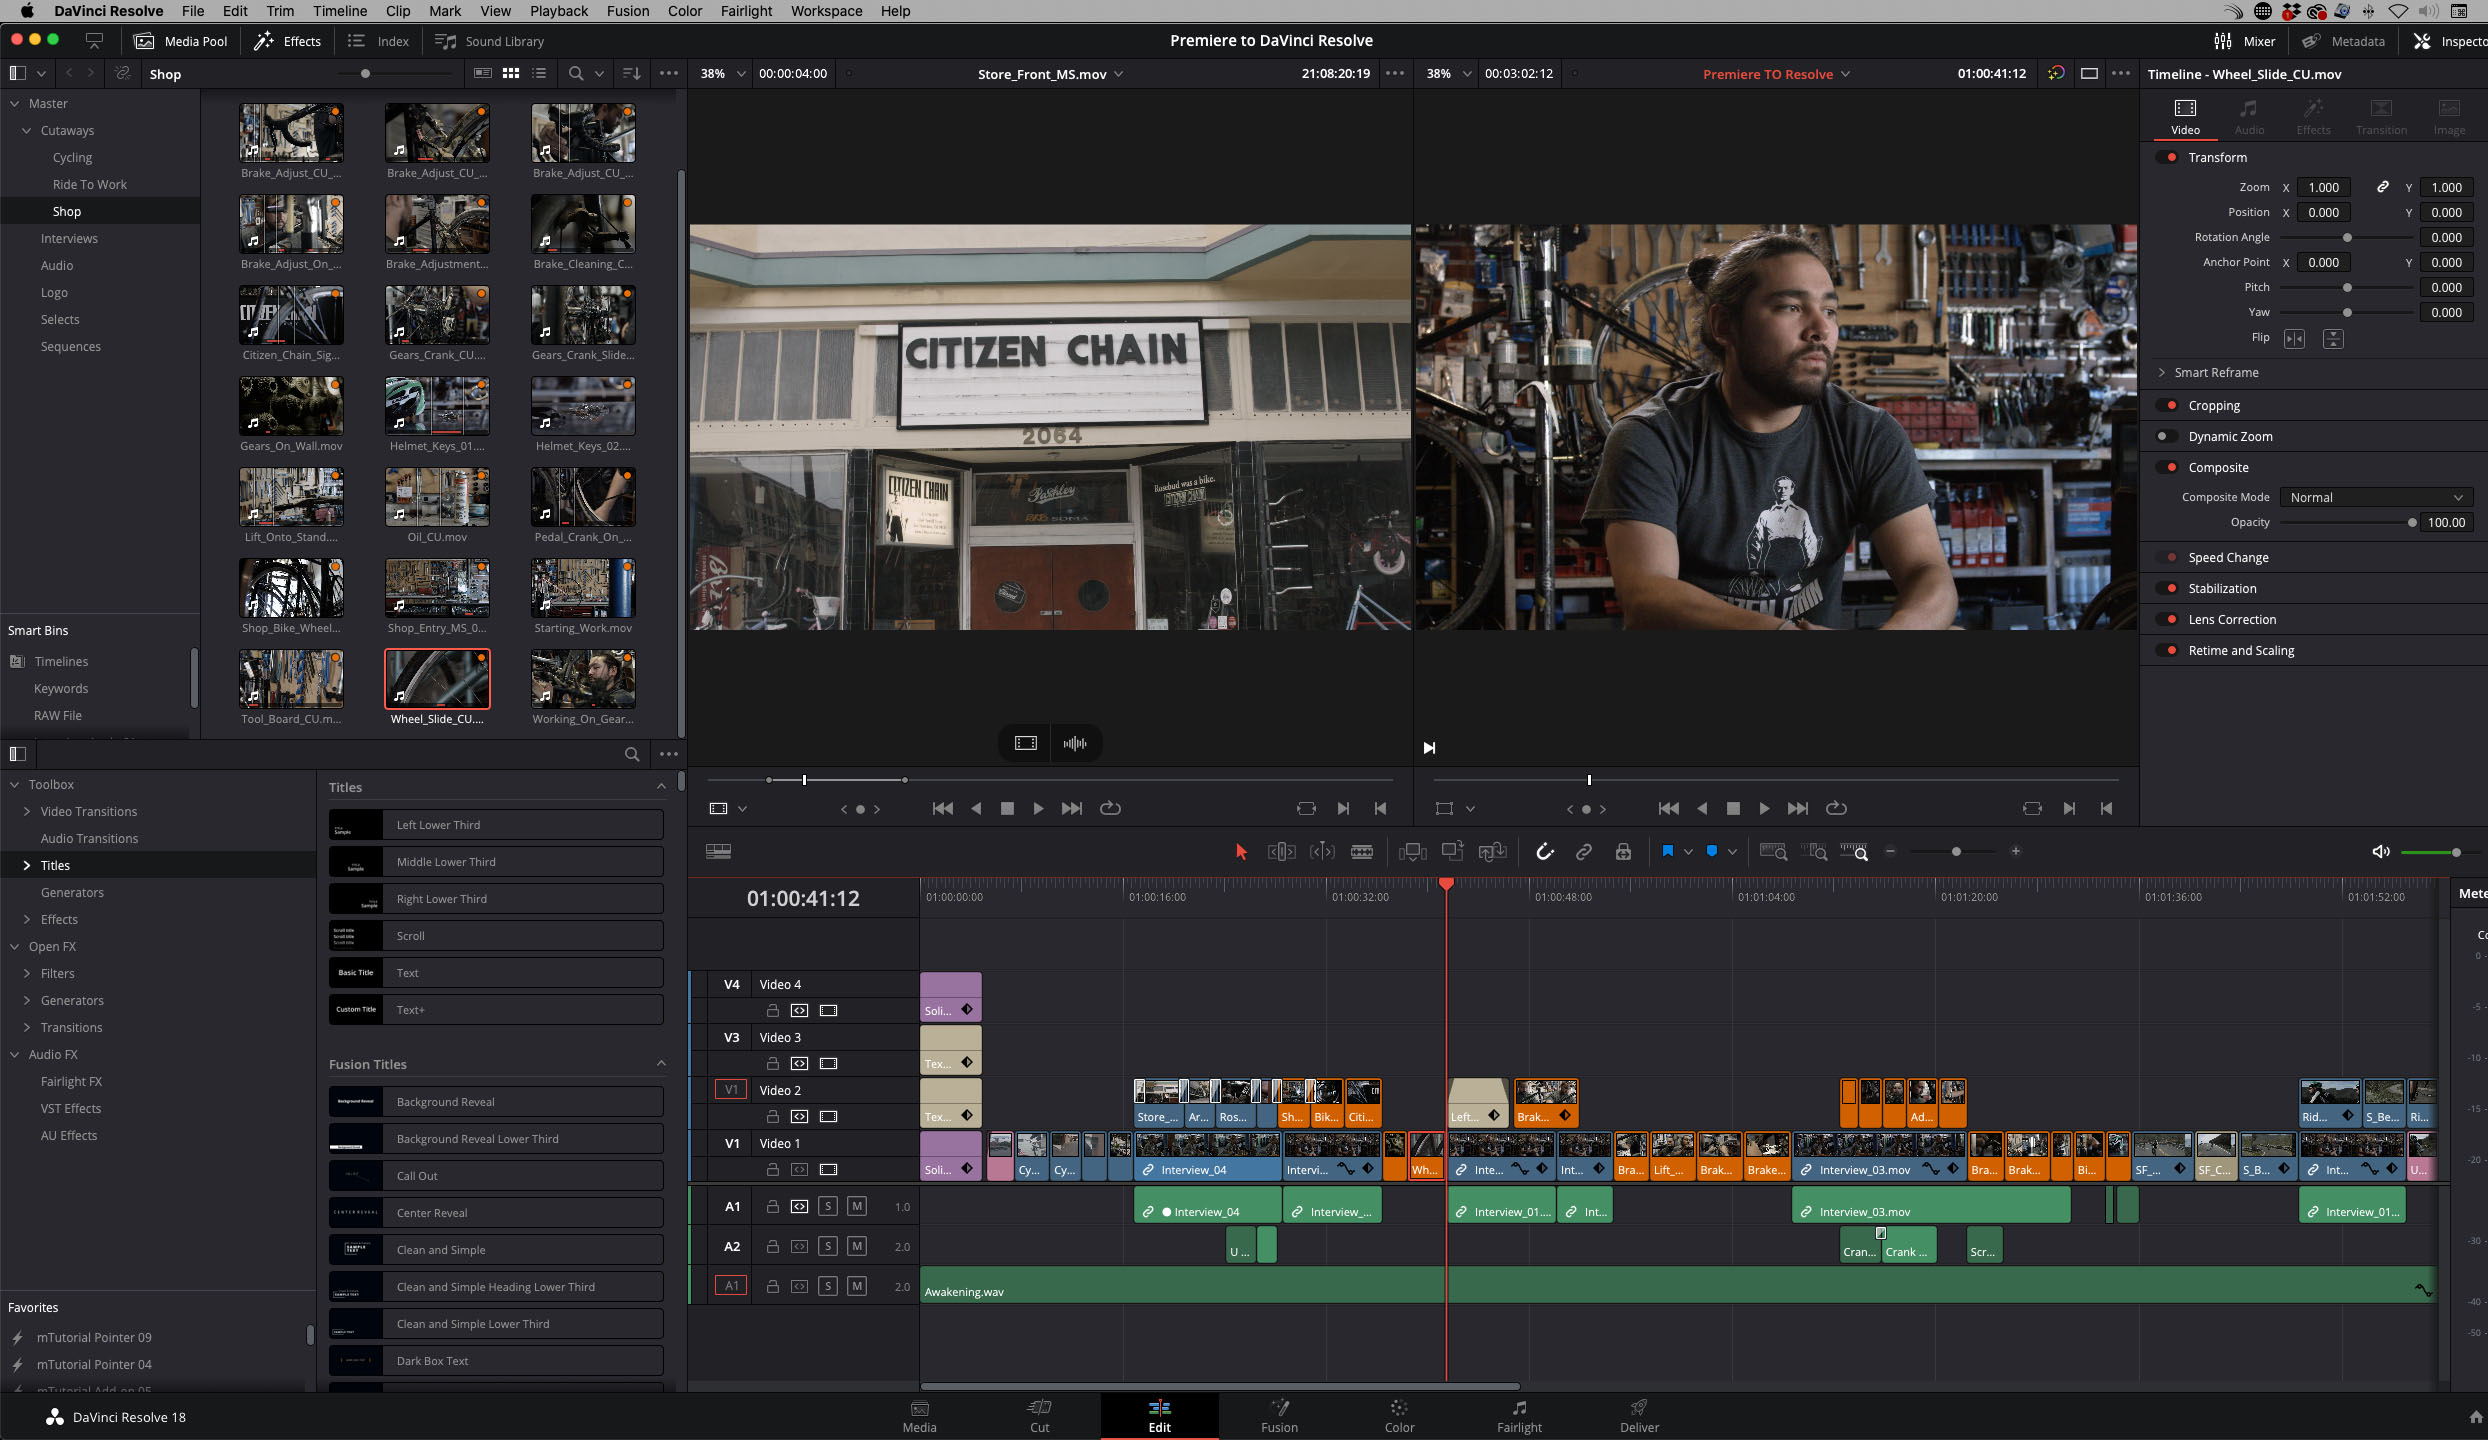
For those transitioning from Adobe Premiere, it is recommended to initially focus on the Edit page for a more familiar experience. When you switch to the Cut page in DaVinci Resolve, you will find the same edit presented in a slightly different format.
To start an edit, you place a clip from the media pool panel onto the timeline, where it is automatically matched to the timeline settings.
The size of the icons in the timeline may take some time to get used to, but you can adjust the video and audio track heights to suit your preferences. Additionally, the keyboard shortcuts can be set to match Adobe Premiere's shortcuts, making the transition smoother. To do this, go to the Keyboard Customization option in the top menu bar and select Adobe Premiere as the pre-set, or create your own.
If you ever need to create a new timeline for a separate edit within this project, instead of creating a separate project folder on the home menu, right-click inside an open bin in the media pool and select 'create new timeline'. The timeline will initially be populated with the settings for the project, but if this new timeline requires settings that differ from timeline one, you can untick use project settings and input your required settings.
For more in-depth editing tips, I recommend you browse through my DaVinci Resolve playlist on YouTube
06. DaVinci Resolve workspace
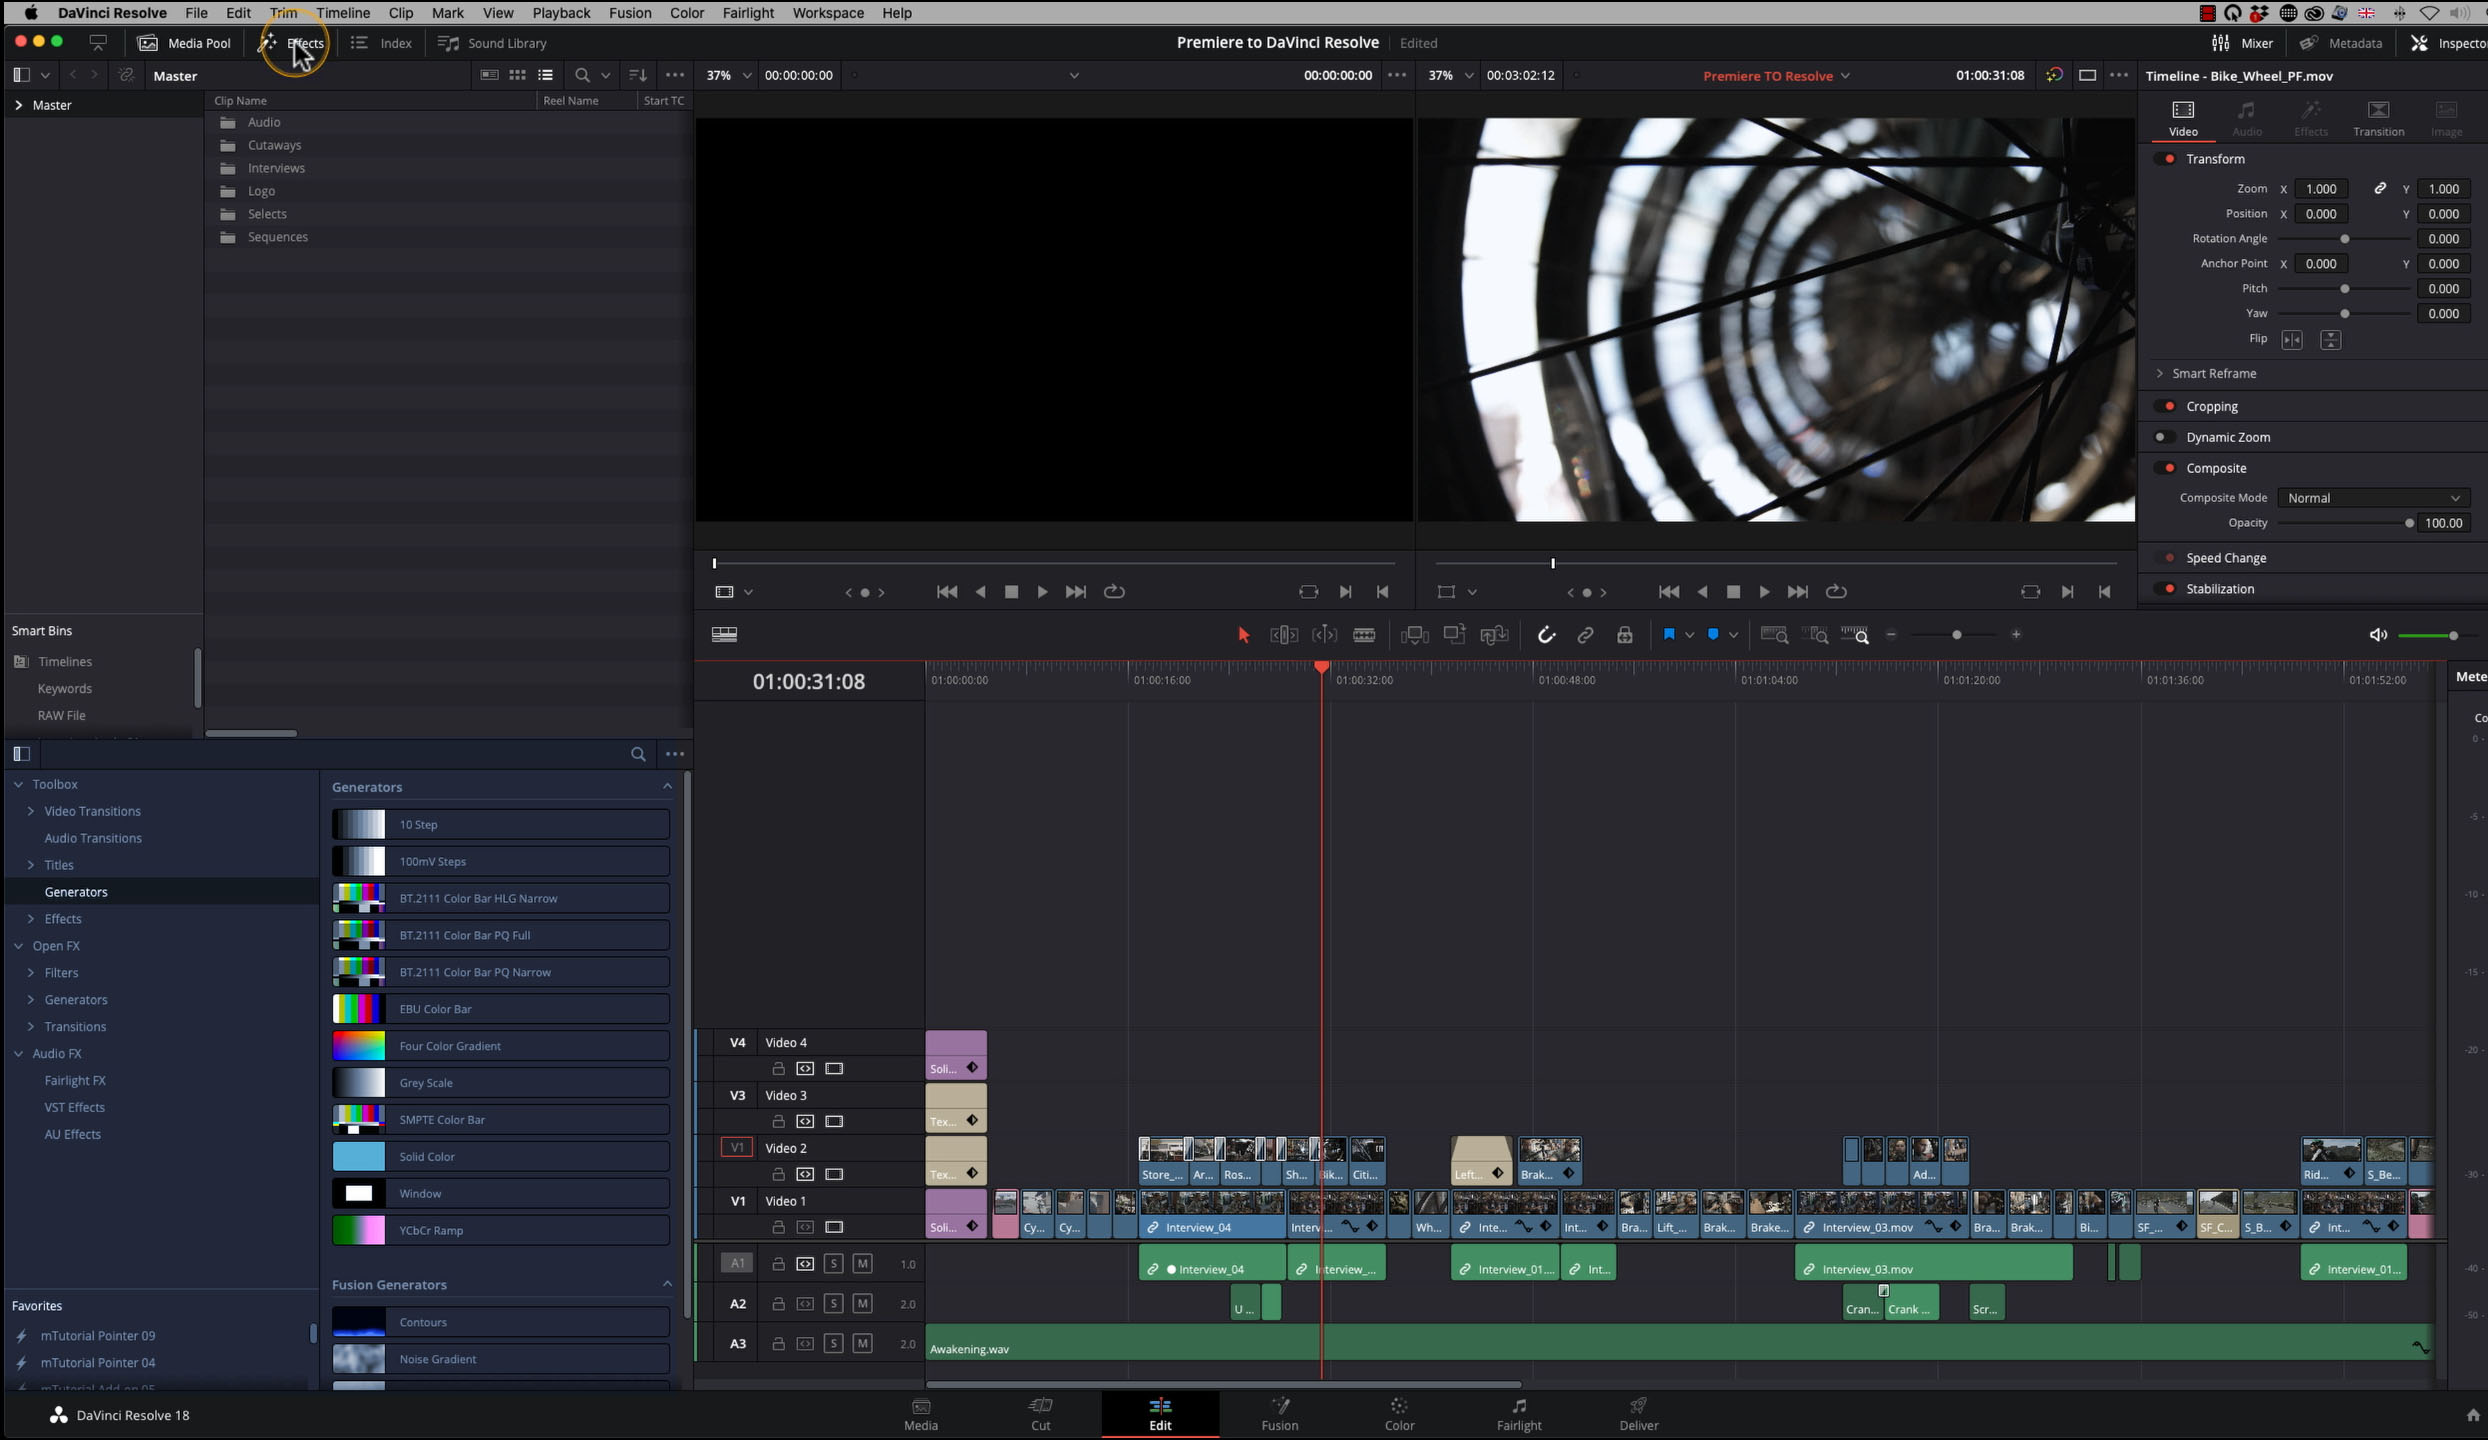
In DaVinci Resolve, the window arrangement is fixed compared to Adobe Premiere, where you have more flexibility in moving windows around. However, you can open and close the windows from the top of the interface. Where an icon identifies each window, click the corresponding icon to close that window.
While the size of the windows can also be slightly modified to give you a larger or more minimised view of the area, if I were to open the effects library, I can also expand the size of the panel by clicking the edge of the panel and expanding the view. I'm unable to expand the panel to the extent I could in Premiere Pro, but the increase in panel size is more than sufficient to display all my effects without needing to scroll.
If, at first, you find little use for the Cut and Fusion pages, you can also hide these from view by navigating to the workspace menu, selecting Show Page and then deselecting the pages you want to hide.
07. The Inspector
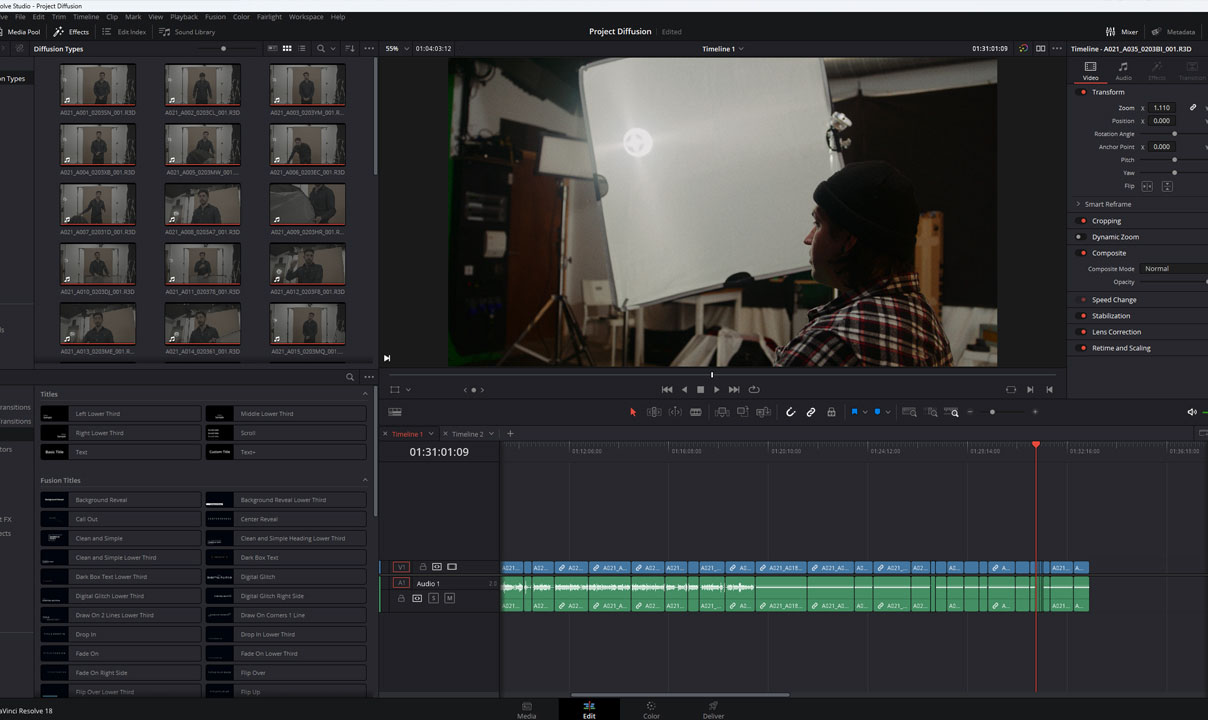
In DaVinci Resolve, the Inspector is located on the right side of the screen, and this menu allows you to access the properties of a selected clip. This includes adjusting the zoom, scaling, and keyframing of the clip's position, rotation, and other attributes. Resolve also has full keyframing capability here too.
While you may need help with the workspaces and layout customisation options available in Adobe Premiere, DaVinci Resolve also provides the ability to save workspaces and layouts. This allows you to switch between different layout presets and assign keyboard shortcuts if desired.
08. Effects in Resolve
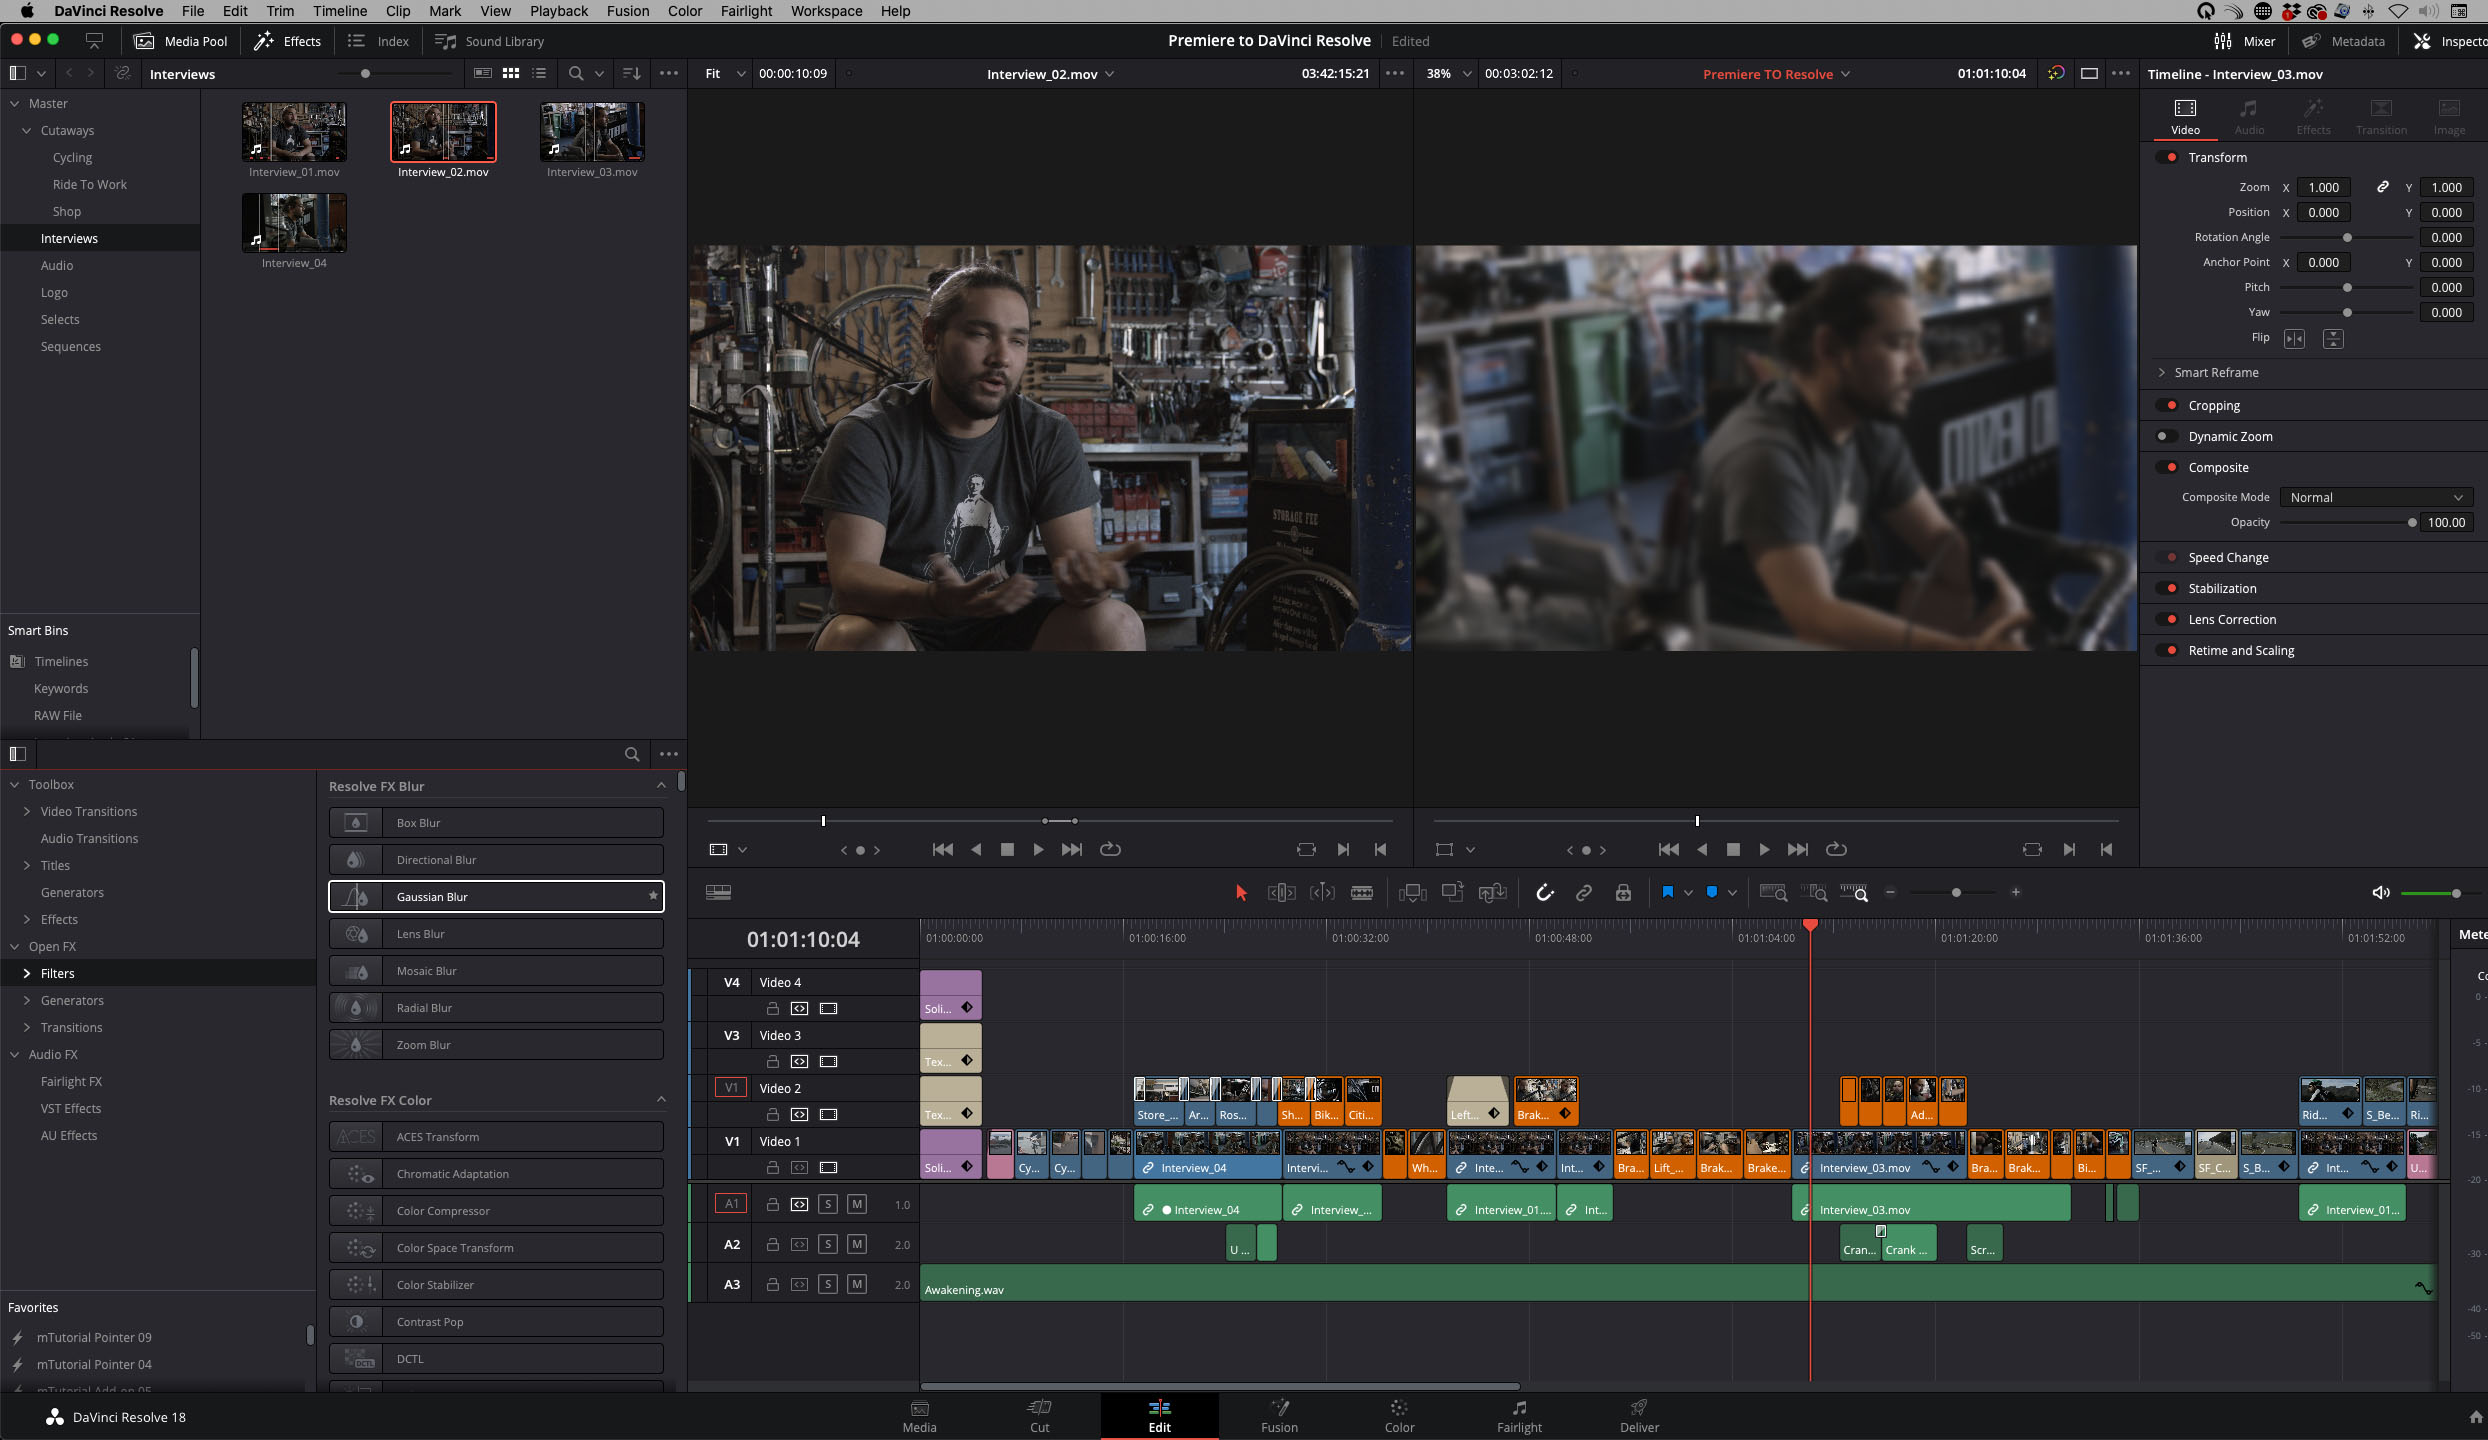
It is a well-known fact that Adobe Premiere has a multitude of plugins provided by third-party vendors. These third-party vendors are now producing top plug-ins for DaVinci Resolve, including MotionVFX. The Effects section can be found at the bottom left corner and contains a vast number of options.
These also include Sapphire Effects and Boris FX, which are compatible with DaVinci Resolve. This section serves as the equivalent of the Effects tab in Premiere.
09. Exporting in Resolve
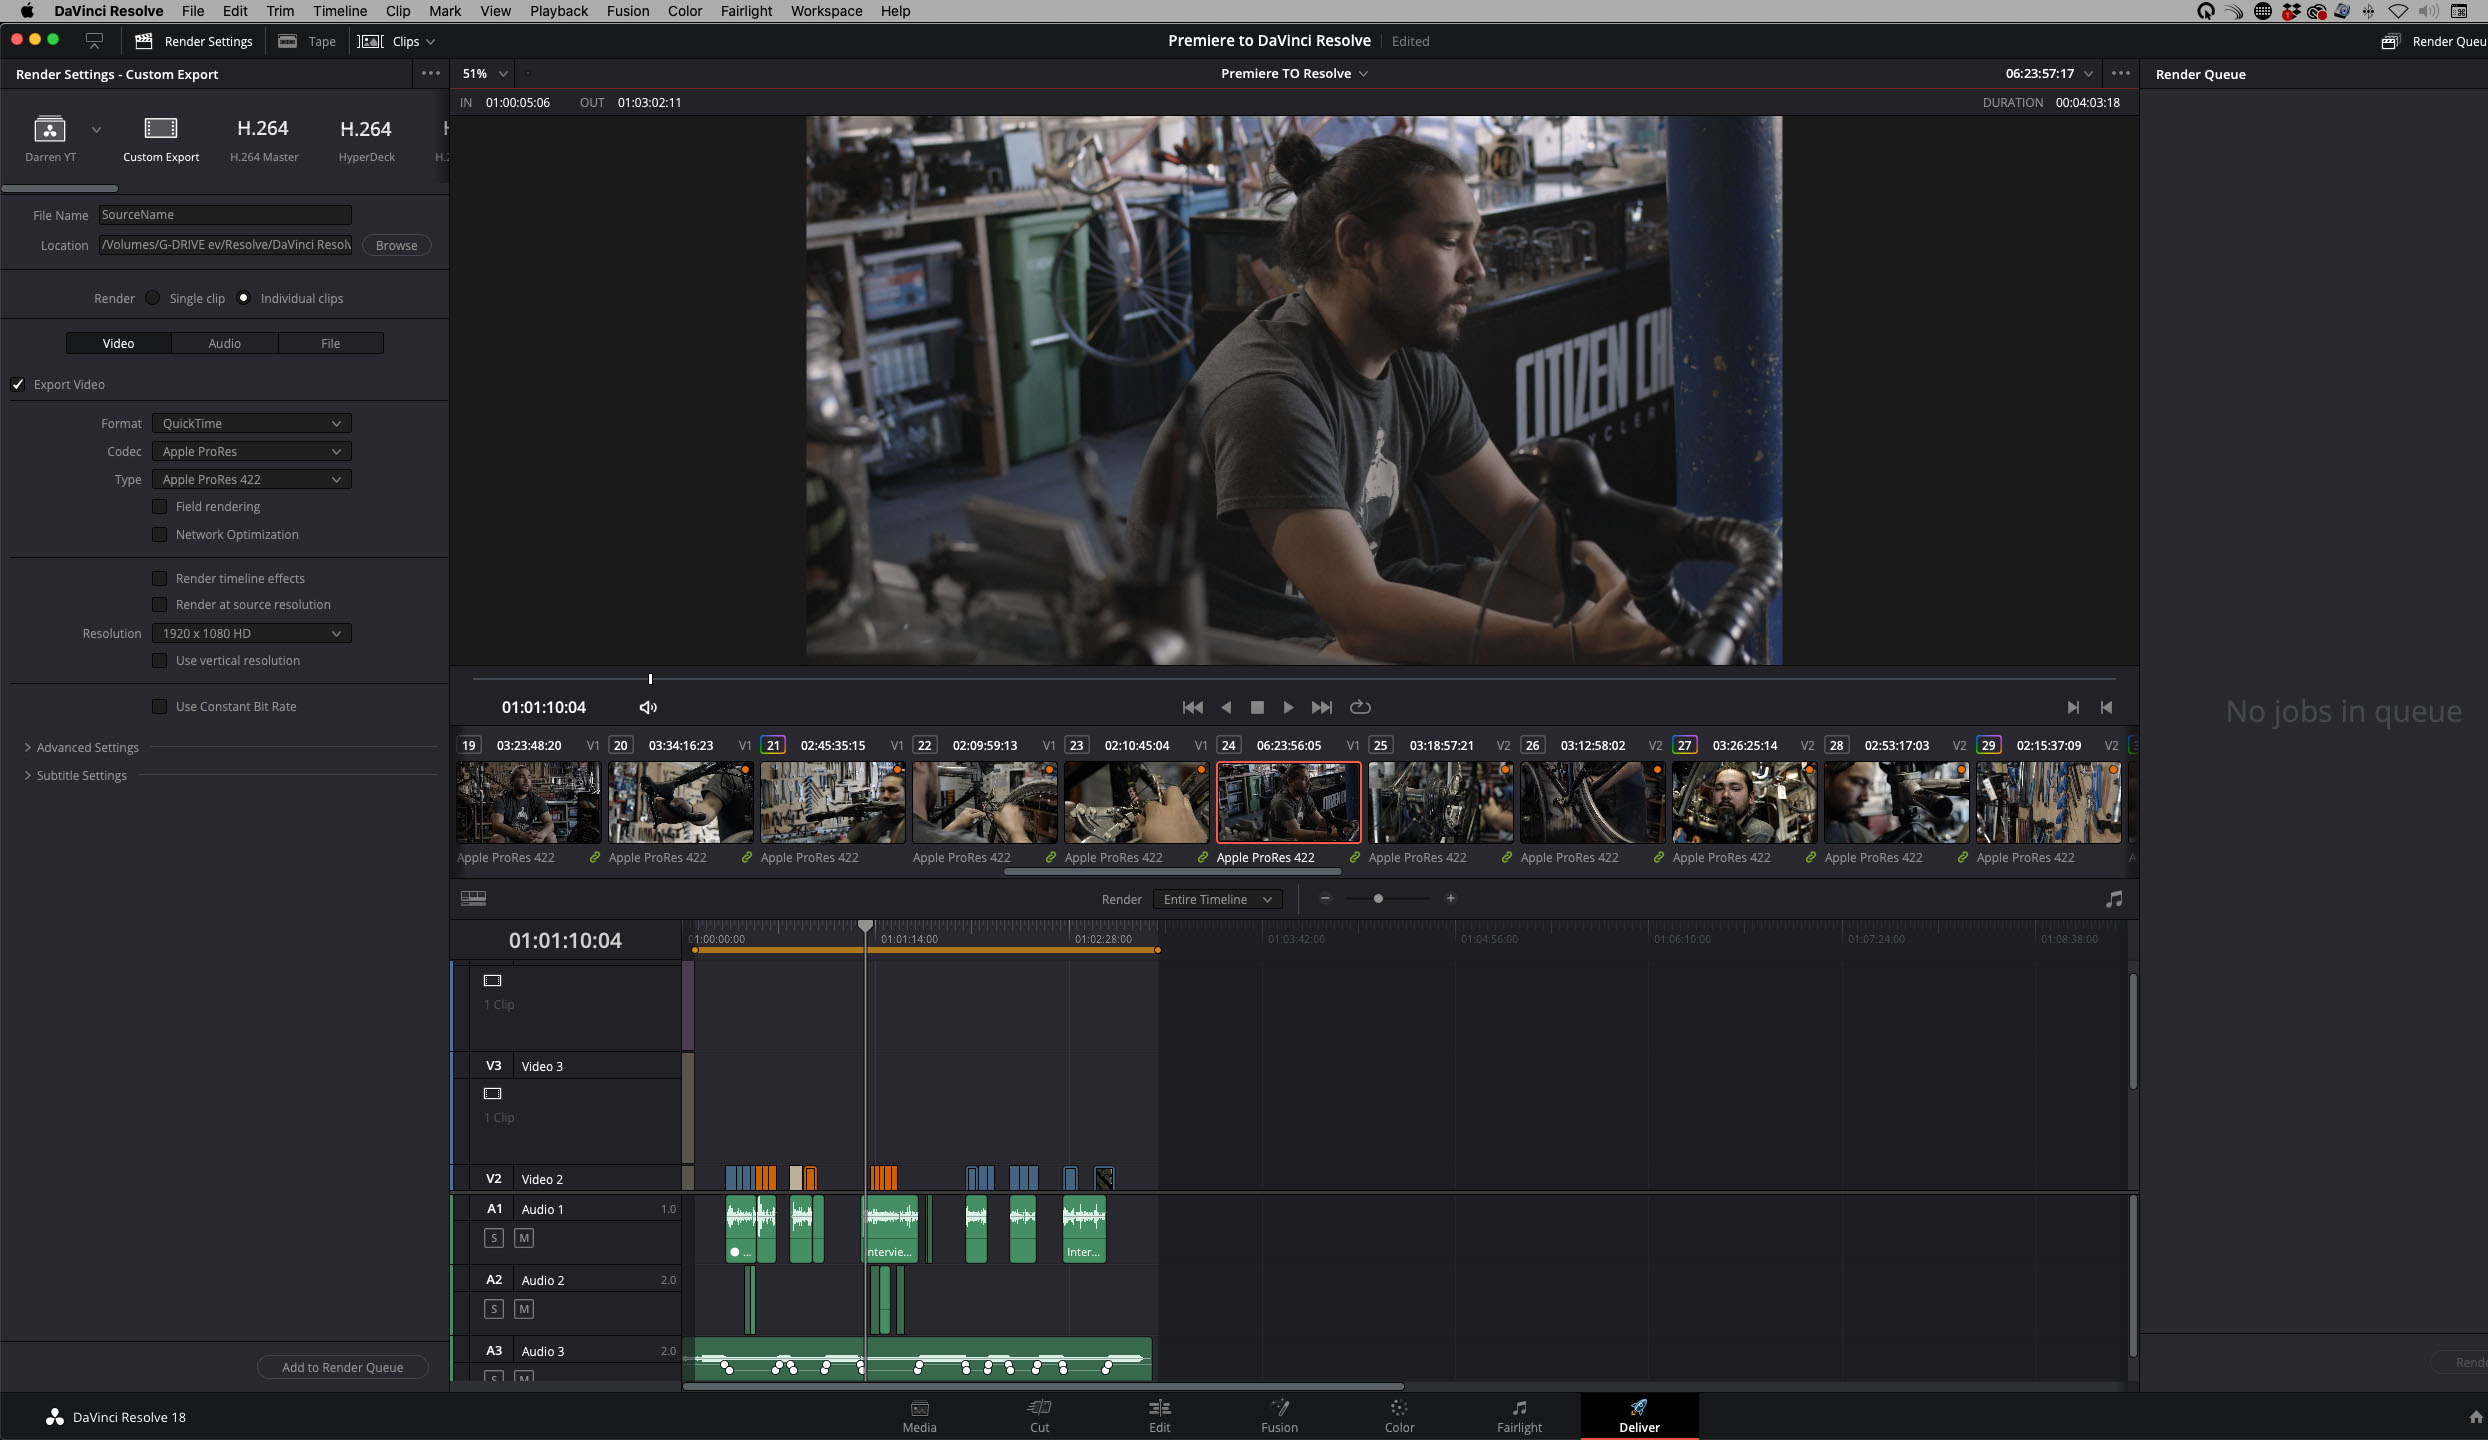
Exporting media in DaVinci Resolve is slightly different compared to Adobe Premiere. In Adobe Premiere, one would go to File, Export, Media and set all desired settings, such as size and codec, in the Export Settings box, which communicates with Media Encoder in the background.
In DaVinci Resolve, one follows the tabs down, starting from Media to Import, then to the Edit page (Cut page not necessary), then to Colour grading and finally to the Delivery page. On the Delivery page, all the desired options for video and audio format, codecs, file names and export settings are available in the drop-down menus on the left side. Resolve’s media encoding is significantly faster than Adobe Premiere.
Making the switch from Premiere Pro to DaVinci Resolve
If you are currently using Adobe Premiere Pro and are considering switching to DaVinci Resolve, I highly recommend that you take the opportunity to do so. While adjusting to a new program may come with a learning curve, the transition is worth it.
The built-in colour grading system of DaVinci Resolve is highly regarded and used in the production of Hollywood feature films and the most prominent TV shows. Furthermore, it is faster and more efficient than Adobe Premiere Pro, and the free version is readily available for download.
Read more:
- The best free video editing software
- 10 video editing tips and tricks for beginners
- The best iPad for video editing

Thank you for reading 5 articles this month* Join now for unlimited access
Enjoy your first month for just £1 / $1 / €1
*Read 5 free articles per month without a subscription

Join now for unlimited access
Try first month for just £1 / $1 / €1
Get the Creative Bloq Newsletter
Daily design news, reviews, how-tos and more, as picked by the editors.
Darren Mostyn is a highly experienced senior colourist and founder of a UK-based creative post facility. Darren specialises in colouring broadcast documentaries, music videos, and commercials. With a diverse portfolio, he has worked with prominent broadcasters such as BBC, Amazon, SKY, ITV, Channel 4, Channel 5, and many global networks. He is a certified DaVinci Resolve Master Trainer and regularly trains and speaks at seminars globally.
