Infinite Painter: 15 tips to master the mobile art app
Expand your mobile art abilities with these top tips for Infinite Painter.
Infinite Painter is an art app designed specifically for mobile. Mobile tablets are changing the art landscape. Take, for example, the ability to couple an oily brush with a three-point perspective grid to create dynamic imagery that fits in the realm of an art gallery. Or how about when I took my iPad into the Paris museums to learn from the Old Masters?
In this article, we will share tips on how you can knock out concept sketches in Infinite Painter using a few techniques and a handy custom interface. We’re sure these tips will not only speed up your art process but will hopefully expand your abilities beyond your comfort zone.
Find more brilliant digital art apps in our list of the 21 best drawing apps for iPad.
01. Get to know your brushes
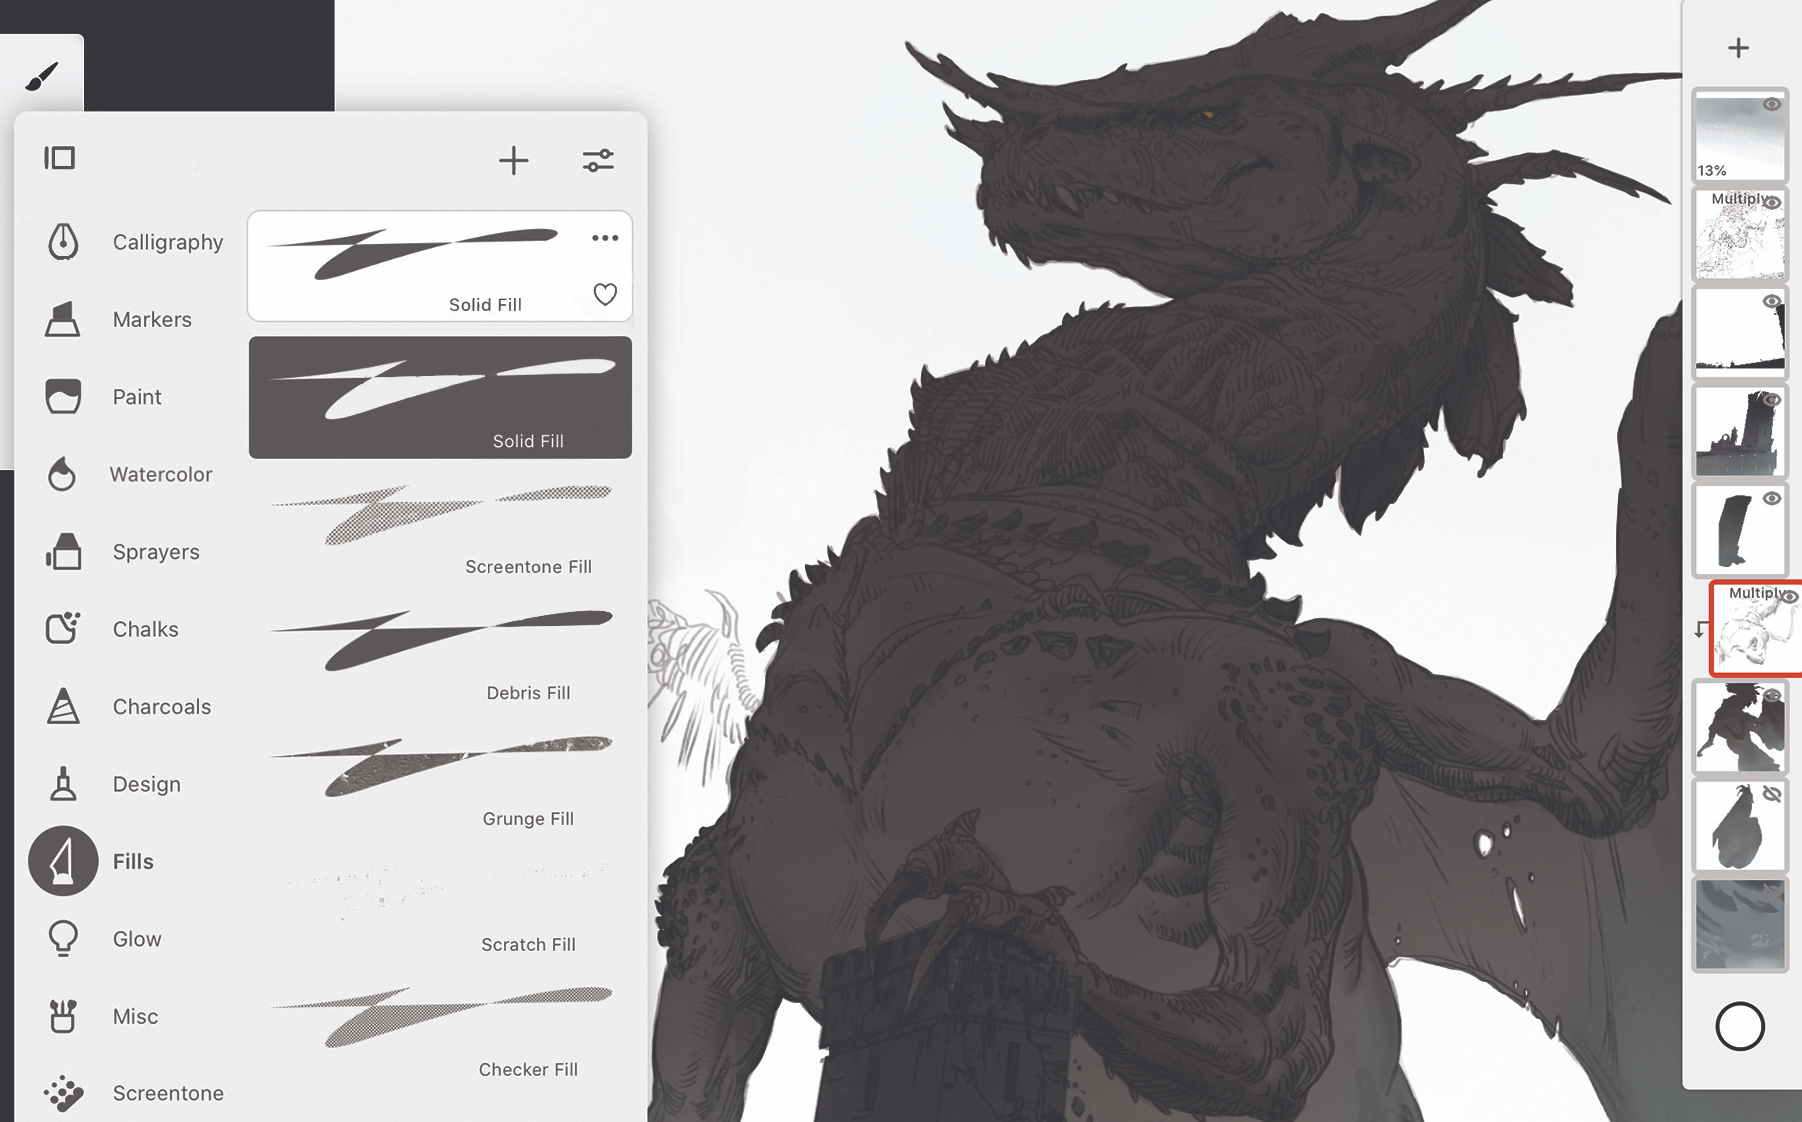
Final line art is a great way to solve problems and refresh your design. But when it’s time to build the layer structure for painting, open the Brush palette and use the Solid Fill brush to fill in the silhouettes of your characters or environment. I use the Solid Fill as both the brush and eraser.
If you have a dynamic scene that has a unique vanishing point, try using our Perspective Grid tools. By turning off the Magnet I was able to use the grid as a guide for the dragon’s towering body while turning the Magnet back on locked the architectural drawing into perspective.
If you create a new layer above the silhouette, you can then use a Clipping Mask to add detail to the layer below without altering your original silhouette. Simply tap the Layer icon in the Layer palette and then clip your render pass to the layer or group below.
02. Dock your Color Wheel
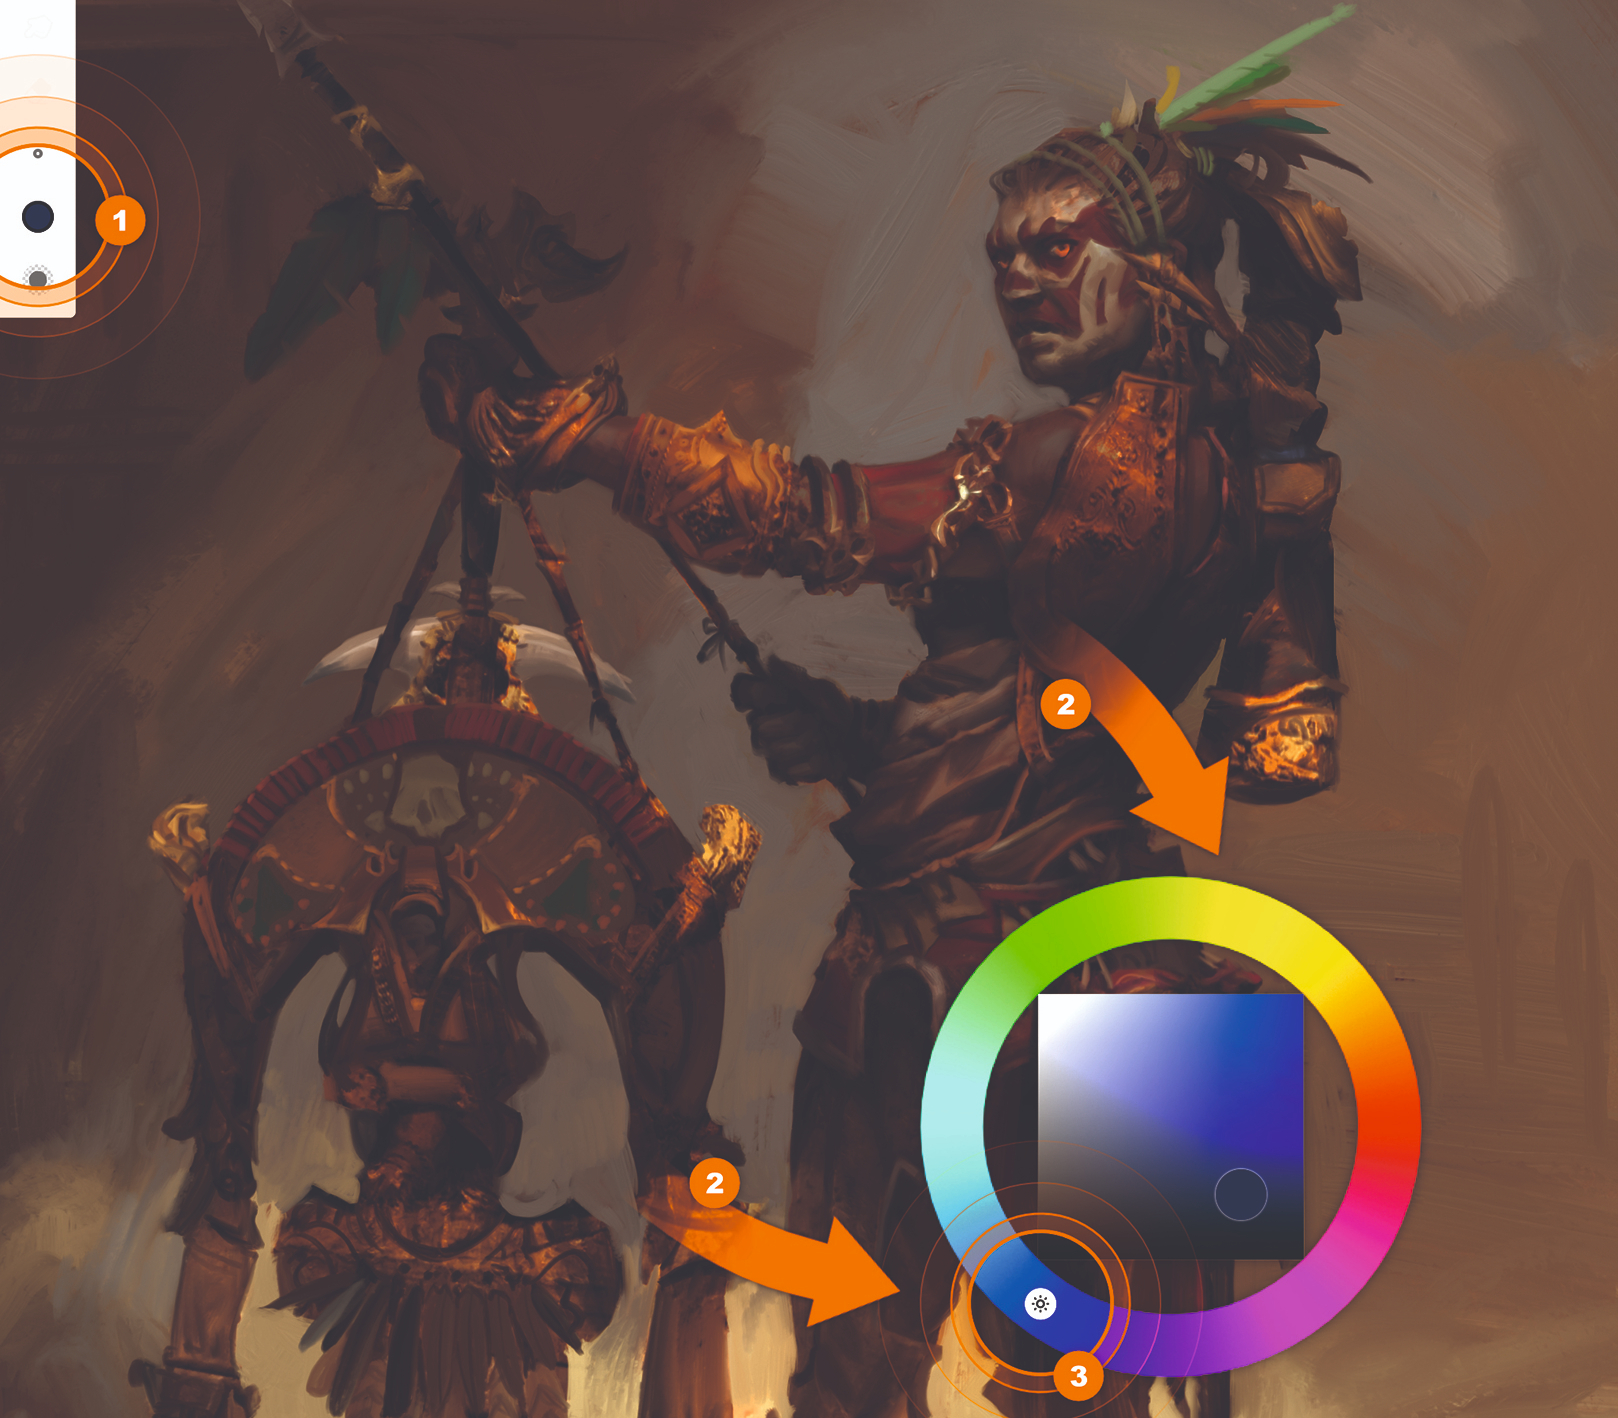
Here’s a tip to speed up your colour picking. Pick your Brush tool, then open your Color Wheel and with two fingers grab the wheel to dock it on to the canvas. Notice the Sun icon on the wheel: try clicking it and turning the wheel. When the Sun icon is active, the value of the colour choice will stay the same as you spin the wheel. When spinning the wheel without the Sun icon active, see how a yellow colour is brighter than a blue and how the colour dot no longer adjusts the value automatically.
03. Import reference imagery
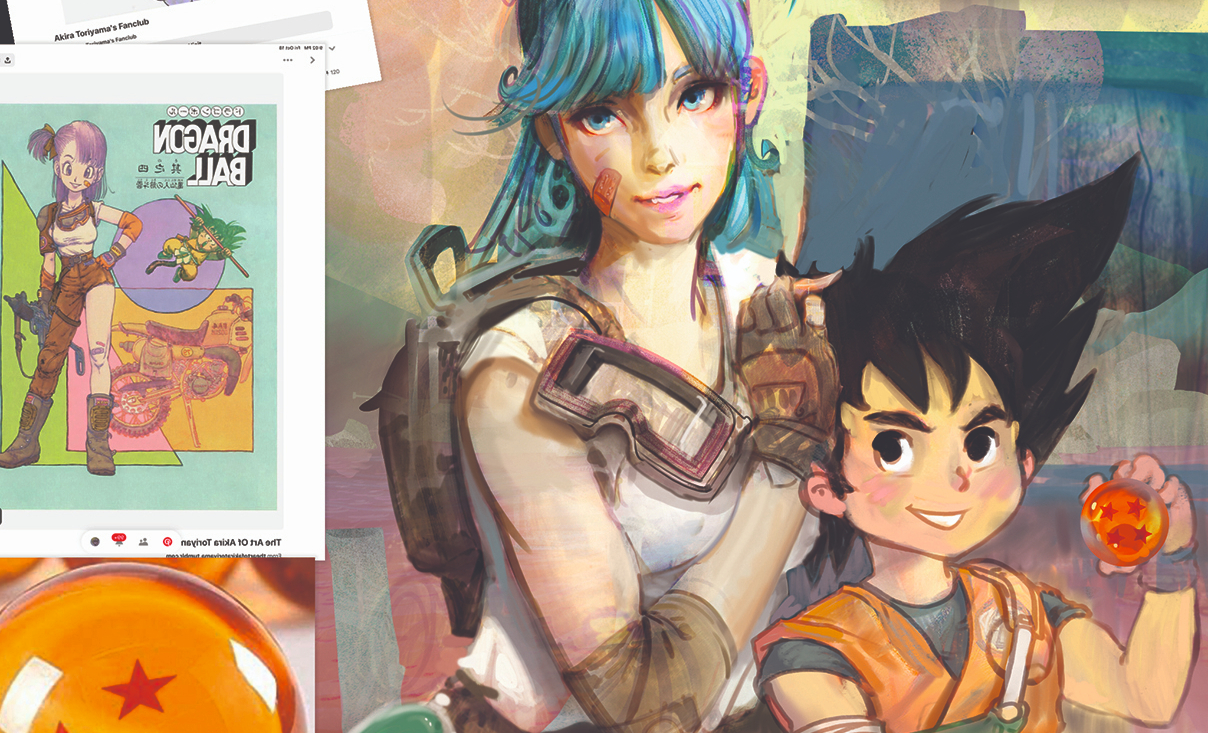
Click the three buttons at the top-right corner to open the Options menu and hit Import. This gives you the option to load an image from your gallery, clipboard or even take a photo with the device’s camera. Once you’ve made your photo selection, you can import it as a Layer or Reference: choose Reference. Now your inspiration will float above the canvas. You can resize it, flip it and toggle its visibility by clicking the Pin icon on the top-right of the screen.
04. Create a custom oil brush
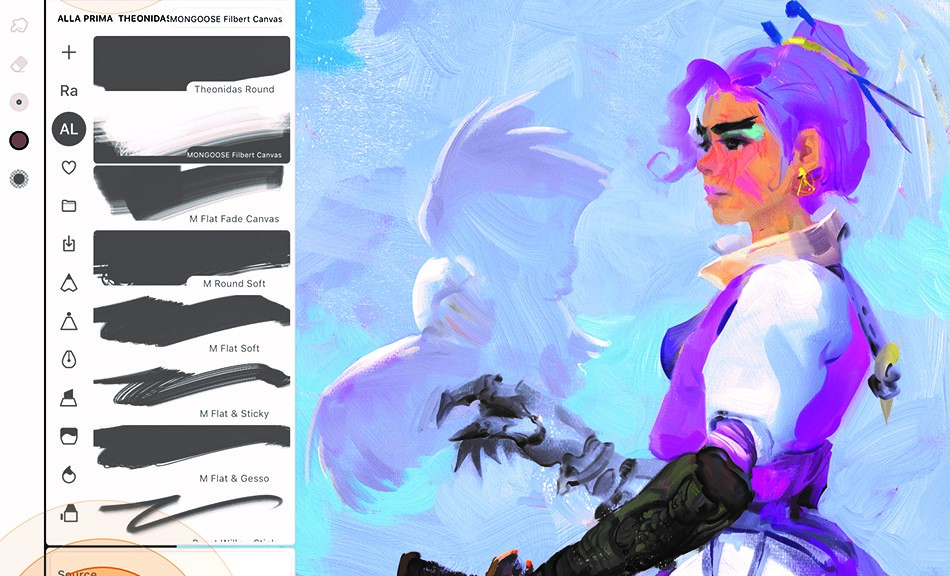
The most important feature to customise in a paintbrush is the head shape. Think of the head like stamping a brush with black ink. In greyscale, try to capture the clusters of bristles on a white layer. With the Lasso tool, select your brush head shape and on the right of the Lasso functions click +Brush. Now go to the head section of your brush and change the head to your black and white stamp. Play with the other Brush Creator settings to finalise the feel of your new tool.
05. Use smart lines and shapes
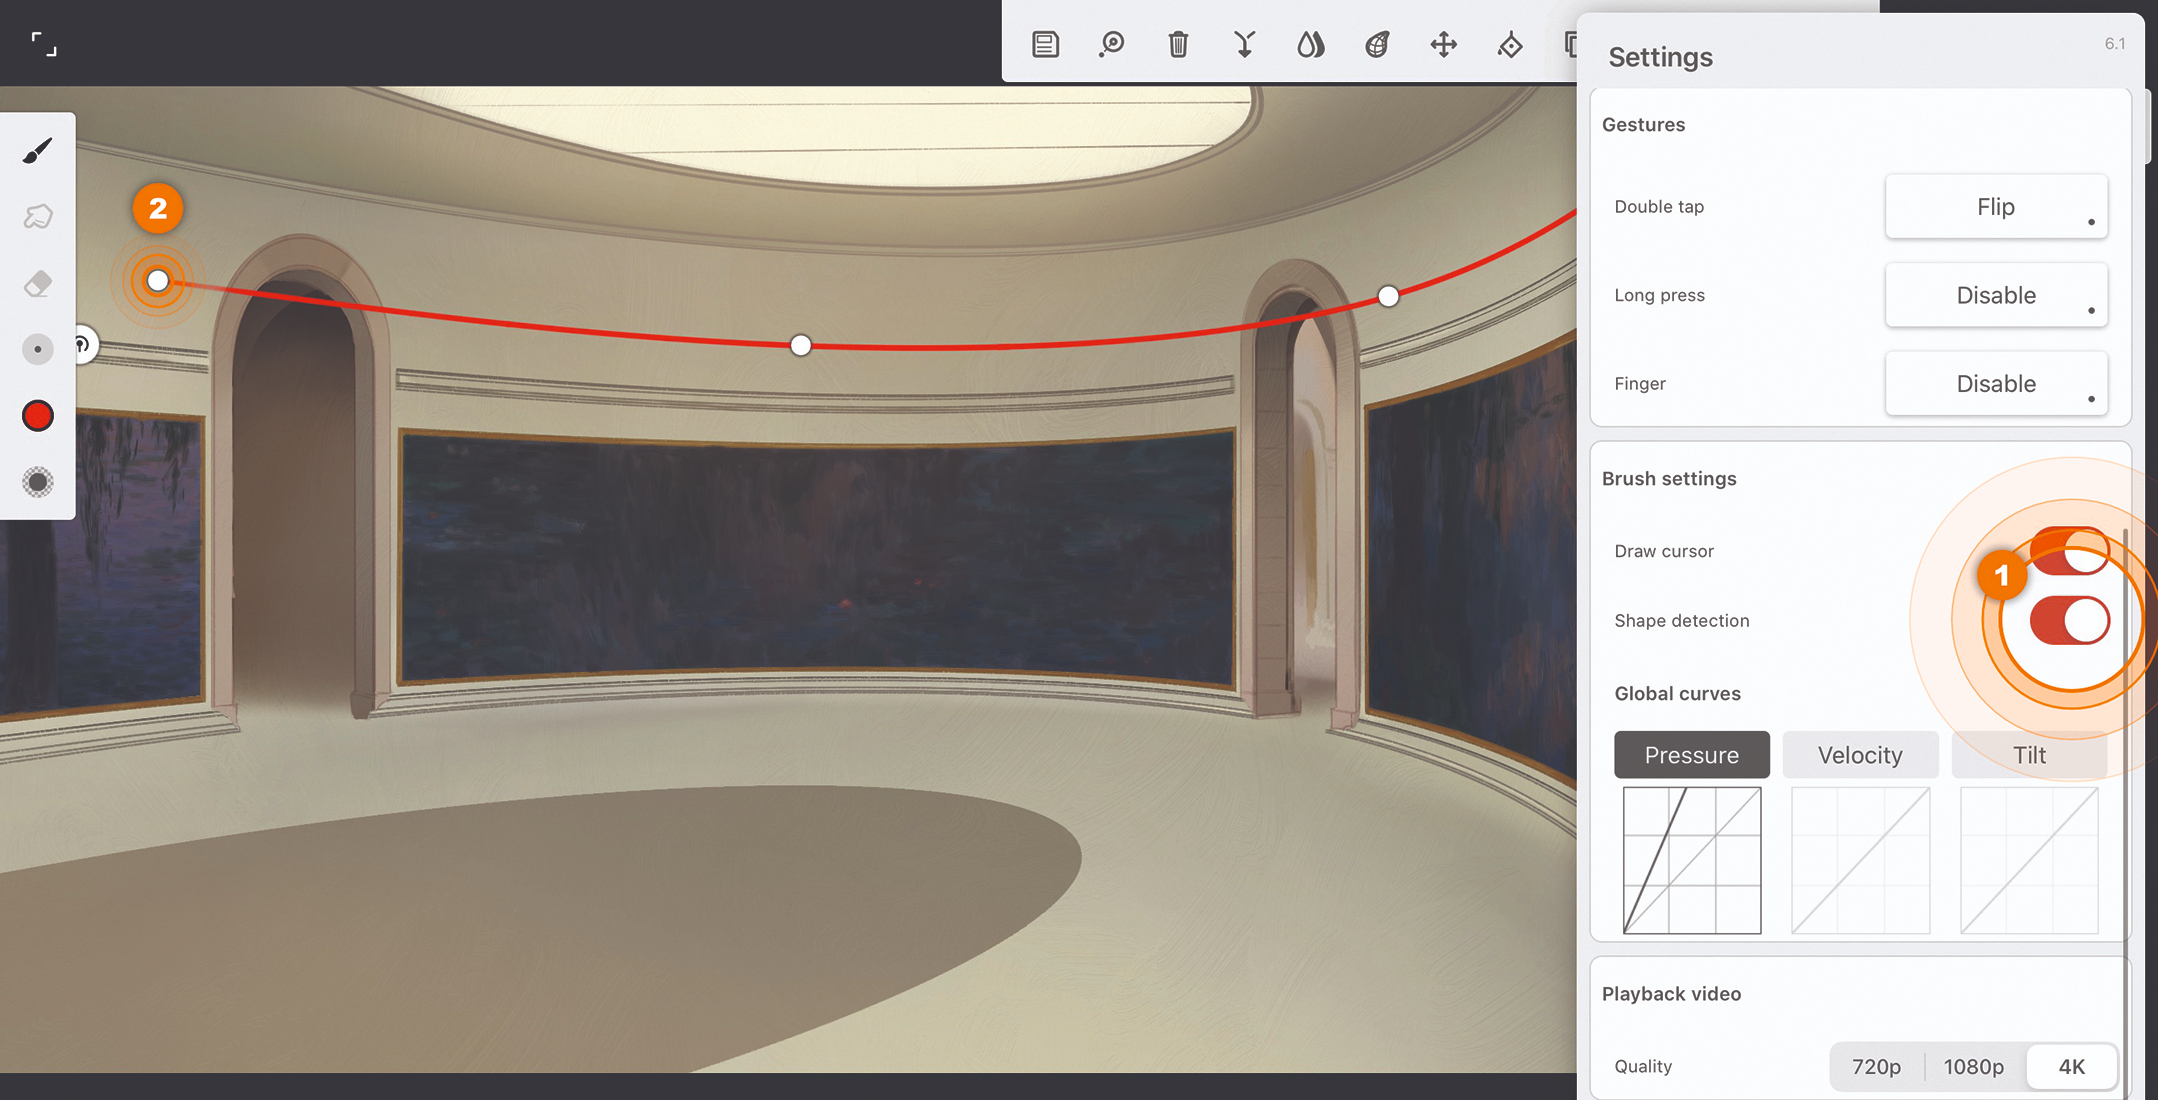
Infinite Painter has a wonderfully useful setting that makes it possible for you to activate predictive shapes by holding down the stylus at the end of a stroke. The system can detect all sorts of shapes such as lines, arcs, ellipses, rectangles and even complex paths.
The curved lines in this copy of a Monet masterpiece were beyond my skill set. With one single Smart Curve activated, I moved the pins into position to create the curved lines in the architecture and golden frames, then cloned the line by tapping the Stamp icon and moved those new pins down to the next horizontal curve.
06. Make custom patterns and textiles
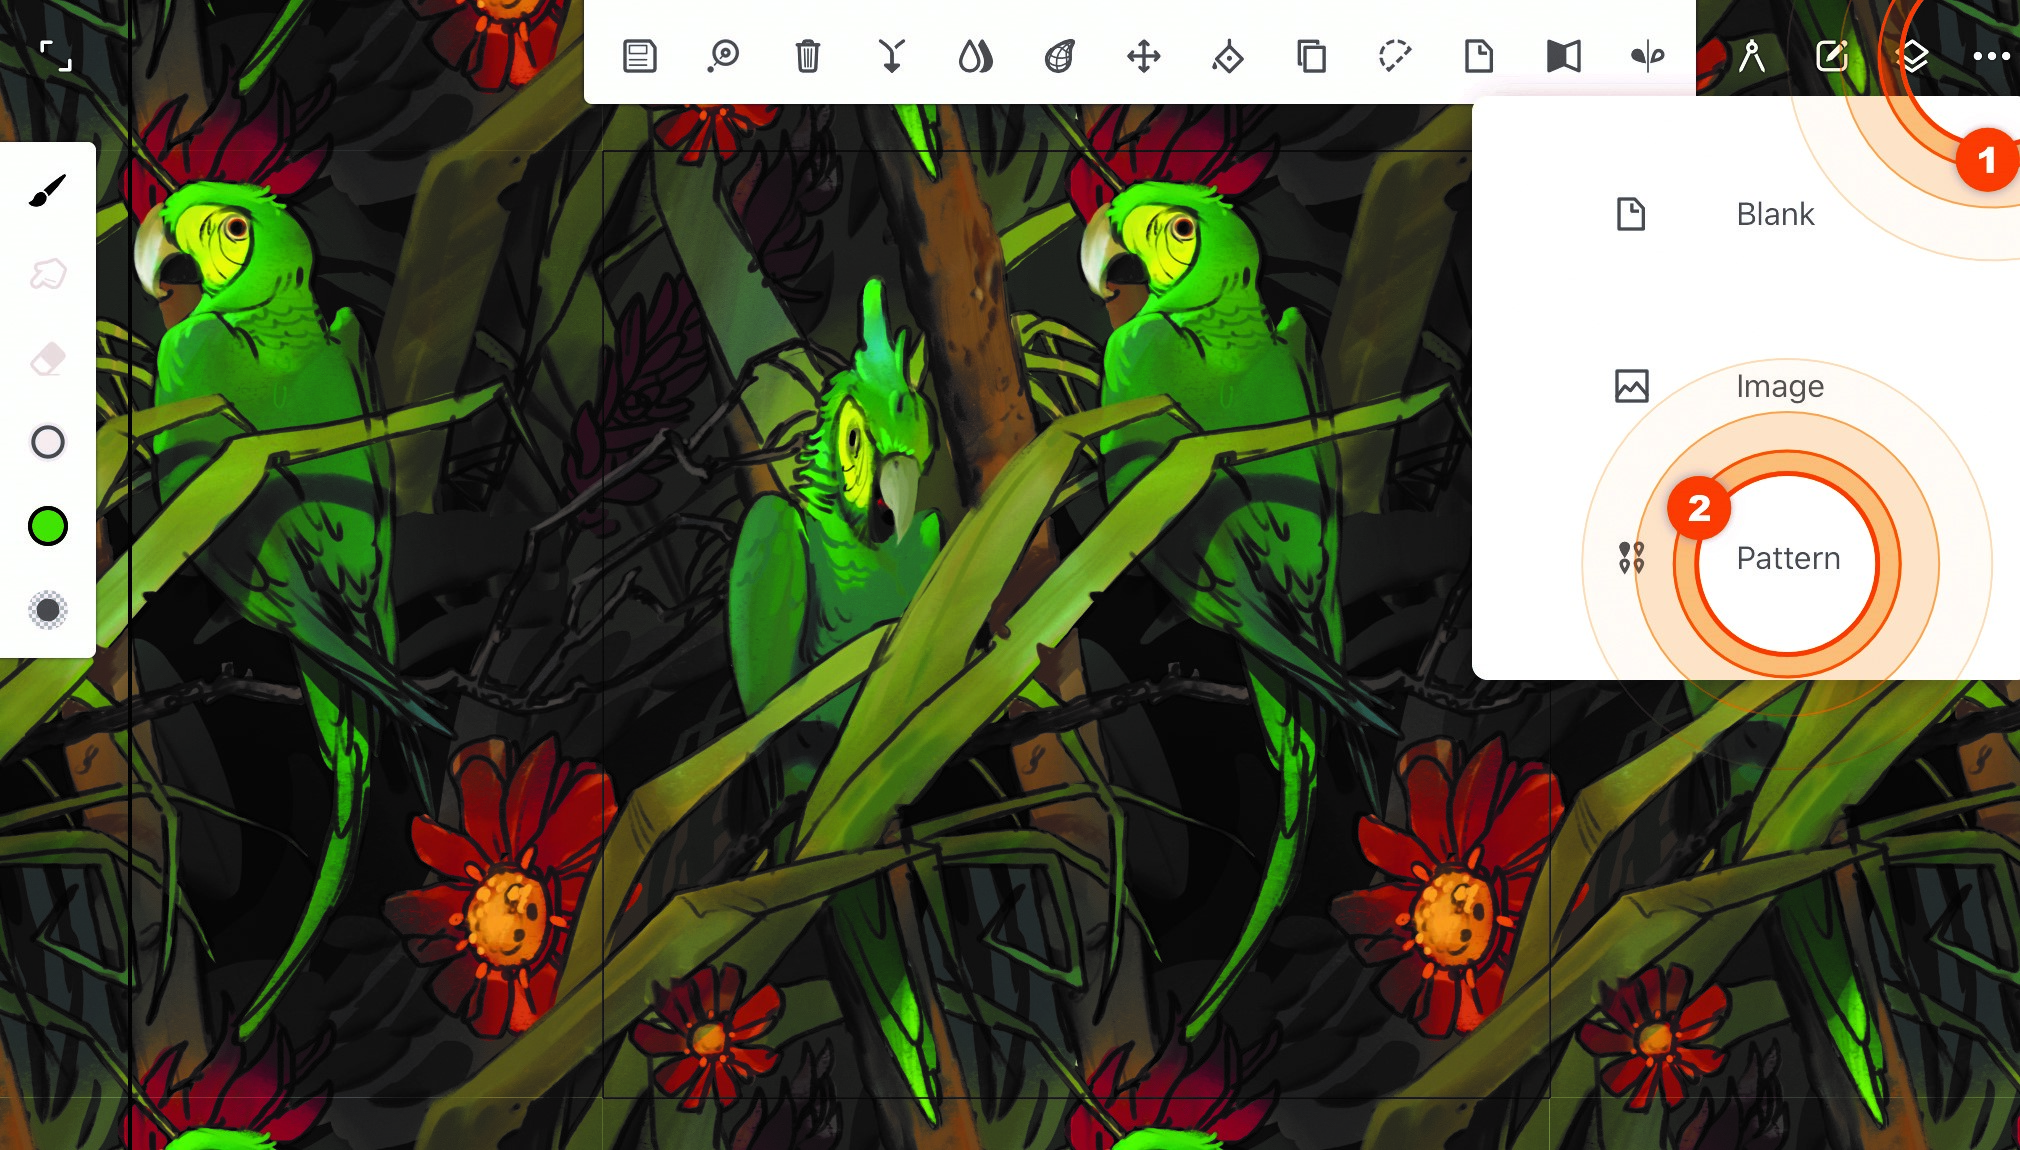
Seamless pattern projects are great for textile designs and brush making. Open the New Project window and choose Pattern. This file type will automatically stitch together the four corners of your illustration, which can then be used as a patterned asset in an illustration using the Pattern Fill tool or as a standalone textile for some wrapping paper. Alternatively, you could even make a custom brush using the pattern as your brush texture, and selecting Warp as the texture setting. Patterns such as fish or snakeskin would make a cool brush.
07. Attach a filter to your brushes
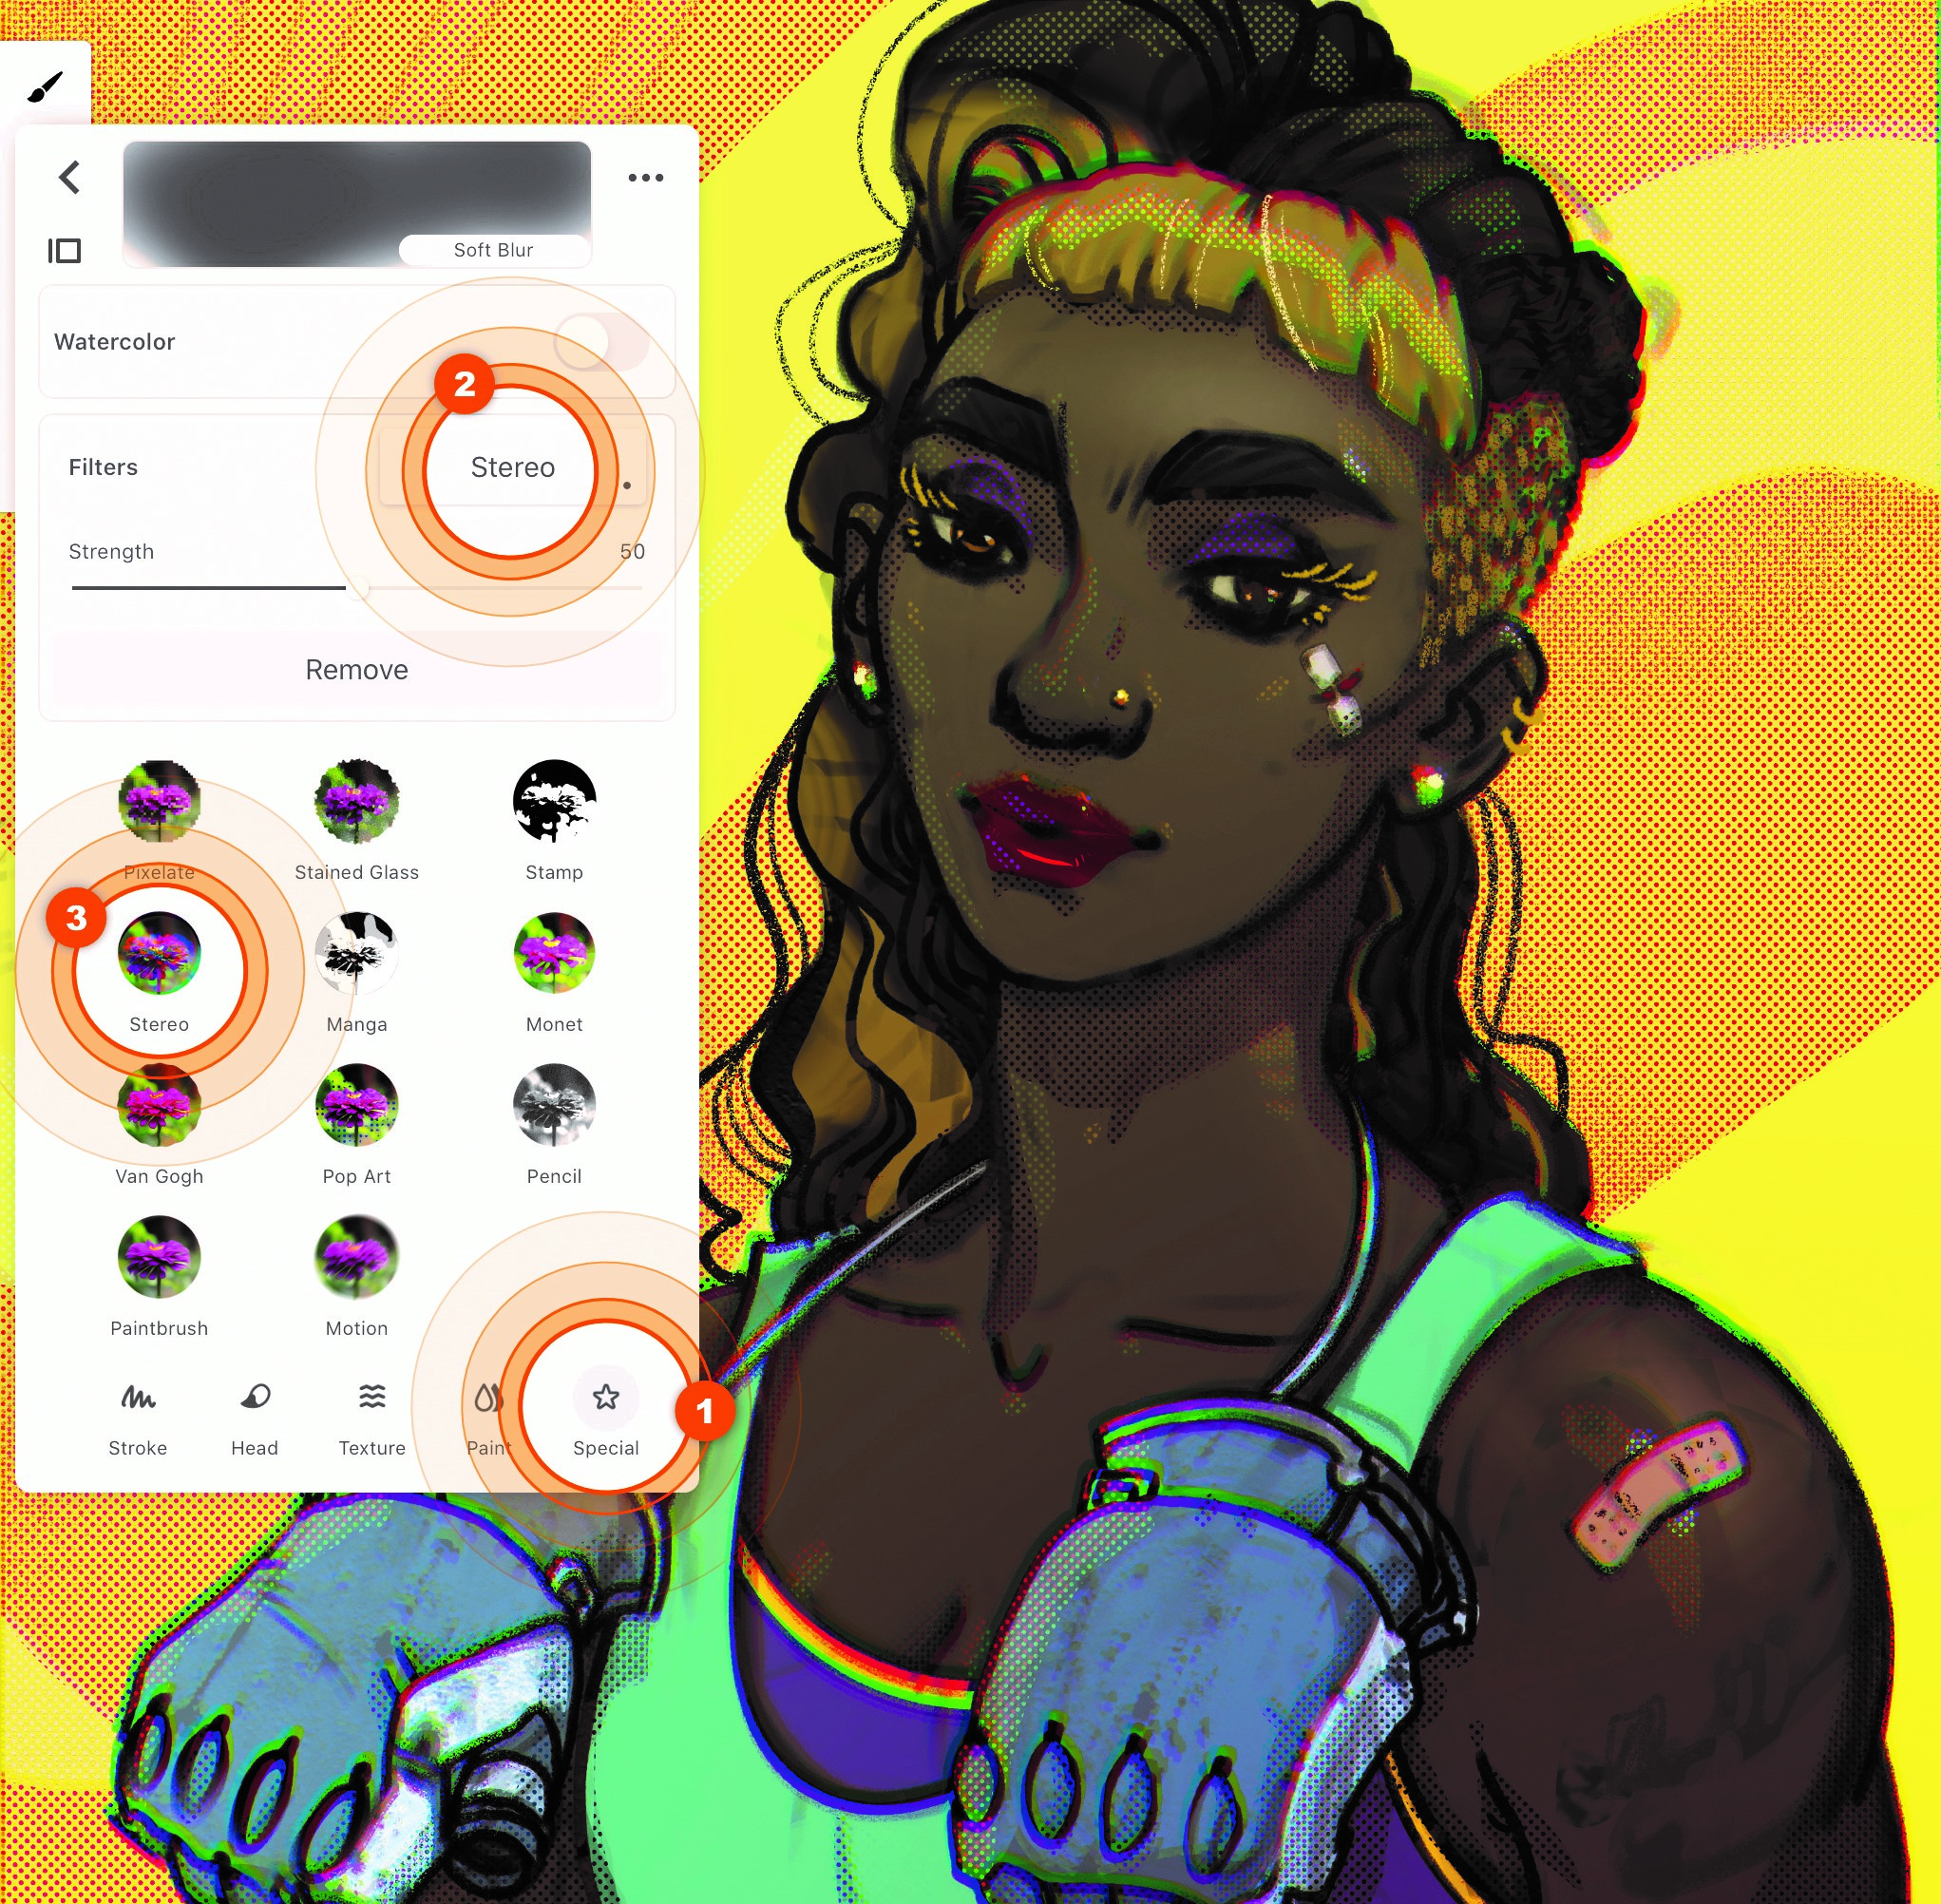
In the Brush editor, click the Special column and check out the Filters section. In this example, I attached the Stereo filter to an Airbrush that pinpoints the effect of separating the RGB channels. But what if you attached something like Motion Blur instead? You could give the boxing gloves a punching effect by swiping your brush in the direction that you want the blur effect to show. See what kind of cool brush combos you can make by attaching filters.
08. Add shapes to perspective grids
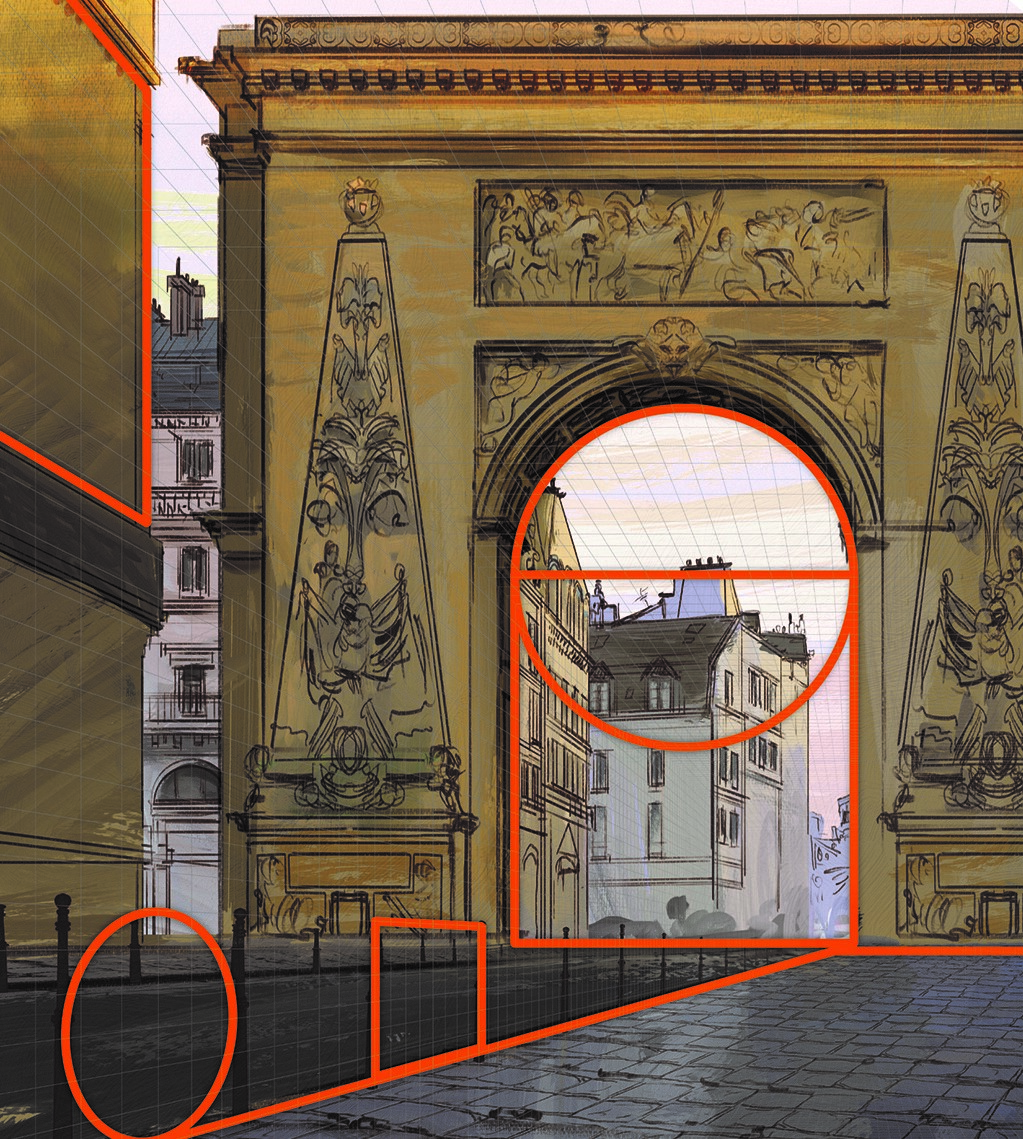
Using the Perspective Grids is pretty straightforward: adjust your vanishing points and then toggle the Magnet on and off to stick to the grid. Add an ellipse or square with the Magnet active and that shape will snap into that active perspective. Slide it around, and watch how the shape morphs into perspective. You can clone the shape by tapping the Stamp icon, then adjust the new shape as you need it. When your shape is still active, change the brush or brush size to alter the line weight, or use the Solid Fill brush for a solid shape.
09. Paint with symmetry
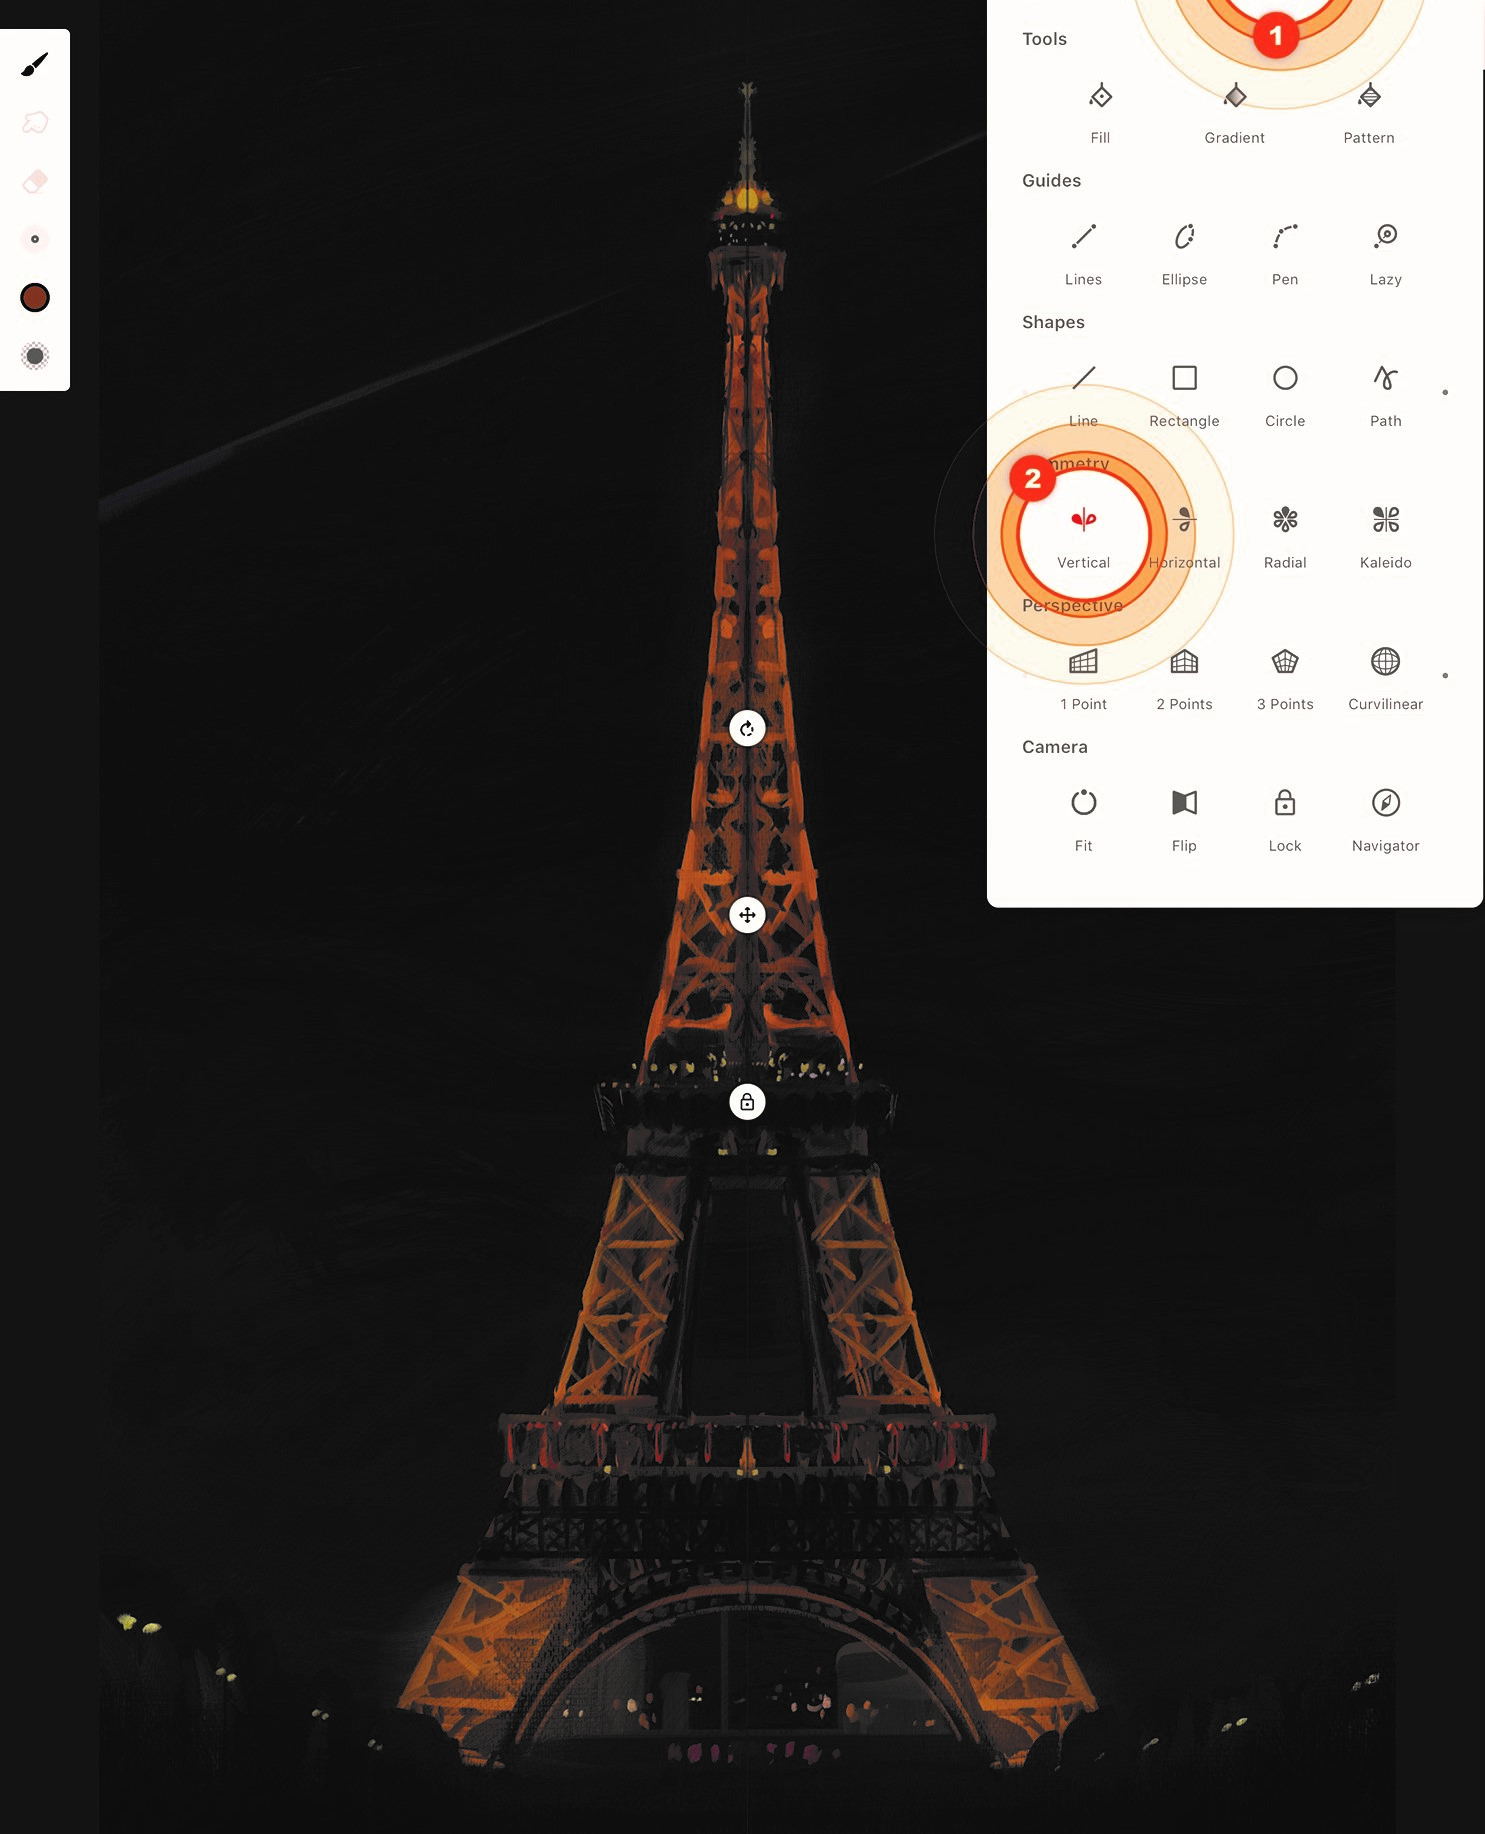
Symmetry can be a powerful shortcut for certain designs in concept art or even real-world sketching. Take, for example, the Eiffel Tower, which I painted from life in the grassy lawns of Paris. Open the Drawing tools panel and with the Vertical Symmetry tool enabled, move and rotate it into place and lock it. Now all your tools will be mirrored, including the brushes, Lasso, Liquify and more. This tool enabled me to quickly paint the tower. Paint brushes will lay down paint differently on both sides based on the asymmetry of a brush, which adds a subtle variation so that it’s not 100% symmetrical.
10. Generate patterns quickly and easily
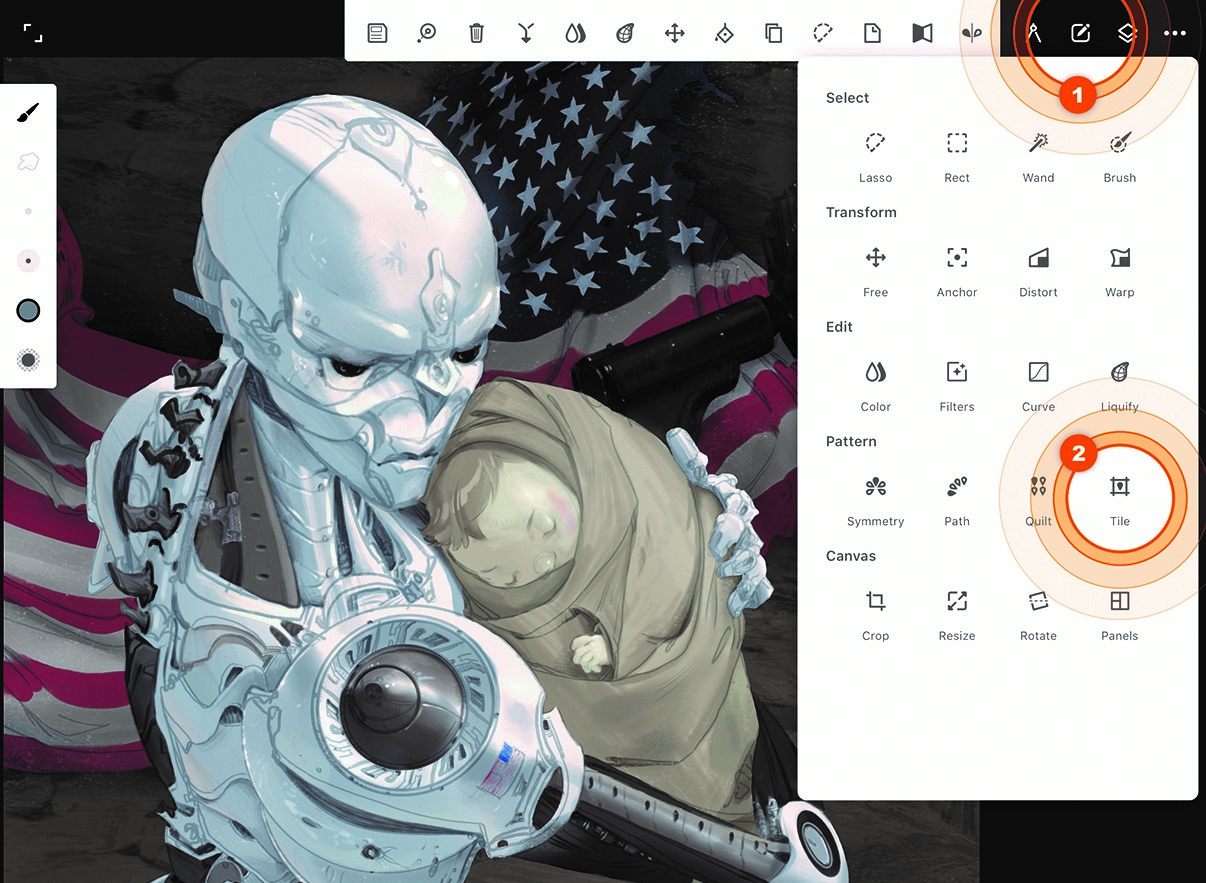
Rather than starting a new pattern file type to paint, for example, stars on a flag, you can create the star pattern inside your standard file type. When making the first star for the flag, I use the Kaleidoscope tool in the Symmetry section. Then I open the Selection tool panel, and with the Tile tool in the Pattern section, I make a box around the star and play with the size of the box to influence the spacing between stars. You can also check some of the mirror-flipping icons to give the pattern a more randomised look.
11. Dock your favourite tools
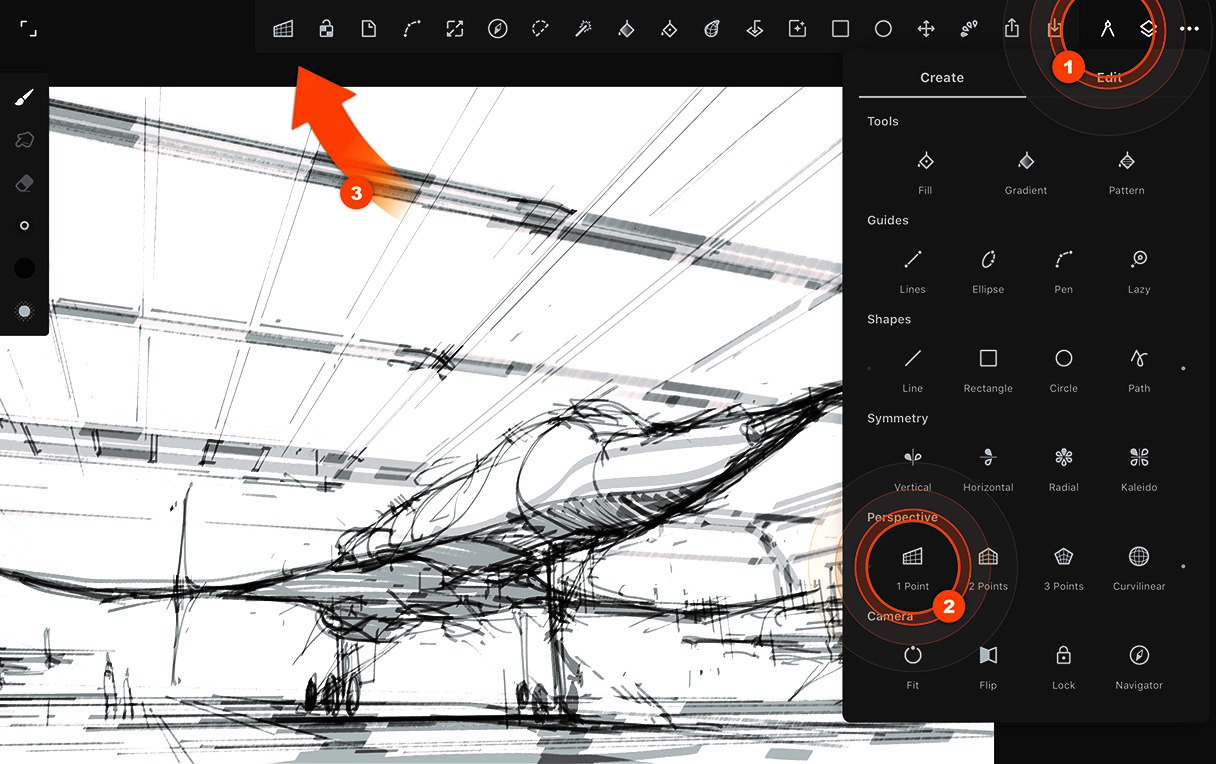
You can dock your favourite tools to your main workspace with a custom toolbar that meets your needs. No more jumping through menus to find the tool you're looking for. Just long-press on any tool icon and drag it into the station at the top of the screen beside the Tools icon. This works for options and layer functions like Clip or Merge as well. This time-saver keeps me focused on my art. Edit your toolbar to fit your style.
12. Lay down quick gestures
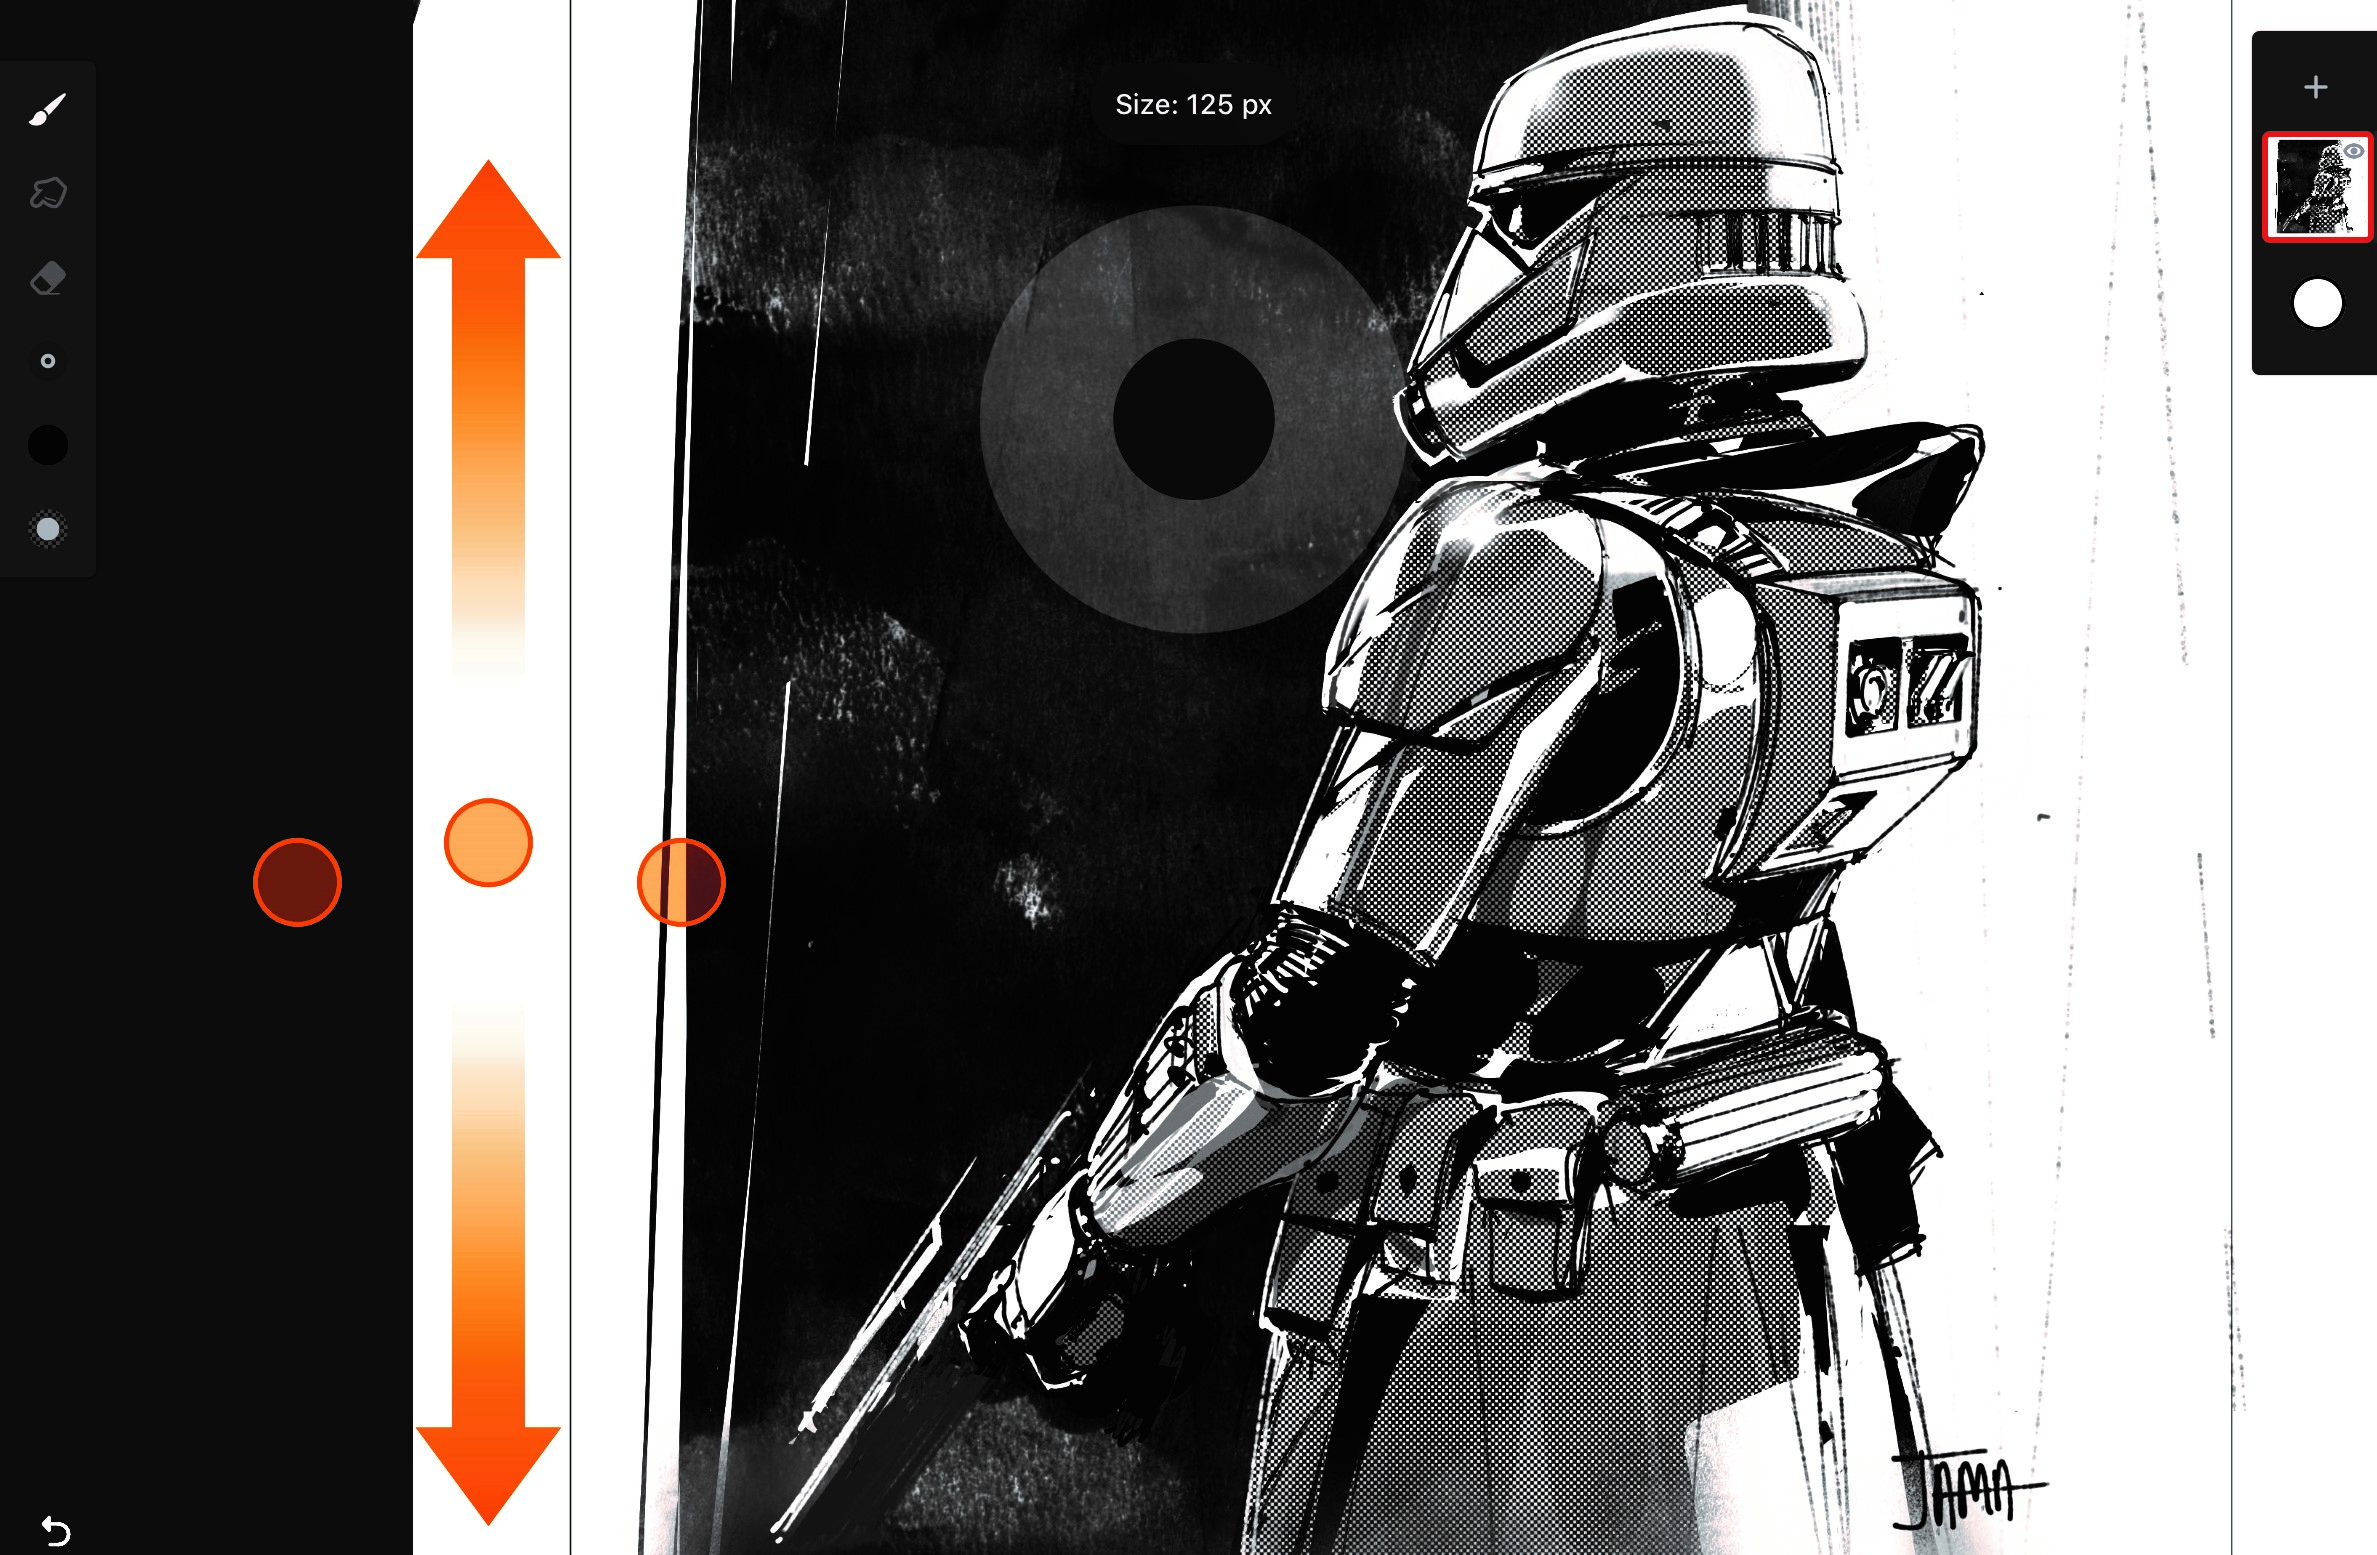
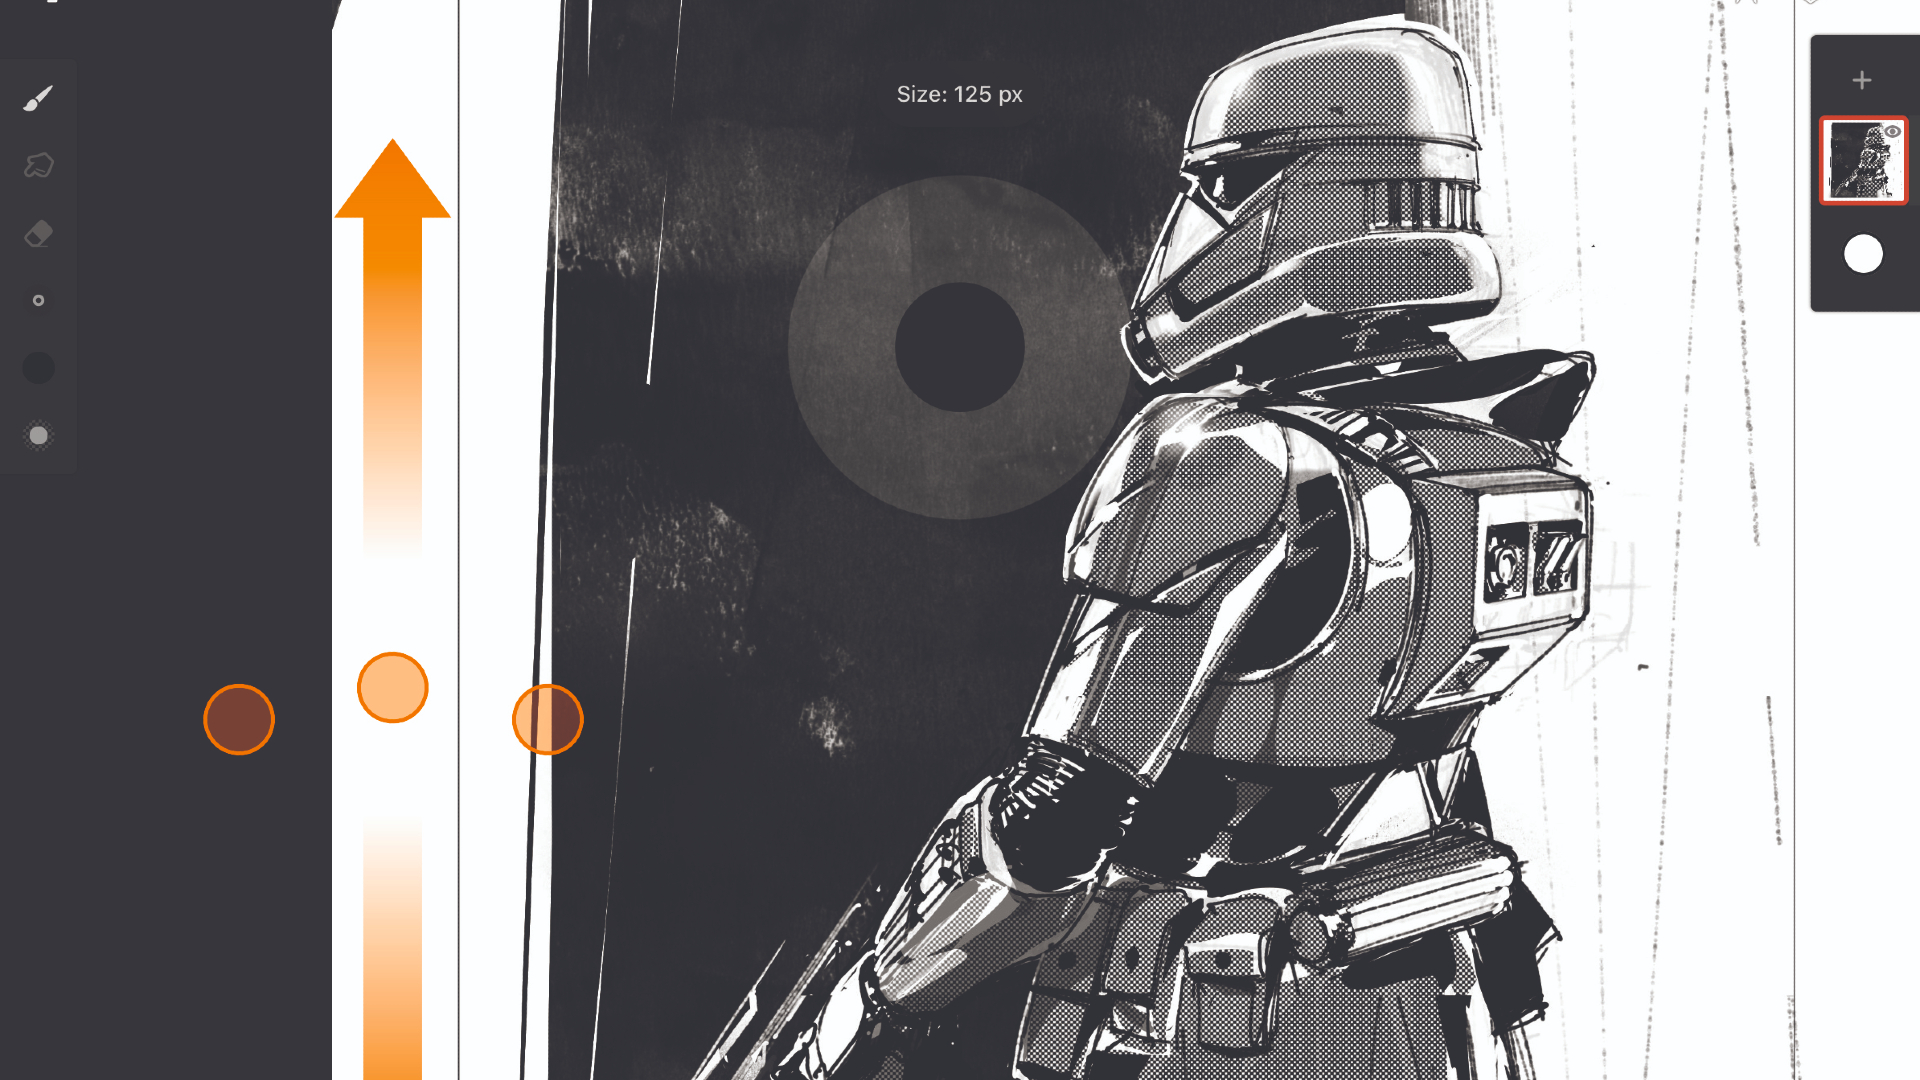
As a concept artist, everything is about speed and staying focused on what I’m sketching. When I want to focus, I tap four fingers to hide the interface. To change the brush size, I slide up or down with three fingers. To undo or redo, I tap two fingers or three fingers. These are great, but my favourite is what you can do with the Finger mode in the Settings. I set mine to Blend. Now when I need to switch between sketching and blending, I press my thumb on the canvas to turn my brush into a blender. Crazy.
13. Get started with key brushes
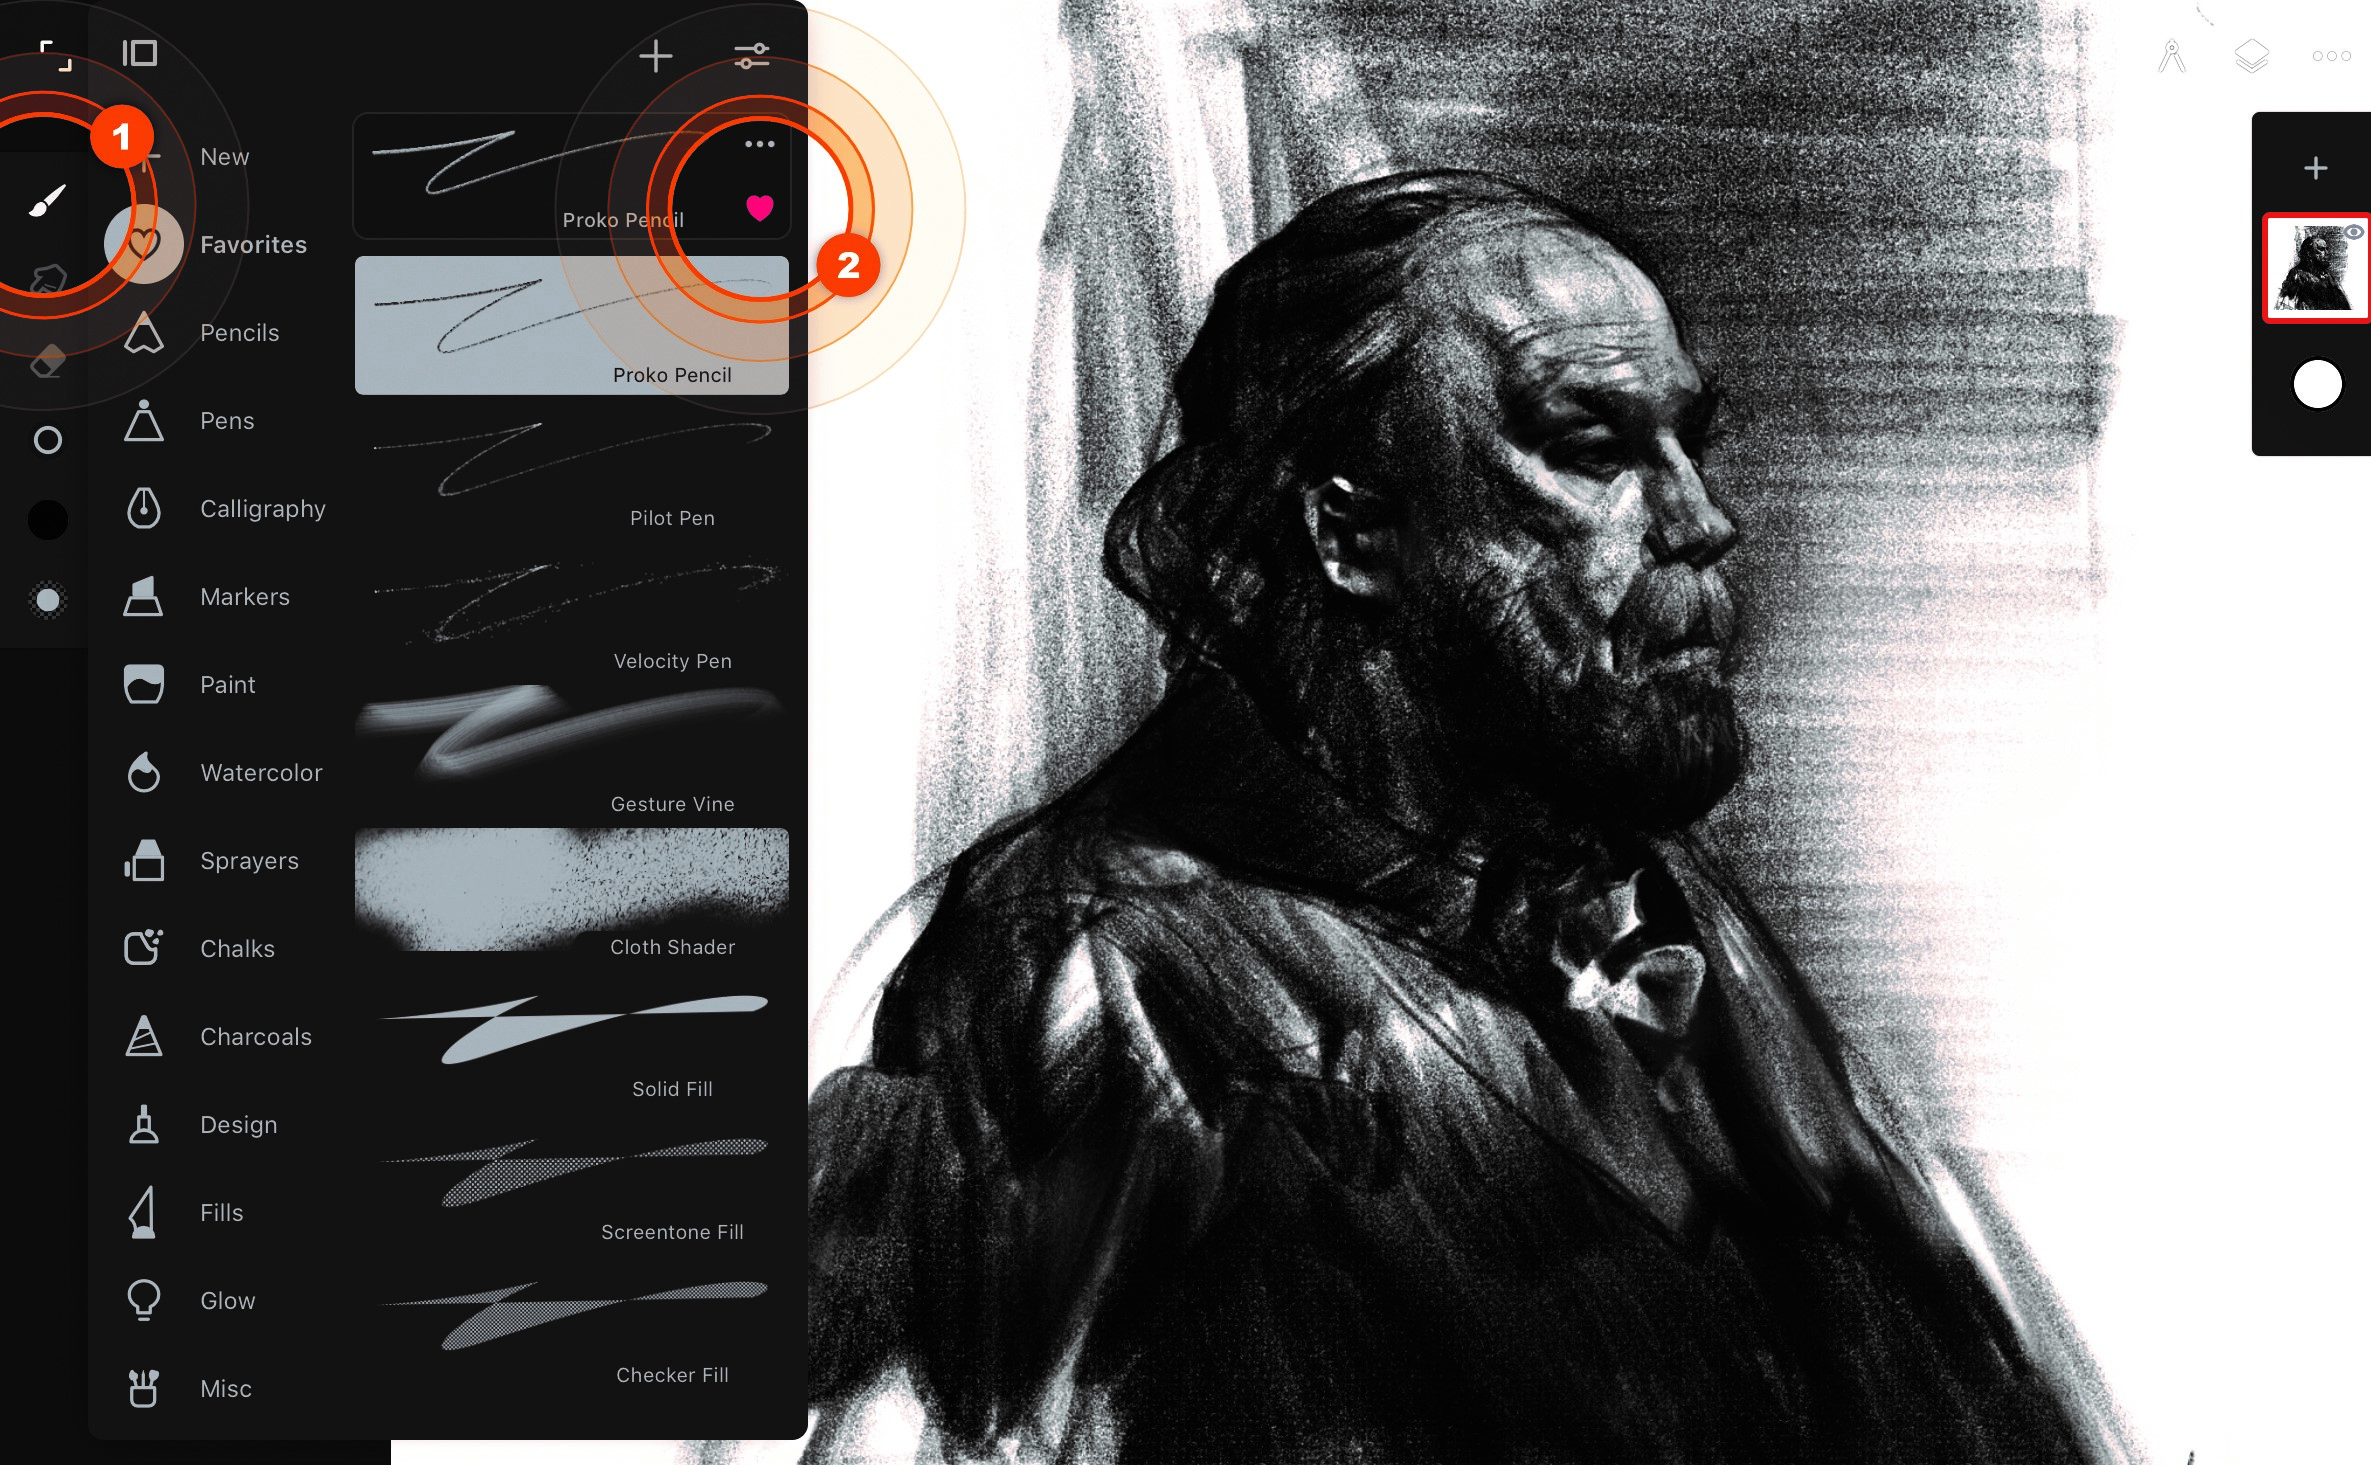
To help you get painting I’m going to point out some of my favourite tools, which you can keep organised. For quick sketching and shading, try out the Proko Pencil in the Pencils and the Gesture Vine in the Charcoals. These are great for strong gesture strokes and tilt shading (lay your pencil flat). The Velocity Pen and the Pilot Pen in the Pens use a particle system that creates a neat pen-to-paper feel. To block in a scene, you can’t ignore the Fill brushes.
14. Shape out your ideas
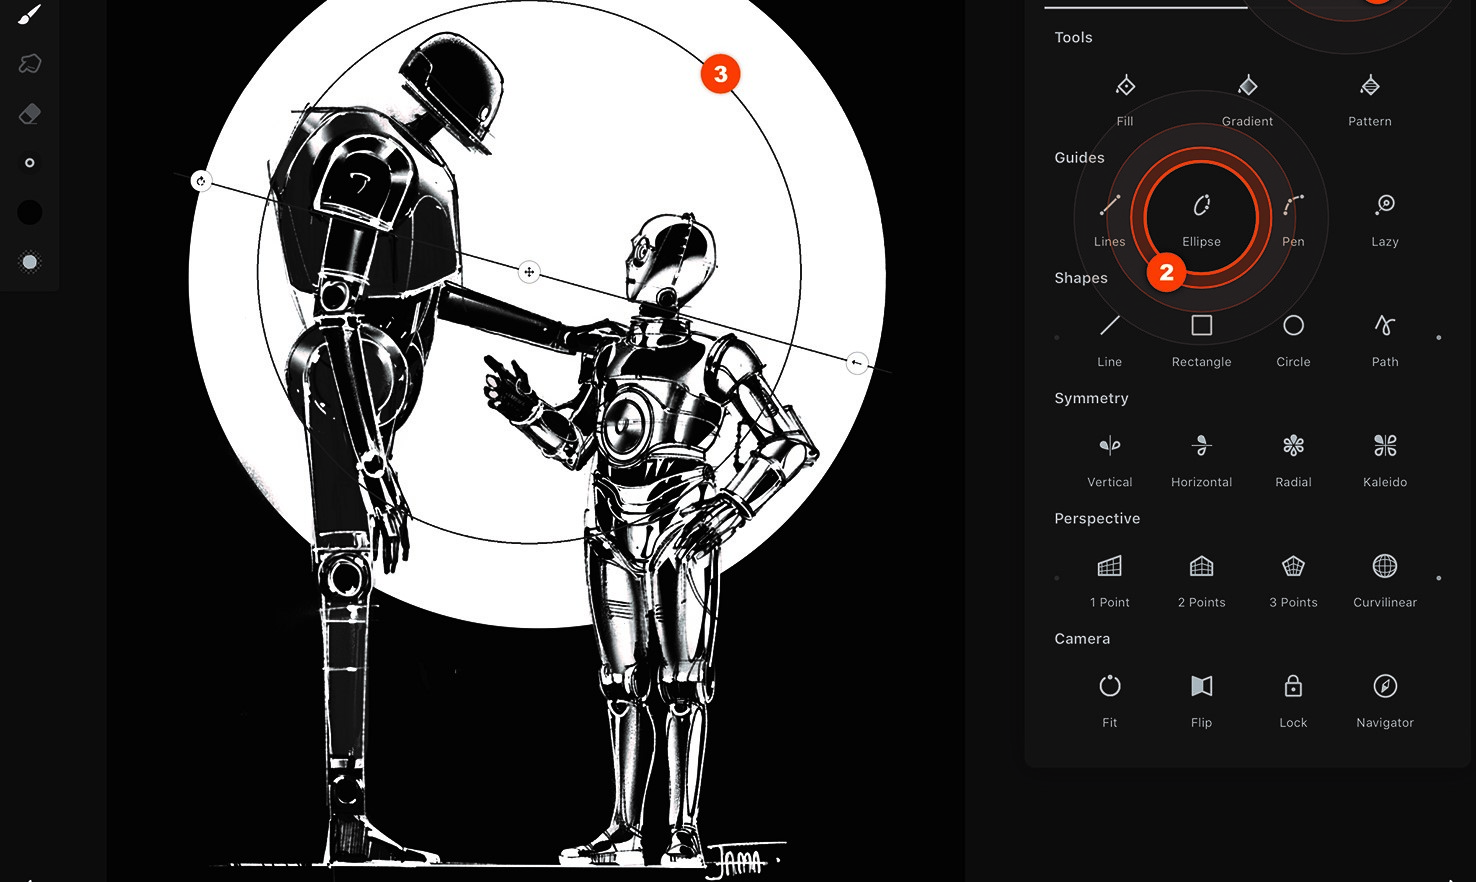
After doing a rough sketch, I use the app’s shapes and guides to construct the final design. The shapes are live until you tap away from them or drag out a new shape, meaning you can adjust brush properties or even change the brush to find out what works best for your piece. If you’re carving out your line work, you have to try the Lazy Guide. It drags the brush behind the stylus to create smooth lines and sharp corners. Or try out the Pen guide and Path shape – these tools make creating tight line-work a breeze.
15. Familiarise yourself with the panels tool
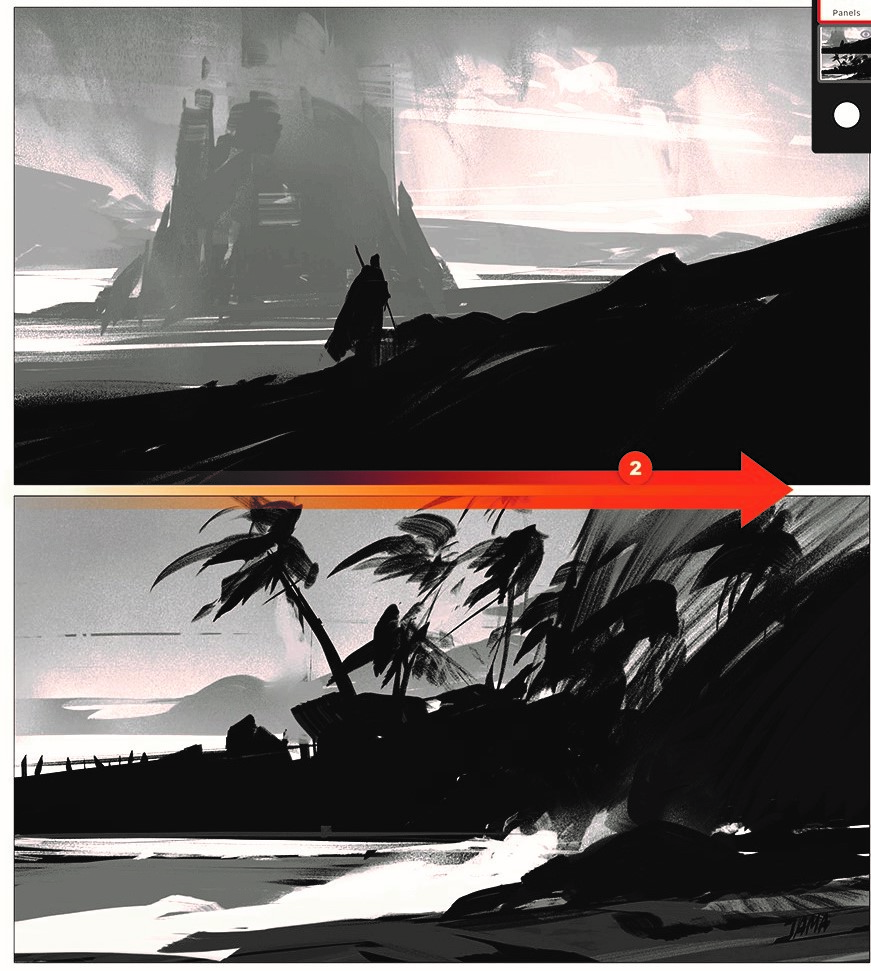
Infinite Painter is constantly evolving with new tools and features. Click the Tools button and select the Panels tool to create a frame around the canvas. It enables you to divide the canvas into panels by slicing from one end of the frame to the other end. This is great when creating thumbnails, planning out sequences, and for creating comics. After you’re finished, the tool creates a Panels adjustment layer that you can re-edit any time by selecting it in the Layers panel.
This article originally appeared in issue 184 of ImagineFX, the world's best-selling magazine for digital artists. Subscribe here.
Related articles:

Thank you for reading 5 articles this month* Join now for unlimited access
Enjoy your first month for just £1 / $1 / €1
*Read 5 free articles per month without a subscription

Join now for unlimited access
Try first month for just £1 / $1 / €1
Get the Creative Bloq Newsletter
Daily design news, reviews, how-tos and more, as picked by the editors.
