How to calibrate a monitor: level up your display with these tips
Do your creative work justice, by learning how to calibrate a monitor properly.

Wondering the best way to calibrate a monitor? Whether you're setting up a monitor for graphic artists or a monitor for MacBook Pro, proper calibration is essential for achieving true-to-life colours and optimal display performance.
Many creative professionals don't realise their screens are displaying colours inaccurately until they learn how to calibrate a monitor. Even expensive displays can drift from their factory settings over time, leading to subtle distortions in colour reproduction that can impact your work. And so an uncalibrated monitor can mean the difference between perfect prints and costly mistakes.
While some premium displays come pre-calibrated, most monitors require manual adjustment to reach their full potential. So whether you're editing photos, designing graphics, or simply wanting the best possible viewing experience, read on to learn the best way to calibrate a monitor running Windows and macOS respectively.
How to calibrate a monitor: Windows
1. Open the Color Calibration Tool
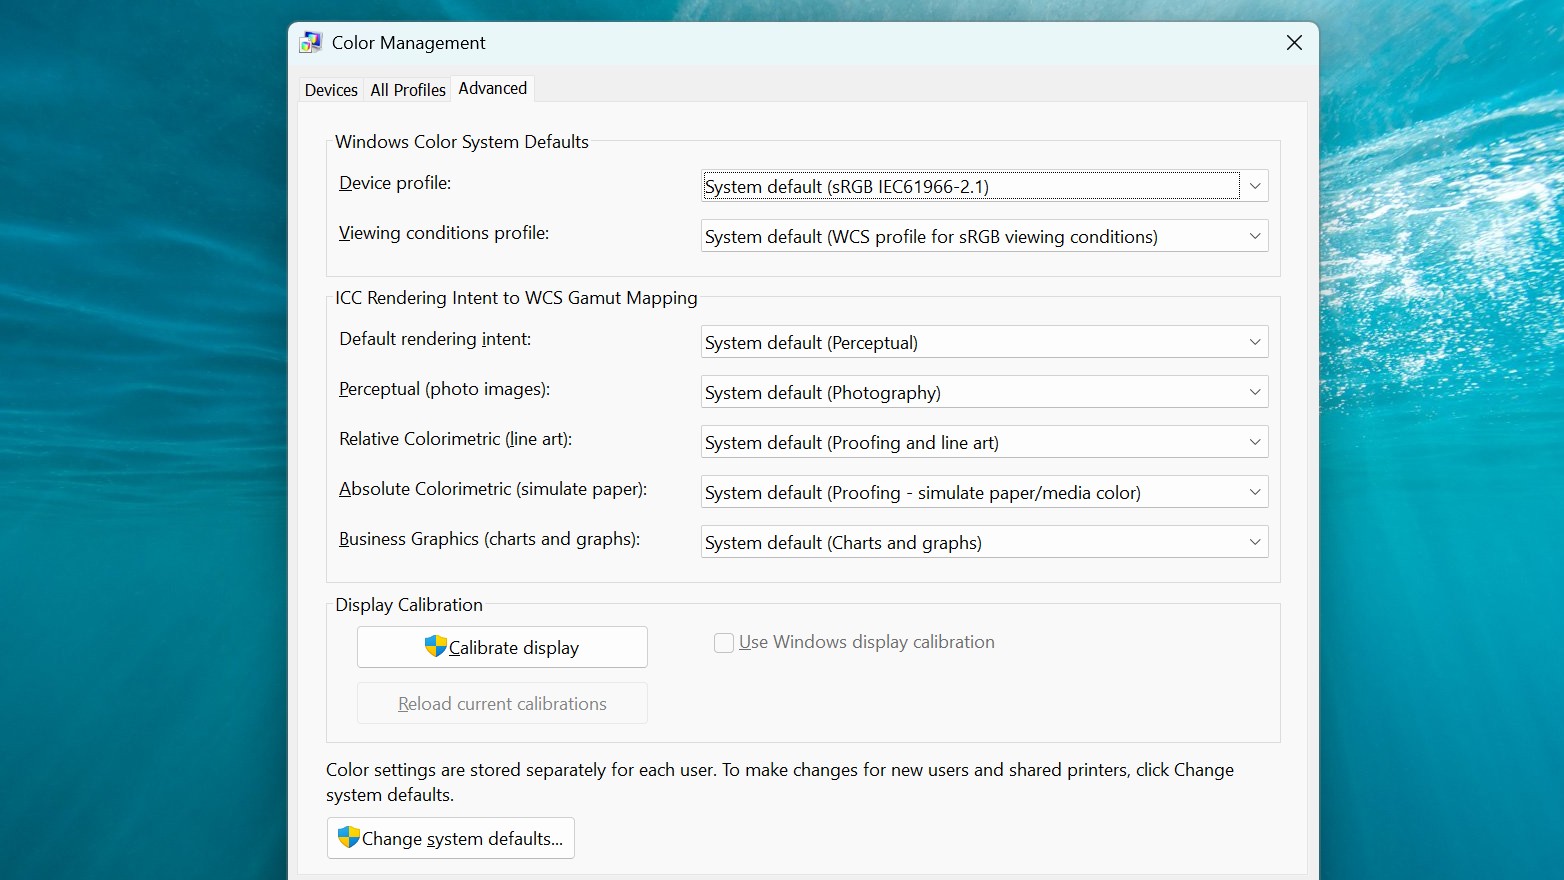
In Windows 11, the easiest way to find the Color Calibration Tool is to open the Settings (Windows key + I) and type color management into the search bar. In the box that appears, select the correct display from a dropdown (the default will probably be the laptop's own screen), and then click on Advanced. Finally, click on Calibrate display.
02. Adjust Gamma
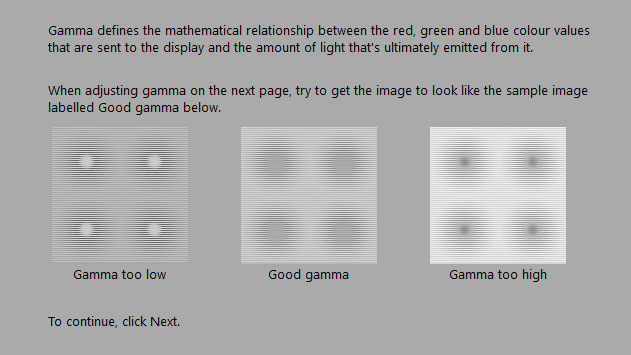
The first stage is to adjust gamma, which, as Windows eloquently puts it, is "the mathematical relationship between the red, green and blue colour values that are sent to the display and the amount of light that’s ultimately emitted from it". Thankfully visual representations of good vs. bad gamma are also provided – all you need to do is match your monitor's gamma to the 'good' example.
03. Balance brightness
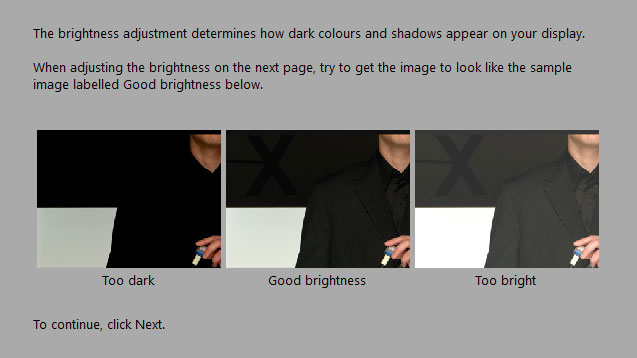
With the aid of a helpful high-contrast sample image, Windows helps ensure your monitor is displaying enough shadow detail in images without being so bright as to overexpose highlights. This is a fairly useful tool, especially if you're using a cheaper monitor with restrictive viewing angles that make it prone to varying contrast depending on the up/down tilt of the screen.
04. Set contrast
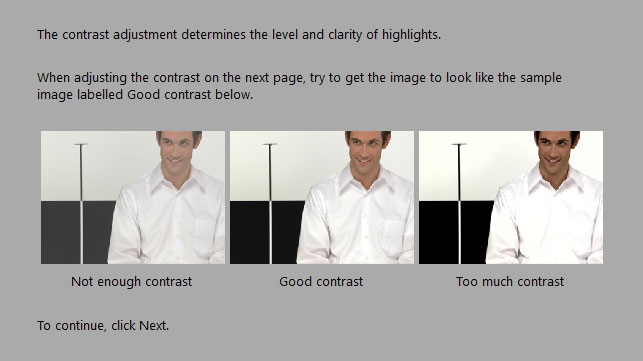
Adjusting contrast with the Windows calibration tool is almost exactly the same as with brightness, requiring you to manually set your monitor's contrast level with the assistance of another mostly monochrome sample image.
05. Tweak colour
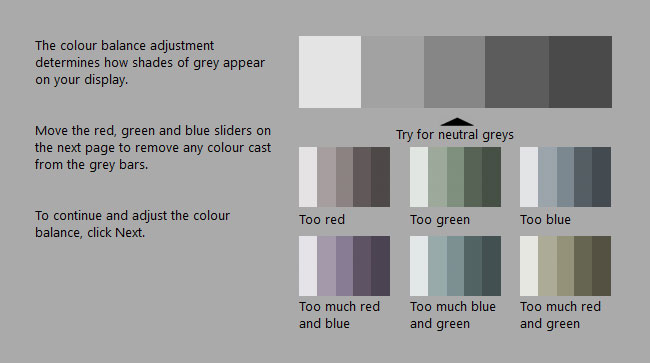
The final step in learning how to calibrate a monitor is knowing how to adjust colour accuracy. Windows give you several greyscale charts, each with an obvious colour cast applied. The next screen gives you individual RGB sliders so you can tweak the Windows colour output.
However, while this is useful for correcting a strong colour cast, it's difficult – if not impossible – to accurately judge colour in this way. The human eye’s definition of 'grey' is far too vague, and your idea of 'correct' grey could well be slightly different to mine.
So ultimately, while this is a good start, it's ultimately not the best way to calibrate a monitor in the long term. This Windows utility is really only useful for correcting an obvious colour cast – creative professionals need better, in the form of the best monitor calibration tools.
How to calibrate a monitor: Mac
1. Open the Display Calibrator Assistant
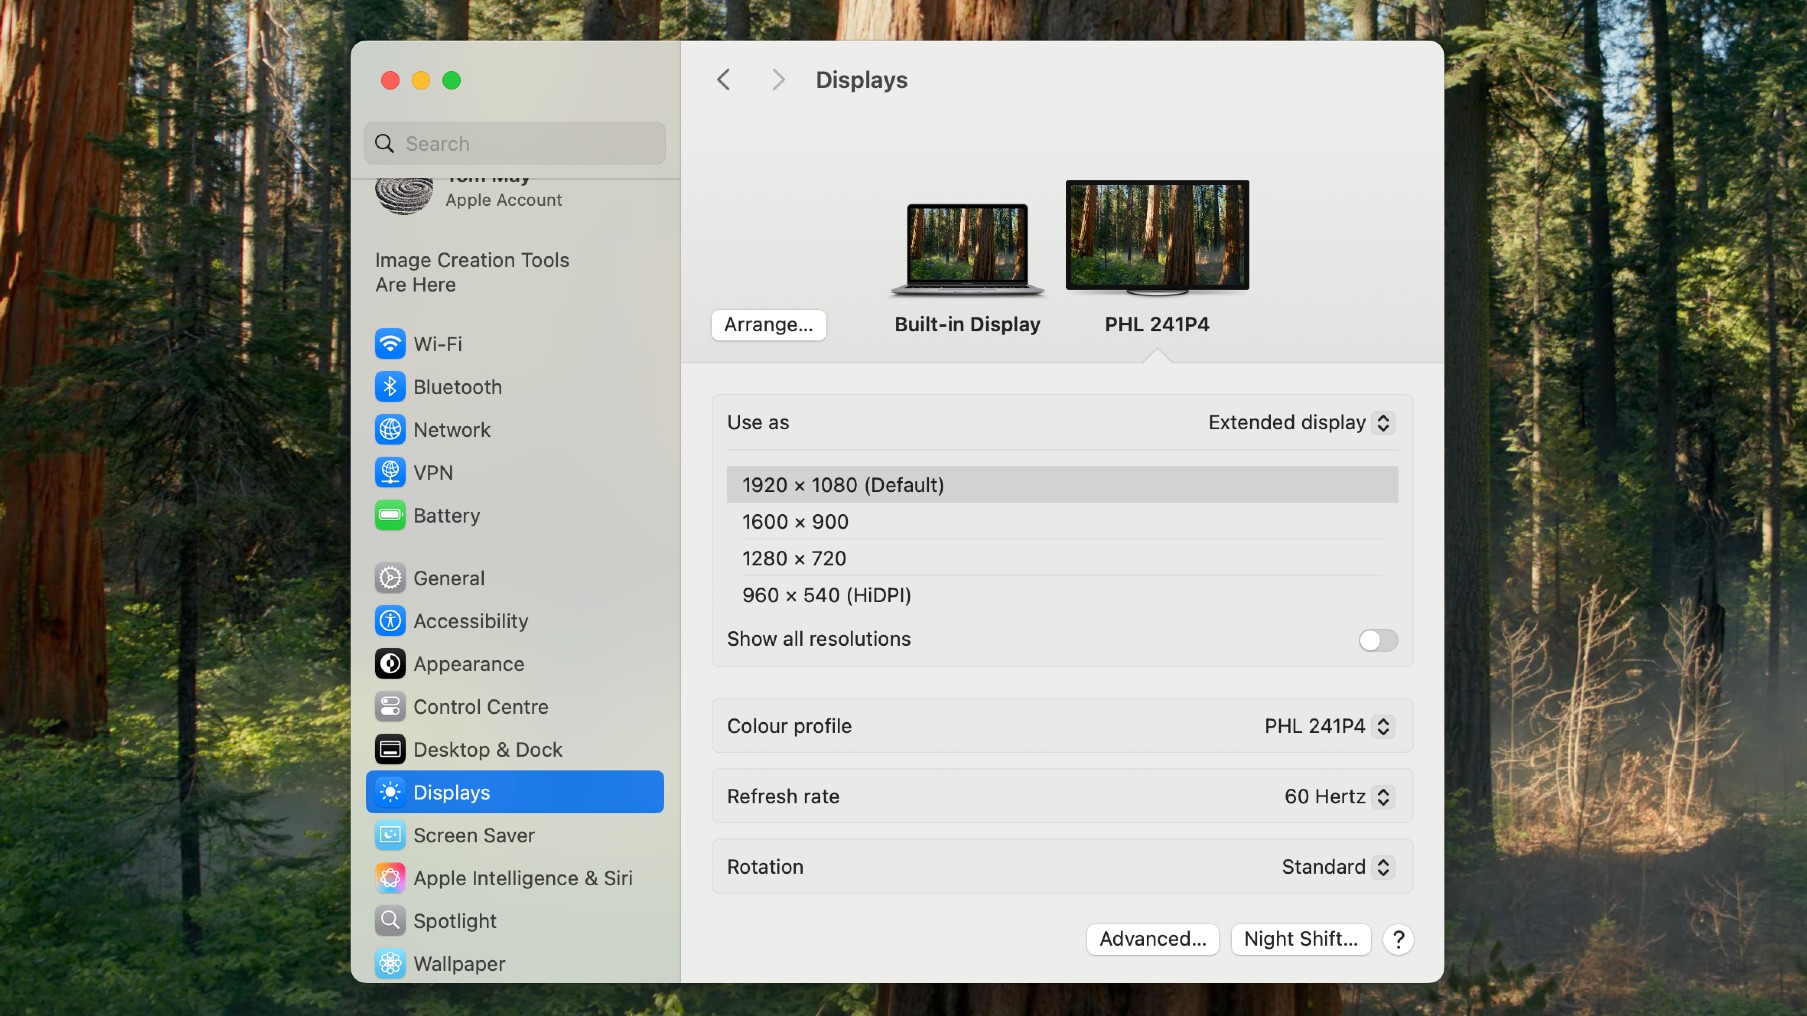
Learning how to calibrate a monitor on a Mac is slightly different. The Display Calibrator Assistant built into OS X is accessed via the Displays icon in the System Preferences menu.
Follow these steps:
1. Go to the Apple menu in the top-left corner of your screen.
2. Select System Settings.
3. Click Displays in the sidebar (you may need to scroll down).
4. Choose the display you want to calibrate.
5. Click the Color profile pop-up menu, then select Customize.
6. Click the + button to open the Display Calibrator Assistant.
02. Adjust brightness and contrast
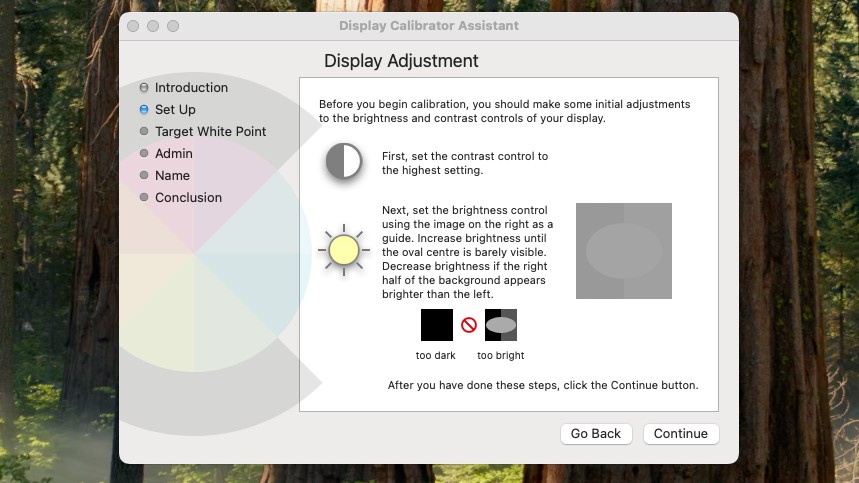
The Display Calibrator Assistant guides you through several steps to adjust your monitor settings. This begins with making some initial adjustments to the brightness and contrast controls of your display.
03. Set target white point
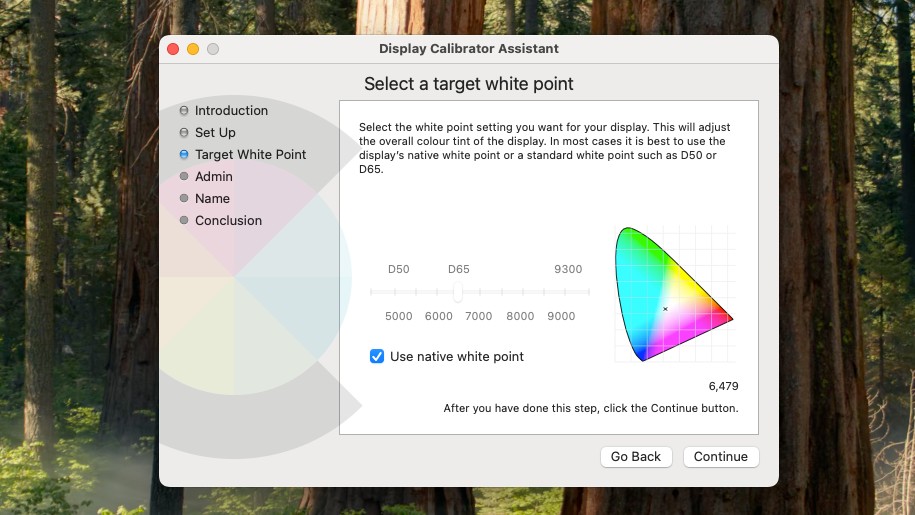
Now it's time to set a target white point. This determines how your monitor displays white, as white can be set to appear 'cooler' or 'warmer' depending on personal preference (think daylight vs. warm white LED light bulbs). Checking the 'Use native white point' tickbox is usually the safest option here, or move the slider to the D65 point. Now you can save your new colour profile to become the default that loads each time you use your Mac.
Note: While you'll end up with a "calibrated" profile at the end of the process, be aware that this profile may not be very accurate for most users. This is because Apple's calibration tool relies on basic estimations rather than precise measurements.
So while it's a good place to begin, it's not the best way to calibrate a monitor. Creative professionals will ultimately be better off investing in one of the best monitor calibrator tools.
Test pages
01. Photo Friday
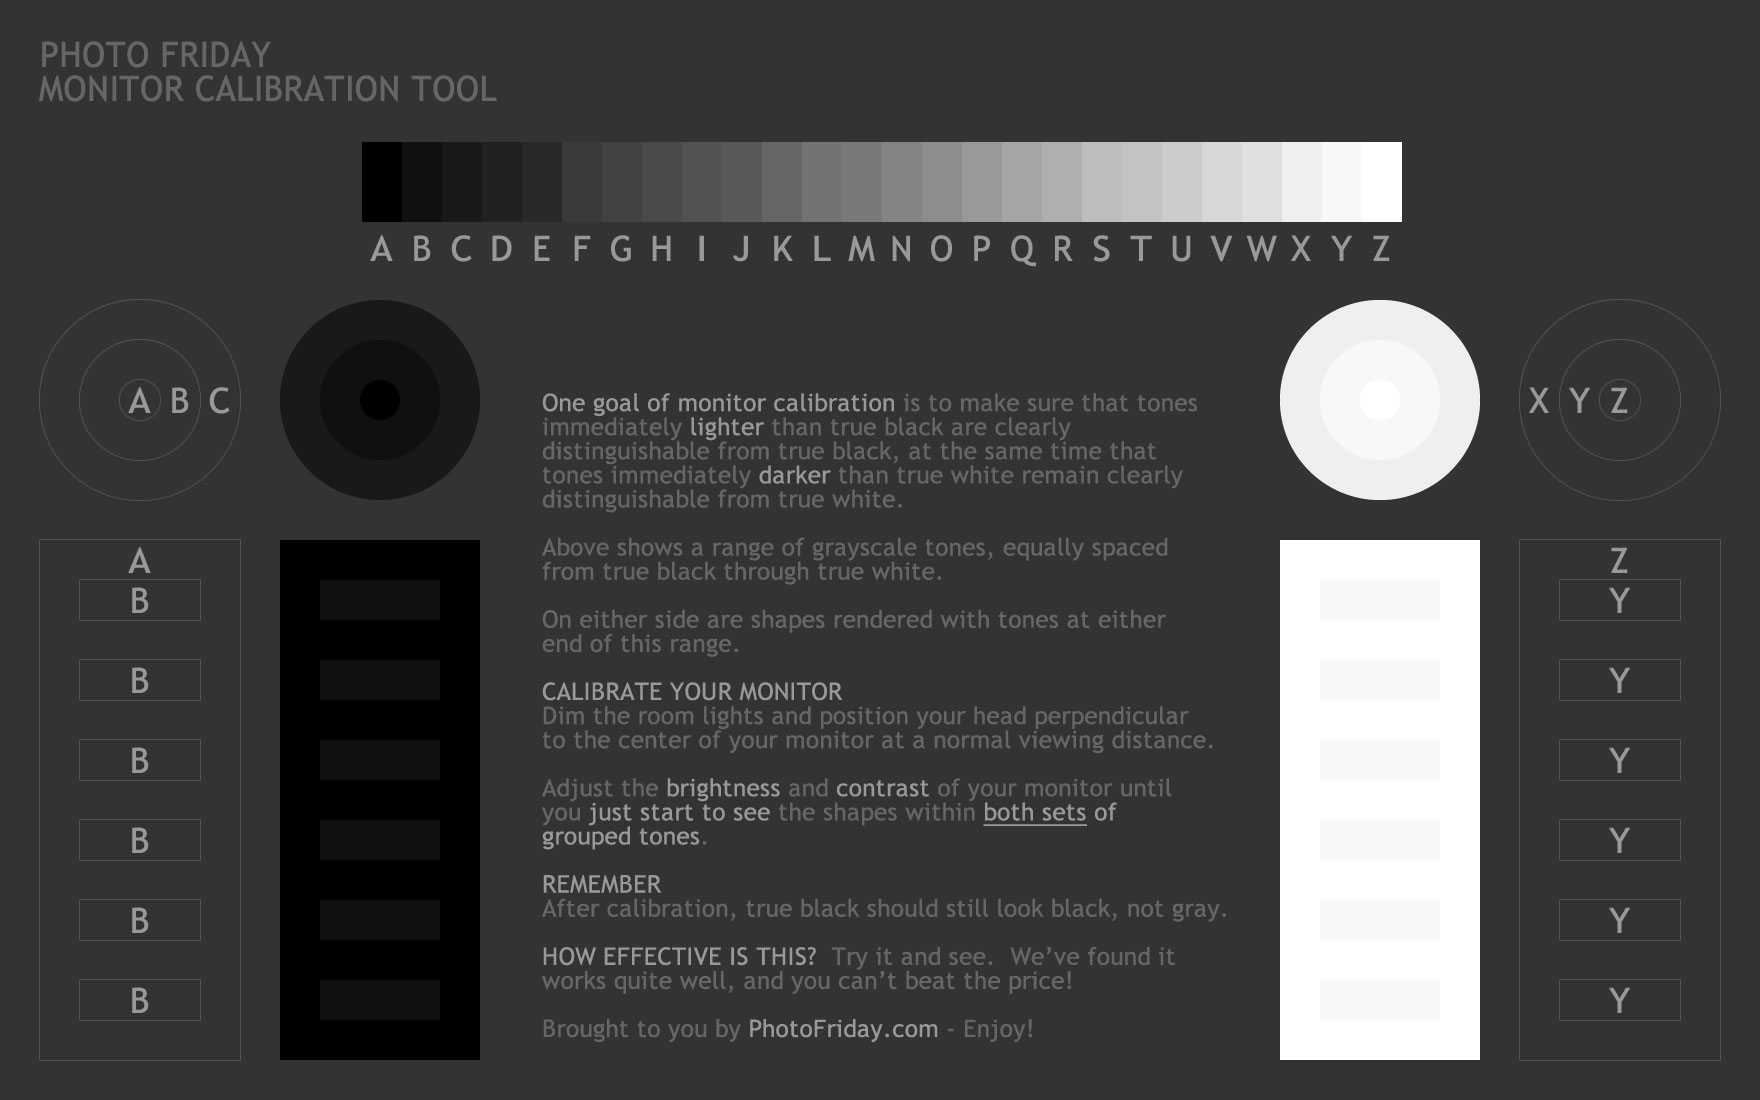
The Photo Friday Monitor Calibration Tool is a webpage that displays a greyscale image. You then adjust your monitor's brightness and contrast so the black and white shapes display as instructed by the walkthrough.
02. The Lagom LCD Monitor Test Pages

This selection of calibration web pages is very comprehensive and includes various images and charts to help you calibrate everything from black level to sharpness, along with the usual brightness, contrast and gamma options. It's one of the best online calibration tools out there, though some of the available options aren't of much use for creatives.
Top monitor calibrators
Released in late 2024, this colorimeter is specifically aimed at first-timers. With intuitive one-click presets and support for a wide range of monitors including LED, OLED, and Apple Liquid Retina XDR displays, it adds up to a simple yet effective solution.
This is our recommendation for most creative professionals working today. This affordable monitor calibrator offers advanced features like multi-monitor support, and detects light conditions to ensure your screen looks its best wherever you're working.
When it comes to the best monitor calibrators, two brands dominate today: Datacolor and Calibrate. Both produce excellent products to suit a variety of price points and feature requirements. And the best bit is you don't need to drop big bucks on a range-topping calibrator to get accurate calibration.
Even an entry-level tool like Datacolor's Spyder Essential Colorimeter will calibrate your monitor super-accurately. Spending more money will get you extra features like multi-monitor calibration, as well as ambient light monitoring that'll tell you the optimal screen brightness to suit your studio environment.
Higher-end calibrators also tend to be quicker – a calibrator like Datacolor’s SpyderX Pro is able to calibrate a monitor in well under two minutes. That's useful when you need to calibrate regularly to ensure your monitor is consistently displaying colour-critical designs.
FAQs
What is monitor calibration?
Monitor calibration ensures the colour output from your monitor matches a predefined standard, such as the sRGB or Adobe RGB colour space, rather than whatever colour balance the screen happens to display after it rolls off the production line. The calibration process doesn't alter anything about the monitor itself, apart from settings like brightness or contrast. Rather, it detects the colours emitted by your screen and creates a bespoke software profile – or look-up table – that tells your computer’s graphics card to distort its colour output to compensate for the inaccuracies of your monitor.
Can I use an app for monitor calibration?
There are apps built into your computer’s operating system, as well as free online tools, that will help assist you to manually adjust your monitor's colour output by eye. But while these are useful for rectifying glaring colour and contrast issues, we strongly recommend investing in even an entry-level hardware calibrator if you’re at all serious about accurate colour – it's the only way to get the job done properly.
Why do designers need a monitor calibrator?
No matter how closely you follow an online or operating system calibration process, there's always going to be a weak link in the process: the human eye. When learning how to calibrate your monitor it's important to remember that even if you have perfect vision, the eye just isn't an objective judge of colour balance or consistency.
There are plenty of optical illusions that highlight the eye's fallibility, so to get around the problem and calibrate your screen properly, there really is no alternative but to splash out on an electronic eye: a dedicated monitor calibrator, also known as a colorimeter.
These nifty gadgets are usually about the size of a computer mouse and only require a USB connection. Simply hang it over the top of the screen so it rests in the middle, then corresponding software flashes various different colours over a period of several minutes for the all-seeing eye to detect. The calibrator then feeds the colour data back to the software so it can create a custom colour profile to apply to Windows or OS X.
How often should you use a monitor calibrator?
Monitor calibration is not a 'one and done' process. The brightness and colour reproduction of any monitor will fluctuate over time, so to keep everything consistent you should repeat the calibration process once every few months.
What is a spectrophotometer?
Colorimeters aren't the only hardware you can use for monitor calibration. Spectrophotometers look identical and do the same job, but will also calibrate your printer, as they're capable of analysing both emitted light from monitors and also light reflected off printed colour swatches. Note, though, spectrophotometers cost considerably more than a monitor-only calibrator.

Thank you for reading 5 articles this month* Join now for unlimited access
Enjoy your first month for just £1 / $1 / €1
*Read 5 free articles per month without a subscription

Join now for unlimited access
Try first month for just £1 / $1 / €1
Get the Creative Bloq Newsletter
Daily design news, reviews, how-tos and more, as picked by the editors.

Ben is the imaging labs manager for Future titles, including for Creative Bloq's sister site Digital Camera World. Whether he's in the lab testing the sharpness of new lenses, the resolution of the latest image sensors, the zoom range of monster bridge cameras or even the latest camera phones, Ben is our go-to man for technical insight. With years of experience in testing cameras, monitors and calibrators, he's able to recommend the best buys for creatives.
- Tom MayFreelance journalist and editor
You must confirm your public display name before commenting
Please logout and then login again, you will then be prompted to enter your display name.
