Build a responsive website from Photoshop layouts
Get to grips with Edge Reflow, Adobe's web design tool, by following Nathan Segal's step-by-step walkthrough.
In an earlier article - which you can read here - I explained the basics of setting up Photoshop CC and Edge Reflow CC to import Photoshop layouts into Edge Reflow. Now let's go further and create a living, breathing website.
To get up speed with Edge Reflow, download this PSD template file and Reflow file. These will help you see how Photoshop and Edge Reflow work together.
When building a responsive design it is important to create a site which displays properly on desktop, tablet and mobile. Two major culprits that can cause issues are images and text. Images not only need to display properly; they need to load quickly. To make sure that happens it is recommended you use different image sizes for the various devices. Another point of concern is with fonts, which need to be clear on all devices.
One way of dealing with this issue is to begin your layout by building the mobile interface first. From there is much easier to scale up. As a starting point, a 400 pixel wide logo for a mobile device is a good place to begin.
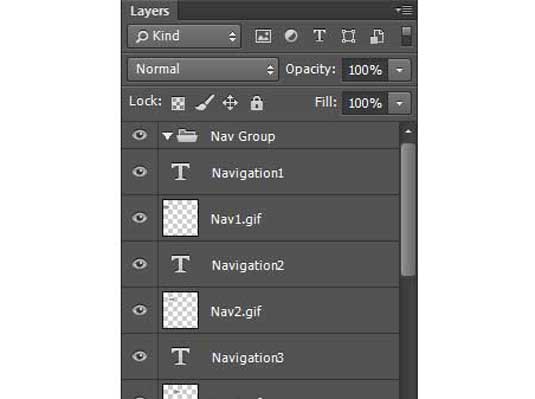
When building a design for Edge Reflow, clear organization is essential otherwise it could cause layout issues. As an example, all layers of a given type will be placed into folders and named with .GIF and .JPG extensions. Also, the layout needs to be built using guidelines to ensure precise placement of image elements and text.
Here is a partial screen shot of the layer organization.
This is the layout I created in Photoshop with plenty of guidelines to ensure proper placement of the image and text elements. The navigation background and footer were created using gradients on an individual layer with matching type for each layer.
Get the Creative Bloq Newsletter
Daily design news, reviews, how-tos and more, as picked by the editors.

When you are satisfied with your layout, you need to export that to Edge Reflow. The first step is to go to File: Generate: Image Assets. This creates the image assets for the Edge Reflow project. Next, go to File: Generate: Edge Reflow Project. Now you are ready to open the file in Edge Reflow.
Here is the layout in Edge Reflow. As you can see, it didn’t match what I created in Photoshop.
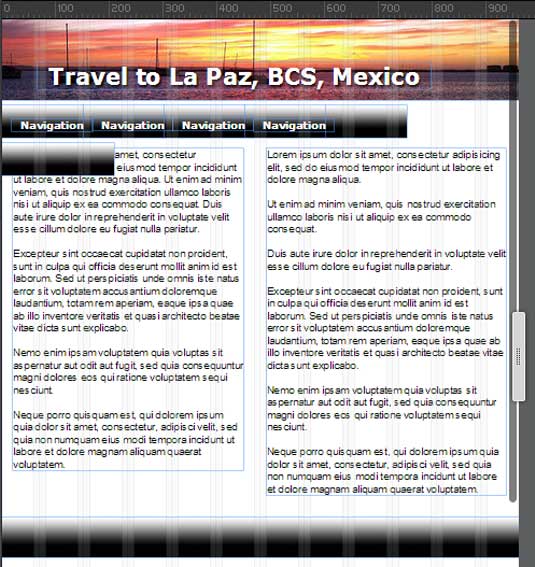
After thinking about it, I quickly realized one reason why. Part of the image extended beyond the layout above and it wasn’t cropped properly. In Photoshop, the Generator plugin exported the entire image, not only the cropped section as I had expected. The end result created layout issues, which I needed to fix in Photoshop.
Once I fixed the image problem in Photoshop and made sure all files were named properly, I created a new Reflow project, which you see below. It’s still not perfect, but much closer to my original layout.
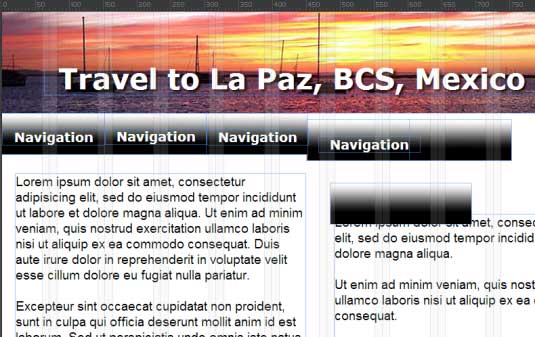
As you can see, it’s relatively easy to start repositioning the image and text elements. Once the desktop design is complete, you can start changing the look and feel for tablets and mobile devices.
7 top tips
When building a Photoshop file for Edge Reflow, there are some things you need to know:
- All image components must be sized so they fit the layout. If cropping is necessary that should take place before you place the images within your design. This is especially important when working with layers.
- If an area is hidden or out of frame as the image was in my layout above, it can break or distort your design.
- All image elements must have a .JPG, .GIF or .PNG extension. If not, the elements will not be included in the assets folder.
- All text in the Reflow file is editable HTML.
- To speed up your workflow in Edge Reflow, it is a good idea to learn keyboard shortcuts. You can find information about those by clicking on Help: Edge Reflow Shortcuts.
- While you can move the design elements into place visually, it’s better to use numeric entry for precise positioning of all elements. This will help to reduce display issues when previewing in a browser.
- You can also make use of Edge Reflow even if you are only working on images. You would name each image with the appropriate image extension (such as .JPG, .PNG, .GIF). You can add these extensions to layers, groups or smart objects. Once your project is completed in Photoshop you can import the entire file into Edge Reflow.
New advances in Edge Reflow
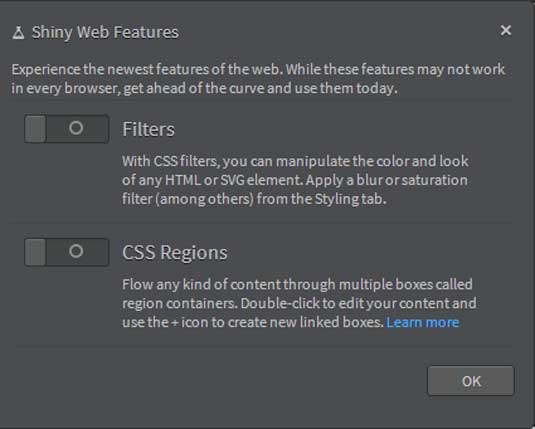
One of the new advances in Edge Reflow is Shiny Web Features. Currently, these are not supported by all web browsers so it is recommended you use them with caution. To activate them, click on View: Shiny Web Features.
With CSS Filters you can add text and image effects to your design. Some of your choices are: Blur, contrast, greyscale, hue, rotate, and more.
With CSS Regions you can make all content "flowable" across your design. To do so, right-click on a box to turn it into a region. At the moment, CSS Regions is available in Safari 6.1+ and iOS7 Safari. It will be available on other browsers soon.
Conclusion
As you can see, it is relatively straightforward to create a layout in Photoshop then export that layout to Edge Reflow for further editing. Once your project is finished, you can copy the HTML and CSS into Dreamweaver or another HTML editor for further refinement.
Don't miss Photoshop Live!
If you use Photoshop in your work, you won't want to miss our own Photoshop Live event in Brighton on 18-19 July. Friday 18 will be curated by Computer Arts and Creative Bloq for creative professionals, with some of the biggest names in design giving talks. Saturday 19 July will be curated by Practical Photoshop for digital art with photography. You can find more details here.
Words: Nathan Segal

Thank you for reading 5 articles this month* Join now for unlimited access
Enjoy your first month for just £1 / $1 / €1
*Read 5 free articles per month without a subscription

Join now for unlimited access
Try first month for just £1 / $1 / €1

The Creative Bloq team is made up of a group of art and design enthusiasts, and has changed and evolved since Creative Bloq began back in 2012. The current website team consists of eight full-time members of staff: Editor Georgia Coggan, Deputy Editor Rosie Hilder, Ecommerce Editor Beren Neale, Senior News Editor Daniel Piper, Editor, Digital Art and 3D Ian Dean, Tech Reviews Editor Erlingur Einarsson, Ecommerce Writer Beth Nicholls and Staff Writer Natalie Fear, as well as a roster of freelancers from around the world. The ImagineFX magazine team also pitch in, ensuring that content from leading digital art publication ImagineFX is represented on Creative Bloq.
