5 things you didn’t know you could do in Illustrator
We reveal some of the hidden secrets of Adobe's vector drawing software.
If you work in design, chances are you use vector drawing software Illustrator as part of your Creative Cloud subscription. If you've never done so, then a great place to get started is this collection of Illustrator tutorials.
For the rest of you, in this article we look at a number of handy little tricks you can use Illustrator.
01. Create glowing text
One effect which can add a lot of power to an object is a glow. This is especially effective with text. To begin, select 'File > New'.
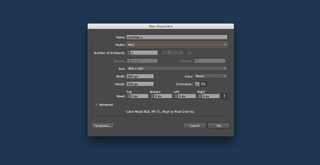
In the New Document dialog box, choose Web as the profile and click on OK.
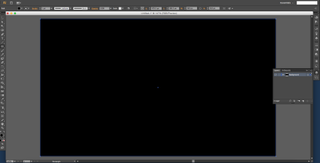
Set the fill to Black and draw a rectangle which covers the entire working area. Lock it in place and name the layer Background.

Go to the Layers panel and create a new Layer. Name it 'RGB Cyan Text'. Activate the Type tool and type out a block of text (Impact at 200 points).
Click on 'Edit > Copy' to copy the text. Go back to the Layers panel and create another layer. Name it 'RGB Blue Text'. Click on 'Edit > Paste' to paste the text into the new layer. Fill it with RGB Cyan.
Get the Creative Bloq Newsletter
Daily design news, reviews, how-tos and more, as picked by the editors.
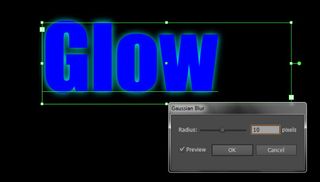
Next, select the RGB Blue text and drag it on top of the RGB Cyan text, making sure the Cyan text is completely covered (use keyboard arrows for precise positioning). Select the RGB Cyan Text ('Select > Next Object Below' or 'Select > Next Object Above'). Click on 'Effects > Blur > Gaussian Blur'.
In the Gaussian Blur dialog box, enable the Preview checkbox, set the blur to 10 pixels and watch what happens. You can experiment with this setting to attain the glow effect you desire.
02. Create a specular glow
This is another variation of a glow style from the old multi-image days, where we created special effects with pin-registered cameras, enlargers and film. The specular effect makes your glow seem like it's alive – and it's easy to create.
Go to the RGB Blue Text and RGB Blue Cyan layers and change the text to 'Specular'. Use the Eras Bold ITC font and change the point size to 110.
Next, go to the Layers panel and create a new layer. Name it Scribble and position it under the RGB Blue Text layer. Activate the Scribble layer and click on the Paintbrush tool. Make sure the Stroke is set to Black and then start scribbling in the layer.
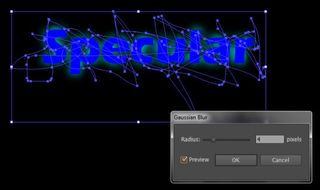
Select the Scribble. Go to 'Effect > Blur > Gaussian Blur'. In the Gaussian Blur dialog box, enable Preview and set the Radius to 4 pixels and click on OK.

After that, go to 'Window > Transparency' to activate the Transparency panel. Set the mode to Multiply.
You should get something similar to the effect above. If too much of the glow is suppressed, reduce the amount of scribbling and then apply the Gaussian Blur again. You might also need to use more blur. Test out values of 6, 8, or even 10 pixels.
If you want to intensify the glow effect, select the RGB Cyan text layer then click on 'Effect > Blur > Gaussian Blur'. A message will pop up letting you know that you will be applying another instance of the blur. Click on the Apply New Effect button and create another Gaussian Blur.
03. Create a drop shadow
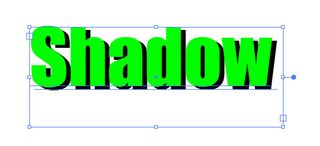
A variation of the glowing effect is to create a drop shadow. To get started, create a new document ('File > New'), select Web as the profile and click on OK.
Click on the Fill icon on the top menu bar and select black, then activate the type tool and type some text for the drop shadow effect.
Making sure the text is still selected, start dragging it and press the Alt key to duplicate it. Fill the duplicate text with RGB Green. Drag it so the text creates a bit of a drop shadow effect with solid black text below.
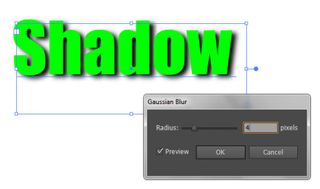
Select the black text ('Select > Next Object Below') and click on 'Effect > Blur > Gaussian Blur'. In the Gaussian Blur dialog box, enable the Preview checkbox and set the blur to 4 pixels and click on OK.
Now you can move the drop-shadow to achieve the position you desire. For precise positioning, use the arrow keys.
04. Reshape objects with Live Corners
Live Corners enable you to reshape anchor points of a path into one of three corner types: rounded, inverted rounded and chamfer. Here is how it works.
Draw a shape (in this case a star). Set the stroke weight to 5 points.

Making sure the shape is selected, click on the Direct Selection tool. Note the icons that appear in the screen shot above. These are the Live Corners widgets.
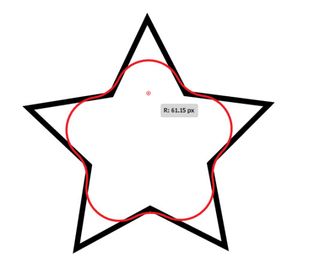
Click on the widget near the point of the triangle and drag it inwards. The red line indicates when the maximum shape has been reached.
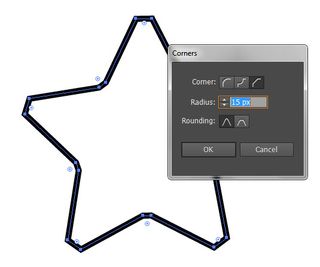
Double-click on a widget to open the Corners dialog box. Here, you can set the type of corner, the radius and the rounding. Click on OK to accept your changes.
05. Create transparency with overlapping shapes
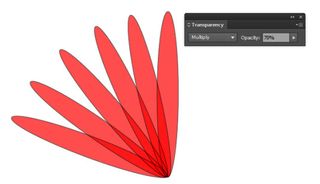
This is a useful technique if you want to create transparency between shapes. To begin, simply draw a series of overlapping shapes and fill them with the colour of your choice.
When that's complete, select all the images. Go to 'Window > Transparency' to bring up the Transparency pallet if it's not already active. Set the mode to Multiply and the transparency to 70.
As you can see, there are some really cool effects you can create with Illustrator. If you've stumbled across a cool Illustrator tip or technique, why not share it with the community in the comments below?
Related posts:

Thank you for reading 5 articles this month* Join now for unlimited access
Enjoy your first month for just £1 / $1 / €1
*Read 5 free articles per month without a subscription

Join now for unlimited access
Try first month for just £1 / $1 / €1
The Creative Bloq team is made up of a group of design fans, and has changed and evolved since Creative Bloq began back in 2012. The current website team consists of eight full-time members of staff: Editor Georgia Coggan, Deputy Editor Rosie Hilder, Ecommerce Editor Beren Neale, Senior News Editor Daniel Piper, Editor, Digital Art and 3D Ian Dean, Tech Reviews Editor Erlingur Einarsson and Ecommerce Writer Beth Nicholls and Staff Writer Natalie Fear, as well as a roster of freelancers from around the world. The 3D World and ImagineFX magazine teams also pitch in, ensuring that content from 3D World and ImagineFX is represented on Creative Bloq.
