Achieve handmade print effects
Ben Steers shares some useful techniques using the Live Trace tool to add a worn, handprinted look to your vector illustrations
- Software Illustrator CS2 or later
- Time needed 10 minutes
- Skills -Importing textures into Illustrator-Using custom presets in Live Trace-Applying textured effects to vector images.
The words 'live trace' hold negative connotations for some illustrators, and since its introduction in Illustrator CS2 the reputation of the Live Trace tool has barely improved.
Used correctly, however, its custom options and presets can help in creating a whole host of unique, bespoke effects.
The focus of this tutorial is on creating a 'worn' effect using handmade, scanned textures and the Live Trace options. You can also use these techniques to help your vector illustrations stand out with a screen-printed feel.
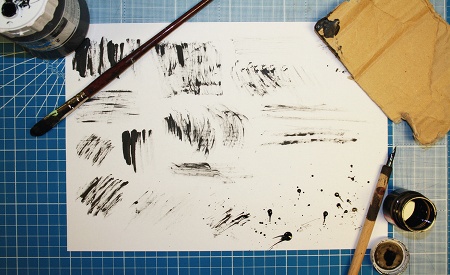
01 With some paint and ink, create a series of marks on a piece of paper. Experiment with different materials to apply the paint - anything from a piece of card to a paintbrush - to see what effects you can get.
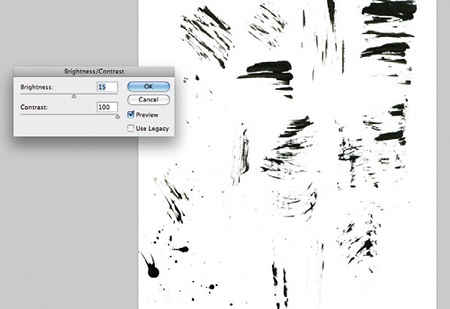
02 Once you're happy, scan the marks in and open them in Photoshop. Click Image>Adjustments>Brightness/ Contrast. Bring your Contrast level up so the black marks are more prominent. Adjust the brightness if your image is looking a little dull, and click Save.
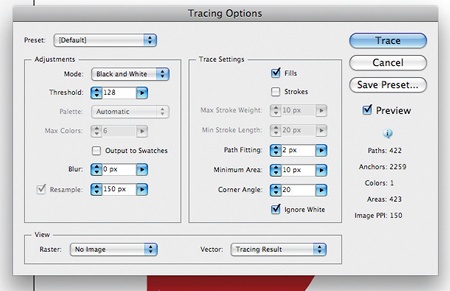
03 Open your chosen Illustrator file and click File>Place. Now put your textures into your document and click Object>Live Trace>Tracing Options. With your Tracing Options window open, click the Preview box. Make sure the Strokes and Ignore White boxes are also ticked.
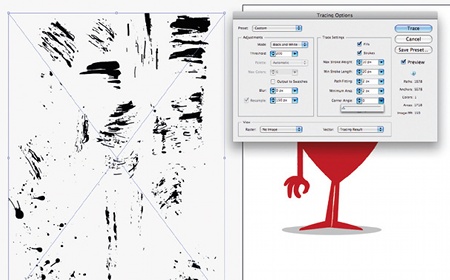
04 Increase your Threshold level to pick up more of the detail and bring your Corner Angle level down to 0 to achieve a rough look. Alternatively, you can use the installed Preset settings. The Detailed Illustration preset is generally best for this sort of work. Once you're happy, click Trace and Expand.
Get the Creative Bloq Newsletter
Daily design news, reviews, how-tos and more, as picked by the editors.
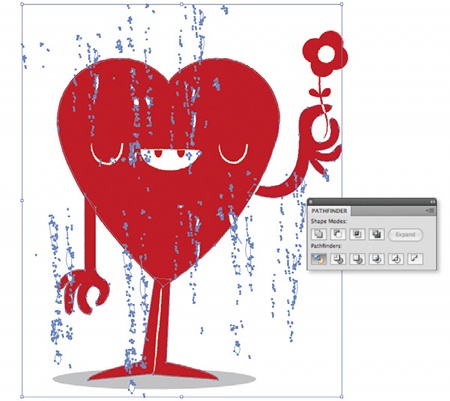
05 Ungroup your freshly traced image (Ctrl/Cmd+Shift+G), and your texture is now editable. Convert your textures to white and apply them on top of your image. Try to be subtle with your placement. To finish, select your textures and underlying image, and click Divide on the Pathfinder toolbox.

Ben Steers
A freelance illustrator and designer from Bristol, Ben's work is a mix-and-match of graphic styles with influences ranging from '80s animation to early graffiti. Clients include the Tate Modern, The Sunday Times and streetwear label Spunky Clothing.

Thank you for reading 5 articles this month* Join now for unlimited access
Enjoy your first month for just £1 / $1 / €1
*Read 5 free articles per month without a subscription

Join now for unlimited access
Try first month for just £1 / $1 / €1

The Creative Bloq team is made up of a group of art and design enthusiasts, and has changed and evolved since Creative Bloq began back in 2012. The current website team consists of eight full-time members of staff: Editor Georgia Coggan, Deputy Editor Rosie Hilder, Ecommerce Editor Beren Neale, Senior News Editor Daniel Piper, Editor, Digital Art and 3D Ian Dean, Tech Reviews Editor Erlingur Einarsson, Ecommerce Writer Beth Nicholls and Staff Writer Natalie Fear, as well as a roster of freelancers from around the world. The ImagineFX magazine team also pitch in, ensuring that content from leading digital art publication ImagineFX is represented on Creative Bloq.
