Speed up your SketchUp workflow: 17 pro tips
If you're just getting to know the 3D modelling tool, Ronen Bekerman's tips will set you on the right track.

SketchUp has been around since 2000, and I've been working with it for more than a decade now. I picked it up in my first year at TLV University School of Architecture, despite the use of computerised aids being a taboo at that time.
It's as powerful as it is simple, and yet repeatedly underestimated. I keep getting interesting responses from clients once they realise I use SketchUp for my work, which I attribute to the reputation it gained by being 'free 3D for everyone' after the Google acquisition in 2006.
The name, cool and catchy as it is, does imply less accuracy to some. But in all honesty, there's one more reason the use of SketchUp sometimes raises eyebrows: most people just don't use SketchUp that well. Considering the Pro users group alone, I've seen too many artists pick up bad habits, then later find it hard to use the program to its full potential.
The tips I've gathered here are designed to help both new and experienced users to get a better grasp of SketchUp. Hopefully, they'll help you design smarter and faster.
- Download the source files for this feature here
01. Get help on the fly
Addressing the true SketchUp newbie, the first tip is an obvious one. Keep the software manual nearby, right? SketchUp offers something better than that in the form of the Instructor panel. Docked to the side, it brings up all you need to know about the currently selected tool.
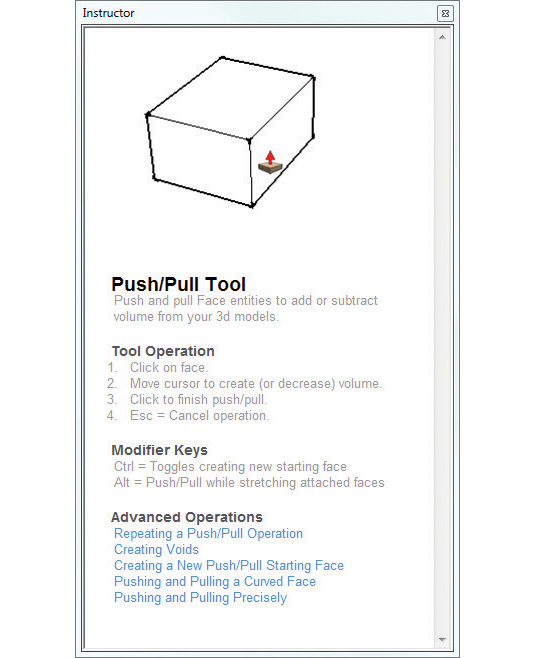
You'll see a looping animation showcasing how it's used, along with a short description, operation specifics, modifier keys if the tool has various modes of operation, as well as links to more in-depth help. In most cases this is all you need, and after you've seen it once, you've got it. It would be nice if plug-in developers added content to the Instructor, too.
02. Use shortcuts
Using shortcuts will help you work faster, make your user interface cleaner, and allow for more screen space for you to model. SketchUp comes with a predefined set of shortcuts, but you can customise these as you see fit. Smartly implemented, shortcuts enable you to skip toolbars and menus, which boosts your productivity tremendously. I hardly ever use the standard toolbars and menus – other than those related to plug-ins that can't be mapped to a shortcut conveniently.
You can see what my typical viewport looks like above. I like to keep my Layers, Shadows, Face Styles, Sections and Walkthrough toolbars visible. Everything else is tucked away and called upon when needed using shortcuts. This cleans up the UI, making more space available for third-party toolbars and the most important thing of all – your model!
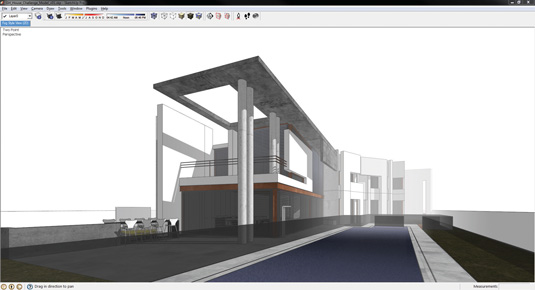
I urge you to explore the mapping of shortcuts, even assigning more than one shortcut combination per command. This is great for setting left and right keyboard shortcut layouts, accommodating preferences of more than one user, and setting combos in such a way that one is nearer to a specific other shortcut combo during work. Export and import shortcuts through the Preferences dialog, so you can keep the same set in a multiple workstation work environment.
A good rule of thumb is to map the most used tools to the most obvious key combinations (for instance, the first letter with Shift, Ctrl and Alt combinations), and after that consider the keyboard location and most used cases, and see if it still fits. Keep an open mind and be willing to change combinations after you find that they don't work that well or others perform better for you. I've made a nice cheat sheet for you, as well as saving out my own shortcuts to a preferences file for your own use. You can download the files here.
03. Use guidelines
Guidelines in SketchUp are like having a super grid system that's infinitely flexible, multi- directional and reusable. They are a true blessing! Add parallel guidelines and check distances using the Tape Measure tool, and set slopes and check angles using the Protractor tool.
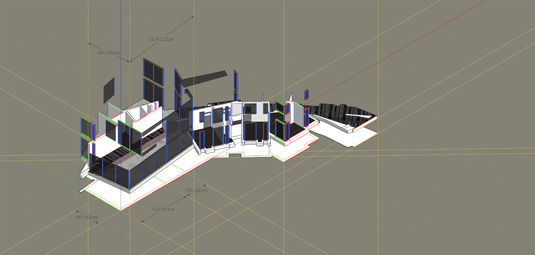
I use them all the time to lay out various grids, check measurements, assist with snapping or following a line, a slope and a lot more. When you find that you have too many of them, just clear them all out with one shortcut combination, and start all over again as needed.
04. The inference engine
If I had to pick just one feature that sets SketchUp apart as a fast and efficient 3D modeller, it's its geometric analysis engine, better known as the inference engine. I haven't found any other 3D modelling application that offers something similar and so intuitive to understand and use.
The inference engine helps you draw accurately by constantly checking where you are in 3D space in relation to the model geometry, and based on that, infer points as you draw while also providing you with colour-coded visual cues that show up automatically.
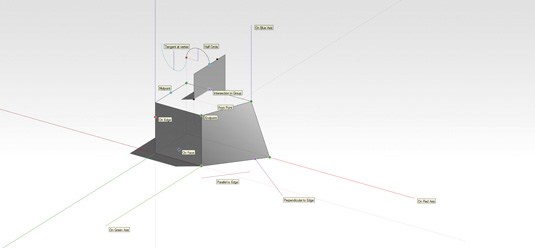
These cues will bring to your attention if you're On Axis, Parallel to Edge, Perpendicular to Edge, Tangent at Vertex, At Intersection, At Midpoint, On Face, At Half Circle, At Square, At Golden Section, and more. Using these becomes second nature when working with SketchUp, so don't worry about it too much.
05. Avoid surface problems
SketchUp's most basic building block is the line. When combined to close a loop, lines form surfaces. When lines intersect, surfaces are formed between them. Sometimes this process doesn't work all that well, and the surfaces aren't being made as they should without your being able to see it.
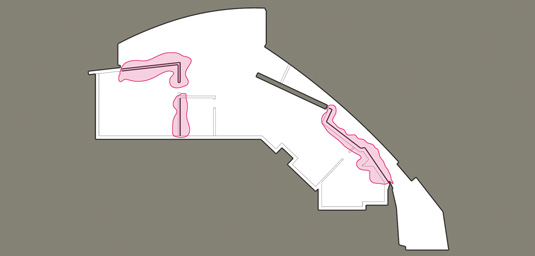
To prevent this from happening, I use the Line Profile Style thickness as a visual cue, thus catching any floating line that didn't cut and merge properly into a surface. Since all floating lines are considered profile lines (lines on the visual perimeter of an object), setting its thickness to 2 (or more) will instantly show where you might have problems.
06. Color Lines by Axis
Choosing this option will colour all the lines parallel to the current axis system in red, green and blue, thus uncovering possible line-work issues. This will allow you to trap and fix right away any issues after importing CAD files or someone else's models, or with your own mistakes.
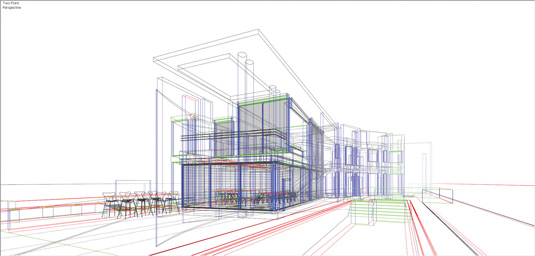
I use this command all the time on CAD drawings imported into SketchUp to make sure all is well with the lines. Later on while modelling, turn this option on if you ever stumble upon stubborn non-closing faces. It's most likely due to non-parallel lines that were introduced into the model.
07. Find flipped normals
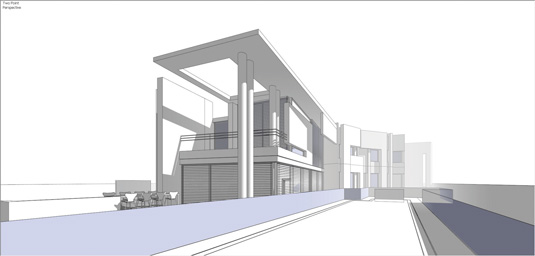
Intended as a visual face style representation, Monochrome Face Style mode will also uncover all flipped normal issues, specifically after textures have been applied to the model, and you no longer see the default face style colouring (originally grey on the normal facing side and blue on the opposite side). Some SketchUp commands such as PushPull and FollowMe tend to create flipped faces, so you sometimes can't see if the model is textured (many plug-ins have this problem too).
08. Trap and fix hidden problems
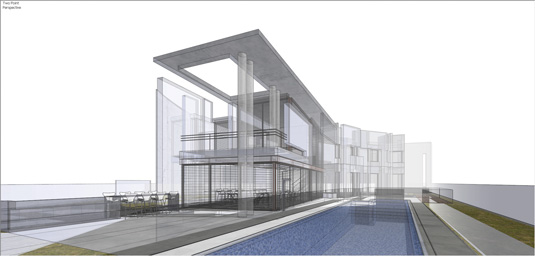
The X-Ray Face Style mode enables you to see through the geometry and model in a way impossible without it. Instead of rotating or hiding elements just to snap to something you can't see, switch to X-Ray mode – even during another command – and quickly edit in place while saving a lot of time. You can also trap and fix various leftovers that you can't normally see, hidden inside your model volume.
09. Focus on the element you're working on
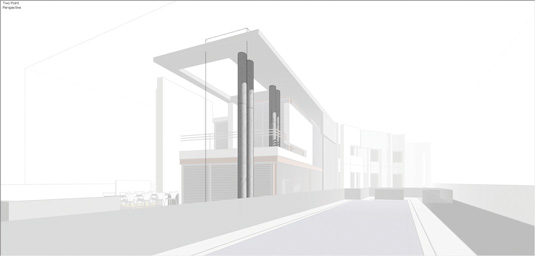
Hide Rest of Model and Hide Similar Components are convenience toggles. While X-Ray mode lets you see through the geometry, these commands actually fade or hide elements away so that you can focus on the one you're working on at any given time. It's very helpful to model with a clear workspace, and you can always toggle the rest of the elements or the complete model for quick check ups and for re-orienting. You can control the fade levels in the Model Info dialog.
10. Group first, layer later
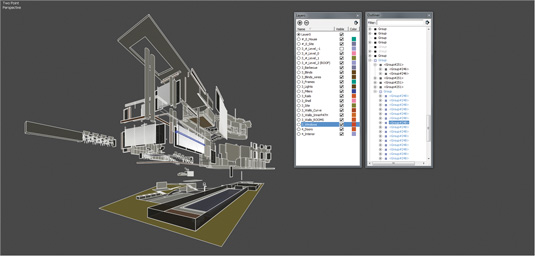
My rule is: nothing goes into a layer before I group it. This makes sure I get geometrical separation, and all the geometry inside the groups remains on SketchUp's predefined default layer – layer0. By grouping, and assigning the groups to layers, you can have two levels of information separation, which can be enhanced by using the scene system for more than just saving viewpoints.
11. Use components smartly
A component is a group that applies any edits to instances of that group. Group and turn into a component all the elements you know will be reused, and keep the same properties throughout the model. Do it as early as possible with a low level of detail, knowing that you can add to it any time you like later on in the modelling process. Try to find the lowest common denominator, and turn that into a component instead of more complex elements you might need to make unique components.
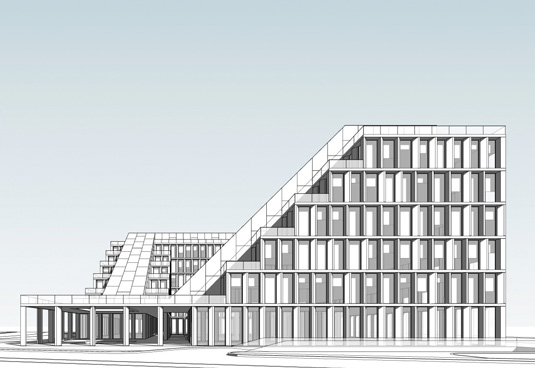
For example, one might consider a typical floor as a worthy candidate to become a component, because it repeats on several stories. But consider a case with four identical apartments on that floor. What if the core apartment is the same, and only the balconies change a bit depending on the direction they are facing and their floor number.
Smart component creation will allow you to change very few single items that in turn will change the complete model faster. In complex models, I've made it a habit to place a copy of each such component outside the main model structure, so that I can make changes without even touching the main model.
12. The flexibility of scenes
Creating a scene in SketchUp enables you to capture a state of the model. You have various properties you can choose to capture or ignore when doing so, such as the camera, hidden geometry, layers, sections, style, shadow and axes location. Most SketchUp users consider scenes for saving viewpoints alone, but they are so much more powerful than that! With your basic SketchUp model growing more and more complex during the design process, scenes can help you further separate and segment the data for your convenience.
If you set scenes to save only visible layer and hidden geometry information, you can create a visual segmentation set for your model. A good example would be having scenes such as show all, site only, ground floor, second floor, and so on.
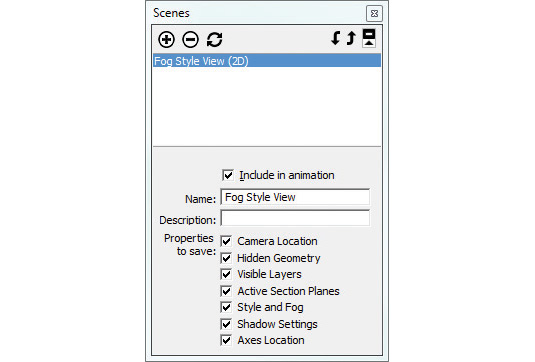
Save scenes with only the Style, Fog and Shadow settings options active to create various visual representations of your model at different times of the day with accurate shadows, and perhaps a special view with line work only for those very early design meetings.
For complex structures, following more than one grid, you can save just the axes location in a scene, and browse through them as you focus on modelling in each section. This is much more convenient than setting the axes manually all the time, especially when more than one person is working and reviewing the work file. Saving only the camera location will create viewpoint scenes only, with all else kept the same as you browse this type of scene.
13. Set the standards with templates
You can save a SketchUp file as a template to be reused later on, and also set it as a default one when starting a new file. A template file is actually a regular SketchUp file, but one that you added and saved information relevant to your workflow that can be reused straight away when you start a new file.

This information can include your choice of preferred units, geometry, layers, materials, styles, geolocation, copyright credit and much more. Templates are also a great way to facilitate common standards of use and workflow with a collaborative work environment.
14. Improve performance with good housekeeping
SketchUp models save all the information inside the file. Each texture, material, component and CAD drawing block is saved into the model file and stays inside even if you delete it from the workspace. This can really bloat and slow down your file performance.

To clean all of these excess elements, you need to use the Purge Unused command in the components, material and layers dialogs. Addressing textures specifically, and considering that you'll export your model for rendering in an external application, I would also recommend creating low-resolution versions to be used in SketchUp.
15. Position the pivot anywhere on the model
SketchUp offers predefined move and rotate controls for groups and
components, available while hovering over them with the Move tool. It's fast and convenient to use them, but the problem with rotation operations is the centre of mass being used as the pivot. For completely symmetrical objects, this poses no issue, but for the groups and components you create that don't fall under this category, here's a cool trick that you can implement to shape the way it behaves.
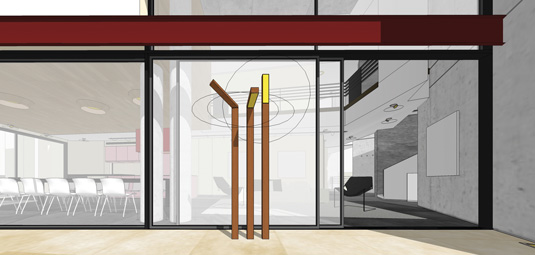
Since SketchUp considers all the geometry inside a group for the centre of mass calculation, you can add line work inside the group, placed inside a special layer that remains hidden until you call it up. With this line work, you can shift the centre of mass, better known as the pivot point, to fit your needs. If you define your group as a component, you can use Change Axes in the right-click context menu to reposition the local axes to align with any rotation plane you choose. I use this method to set correct pivot points for doors, windows, spotlights, etc.
16. Photo matching
SketchUp has one of the best photo-matching tools I've come across. Success in using it relies on using unedited original photography and an accurate model that reflects the scale and measures of the subject in the photo.
You should also strive to get the camera's focal length for the specific photo you try to match. All it takes is importing the photo, placing the yellow origin mark on it (corresponding to where the model origin is), and aligning both red and green axis lines to the subject features in the photo that follow the same direction. If you're off-scale, dragging the mouse on the blue axis line enables you to fit the model size to the photo subject size.
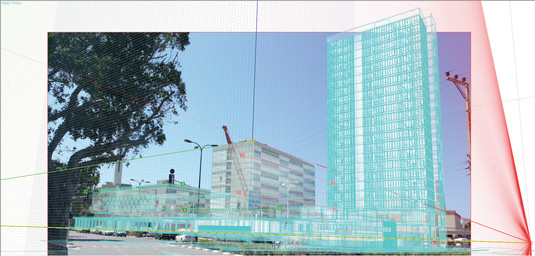
You could also model a subject from scratch, based on several photos that you import into SketchUp. Keep referencing two, three or more photos as you model to get an accurate model that you can then bake photo information on it as texture. This is great for creating contextual 3D models for your scenes.
17. SketchUp in sync
If you're like me, and work in the office, home and on a laptop on the go, maintaining consistency among your various SketchUp instances could be a hassle. Since being online is like second nature for us these days, I use Dropbox as my main folder for all ongoing projects, so that everything I do gets synced across all my devices.
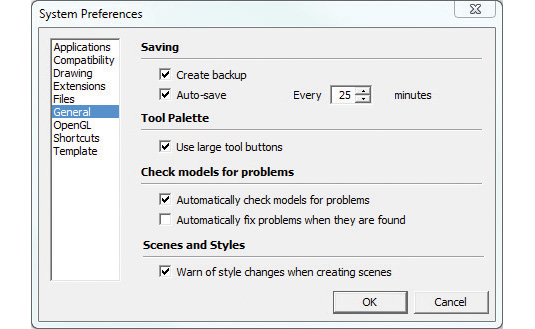
I also set SketchUp's default folders for models, components, materials, styles, texture images, watermark images and export inside Dropbox too. This way I always have my work files and resources no matter where I am. This simple workflow change has saved me so many times that I can't stress how important it is for those crunch times when you suddenly realise you left some files in the office.
This article originally appeared in 3D World issue 166.
Liked this? Read these!
- The best 3D movies of 2013
- Download free textures: high resolution and ready to use now
- Discover what's next for Augmented Reality

Thank you for reading 5 articles this month* Join now for unlimited access
Enjoy your first month for just £1 / $1 / €1
*Read 5 free articles per month without a subscription

Join now for unlimited access
Try first month for just £1 / $1 / €1
Get the Creative Bloq Newsletter
Daily design news, reviews, how-tos and more, as picked by the editors.

The Creative Bloq team is made up of a group of art and design enthusiasts, and has changed and evolved since Creative Bloq began back in 2012. The current website team consists of eight full-time members of staff: Editor Georgia Coggan, Deputy Editor Rosie Hilder, Ecommerce Editor Beren Neale, Senior News Editor Daniel Piper, Editor, Digital Art and 3D Ian Dean, Tech Reviews Editor Erlingur Einarsson, Ecommerce Writer Beth Nicholls and Staff Writer Natalie Fear, as well as a roster of freelancers from around the world. The ImagineFX magazine team also pitch in, ensuring that content from leading digital art publication ImagineFX is represented on Creative Bloq.
