Animation basics: get started with rigid body dynamics in 5 steps
3D artist Rob Redman teaches you how to set up your scenes to interact with themselves.
Playing with dynamics systems in 3D software is one of the areas that gives the most instand gratification, probably working the same areas of the brain that give us a buzz when playing Mousetrap as a kid.
Setting up a dynamics system is pretty simple but if you've never tried before here is a run through to help you get up and running quickly. Keep in mind that the results you can achieve are massively varied so take what you learn here and experiment.
01. Build your assets
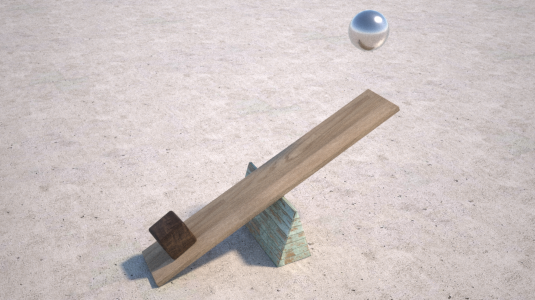
The first step to making this work is to build all your assets. Most people start by making a simple ball bounce on a floor but to help you understand we will take things a step further. Use simple geometry to set up a seesaw, using an extruded pyramid with a plank laying across it. Then add a cube to one end.
Lastly position these pieces so the cube end is resting on the floor (or near it). Now add a sphere to the scene and position it above the opposite end to the cube. You should have something similar to the image.
02. Add tags
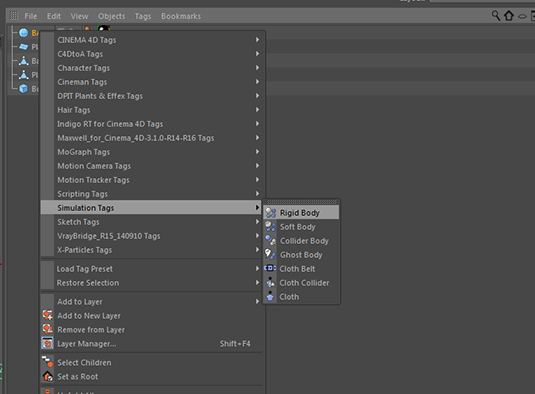
Now select your ball in the object manager and right click it. Choose Simulation/Rigid Body. This applies the tag to the ball with immediate results. Hit play and you'll see it fall down but it doesn't interact with anything else. That's because everything that interacts needs a dynamics tag.
Before you charge in and start adding them though you need to know there are different kinds. Add the same tag to the floor and hit play. Oops. For things you want to be solid but immovable you need the Collider tag. Add this to the floor and the base triangle.
03. Adjust the settings
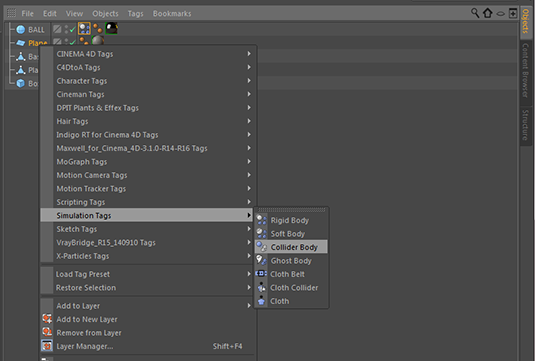
For the objects that will move as well as collide you can use the rigid body tag. Now hit play and see what happens. Doesn't quite act like a seesaw so you'll need to look at fixing it. You could model a notch to stop the plank slipping but really you can do it all from the tag's attributes.
Get the Creative Bloq Newsletter
Daily design news, reviews, how-tos and more, as picked by the editors.
The most common things to adjust here are in the collision tab. Try increasing the friction and reducing the bounce of of both the ground and the base. Model in a piece to stop the cube sliding as increased friction here could cause problems later. Play the animation again and almost there.
04. Change the density
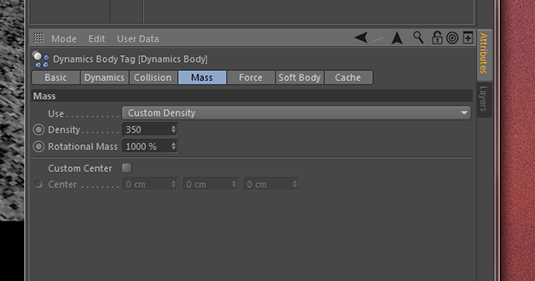
What needs to be fixed at this point is matching the dynamics ot the materials you will be applying. This means the metal ball should act like it's heavier than the wooden box and should propel it upwards pretty fast. Luckily we have controls for that so choose the ball's rigid body tab and move to the Mass tab.
Here open the drop down and choose custom density. Set what you think looks right here, judged by running the simulation after each move. Make big changes and narrow down by 50% increments to stay efficient. Don't worry that the plank will shoot off. We will lfix that next.
05. Add a connector
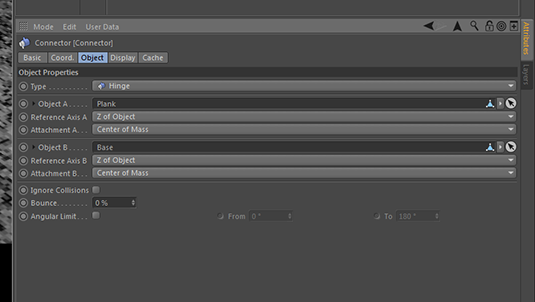
The final fix is to ensure the plank stays put but is able to rotate. This is done with a connector. Connectors are complex and can do many things so we will only look at the options we need. Add one to the scene from the Simulate menu.
Keep its type to hinge, then drop the plank into Object A and the base into Object B. If the hinge isn't facing the direction it should then simply rotate it 90 degrees. That should have added a hinge to the seesaw which is now reacting to the weight of the ball but without any movement that shouldn't be there.
Your animation should look like this:
Give us some feedback on this or other animation tutorials you'd like to see in the comments!
Words: Rob Redman
Creative director and VFX supervisor at Pariah Studios, Rob is also often found speaking at industry events and teaching either on location or at his studio.
Like this? Read these!
- Animation basics: 5 pro tips for using keyframes
- Hands-on review: Adobe After Effects CC
- How to land your dream job in VFX

Thank you for reading 5 articles this month* Join now for unlimited access
Enjoy your first month for just £1 / $1 / €1
*Read 5 free articles per month without a subscription

Join now for unlimited access
Try first month for just £1 / $1 / €1

Rob Redman is the editor of ImagineFX magazines and former editor of 3D World magazine. Rob has a background in animation, visual effects, and photography.
