Match your camera angle to a background image in 3ds Max

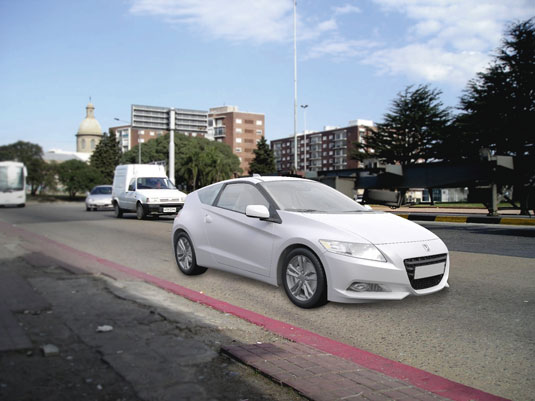
In the early days of 3D visualisation, I can remember matching 3D objects like cars or buildings to photographic backdrops on a fairly regular basis – making small adjustments to the position and the field of view, until finally everything slotted into place and it looked right.
Thankfully, the days of just doing it by eye are over – because they often drove me crazy. Over the years, 3ds Max has included other tools such as Camera Match, but no solution has been as simple or straightforward as the latest attempt.
Camera orientation
It's called Perspective Match, and it's been a part of 3ds Max since the 2014 edition; so if you've not come across it, it's because it's not been around for all that long. Perspective Match enables you to take any background image and orient the camera so that its position and field of view perfectly match the perspective of the image. You do this by adjusting X, Y and Z gizmos, which the camera then uses to know how it should position itself.
Perspective Match is perfect for jobs where you want to set something in a photographed context. If you want a more scientifically accurate camera match, you will need to also survey key points found on the objects in your photo and use those to align your 3D model.
That being said, let's dive straight in to see the few simple steps that make up the Perspective Match utility.
01. Set up the scene

Drag and drop your chosen image into the viewport to assign it as a background. Press [8] to bring up the Environment window, and drag and drop your environment map into your Material Editor.
Select Instance when prompted to ensure that adjustments to the bitmap are replicated in the environment. Once in the editor, change the Mapping Type for that bitmap to Screen. Close the Material Editor.
Daily design news, reviews, how-tos and more, as picked by the editors.
02. Render setup

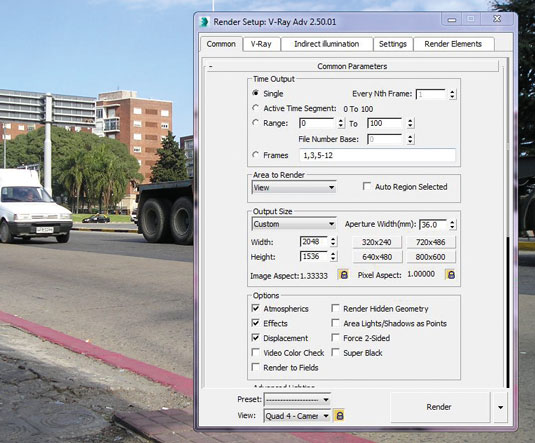
Next, press F10 to bring up your Render Settings. Change your render output size so that it matches the aspect ratio of the background image.
Obviously anything you render out of your camera needs to match the aspect ratio of the image you are trying to match. To apply your output aspect ratio to the viewport, just press [Shift]+[F] with the viewport selected, and this will bring up your safe frames.
03. Set the perspective

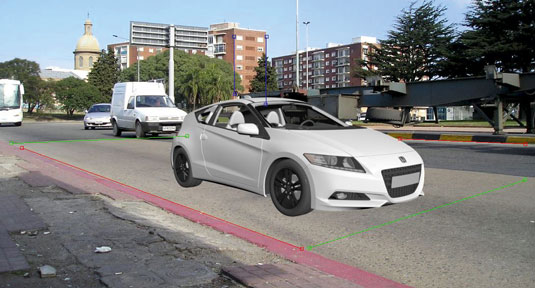
In the Utilities panel, click Perspective Match, then turn on Show Vanishing Lines to show gizmos for the X, Y and Z axes. Drag the lines to move them. Place them at right angles and line them up with your image.
The blue gizmo needs to align with the vertical lines in your image. As you adjust the gizmos, your camera will adjust to align with the image. Any objects that you add to the scene will fit in perfectly.
Words: Paul Hatton
This article originally appeared in 3D World issue 187.
Like this? Read these!
- Discover what's next for Augmented Reality
- Download free textures: high resolution and ready to use now
- The designer's guide to special characters

The Creative Bloq team is made up of a group of art and design enthusiasts, and has changed and evolved since Creative Bloq began back in 2012. The current website team consists of eight full-time members of staff: Editor Georgia Coggan, Deputy Editor Rosie Hilder, Ecommerce Editor Beren Neale, Senior News Editor Daniel Piper, Editor, Digital Art and 3D Ian Dean, Tech Reviews Editor Erlingur Einarsson, Ecommerce Writer Beth Nicholls and Staff Writer Natalie Fear, as well as a roster of freelancers from around the world. The ImagineFX magazine team also pitch in, ensuring that content from leading digital art publication ImagineFX is represented on Creative Bloq.
