Create a powerful female character in 10 steps
Brilliant CG artist Maria Carriedo takes you behind the scenes of her process and shares her secrets.
06. Skin
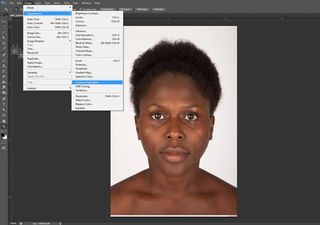
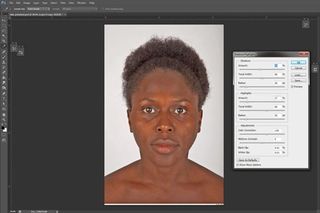
The next step is texturing the skin. The most important part of this is having high resolution quality images of a model that suit your needs. In this case, I needed a black young female, and after finding a good set of photographs, I proceeded to do some editing.
The thing is, you really don't want any lighting information, so any highlight in the skin has to go. It's going to look a little odd, almost dead in some way, but when you plug this is to your SSS shader with the correct specular, its going to make a BIG difference.
For this purpose, I used Photoshop. The process is pretty straightforward: with your high-res image open, go to image> Adjustments > Shadows/Highlights. You can leave it as default, or play around with the values, although try not to go too crazy since things might start looking a little to clamped. Its ok to leave some highlights, since you can clean those afterwards.
07. Highlights
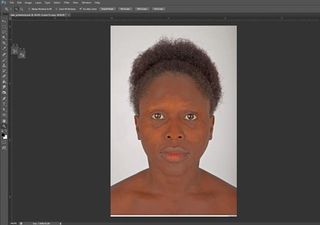
Once you are satisfied with the more uniform skin, you can get rid of the tighter highlights with the clone tool, sampling from areas on the skin where there is no light information. Once you do this, you can also get rid of the eyebrows and the eyelashes, since you'll be needing other tools for this.
And of course, repeat this process for all your other images. It's time consuming, but completely worth it!
08. Match images to your geometry
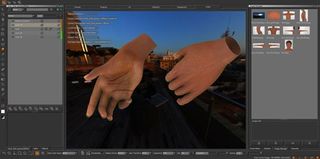
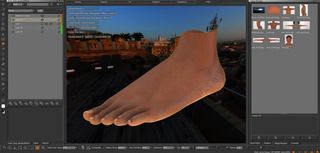
Now that you have your matte images, you can take your time to project them and match them to your geometry, being careful with not leaving any seems and making it look as uniform as possible. Its very easy to make skin look "patchy", especially in darker skin, so take your time! You can't rush perfection.
09. Environment fog
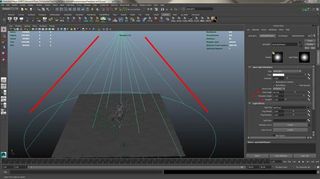
Next comes the environment fog. After I finished painting my textures in Mari, and set up the shaders in Vray, I moved on to setting up the environment fog. There are different ways to tackle it, but after some testing I went for the easiest and fastest render done in Maya software. Basically, you apply a black surface shader to your entire scene, so this way you are ultimately creating a Fog pass to comp later. Something really important to consider, is that this will not allow you to use displacement maps, so if your silhouette changes too much without them this option would not be ideal.
After assigning the surface shader, turn off all your scene lights, and add a basic spotlight that covers your entire shot. Play with the cone and penumbra angle, as well as adding some dropoff to get a softer feel. After you set this up, you should have a dropdown for light effects, where you have an option for light fog. Add the fog by clicking on the checker next to it, and on the light fog color options, plug in a cloud 3D texture, which you should scale up considerably, testing what size works better for your scene.
Play with the fog spread and intensity until you get the desired look. This way, you create a super simple and really fast fog pass. (13 seconds a frame in this scene!)
10. Compositing
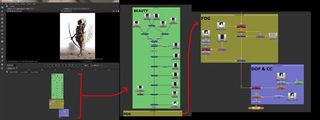
For the final compositing on this project, I opted for using Nuke, since it gives you great control over your look and its fairly simple to use. I rebuilt my beauty passes, and took the fog pass I created previously and just did a simple merge.
Since it was already layed out to match perfectly, there is not much to adjust except some basic grading to add some color and decrease/increase the intensity. After this I just added some depth of field and final color correction.
Words: Maria Carriedo
You can see more of Maria’s work and a video of this illustration at www.mariacg.com
Like this? Read these...
- How to build an app: try these great tutorials
- Free graphic design software available to you right now!
- Download the best free fonts

Thank you for reading 5 articles this month* Join now for unlimited access
Enjoy your first month for just £1 / $1 / €1
*Read 5 free articles per month without a subscription

Join now for unlimited access
Try first month for just £1 / $1 / €1
Get the Creative Bloq Newsletter
Daily design news, reviews, how-tos and more, as picked by the editors.
The Creative Bloq team is made up of a group of design fans, and has changed and evolved since Creative Bloq began back in 2012. The current website team consists of eight full-time members of staff: Editor Georgia Coggan, Deputy Editor Rosie Hilder, Ecommerce Editor Beren Neale, Senior News Editor Daniel Piper, Editor, Digital Art and 3D Ian Dean, Tech Reviews Editor Erlingur Einarsson and Ecommerce Writer Beth Nicholls and Staff Writer Natalie Fear, as well as a roster of freelancers from around the world. The 3D World and ImagineFX magazine teams also pitch in, ensuring that content from 3D World and ImagineFX is represented on Creative Bloq.
