Create a powerful female character in 10 steps
Brilliant CG artist Maria Carriedo takes you behind the scenes of her process and shares her secrets.
I guess I should start by saying that you should always start with a concept you love, since you're going to spend a lot of time working on it. In this case, I wanted to do something tribal, and after a long search I ran across an amazing Dutch artist, Hendrik Visser.
Once you have the concept you want, the easiest way of starting is doing a simple paintover to block out and list all the meshes that are part of the piece. I've found that this way you'll have a "plan of attack" and you'll have a more clear idea of the pieces you have to make, if you are going to polymodel or sculpt, etc.
Be inspired by these brilliant examples of 3D art
01. Modelling
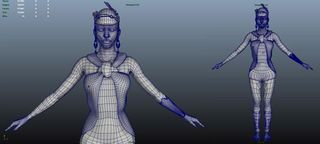
The first step is modelling. I believe that its crucial to have good working topology in all your models, even if a character you are working on is not going to be animated. It is good practice to keep clean, rig/animating friendly topology in every model you do, and from what all my teachers have taught me, recruiters will always want to see this in your models too.
For this reason, I did the base mesh in Maya. At this stage I don't worry about likeness to the concept or posing, but keeping a clean edge flow and basic shape layout for easier and more organic sculpting later. The awesome thing about having a clean base mesh is that you avoid having to retopo your sculpt in the end.
02. Retopology
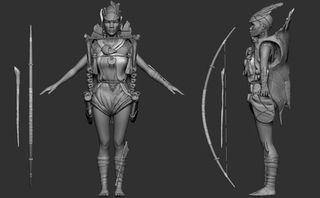
This is the mesh I took into Zbrush for further sculpting, but after doing so I was not very happy with the topology on the legs, so I did some retopology on that part.
After I was happy with the sculpt, I exported the lowest subdivision levels back into maya for UV unwrapping, and then brought them back in to Zbrush to export all of the displacement maps. It's definitely a slow process, but its immensely gratifying when you have all of your sculpted detail in a usable polycount.
03. Feathers
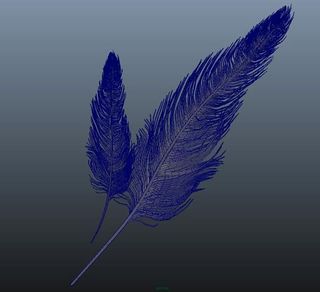
One of the most fun little details I had to model were the feathers. I approached them with different strategies, ranging from VrayFur to tying out Fibermesh in Zbrush, but in the end choosing to model the feather in the exact shape that I wanted, since the other strategies were not giving me the control that I needed.
I started out by modeling the spine of the feather, and deforming a 1x10 polyplane with the lattice tool, duplicating and lattice again, and so on. As one of my teachers told me "If you can get away with modeling it, do so. Nothing will ever beat a good model", as in this case its better to make it, not fake it.
04. Posing
At this point you can also pose your character, either by using the tools in Zbrush or by using a simple rig in Maya, although in this case, I used Zbrush for posing. If you do this, it is very important that you keep a T-pose version of your sculpt, since Zbrush doesn't keep transformation information.
Once I had my pose ready, I took some time to model the environment and set up the lighting while trying to match the mood as closely to Hendrik Visser's original concept as possible. For this project, I decided to use Vray, since I find it gives very good results and its very easy to work with. I had a warm keylight on the right as the sun, a cooler fill light on the left side, and an environment hdr for my indirect lighting.
05. Texturing
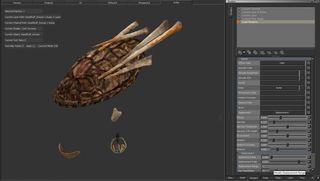
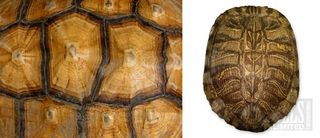
The next step is texturing. Once the hard part is done, on to my favorite part: texturing! I went through this huge task from head to toe, piece by piece, using Mari. I've found that this program, although intimidating at first, includes so many handy tools that simplify the process of texture painting, without having to worry too much about having seams on your meshes.
By using high resolution photographs along with painting tools and blending modes in Mari, I ended up having very convincing and seemless textures for my project. Another thing that I find super useful in this program is that you can build mock-up shaders where you can plug in (and edit) displacements, bumps, specular maps, etc.
Next page: five more steps on how to create a powerful female character...

Thank you for reading 5 articles this month* Join now for unlimited access
Enjoy your first month for just £1 / $1 / €1
*Read 5 free articles per month without a subscription

Join now for unlimited access
Try first month for just £1 / $1 / €1
Get the Creative Bloq Newsletter
Daily design news, reviews, how-tos and more, as picked by the editors.
The Creative Bloq team is made up of a group of design fans, and has changed and evolved since Creative Bloq began back in 2012. The current website team consists of eight full-time members of staff: Editor Georgia Coggan, Deputy Editor Rosie Hilder, Ecommerce Editor Beren Neale, Senior News Editor Daniel Piper, Editor, Digital Art and 3D Ian Dean, Tech Reviews Editor Erlingur Einarsson and Ecommerce Writer Beth Nicholls and Staff Writer Natalie Fear, as well as a roster of freelancers from around the world. The 3D World and ImagineFX magazine teams also pitch in, ensuring that content from 3D World and ImagineFX is represented on Creative Bloq.
