The best 3D art requires skill and precision, but if you take the time to learn and explore, you can achieve stunning results. Working in 3D adds a level of depth and realism that's extremely hard to capture in 2D, and 3D art examples can be used for various projects – as art in their own right or or animation, games or 3D printing.
If you are just starting out in 3D art, looking at others' work, including from some of the most popular 3D artists, can provide the inspiration you need to propel you forward. As well as presenting the beautiful images, we've spoken to the artists below to learn about their workflow and design process, to find out what it takes to make amazing 3D art.
The best 3D art examples
If you want to feature in our list of inspiring 3D art, contact us via email at: contact@creativebloq.com. Send us your portfolio links, new projects and tell us all about them.
Click the icon in the top right of each image to see it full-size.
Character design
1. Needle Knight Leda

'Needle Knight Leda' is an intricate 3D model created in ZBrush and Marvelous Designer by 3D character artist Razvan Smaranda.
Razvan used Marvelous Designer for the fabric simulation and ZBrush for sculpting and detailing. He says the most difficult aspect was applying the pattern to the cloak and dress. "Replicating the concept’s pattern required UV warping and creating the alpha design, followed by using the CurveFlatSnap brush to create a 3D mesh on top of the alpha, with the alpha serving as a guide," he explains.
"As well as that, I loved creating the ornamental elements. I used alphas and then masked each of them manually, before employing alphas again to fill out the empty space. After that, I used mesh ornaments on top of the alphas to create additional layers."
2. Mother
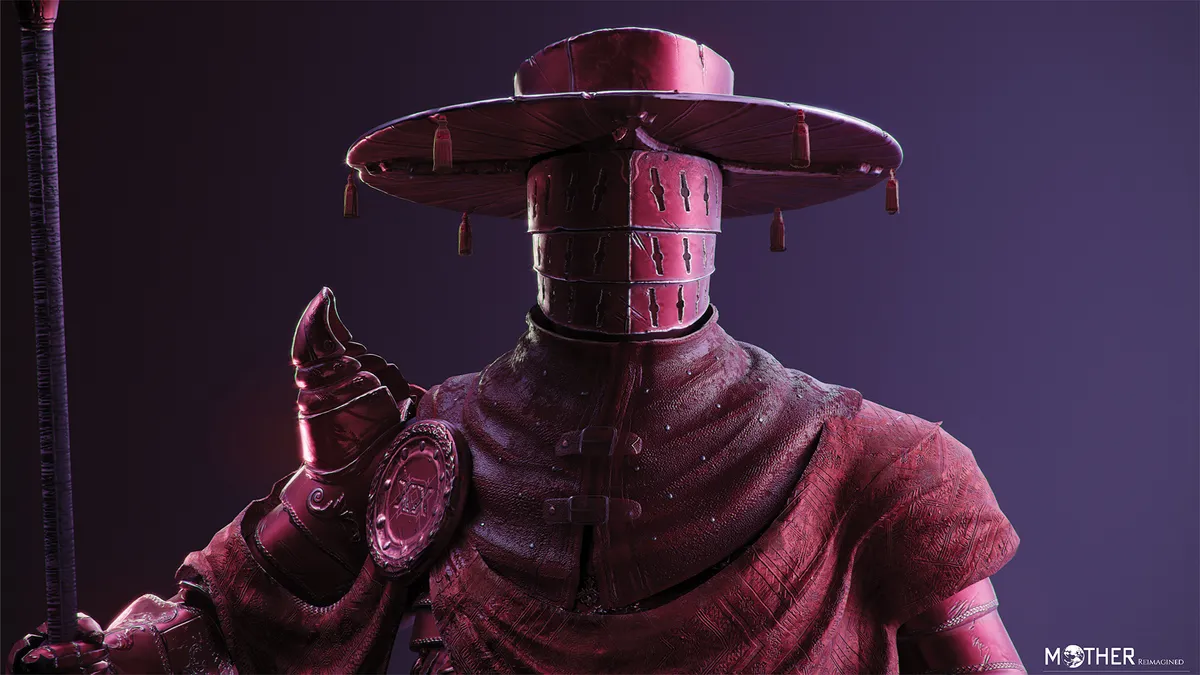
Pietro Boldetti is a 2D and 3D concept artist specialising in a range of artistic disciplines from concept art to 3D modelling. Below is a piece from his 'Mother Reimagined' series inspired by the MOTHER video games. In these 3D sculpts he reimagines the castle gate guards.

Pietro tells us that he used a simple sprite taken from the MOTHER video games as the main reference for the entire design process. "My inspiration was taken from traditional ceremonial French armour from the 16th century, along with not-so-traditional armour such as those from Elden Ring," he says.
In his creative process, Pietro believes in the value of balancing aesthetic beauty with functionality. "I use shapes, colours and silhouettes to get the design how I want it, but also keep a keen eye on the purpose of the design choices taken."
3. Super Mario

Claudio Abraham is a 3D character artist and digital sculptor from Buenos Aires, Argentina. His piece Super Mario Diorama is a playful 3D scene modelled in ZBrush and rendered in Marmoset Toolbag.
Claudio tells us that as a lifelong Super Mario fan and collector, creating this fan art diorama was a real dream come true. He says: "Crafting this piece was a two-month labour of joy, aiming to portray Mario's confidence and the dynamism of the games. It allowed me to combine my passion for the characters with my love for digital sculpting, resulting in a piece that celebrates creativity and nostalgia."
4. Kvasir, the Jailer of Loki

‘Kvasir, the Jailer of Loki’ is fan art by senior character artist Vinayak Sreekumar based on the God of War interpretation of this figure from Norse mythology.
Vinayak tells us that this piece was inspired by Yong Yi Lee’s original concept, and creating it pushed his anatomy and detailing skills to new heights. "Using ZBrush and Maya for modelling and Substance 3D Painter for texturing, I focused on getting realistic facial features and expressive details," he says.
"Bringing Kvasir to life with a blend of mythological elements and realistic textures was the most enjoyable part; this project was a labour of passion. For the final presentation I used Marmoset Toolbag, creating a custom light rig that would enhance the overall presentation of the project."
5. Agent Kruger

3D character artist Thomas-Sten Chermain based his piece on the villain from the SF action movie Elysium, Agent Kruger, and it was done as an experiment in producing a convincing render of a real-life person.
"I chose this project because of its incredible sci-fi elements," he says. "The uncanny valley of the technology wasn't noticeable when I looked at the design of the character: like I was successfully duped by this sci-fi style. One thing that was important during this project was the scanning approach for the clothes. I loved it, and it's now one of my favourite tasks."
His process for posing the character began in Character Creator 4 and finished in ZBrush. The vast majority of his time was spent cleaning up in ZBrush to ensure there was no clipping geometry, stretched UVs or unrealistic deformations.
6. Spine Jetpacker

Popularity_Choi's piece 'Spine Jetpacker' depicts a futuristic soldier and is based on concept art by Yintion J - Jiang Geping. "I've always created characters for medieval fantasy concepts, so this character, which combines modern military clothing and technology, was quite a challenge for me," he tells us.
For the mechanical parts, he first sketched in ZBrush using DynaMesh, and referred to Keos Masons' hard-surface techniques. Each part was then separated, retopologised, and the details refined.
The artist adds: "The modern military-style clothing needed realistic folds, so it was created using Marvelous Designer. The most enjoyable part of this project was the texturing. I had fun working on it because there were many objects with various decals engraved."
7. Stop right there, criminal scum!
Based on a sketch by Victor Titov, this characterful model was created by 3D character artist Antoine Zavagno using ZBrush for the sculpting and texturing, and Marmoset Toolbag for the rendering. "By limiting myself to just these two software packages, I was able to create this portrait much faster than I usually do," he says.
Antoine was drawn to the "sketchy and imperfect" qualities of Victor's drawing. "It's also the part I had the most fun with; not questioning every brushstroke and keeping some of my mistakes in was very relaxing. What I learned during this project is to leave room for mistakes and imperfections. An imperfect image doesn't necessarily mean a bad image."
8. The Seer

Kateryna Hrytsyshyna is a digital sculptor based in Uzhgorod, Ukraine. The Seer was a personal piece inspired by shamanic traditions and ancient myths. She created it in ZBrush and rendered it in Marmoset Toolbag.
She says she focused on capturing the fine details of the face and clothing in the sculpt with the intention of printing the design using 3D printing. This objective meant that she had to carefully consider the structure and geometry to ensure it would print cleanly and maintain the details with no thin areas or overhangs (see our pick of the best 3D printers if you want to print your own work).
9. The Ugly

Dimax Araujo took inspiration from The Good, the Bad and the Ugly by Jeremy Hoffman for this model. He used ZBrush to block and sculpt the initial model, focusing on creating the silhouette and adapting the 2D concept to 3D. Once blocking was complete, he used used Blender to refine the model ready for production. Additions include the revolver and cigar, which he added to give the character more attitude.
Araujo said his favourite part of the process was creating the face and hair to convey the 3D character's dishevelled state. He used Substance 3D Painter to add texture, respecting each of the different components; the metal, hair, wool, tobacco leaf and leather and finally used Blender to pose and light the character for the final render.
10. Robert DeNiro, Casino

Character artist Thomas Rousvoal created this stylish fan art of Robert De Niro as part of his 'Back in '90s' series. An important aspect in the design was to give De Niro "his particular personality and legendary facial expression, balancing the reality and respecting my cartoon stylisations," Rousvoal explains.
Rousvoal paid close attention to applying noise and grain to the image for this 3D art, evoking the atmosphere of Martin Scorsese's Casino. "I like to give life to my works, add defects to them. The human eye is full of imperfection, photo and cinema lenses imitate our vision. I try to get as close as possible to this," Rousvoal explains. "I have my own anamorphic lens camera setup."
Rousvoal has also developed a way of working that consists of building the body of a character that already has details, thanks to real 8K scanner skin maps that he projects onto UVs in Mari. He adds: "All the characters I start are from the same body, and even UV. This allows me to start a new sculpture with different shapes while having my layers of realistic skin details."
11. Olakunde

Olakunde, which translates as 'the brave arrived', took Brazil-based 3D character artist Jack Malone two months to complete. He worked on the incredibly detailed character in between cinematic and video game projects for a range of companies. Malone immerses himself deeply into each project, always aiming for more than just a simple 3D model. "My commitment is to add different art aspects to my work, like composition, design and art direction," he explains.
The most challenging aspect of Malone's process was discovering and defining the African style, "it was rewarding when I finally got the correct design," he adds. After assembling a ton of references, Malone made a raw sculpture to better understand the anatomical proportions of the character and design of the assets. He utilises as many UDIMs as possible to achieve a great UV texture resolution.
After this, Malone starts work on the body texture in using HD Geometry along with the asset textures in Substance Painter. Marvelous Designer was employed to create and simulate the character's skirt, as well as the fabric belt tied around his waist. In the final stage, everything was assembled in Maya and rendered using Arnold.
12. J.R.R Tolkien

It took character artist Roger Magrini three months to complete work on this lifelike recreation of The Lord Of The Rings author J. R. R. Tolkien. "Everything was hand-sculpted and Polypainted in ZBrush on HD Geometry," Magrini explains, "except for his pipe, I used Substance for that."
Magrini began by gathering as much reference as possible, all with different angles and lighting setups. "Likeness is like a puzzle," he adds, "so you need reference to fill in the gaps." Magrini sculpted the likeness in ZBrush, before adding skin details by hand, using brushes he created. "Then I Polypaint the Albedo, Specular and Bump maps," he continues.
Magrini challenged himself to achieve photorealism from the very first render of this 3D art, without any post- processing. "I also like to do a stress test in different lighting setups," he adds, "to see if things hold up."
13. Waiting for the Bus

“The goal for this 3D art project was to study and introduce Substance Painter into my workflow, and also to test Marmoset 3,” explains Mariano Steiner, a character artist and digital sculptor who created this piece in two months. “I wanted to provoke a weird feeling when the viewer sees it,” he reveals. With its realistic setting but unusual character, it’s certainly a piece that will make you look twice.
“In my personal work, I always try to input a bit of what I’m excited about in that moment, and always try to push the level in some way,” he adds. With Steiner finding inspiration through movies, games and toys, as well as nature and space, it sounds like he certainly won’t be short of interests to fuel his imagination.
14. Sacramental

“I always start in ZBrush from a sphere,” explains freelance artist Rodion Vlasov. He goes on to outline the 13-day process behind this image: “From then on the pipeline is pretty regular, nothing tricky and special – I even used the standard shortcuts and UI in ZBrush. When I need custom topology, in the eyes for example, I do it by hand in TopoGun and then merge it with the ZRemeshed mesh.” Lastly, Vlasov does his polypainting in ZBrush as a base for the texturing process in Substance Painter.
Highlighting his favourite part of the process, Vlasov concludes: “I love the process of sculpting, it’s the reason I do this. Some people play games for fun, I play in ZBrush.”
15. Here Be Dragons

This enchanting image, based on the work of Tom Booth, marks the first time Blackmagic Design’s Peter Sandeman had created a forest, taking him a total of three months to complete.
Sandeman says of his process: “Modo has quite a robust replicator system which was used to generate most of the forest’s density and randomisation. Flowers really benefit from replicators because you only need to build one or two hero assets then use the replicator with randomised size, position and rotation.”
Seeing the image come together was a big moment for Sandeman. “It was really hard to tell if it was going to work out or not,” he admits. “With a forest being so diverse it can be hard to see the whole picture when you’re building one flower at a time, so to speak.”
16. Dear Fabricio

“It took me around three and a half days to create the whole piece from concept to final product,” says freelance director, CG supervisor and 3D artist Pedro Conti. This endearing image was a gift for his wife when she was pregnant with their son. The sculptures were based on their ultrasound photos and a little plush monkey from Conti’s childhood.
Conti has 13 years of industry experience to draw from on personal projects like this: “I ran a company called Techno Image for seven years,” he reveals. More recently he has worked on Disney’s Moana and currently freelances for companies like Dreamworks, Universal Studios and Aardman.
“I spent more time thinking about colours, layout and composition than on fancy 3D techniques with this image,” explains Conti. “I felt I should go back to the principles of design and learn more about traditional techniques such as photography, design and Gestalt Theory. If you understand those aspects of art you will find a way to make it work in 3D.”
17. Aghori Portrait

It's hard to believe that Aldo Martínez Calzadilla's 3D art, Aghori Portrait, created using ZBrush, Maya and Mari, only took two weeks to finish. "I try to work as fast as possible," he explains. "In my experience, moments of inspiration don't last too long, so I try to go through the process of creating an image as efficiently as I can."
The meticulous groundwork of modelling and sculpting was his favourite part of the 3D art project. "I knew that in order to do a good job with the Aghori, the forms and anatomy had to be good and accurate to the reference," he reveals.
18. PKTS_09

PKTS is an abstract, sci-fi and contemporary 3D art series from freelance art director, concept and 3D artist Eugene Golovanchuk, also known as Skeeva. Personal projects like this always evolve out of the smallest and simplest of experiments.
“Combine simple shapes and colours and see if you have that inner sense of what you are going to see. If it works then you can develop the idea into something more fully formed. Cinema 4D is my main 3D software. I usually use the viewport as an empty canvas, combining different silhouettes and textures into one composition to see how objects ‘feel’ inside the scene,” he explains.
When it comes to achieving the slick and stylish look of his work, Golovanchuk has some simple advice: “The trick is to try and set up textures and lighting first, so it looks more or less like the final render. Then you can carry on tweaking the model and textures. Most people will say it’s wrong and that the process should be step-by-step. You know what? Don’t listen to anyone else, just do what you feel.”
19. Old God in the Wood

I love the texture of all the moss on this 3D art by Andrey Dobraeb. The Russian 3D artist took inspiration from dark fantasy games like Dark Souls and Elden Ring. He created the character mesh in ZBrush with decimation, and then used RizomUV to create UV maps and Substance 3D Painter for the textures and to achieve the moss effect.
20. Snow Girl

Matteo Hu's Snow Girl captured our attention for its delicate interplay of light and texture and the Italian artist's eye for realism. Inspired by White Snow, an piece of concept art from Zim, he worked through a number of challenges, using the topology plugin jQuadCloth for Maya to retopologize the clothing when exporting it from Marvelous Designer. For the hair, he divided it into sections and made different descriptions to make it easier to manipulate with XGen.
Weapon Design
1. Dying Light crossbow
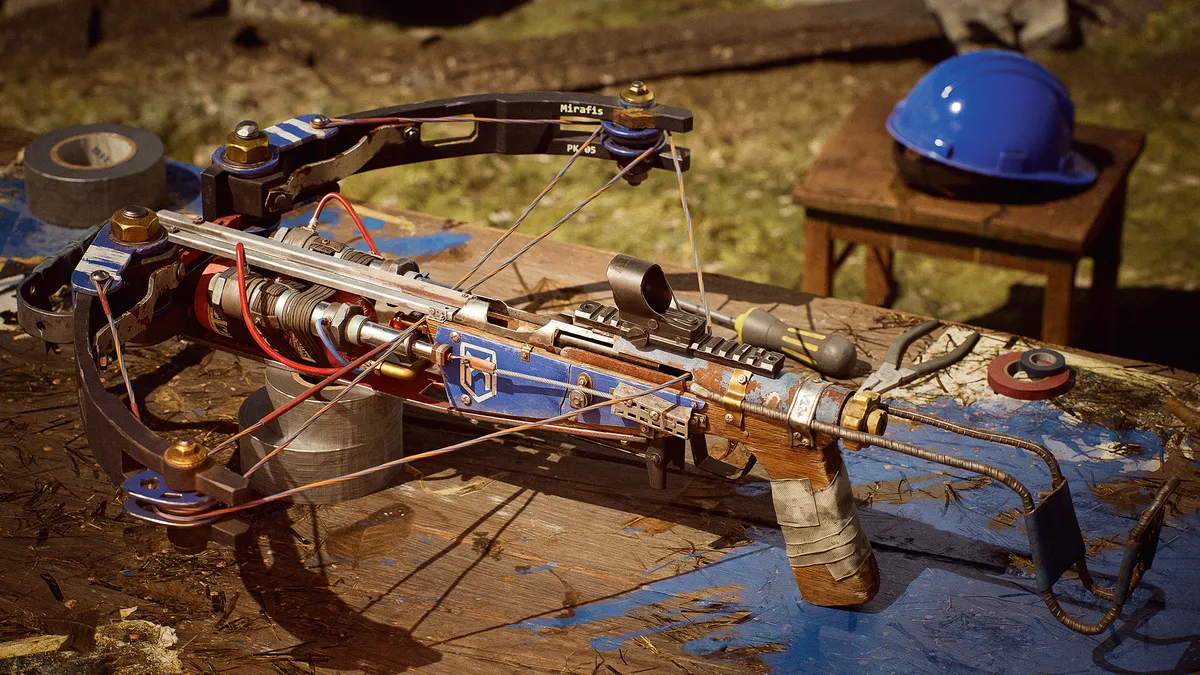
Oleksandr Vasylenko is a 3D artist from Chernivtsi, Ukraine. His piece PK Crossbow is a lavishly detailed render based on a concept by Marek Kaplita. He used Blender and ZBrush for modelling, with Unreal Engine handling the render. Substance 3D Painter also played a key role.
Oleksandr tells us he was inspired to create this work after playing Dying Light 2: Stay Human and seeing a post by Marek Kaplita on ArtStation. "Studying the crossbow and understanding how it works and how to improve its details was the most engaging part," he says.
"The Dying Light setting implies an apocalypse, so depicting material wear and detail interaction was crucial. Working on this project was incredibly interesting and educational."
Environments
1. Halo

James Naughton is an environment artist from Manchester in the UK. His piece Installation 04 is a tribute to Halo. He used ZBrush and Blender for modelling and Unreal Engine for rendering, with SpeedTree, Substance 3D Painter, Substance 3D Designer and Photoshop all lending a hand at various stages.
This environment piece was created in Unreal Engine 5 and is fan art for the popular video game franchise Halo, which has been one of the artist's favourite franchises since he was young.
"I created all the assets from scratch myself aside from the character models, which I found on 3D asset websites," says James. "I made the hard surface assets in Blender using various plugins such as BoxCutter and anything organic was done in ZBrush and SpeedTree."
James advises that when creating environment art, you should always spend lots of time on the blockout and lighting stages. "It’s the difference between your art turning out great or falling flat."
2. Forgotten

Gannon Faust Jaspering's Forgotten was inspired by the ancient Roman statue Sleeping Hermaphroditus – the offspring of Hermes and Aphrodite and source of the term hermaphrodite. The intention was for this 3D art to evoke a sense of loneliness that many queer people feel.
The foliage assets were from Quixel Megascans, but Gannon created the statue, pots, pilgrim and moss clumps. Blender nodes were used to scatter Quixel foliage cards onto the moss meshes, which how they were made so fluffy. Gannon is a senior world builder and environment artist and also works in Unreal Engine, ZBrush, Substance 3D Painter and 3ds Max.
3. Sunshine Bloc

Vincent Moubeche has been creating 3D art for the past decade and currently works as an environment artist for Compulsion Games in Montreal, Canada. He's been working on this fun Super Mario fan art for two months, taking a break in December. "The scene is not technically impressive," Moubeche admits, "I did what I know best: modelling and level art. The only unusual thing I did is rework all the metrics from the original Plaza to fit the more compacted idea I had of the area."
So many buildings were needed for the scene that, rather than making each one unique, Moubeche used kits. He then utilised placeholders with minimal details to plot the scene in 3ds Max. From there he'll make high-poly versions of the assets with 3ds Max or ZBrush. Playing with camera angles and focal lengths allowed Moubeche to achieve happy accidents such as tilt shifts. For this 3D art project, Moubeche also employed Substance Painter's Slope Blur for the first time: "I added a pattern with the Slope Blur to break the shape," he explains, "it brought something interesting into the scene, even if it is subtle sometimes."
4. The Forest

When lighting artist Joannie Leblanc created this beautiful 3D art woodland scene, she knew just how important it was to use lighting effectively to produce the mood she desired.
"Lighting is not just about light and shadows," she explains. "You need to think about what people will focus on in your art to grasp their attention. Contrast, depth, colours and rhythm will help the eyes travel in your picture like a flow, letting the viewers immerse themselves into your world."
5. Dark Forest

Jakub Javora's surreal Dark Forest scene, with its glowing doorway contrasting with the natural scene, perfectly sums up the artist's eclectic and eccentric interests. "I'm mostly inspired by weird phenomena like chaos theory, sexual selection and various religious practices," he explains.
Unusually for Javora, this scene was a pure 3D composition with no 2D techniques involved. "Some people are using the same tools and workflow without changing," he says. "I am always trying to do something extra to keep my creative spirit going and enjoy the work."
6. Somerset Isle

Somerset Isle is a real-time environment rendered with Unreal Engine. "The composition and lookdev is heavily based on the amazing concept works from Chong FeiGiap (Running Snail Studio)," explains environment artist Tomer Meltser of his image, "while many of the design and structure ideas in the environment (boats, architecture) are based on images of Chew Jetty (Malaysia) and other waterfront towns of this nature."
7. Nasu Tepee

Iranian artist Hossein Yadollahpour got his start in 3D back in 2001 when he found himself reading through a tutorial booklet for 3ds Max. “My father gifted it to me alongside my first computer,” he adds. Since then he’s gained experience in architectural visualisation, environment design, character design and VFX, and nowadays he manages his own studio in the city of Qaem Shahr.
He adds: “This re-creation of the Nasu Tepee started when I found some photos of this beautiful building on the internet.” According to Yadollahpour, the biggest challenge on this piece was tree simulation, but he managed to overcome it with the help of vegetation modelling software SpeedTree. “This powerful software is one of the best choices to make any kind of tree. You only need to know what kind of tree you want and SpeedTree makes it for you.”
8. Summoning
For his environmental 3D artwork Summoning, the Dutch concept artist and illustrator Andis Reinbergs wanted to rely less on paintovers and make most of the work in 3D so the scene could be used for cinematic shots. He started with pencil sketches and then made the ruins in Medium by Adobe, enjoying the intuitive approach of sculpting in VR. The rest of the work was done in Blender.
Vehicle design
1. Y-Wing redesign 2020

Work on the intricate 3D model of this Y-wing design took Ubisoft senior 3D environment artist, Encho Enchev, just three days to complete. Enchev built the model in 3ds Max, before rendering in V-Ray and applying finishing touches in Photoshop.
In his day job at Ubisoft Enchev will begin projects by making rough sketches to present his ideas to the art director. Next he creates a low-poly 3D model to figure out the correct proportions and composition for the piece, continuing with the details once he's satisfied. "If I'm making an in-game model for Ubisoft I unwrap the model and start texturing and baking in Substance Painter," he explains, "if I'm doing a design for me I will skip the UVs and just do a paintover after I'm done with the renders."
Enchev adds that his inspiration comes from seeing a work of art evolve from initial sketch to a real 3D model in a movie or game.
2. Space Frame

This image took freelance artist Praveen V. S just a day to complete. No stranger to delivering huge projects at speed, he once created an 8K rendered BMW interior in less than 24 hours.
For this particular 3D art project Praveen employed a number of his own notable techniques. “I used the round edges option to add a bit of roundness to the sharper edges. These help to catch the highlights, adding to the realism,” he explains. “To add extra details I export to ZBrush, remesh, add the detail, unwrap, then import back to 3ds Max.”
Praveen sees 3D art as a means to explore his passion for automotive design. “In real life I don’t have cars or even a home yet. That said, I have done CGI visuals for Mercedes, BMW, Jeep and a few other automotive brands.”
3. Hover Car Garage

“I spent four weeks on this project – almost 100 hours of modelling and 50 hours of texturing,” says Rico Suyang Wang, from China, who’s studied at Gnomon School of Visual Effects, Games & Animation in Hollywood. The concept was inspired by Alejandro Burdisio's work: “He is one of my favourite artists and I have always wanted to turn his designs into 3D art with a realistic style,” says Suyang Wang.
The biggest challenge for this 3D art was making everything look convincing and functional in 3D, explains Suyang Wang. “I modelled the scene in Maya, textured in Photoshop and rendered with V-Ray. I spent a lot of time blocking the scene and defining the mechanical details. For the texturing, nuance is crucial and reference is key. My mindset is very simple: when I feel something is wrong, I know it must be wrong, so I change it very quickly.”
4. The Free Autonomous Republic of Dieselville

“I’ve been doing photorealistic renderings for seven years. 3D has been my greatest passion for almost 15 years, and it’s not fading,” says artist and programmer Federico Ciuffolini. This particular image took him just 100 days to complete.
“I used a lot of cloth simulations in this work,” explains Ciuffolini. “For the smaller objects I used MassFX, which is quick and stable. For more important objects, where I needed more control, I used the cloth modifier.”
For inspiration, Ciuffolini turns to his fellow artists: “I think that we, as 3D artists, are very lucky. We have a broad, open and passionate community and watching what other artists create is a constant, unbelievable flow of inspiration. I frequently find myself awestruck, and when that happens I often feel a real need to work on my own projects, to try new things, to create. It’s almost physical. I really think that the creative process is a fundamental need of human beings. I hope that my works inspires people in a similar way.”
5. Cherry

When he made this 3D art for a contest on the topic of futuristic cars with guns (please don't give Elon Musk ideas), Alexander Andreev found the most challenging part of this piece was making it look good from any angle. Taking inspiration from the Feng Zhu Scorpion and Command & Conquer games he liked he was a kid, he started with rough sketches of a silhouette and then put some logic into the design.
Creature design
1. The Golden Skull

To create this haunting image, CG director, art director and environment artist Hirokazu Yokohara used a variety of notable techniques. MECH/FY - Procedural hard surfaces for Blender 2.8 were used to help create the finer details of the mech. “In addition, I tried using the real-time renderer EEVEE experimentally,” adds Yokohara. The grass was made using Blender add-on Graswald.
The 3D art image took about five days to complete and provided Yokohara with an opportunity to learn and experiment within Blender. He continues: “Thanks to real-time renderer EEVEE, I was able to finish the work quickly because I could proceed with modelling, layout and lighting while watching the final quality image.”
Yokohara’s main tool is Cinema 4D (see here for some great Cinema 4D tutorials), which he finds intuitive and easy to use. “Since I am a CG generalist,” he adds, “I study various tools and workflows daily and try to output them as art.”
Previously Yokohara has worked on various CG projects related to movies, from photorealistic characters to more stylised characters and environmental design. “All these things inspire me,” he continues, “from artwork to everyday trivial events. The latest technology is also a huge source of inspiration.”
2. God Pan

The biggest challenge that professional 3D artist Baolong Zhang faced on this project was creating the character’s photorealistic hair. “He’s got very curly hair that required a lot of attention,” explains Zhang. “I used ZBrush FiberMesh to create the main volume of hair, then the smaller hairs were hand-placed. The shorter facial furs were created with XGen in Maya.”
Throughout the project Zhang was inspired by the photography of Cristian Baitg Schreiweis, and he particularly enjoyed searching for further references. “I started searching for more references like Greek statues and paintings,” he says. “It’s fun to put these together in 3D, especially with Unreal Engine 4.” Elsewhere he finds inspiration in nature and classic art.
Finding an interesting subject is crucial to getting a good start on a project, according to Zhang: “I try to have a good idea of what it’s going to look like. As I’m not a concept artist, I don’t really have a final concept, but I have a lot of reference to follow.”
3. Hippopotamus

4. Ghost Mantis

“I’ve always liked insects, especially the mantis,” explains Dmytro Teslenko of the inspiration behind this ghostly image. “There are so many species. I chose my favourite, the ghost mantis, because he has such a mystique about him.”
Teslenko created the image on and off for over four weeks, choosing not to employ any revolutionary new techniques in the process. “It was all pretty simple, old-school modelling, sculpting and then texturing,” he admits. “Sculpting is my favourite part of the process, I absolutely love every moment of it.”
For Teslenko, improving and refining your work is crucial to its success: “I always try to do as many corrections as possible. When I get to the rendering stage, if I don’t like something, I’ll go back to sculpting or texturing the model before rendering again. Sometimes I’ll do this a few times. Don’t be afraid to spend a lot of time correcting. This is your project and only you can make it look better than it did yesterday.”
Modeller and texturing artist Stefano Strabla utilised HD sculpting for surfacing on this insanely detailed image. He explains: “The advantage of HD is that it allows me to focus on the hi-res sculpting without being concerned with seams or splitting the geometry into many different subtools. It depends on the type of creature and how big it is, but you can reach a really high density for fine surfacing. Also baking out the displacement is surprisingly faster and far more detailed.”
The entire piece took Strabla three weeks to complete, and discussing the process he says: “I’m always inspired by great concept art or artwork with solid shapes and forms. On this particular piece I enjoyed surfacing in ZBrush and the texturing and lookdev phase, where you can finally see the results of all your hard work come together.”
5. There’s a Pulse!

“I like experimenting in ZBrush,” says concept artist and comic book colourist Neeraj Menon. “Marvellous designer is something new I’m playing with. I do a lot of digital painting so both software come in handy for initial ideas.”
“Although the majority of my time was taken up sculpting the underlying model, I think the most significant part was creating the cloth in Marvellous Designer,” he explains. “The actual design is simple, it's just a sheet of cloth. The real challenge was to lay it just right, hiding certain parts and showing others.”
Despite being a challenge at times, Menon maintains that this 3D art experience was an enjoyable one. He concludes: “The most fun part came during the materials and rendering phase. Once the translucency of the cloth was applied, what I had seen in my mind really became a reality. Everything fell into place.”
6. Purple Dino

Ümral Ismayilov likes to collect 2D concept ideas from the internet and turn them into 3D characters. This characterful purple dinosaur is based on the work of concept artist Oleksandr Kayda.
He used ZBrush for sculpting the main base and small details on the high-poly model, and then move to Maya to work on the manual retopology for UVs and texture baking. The textures were made using Substance 3D Painter, and next Ismayilov used Blender for rigging, scene setup and rendering. "I enjoyed the whole process, especially when doing the texturing, because I love to add extra details and colours to make my characters look vivid," he says.
7. Raptors

And here are more dinosaurs! “For this image I used a classic process: sculpt in ZBrush, pose in ZBrush, quick Polypaint, and then I did some tweaks on the materials in KeyShot to get a nice SSS effect,” says character artist Hadrien Gouedard. He begins his creative process with some quick 2D sketches before rushing them in ZBrush, then finishing off with 3D-Coat, Substance and Marmoset, or directly in KeyShot.
Gouedard’s work on this particular 3D art image was driven by a desire to lend a crazy personality to such a wild and dangerous animal. “The challenge is always more artistic than technical for me,” he adds. “The goal is to keep it fun throughout the entire process, when I look at the sculpt it needs to make me smile.”
8. Seahorse in the corals

This breathtakingly realistic image took CG generalist Nika Maisuradze just one week to complete. “I always wanted to work on an underwater scene,” explains Maisuradze. “I was surprised to find that creating a realistic underwater creature, which always seemed like such a challenge before, could be done with such ease and joy.”
The 3D art project, however, was not without its challenges as Maisuradze explains: “From a technical standpoint the biggest challenge was the shading. Instead of painting all my textures, I just painted the main aspects of textures I would need: the main base colour, small horizontal details, masks of each part of the horse, nose, body, tail, and these tiny blue dots. Instead of repainting textures, I just adjusted them with these detail textures in the shading process, on the fly. For these kind of projects this workflow is much more robust.”
9. Ember

Character artist Sina Pahlevani worked on this image every day after work, completing it in around ten days. Rather than undertaking extensive planning, Pahlevani likes to develop his artwork throughout the process. "Most of the time I don't have a clear image in my mind, I just define the main story of my artwork. I might change things a lot during the process."
First, Pahlevani blocks out the character's shape and silhouette in ZBrush. The second stage is adding further detail and enhancing the shape of the character, before it undergoes retopology, UV and texturing. "I do retopology and UV in Maya," Pahlevani explains. "For the texturing part you might use Mari, Substance Painter, or ZBrush Polypaint." The final stage of the pipeline involves setting up the shaders and lighting the scene, before making early test renders in Arnold. "After you get the first result you need to go back and forth to modify your model," Pahlevani continues, "using textures and shaders to achieve your desired result."
Scenes and assets
1. Xenomorph

Kevin C. Sepúlveda Márquez is a 3D character artist who works with ZBrush, Marmoset Toolbag and Photoshop. In this H.R. Gieger-inspired piece, Kevin creates a Xenomorph sculpt in ZBrush, focusing on composition and balancing the original character design with his own unique twist.
Kevin says: "While I wanted to sculpt an alien with ZBrush, I felt that I could create something more than just another static character. That's why I decided to pose it and create a composition. Using simple SubTools I built a blockout for the pose, as well as the column. At first, I applied the golden spiral vertically, but realised the column was too long and diminished the xenomorph's importance. I then duplicated and arranged the spirals horizontally, which worked perfectly.
"After that, I gradually sculpted the creature, brought it into Marmoset Toolbag for lighting, and finally used Photoshop to enhance the renders and give them more personality. Marmoset is an incredibly powerful tool for showcasing your characters, even if they aren't real-time. If you combine it with good post-production in Photoshop, it's a guaranteed win for you."
2. Ramen

This appetising image provided 3D student Laura Keuk with an opportunity to use shading and lighting to create a dreamy and peaceful atmosphere. She used Blender’s cloth simulation for the noodles, doing one noodle and then duplicating it, before simulating them just like clothing.
“I used displacement for the oil,” she continues. “I spread the onion springs using a particle simulation with three different instanced meshes and shaders. I played with the scale and rotation to add more randomness to the elements.”
Keuk is inspired to create images like this by the ins and outs of daily life: “I love to watch all the simple things surrounding me and understand what makes it beautiful. It can just be a leaf on the ground, the way flower petals are arranged, the way light bounces off a piece of sugar, or just a cat walking.”
Food is a symbol of sharing, gathering and happiness in Keuk’s family, and she wanted to portray this in her Ramen image. As Keuk puts it: “The feeling I had when I was younger, the feelings food gave me, and a bit of a magical sensation, where the spectator could see that beauty can be from each thing surrounding us.”
3. Game Buildings

This 3D art project from art director and motion designer Gustavo Henrique is a simple yet effective 3D design. “All constructions were modelled in a very simple way,” Henrique explains. “Most of my designs are simple but full of details,” he continues. “I always try to work with geometric shapes and most of my models are made from a cube. I use the Bevel tool to leave the edges of the objects rounded and create the feeling that it’s something fluffy.”
After modelling the scene, Henrique gets to work on the render settings using Octane Render. “The first step is to work on the camera settings. I get a bit of perspective using a 150mm focal length. I also increase the aperture of the lens to achieve a blur and give it the feel of a miniature.”
Henrique gets inspiration from the feedback he receives from fellow artists:
“What inspires me most is to see people say that they are inspired by my projects. The feeling is incredible and the desire to keep on inspiring other people only increases. I believe recognition is very valuable to artists.”
4. On the Road to Nowhere

This insanely adorable little alien monster pilot was created by Mohamed Chahin in Blender, before rendering in Cycles. Chahin says that when it comes to 3D art, he's most inspired by stories.
"As artists it's our job to tell these stories in a more visual manner," he says. "After all, all artists are storytellers." It's certainly fun to imagine just what this lovable little critter could be getting up to as he flies around in his orange aircraft.
5. Slug Race

It may be a whimsical 3D art scene, but Slug Race is closely based in reality. Brazilian 3D artist Fabricio Moraes and his collaborator Guilherme Formenti used Agisoft PhotoScan to generate 3D spatial data from digital photos.
"Photogrammetry was a technique that I had always wanted to try. So I scanned a lot of trees, rocks and ground to get a more realistic approach," says Moraes.
The pair used 3ds Max and ZBrush for modelling and lighting, V-Ray for rendering and Nuke for compositing. "I normally use Photoshop to compose the final image," says Moraes, "but this time I gave Nuke a try. I was amazed at how powerful it is."
6. Cambot – Memory

Dong Liang is a 3D surfacing artist based in Singapore. His personal project, Cambot – Memory, shows off his talents. “Every artwork begins from a story I try to tell,” he explains.
“To start with, I usually do a bunch of concept sketches to explore the design and composition while also looking for reference images. Once there is a decent sketch, I start blocking in the low-poly geometries in 3D.”
From here, Liang begins working on the detailing and lighting. This piece, however, posed a unique challenge. “The rain effect was done a little bit unconventionally,” he reveals.
“I randomly instanced five different streak models onto a nParticle system to mimic the rain streaks instead of using motion blur to do so. Rendering noise-free motion blur is too heavy for my machine.”
7. Study of Julia Blattman Illustration: Gecko Car

“Pretty much everything used to create this image is a basic modelling technique taught to new students,” says Yisu Zhang.
“I used displacement for the ground and dirt, V-Ray 2-Sided Material for the leaves and varying degrees of SSS material for the geckos and berries,” he explains. “VRaySun and Sky provided the only light source. I painted my diffuse/spec/bump maps in Mari. V-Ray fog and depth of field are tweaked in Photoshop.”
8. Ebola Virus

Medical artist Alexey Kashpersky has won international competitions in scientific visualisation, and his beautiful 3D art rendering of the Ebola virus is a fine example of his skills. "I wanted to transform Ebola into something fantastic and something that had its own unique character," he explains. The image took him three months to complete, with everything modelled by hand.
Inspired by out list of the best 3D art? Then get started for yourself, there are some excellent and easy to use apps for 3D modelling available now - read our guide to the best 3D web browser modelling apps.

You must confirm your public display name before commenting
Please logout and then login again, you will then be prompted to enter your display name.
