How to model Fallout's ferocious deathclaw in ZBrush
Sculpt and render a Fallout-inspired creature using ZBrush, KeyShot and Photoshop.
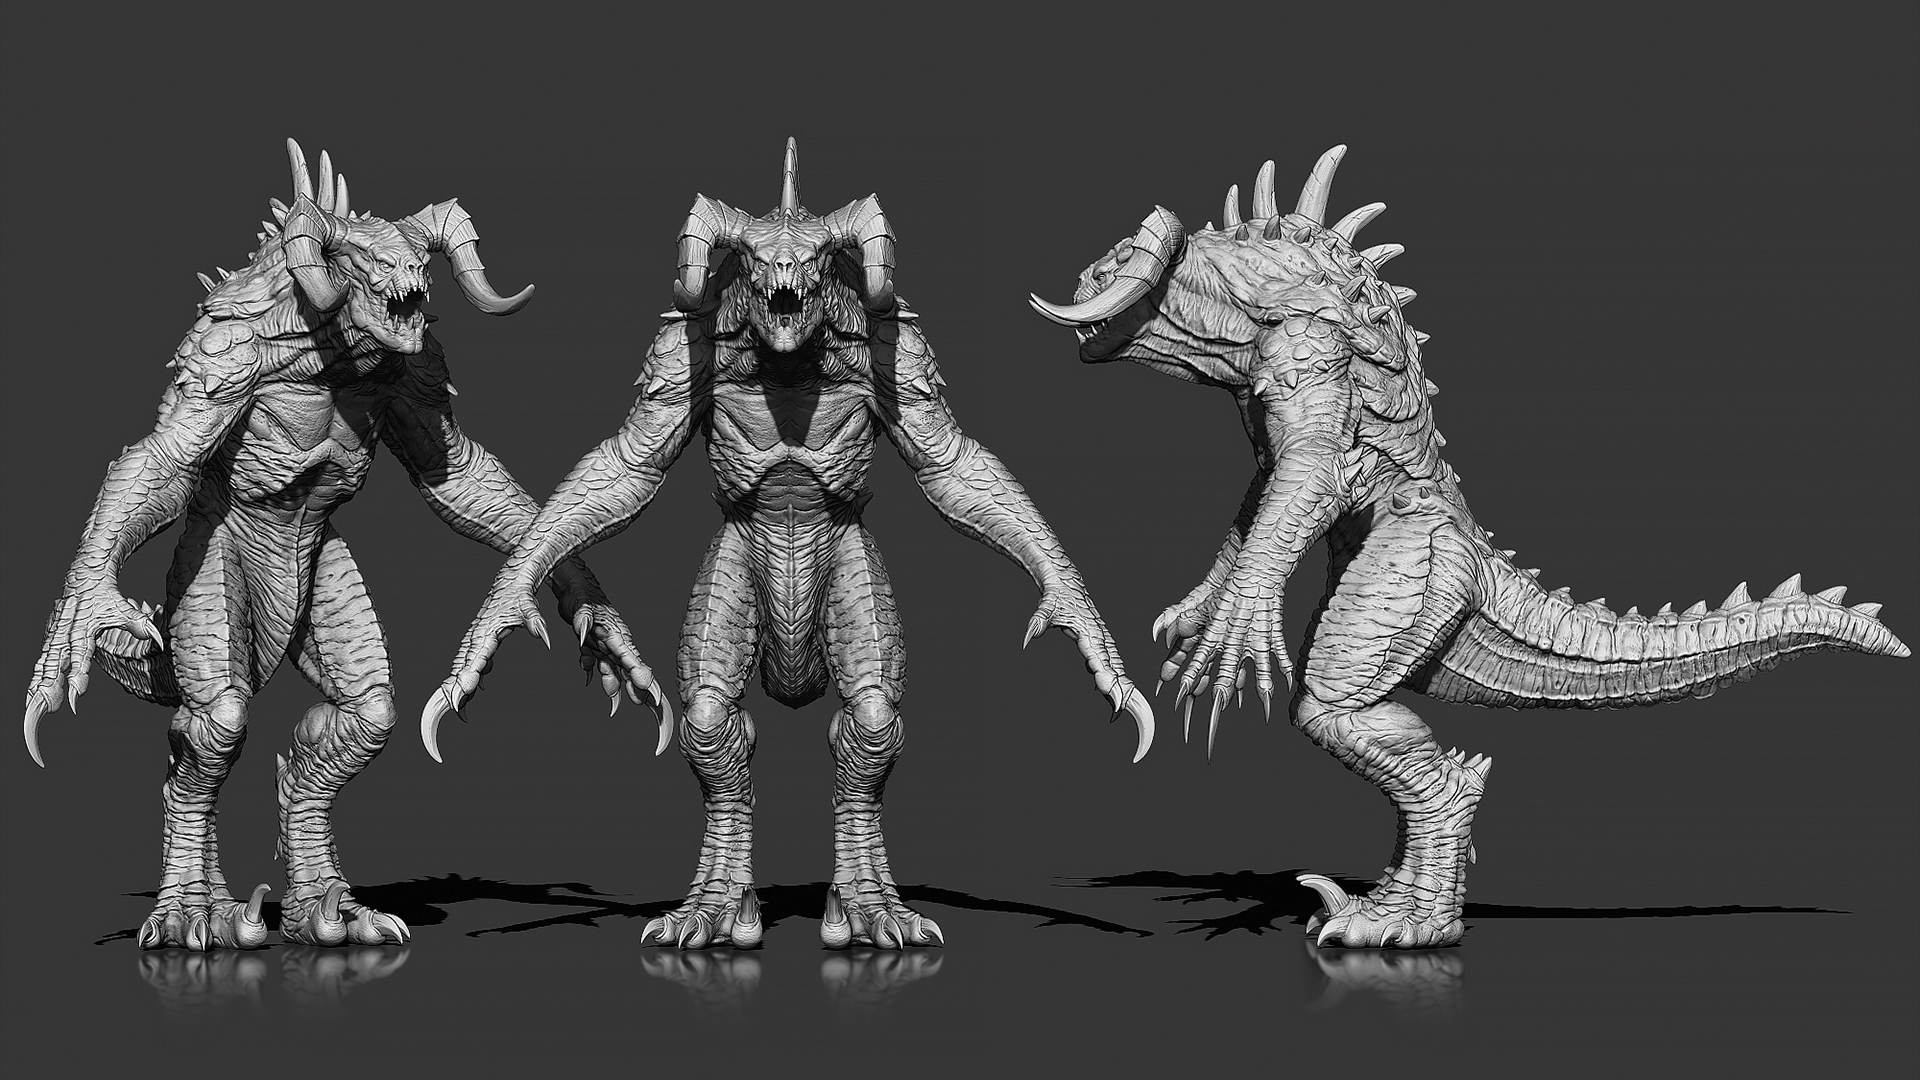
Crafting creatures is my number one passion as a 3D artist. In this tutorial, I’ll talk you through the steps on how to create a high-quality deathclaw model from the post-apocalyptic Fallout universe. This process will involve working with ZBrush, KeyShot and Photoshop.
The primary goal for this walkthrough is to give my overall thoughts on how to create a high-poly model that’s ready to drop into your portfolio, and to teach new techniques you can take into future creature and character concepts. Using the industry-standard ZBrush, we’ll start off by blocking in our creature using primitive shapes and explain how to build a precise silhouette using image planes as references.
Then it’s on to DynaMeshing the primitive models together in groups and adjusting the forms to closer fit the concept and references. We next turn to individual parts of our model using standard ZBrush brushes to sculpt and form the shapes, paying particular attention to the secondary forms.
Once the individual body parts are at a good place overall, we’ll then merge everything together and clean up the seams to form a single SubTool. From that we’ll work the finer details on a ZRemesh model at a higher subdivision level, utilising alpha maps on brushes, as well as other standard brushes for the more detailed areas. I’ll also talk about creating the creature’s extra features such as teeth, claws, eyes and spikes using primitive shapes as base models, and then define them further in the same way as the body.
As a final bonus, I’ll briefly walk you through how to apply colour to your model before placing it in a more dynamic and interesting pose. After transferring the model across to KeyShot, we’ll finally composite the rendered images in Photoshop to complete a portfolio-quality piece.
01. Collect references
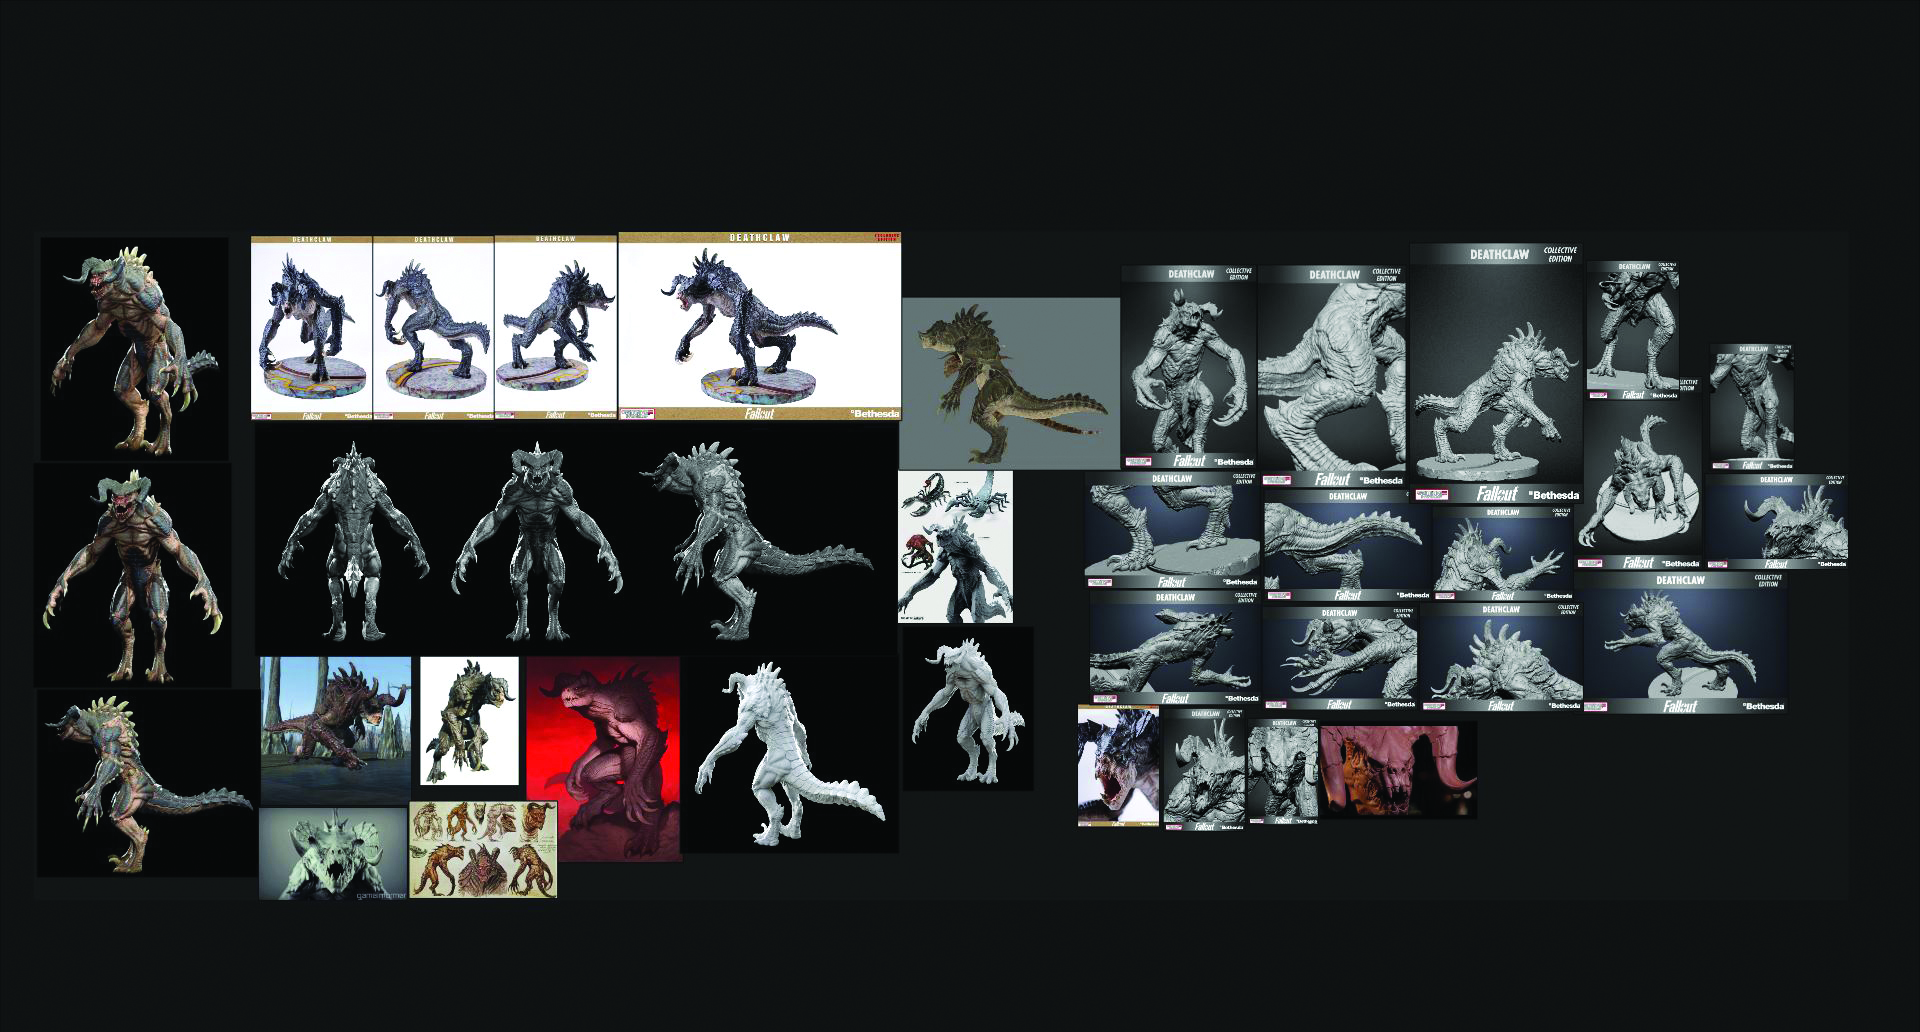
References are the most important part of any sculpt, especially when recreating a creature or character from an existing IP. Having a massive library of references to refer to is essential, so I use a program called PureRef to organise them and maintain a library of useful images found online.
02. Form primitive shapes
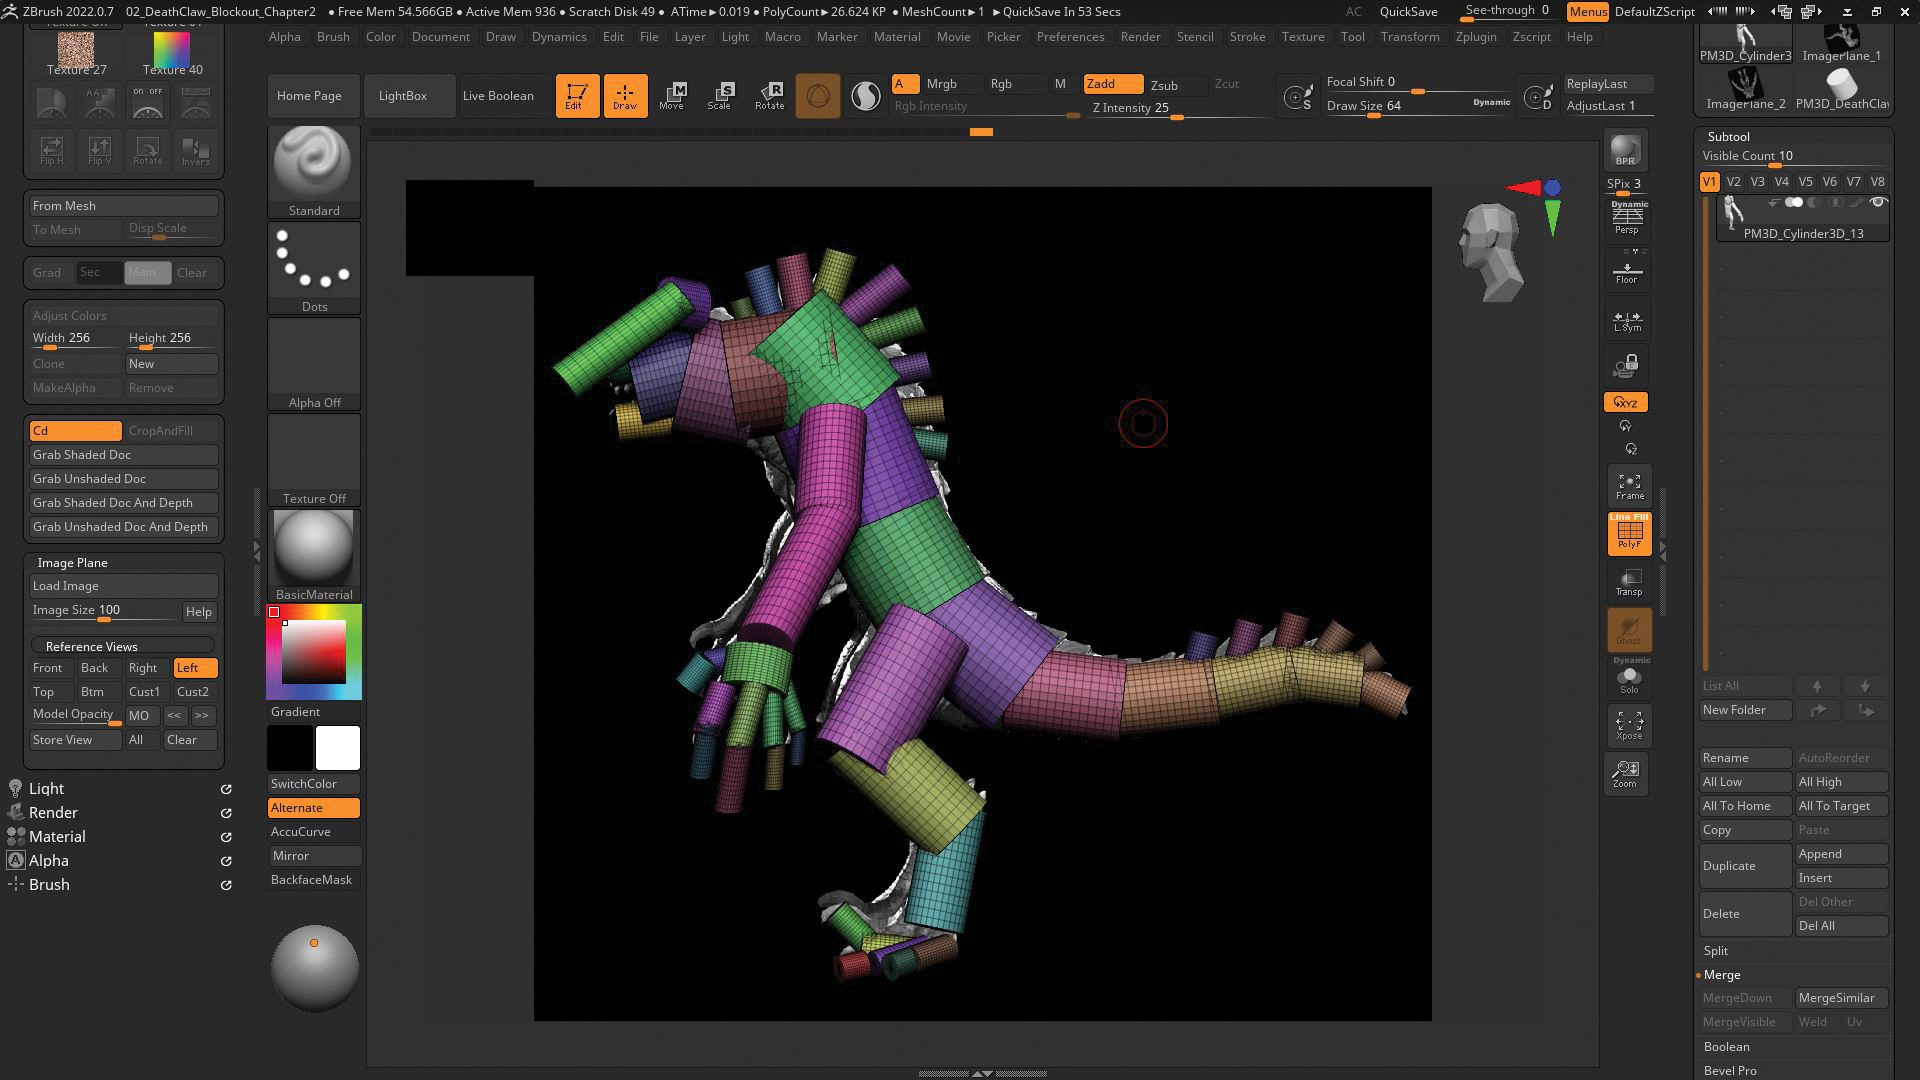
Use ZBrush’s Image Plane function to load a front and side T-pose concept as a reference; I used 3D artist John Lam’s deathclaw concept for this. We’ll only use these images for the blockout stage in order to get the correct proportions.
Start off by blocking out the silhouette of the creature using the Gizmo tool to move and scale primitive cylinders and get the basic proportions from the front and side images. Make sure to get the lengths of the arms, body and legs correct and to scale.
03. Make refinements to the silhouette
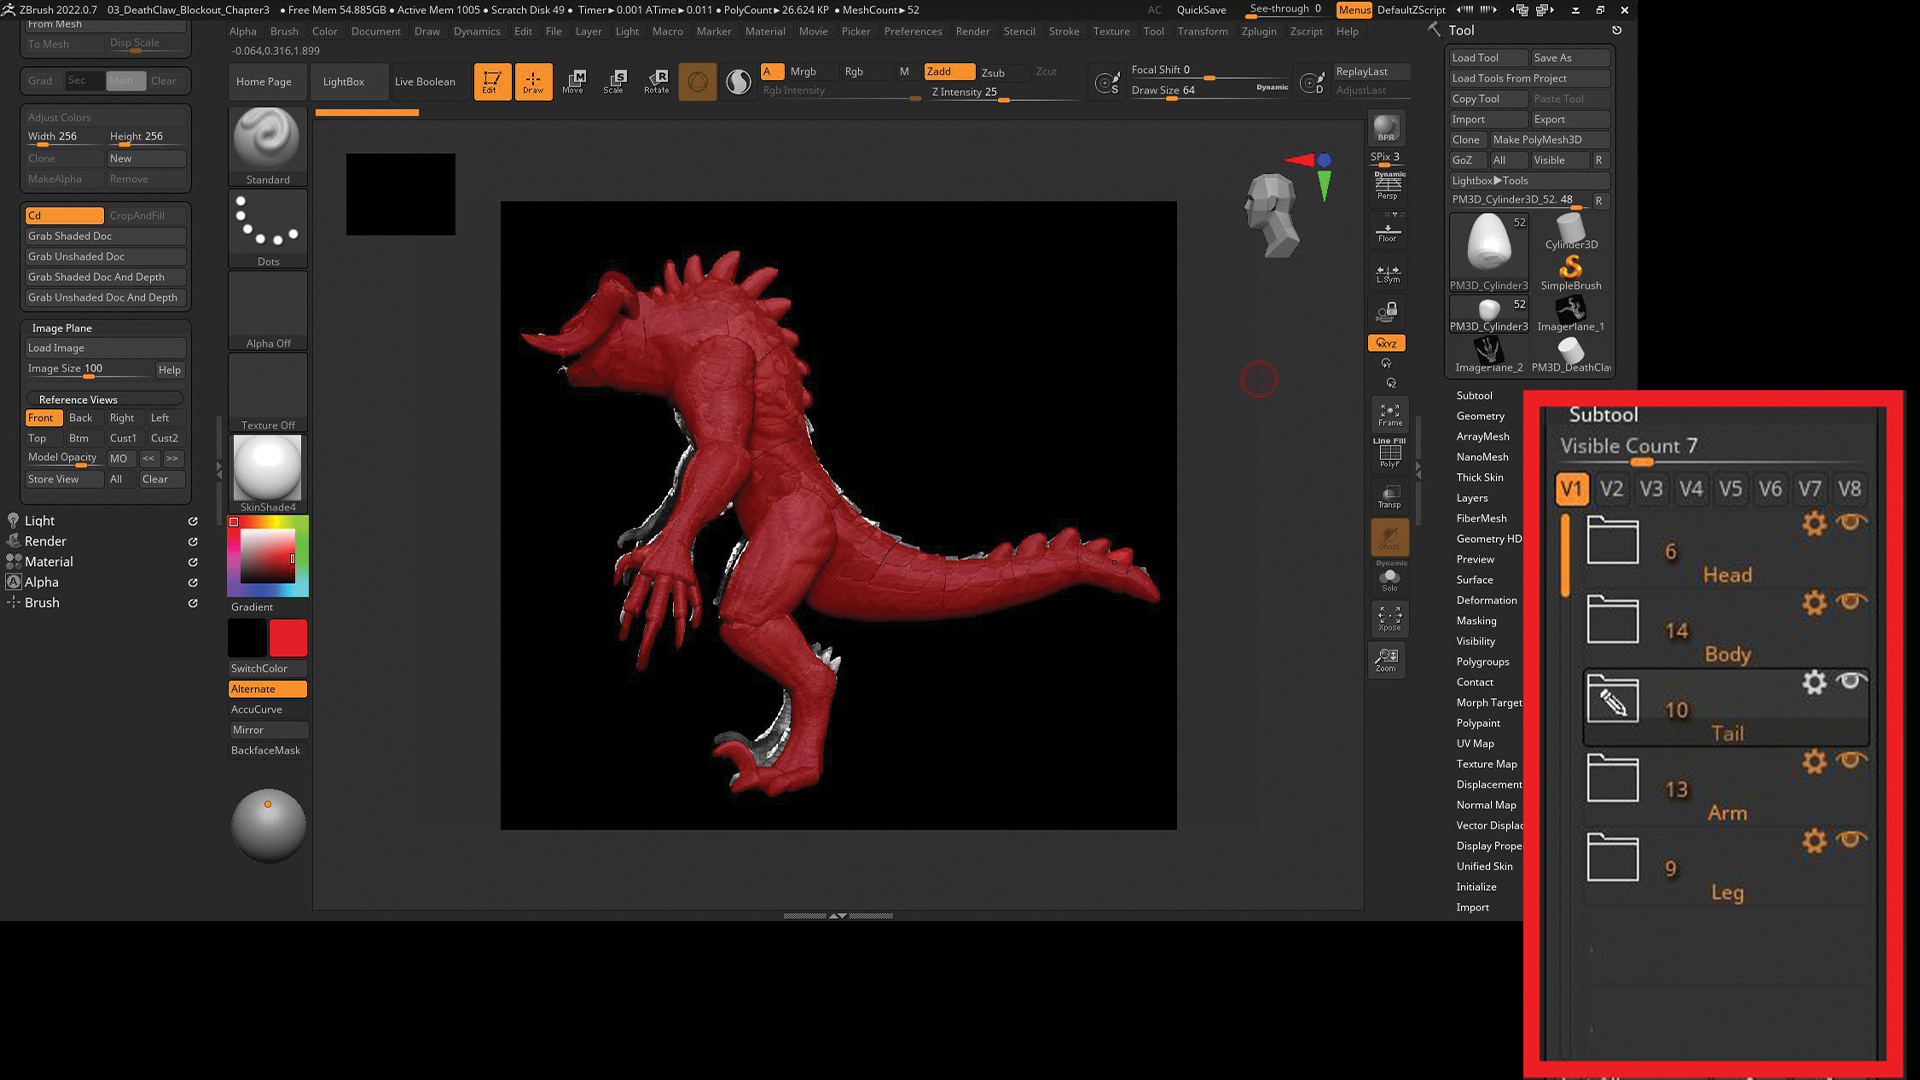
Once we block out the silhouette with the correct proportions, we can use the Move and Smooth brushes to drag and smooth individual primitive shapes to better fit the references. We’re not looking to start any sculpting at this stage, we just want to keep the shapes basic here so that we can manipulate them easier and fill out the silhouette. We can also organise the different body parts into groups in the SubTool palette, which will help to keep us organised throughout the sculpting process.
04. Complete the first sculpting pass
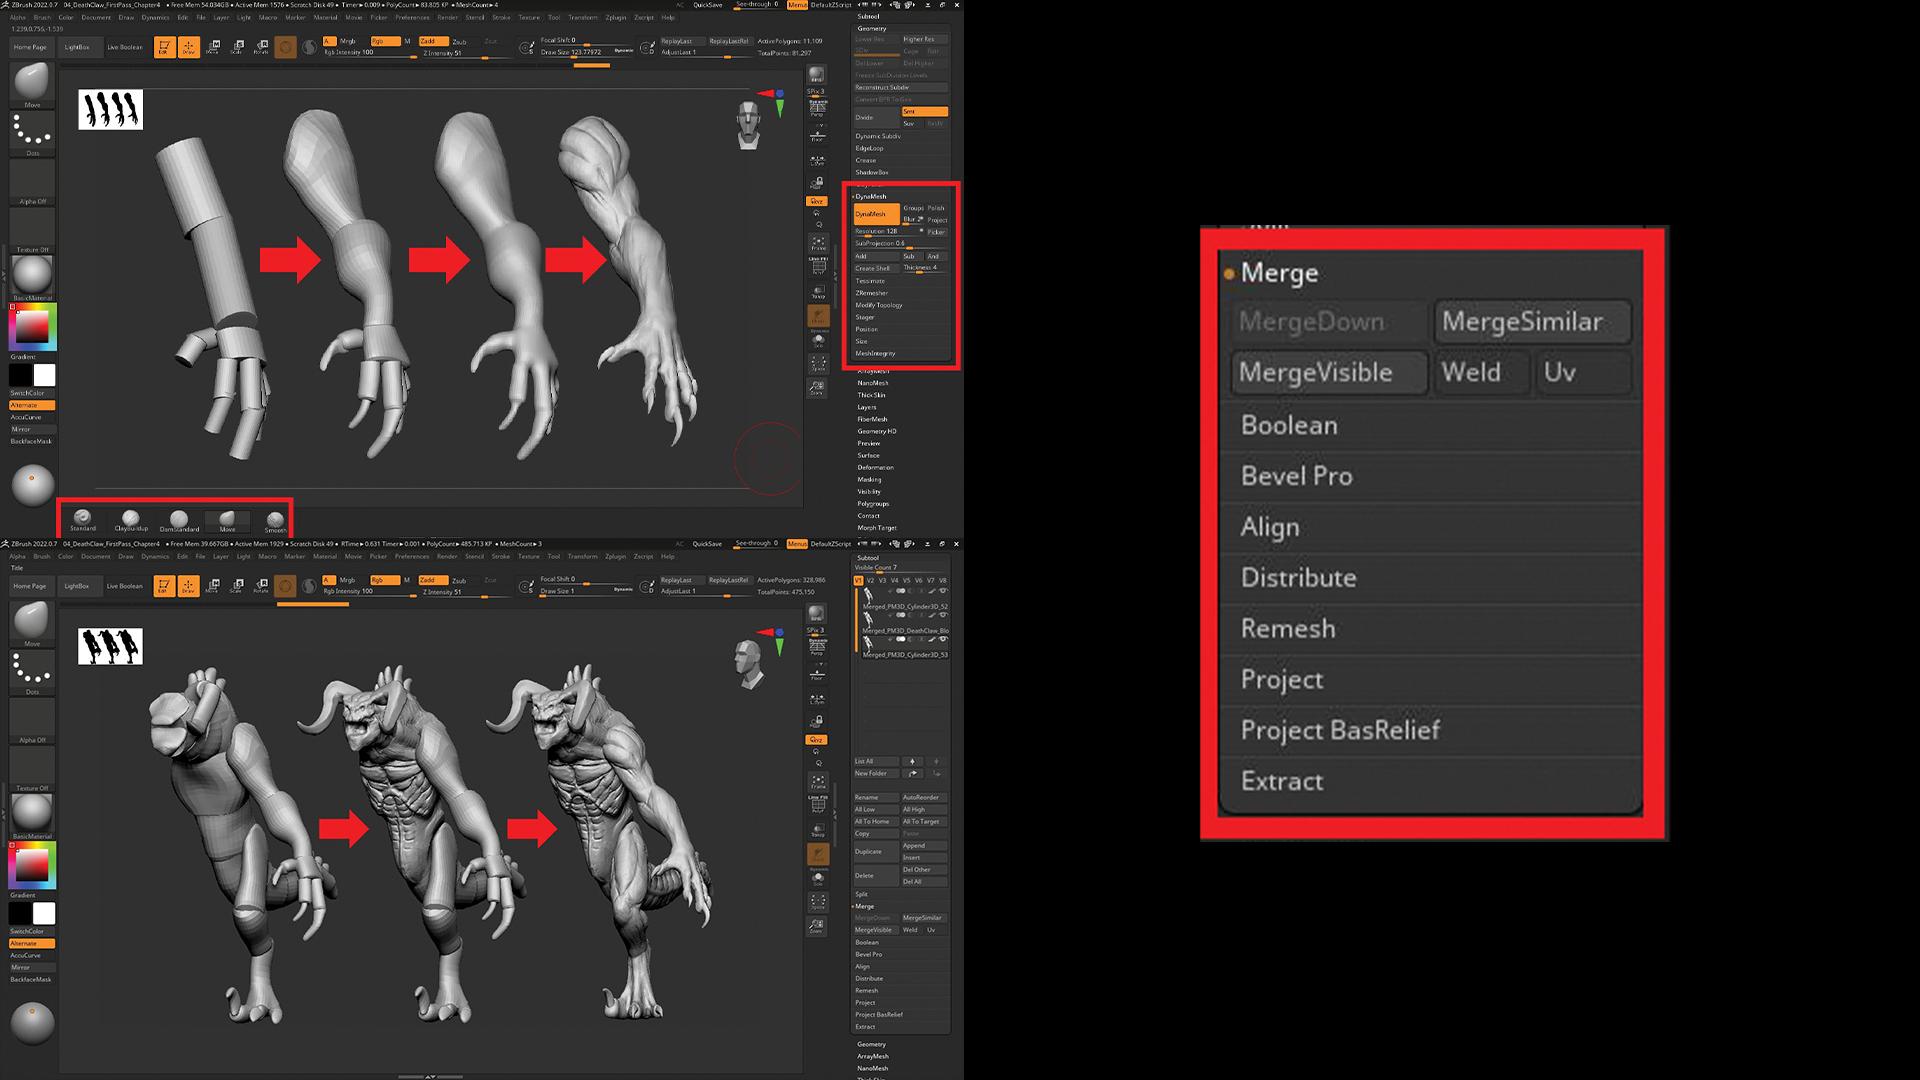
Working on each individual body part, merge the primitives together using DynaMesh at a low-resolution setting and start to sculpt using a mixture of ZBrush’s standard brush sets to create the major muscle forms. Pay close attention to the references as well as looking at other creatures. Use the ClayBuildup, Move, Standard, DamStandard and Smooth brushes to achieve the first stage of detail on the creature. Once you’re happy with the first pass, you can merge all the main body parts and clean up the seams using the Smooth brush.
05. Add early details
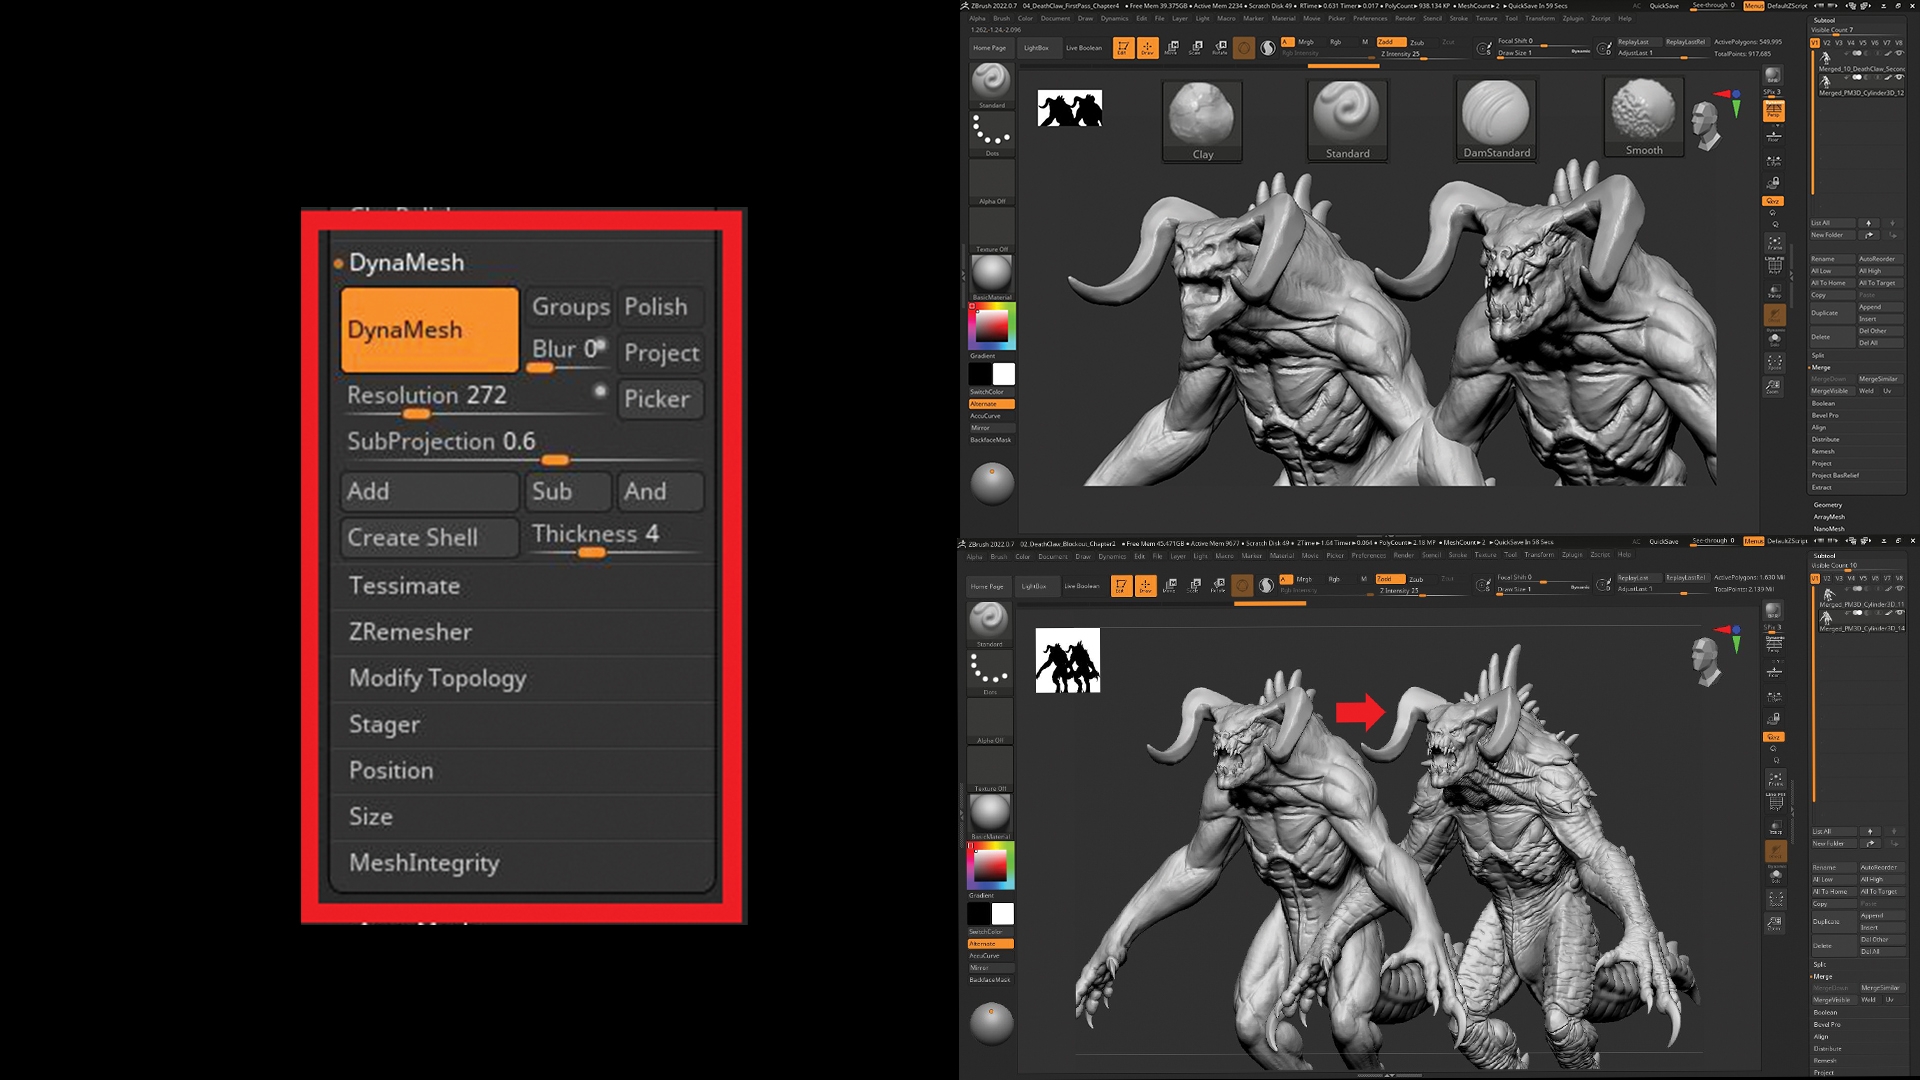
Before moving into the next sculpting pass, we need to add more resolution. In the Tool section under the DynaMesh tab, bump up the Resolution slider to work with more topology. We’ll still be using the same set of brushes from Step 04.
The point of the second pass is to start adding landmark details and features, taking special care to focus on the references more closely. These details include the overall likeness, scales and large wrinkle placements. It’s also here that we can add any extra spikes, teeth and other small details.
06. Retopologise
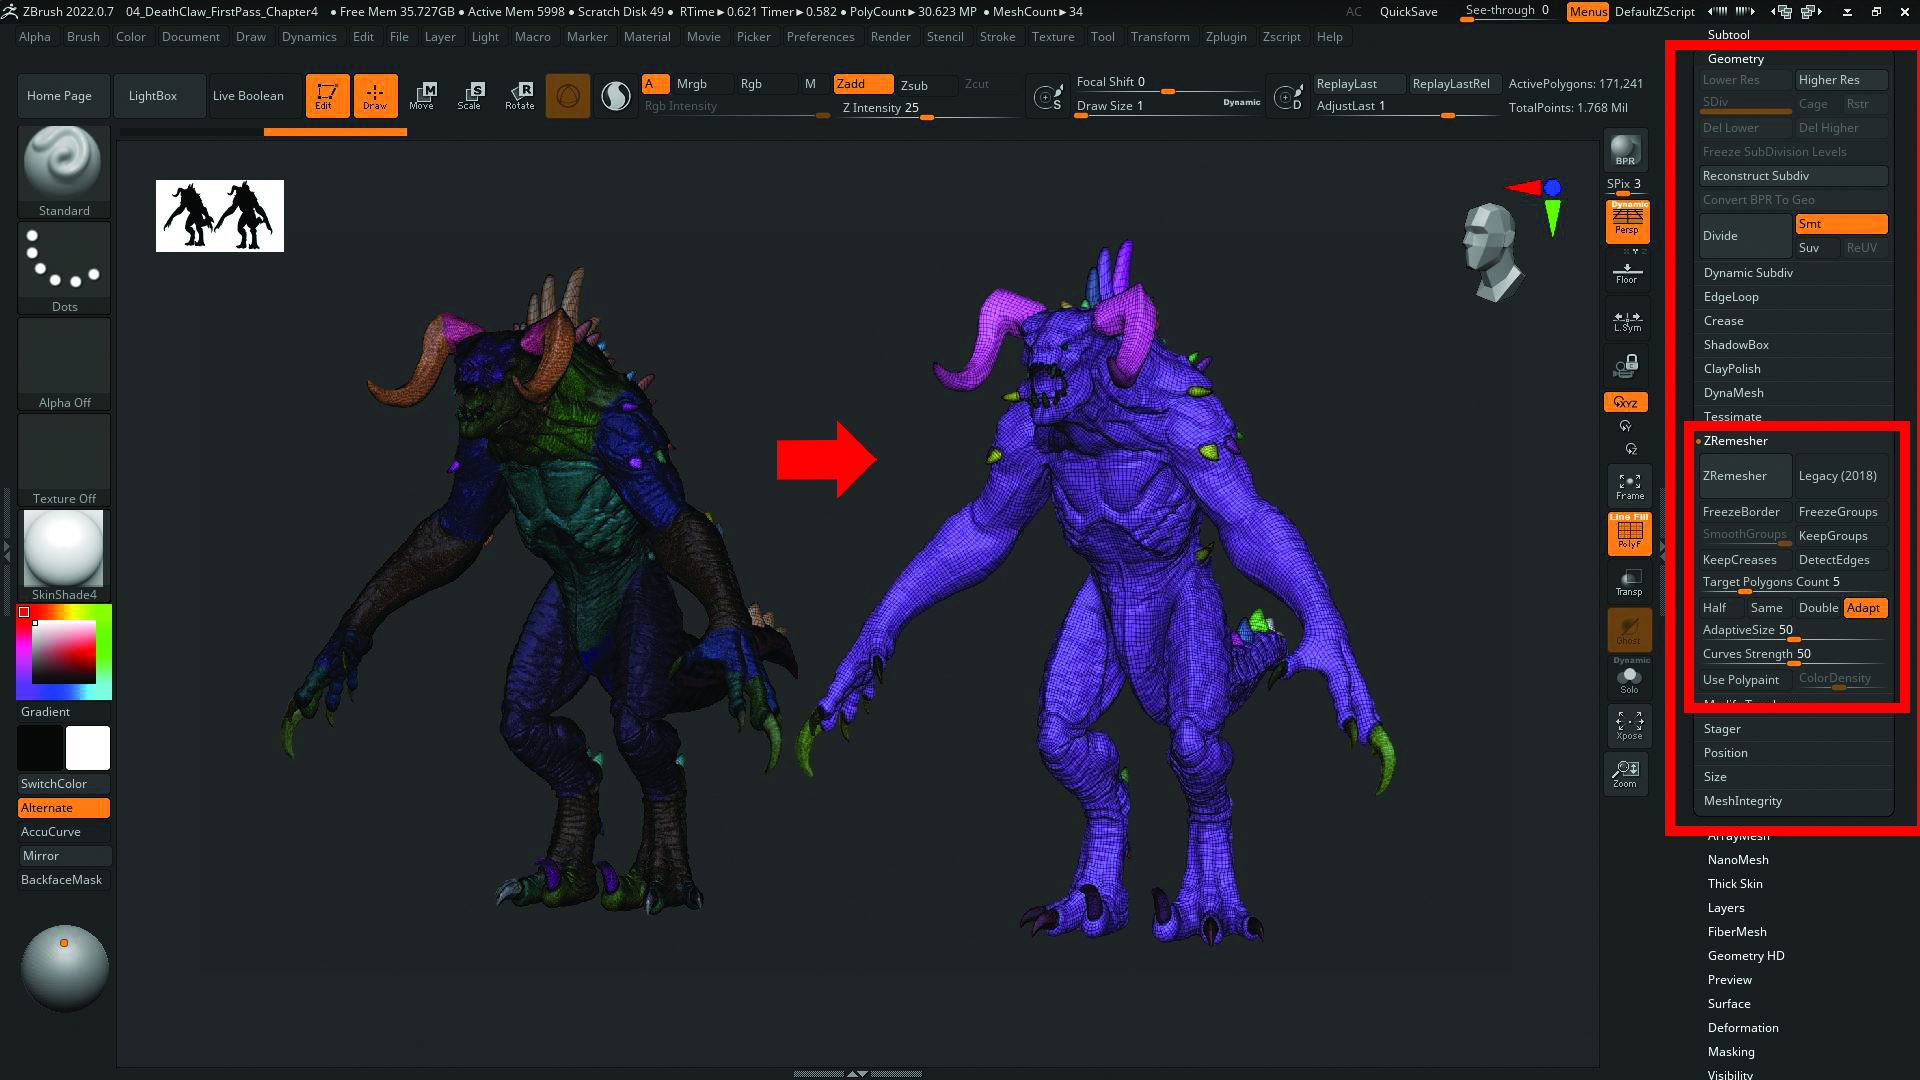
Once we’re happy with the level of detail from the second pass and can go no further using DynaMesh, the next step is to duplicate the model and ZRemesh it to get clean topology. After that, subdivide the low-poly model and reproject all the detail from the high-poly onto the new version.
There will be some artifacts to smooth out using the Smooth brush, and a general cleanup required after projection, but this will give you a better model and more polygon count to work with. At this stage we should be 90 per cent satisfied with the overall design and be ready to sculpt further details.
07. Make the fine detail pass
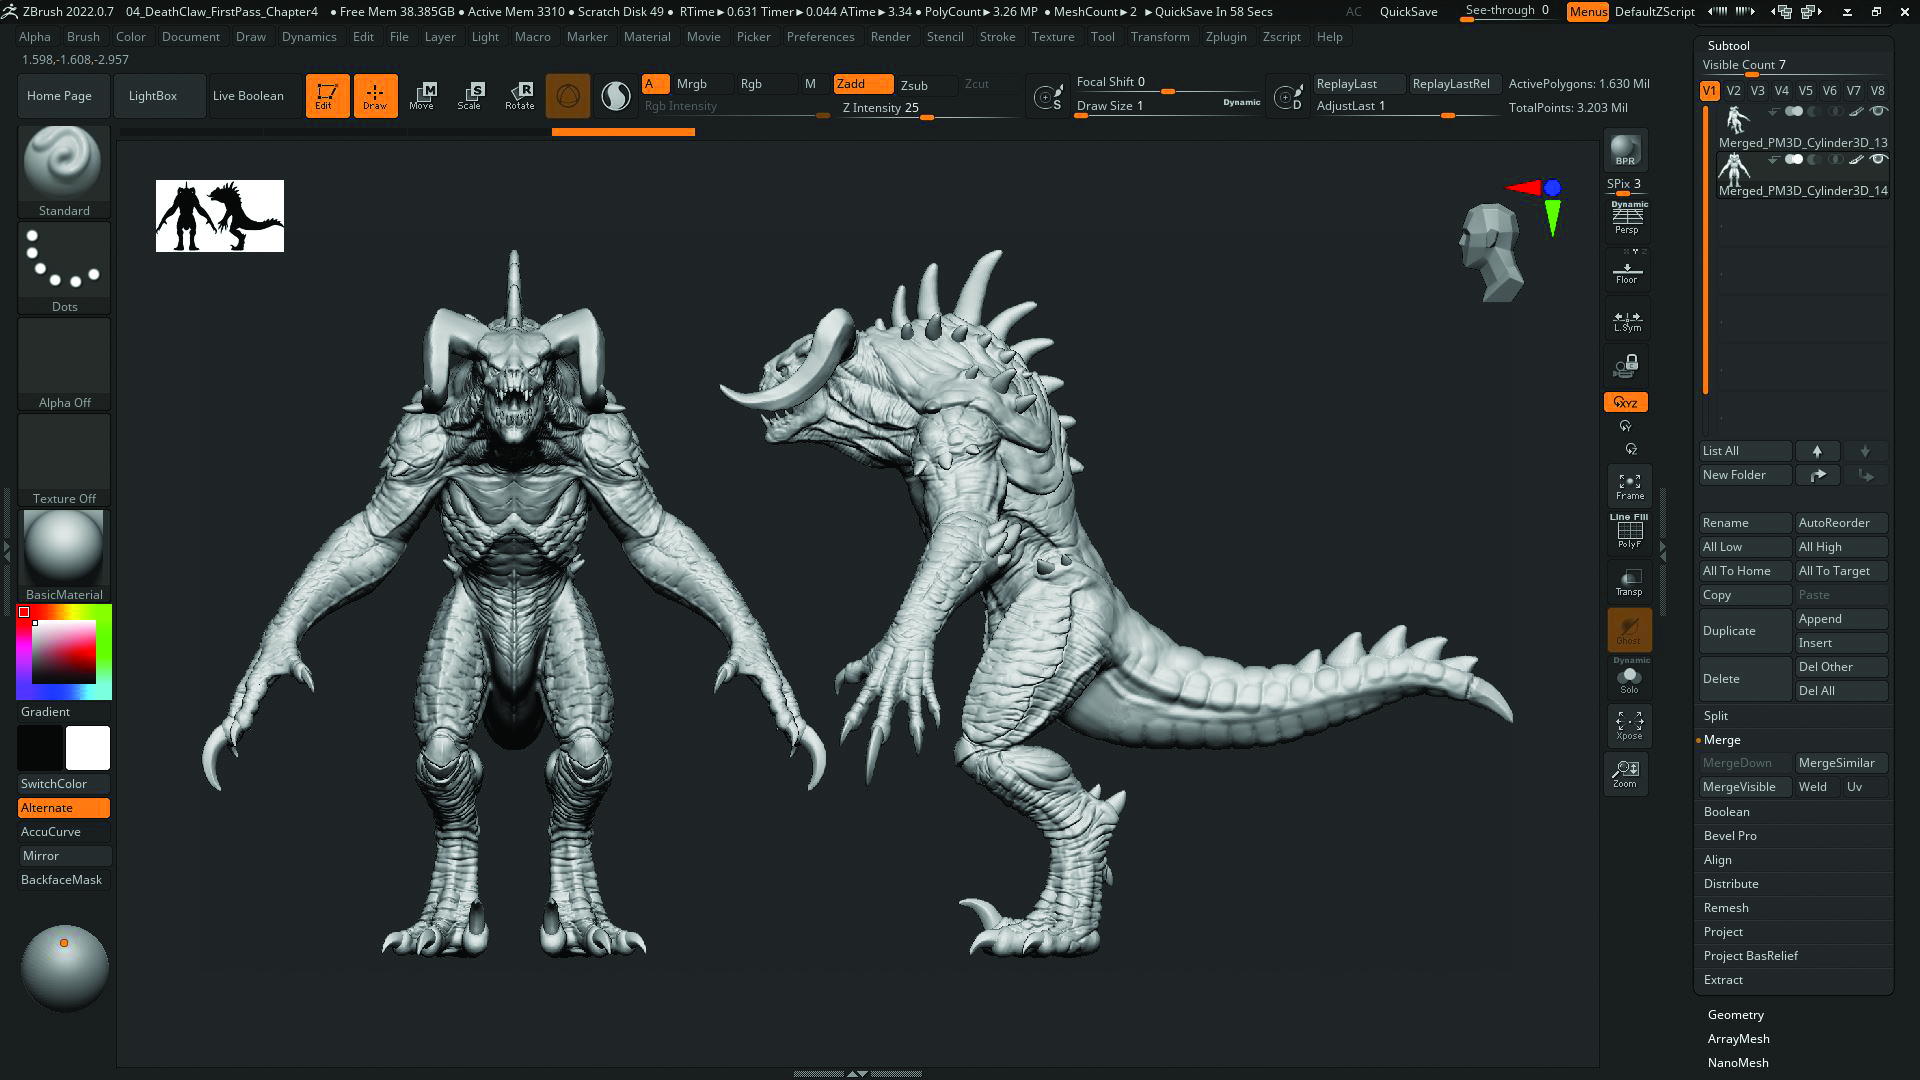
With our new, clean topology at a high subdivision level, we can start adding finer details using the DamStandard, Standard, Smooth and Clay brushes to enhance the wrinkles and landmarks. We can continue to sculpt each body part and focus on their details.
08. Build the head
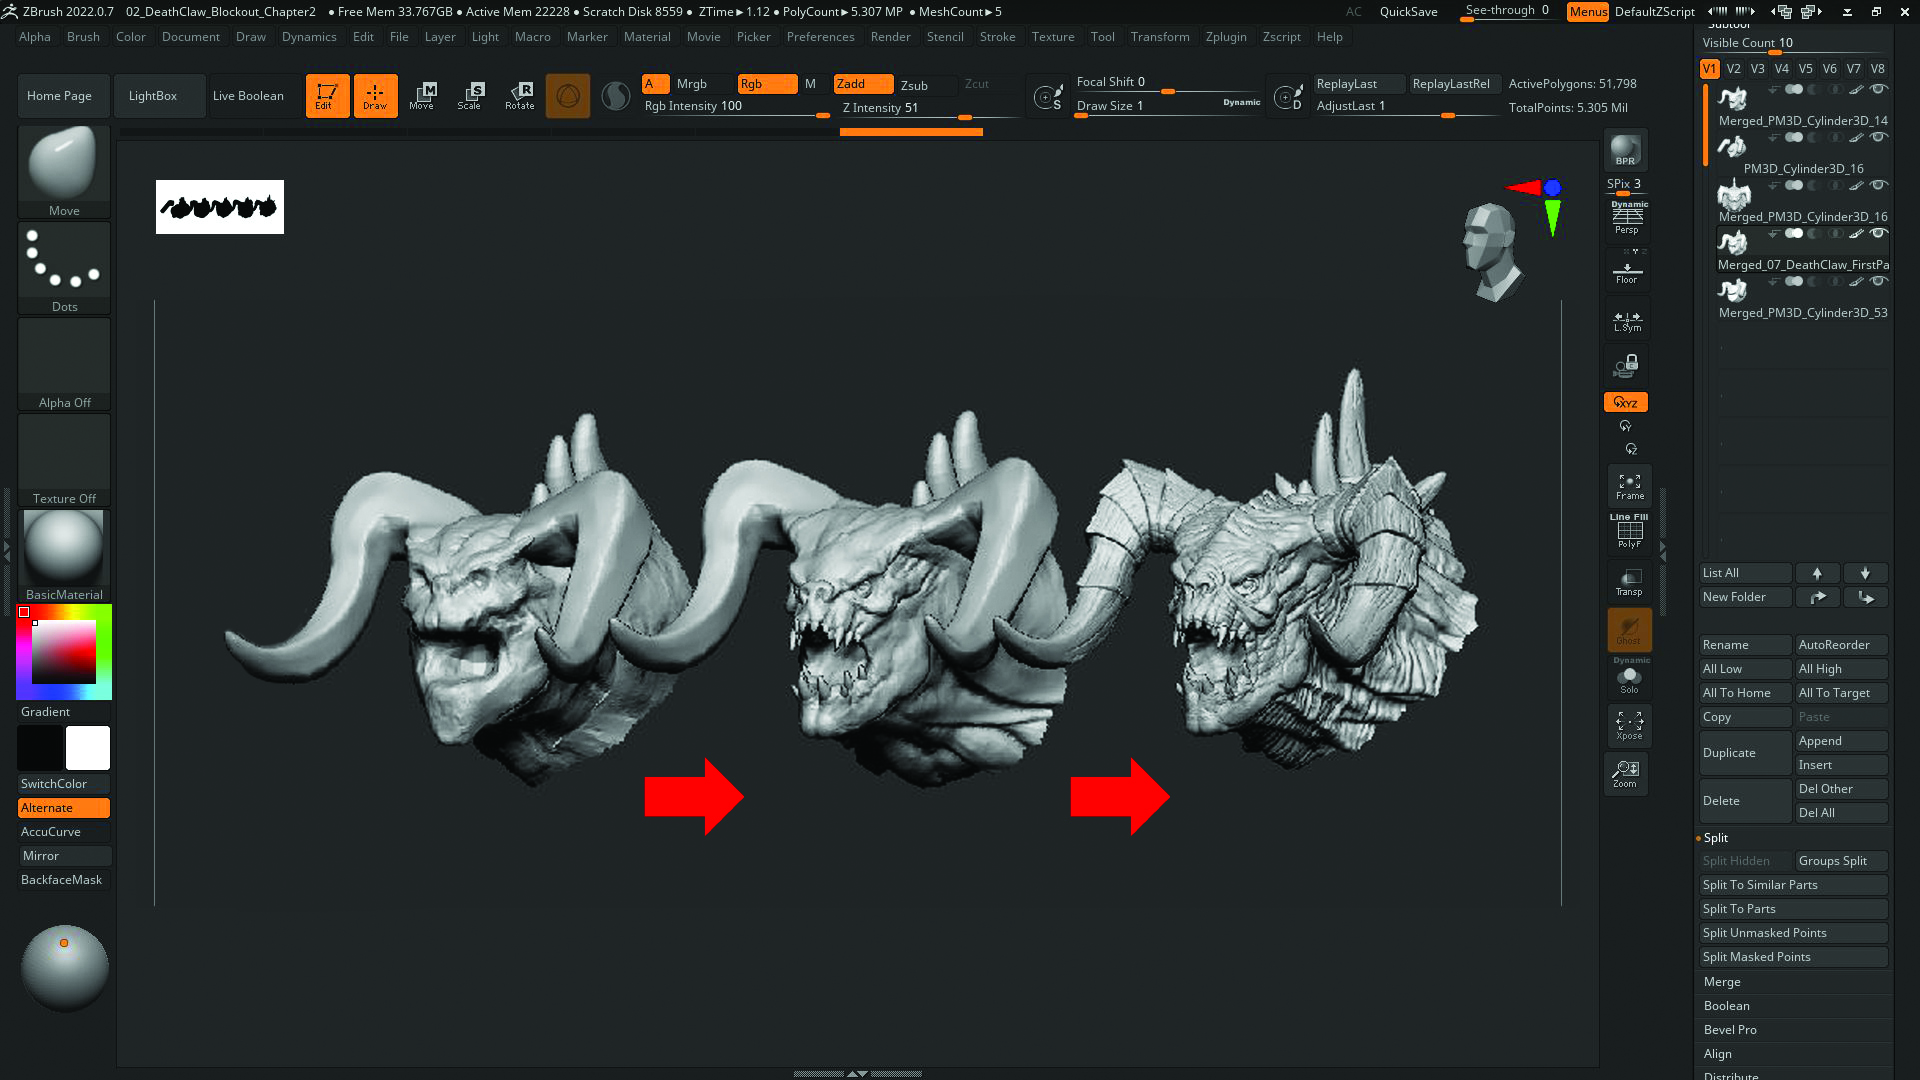
The head is an important part of this model, so getting the design correct in the blockout stage will help us finalise the details faster and give us a better model to work with. Using the DamStandard, Standard and Smooth brushes, we can start to define the wrinkles and pay attention to the key forms around the mouth, eyes and nose that make this creature unique. Pay close attention to the references as you sculpt from all angles to get the best likeness possible.
09. Create the body
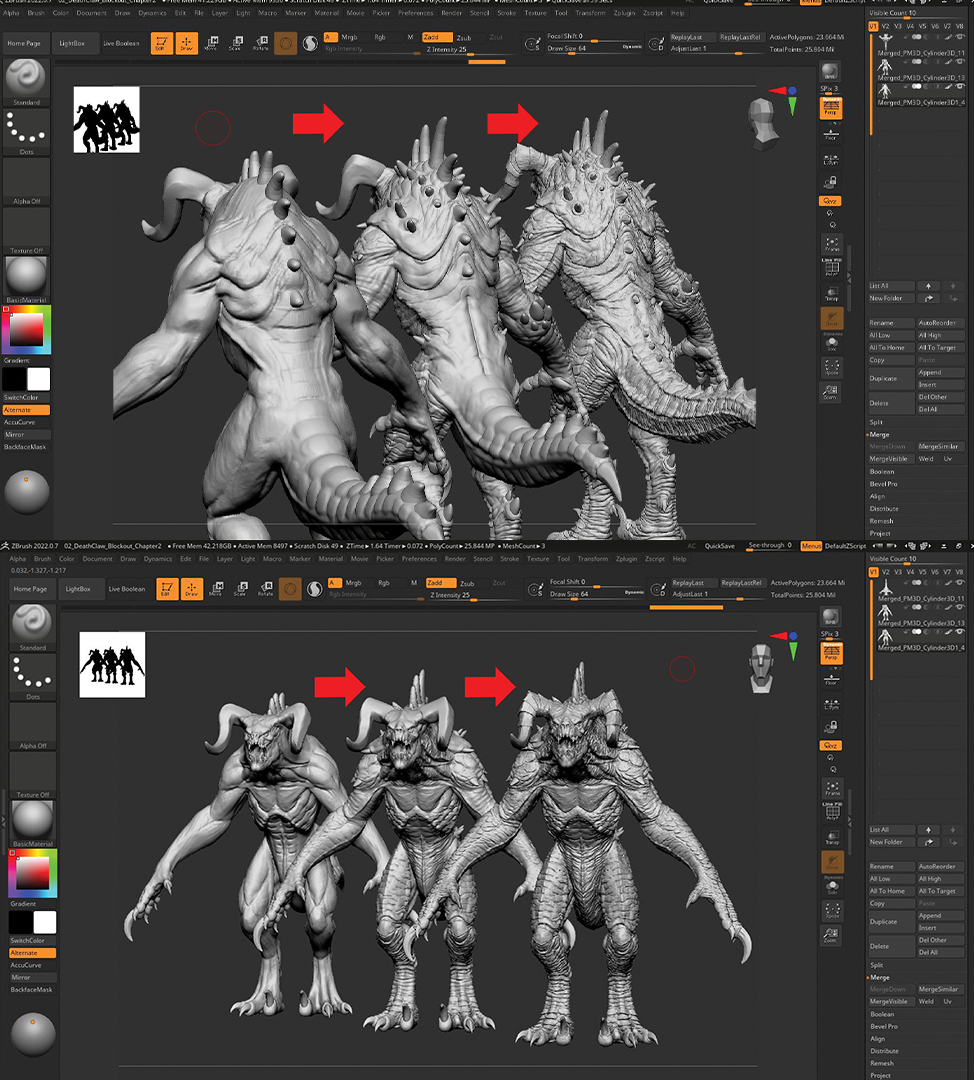
When looking at the references, we can see a hard, scaly skin on the back, legs and arms of the creature, with a soft underbelly and face. This is typical for lizards and other small reptiles, which are great references to pull from.
The best technique for the scales is to use the Clay brush to build up the scaly forms and then use the DamStandard to define the edges of the scales. For the soft underbelly, use the Standard and DamStandard brushes at a lower Intensity and keep an eye on the layout of both the loose and tight skin areas.
10. Add the arms
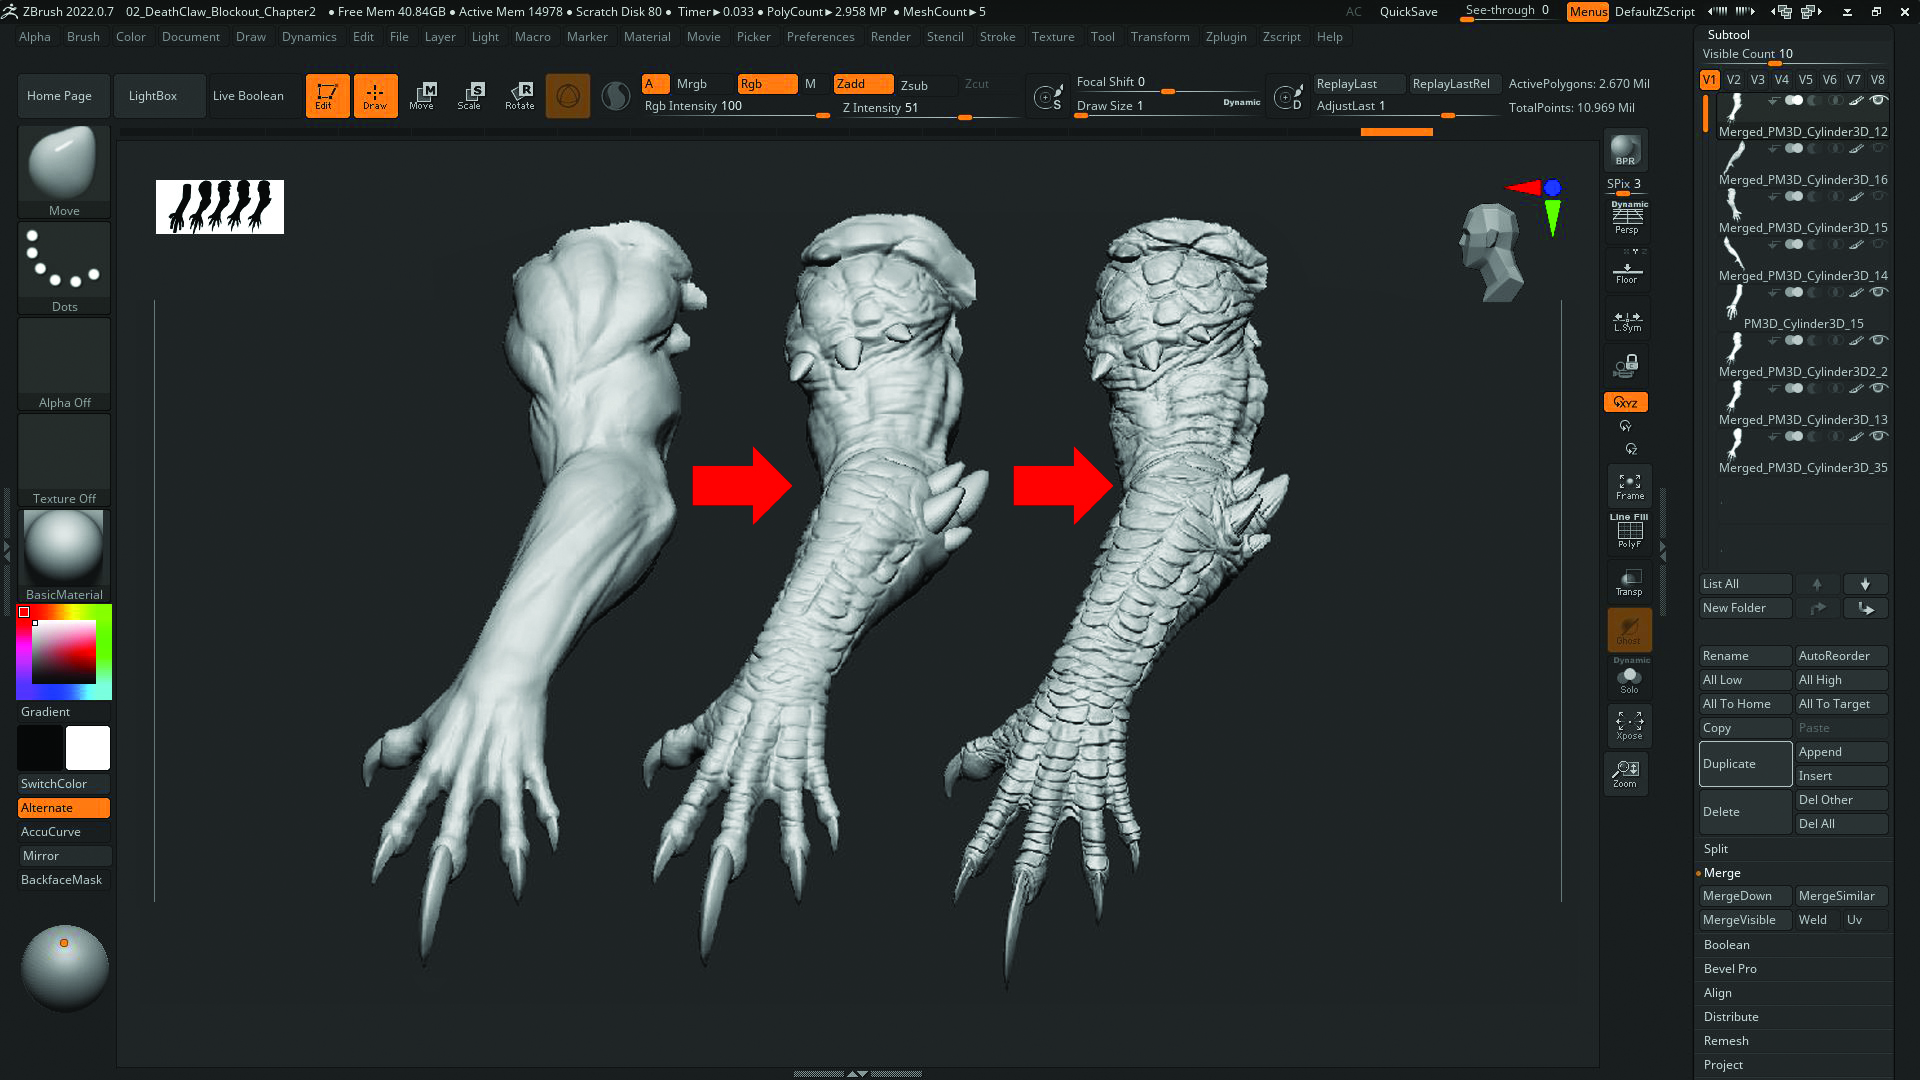
The arms can be split into two sections: the hard, scaly top surface and the softer, wrinkled underside. The scales were created using the Clay brush to lay out their placement along the length of the arm, followed by the DamStandard brush to define them. Repeat this until the entire top of the arm is covered. To define the underside of the arm, repeat Step 09.
11. Make the legs
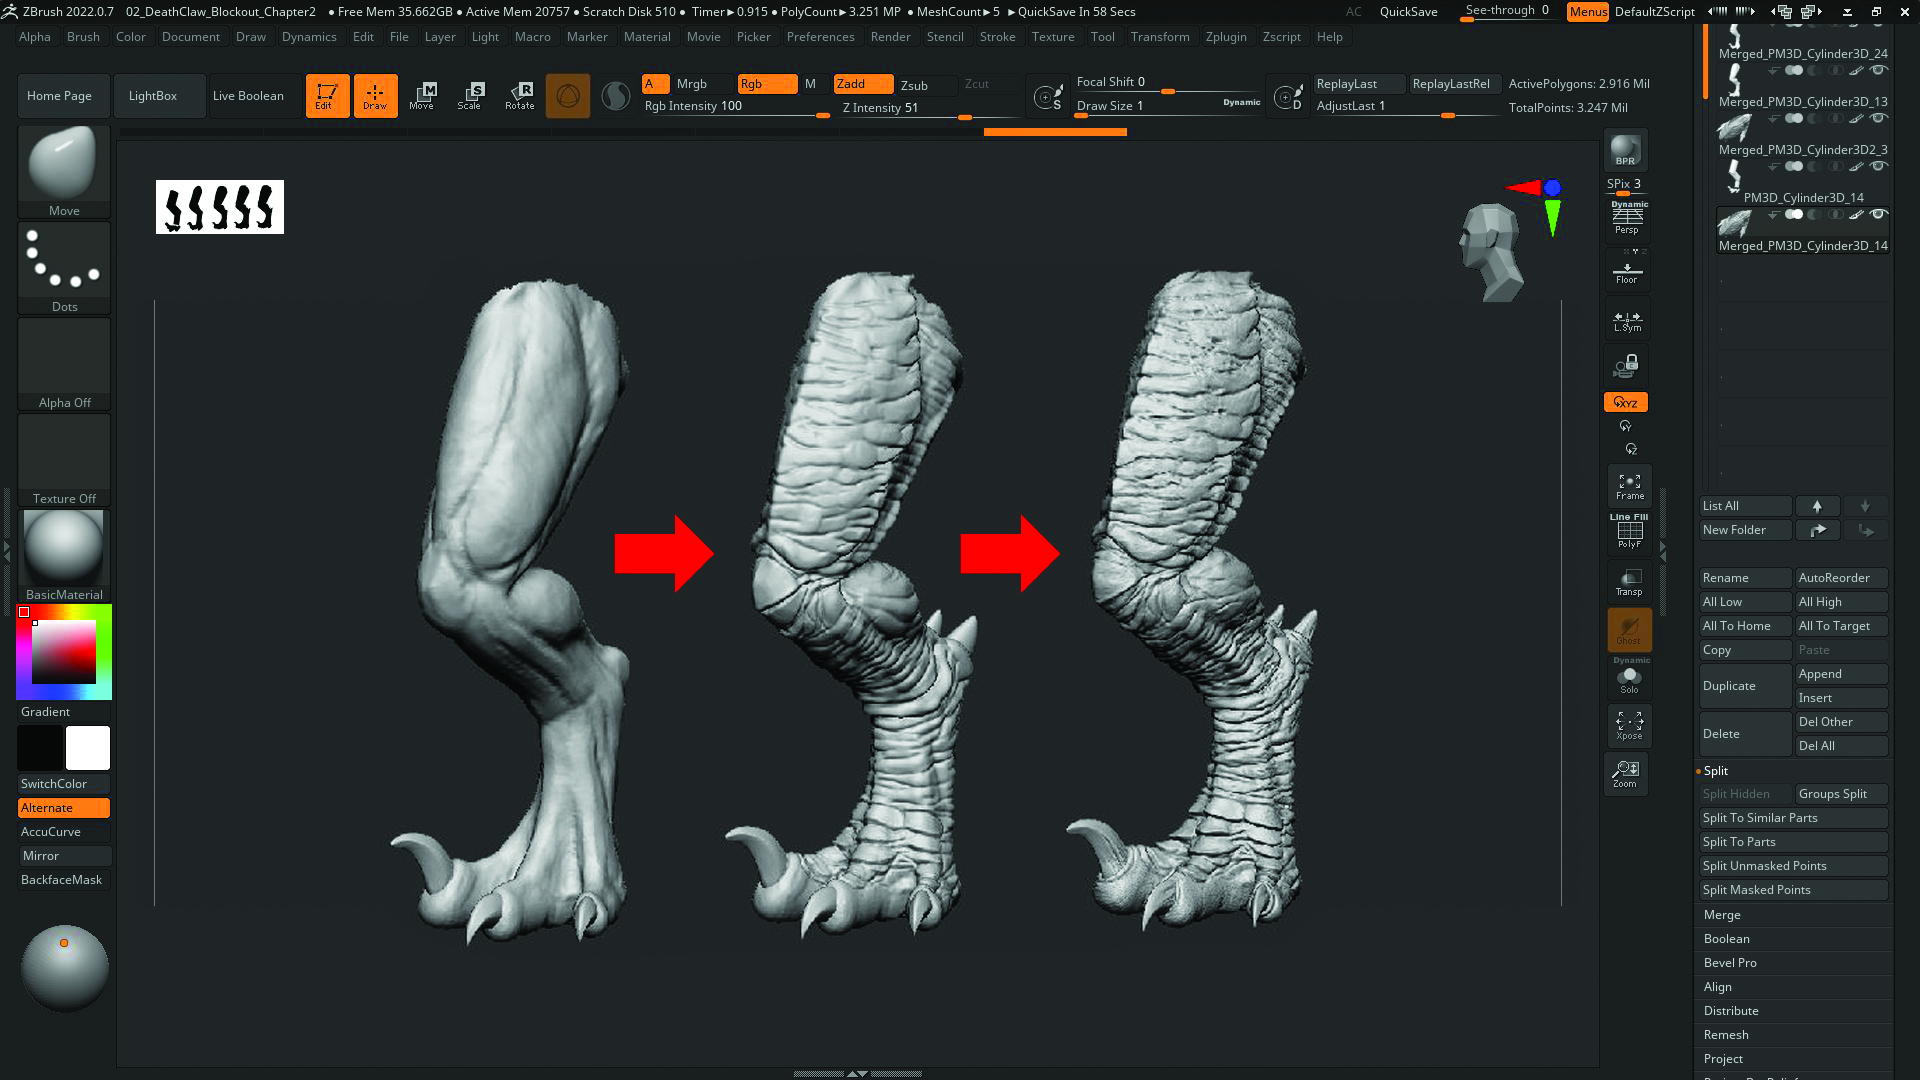
The legs are similar to Step 10. Focus on the flow of the scales and wrinkles to balance out the design. We don’t want too many wrinkles, as this will make our creature appear rubbery with too much loose skin, so make sure to recognise where there are tight and loose skin areas, which are typically near joints. Elephants or Komodo dragons are great references on how skin folds look.
12. Design the tail
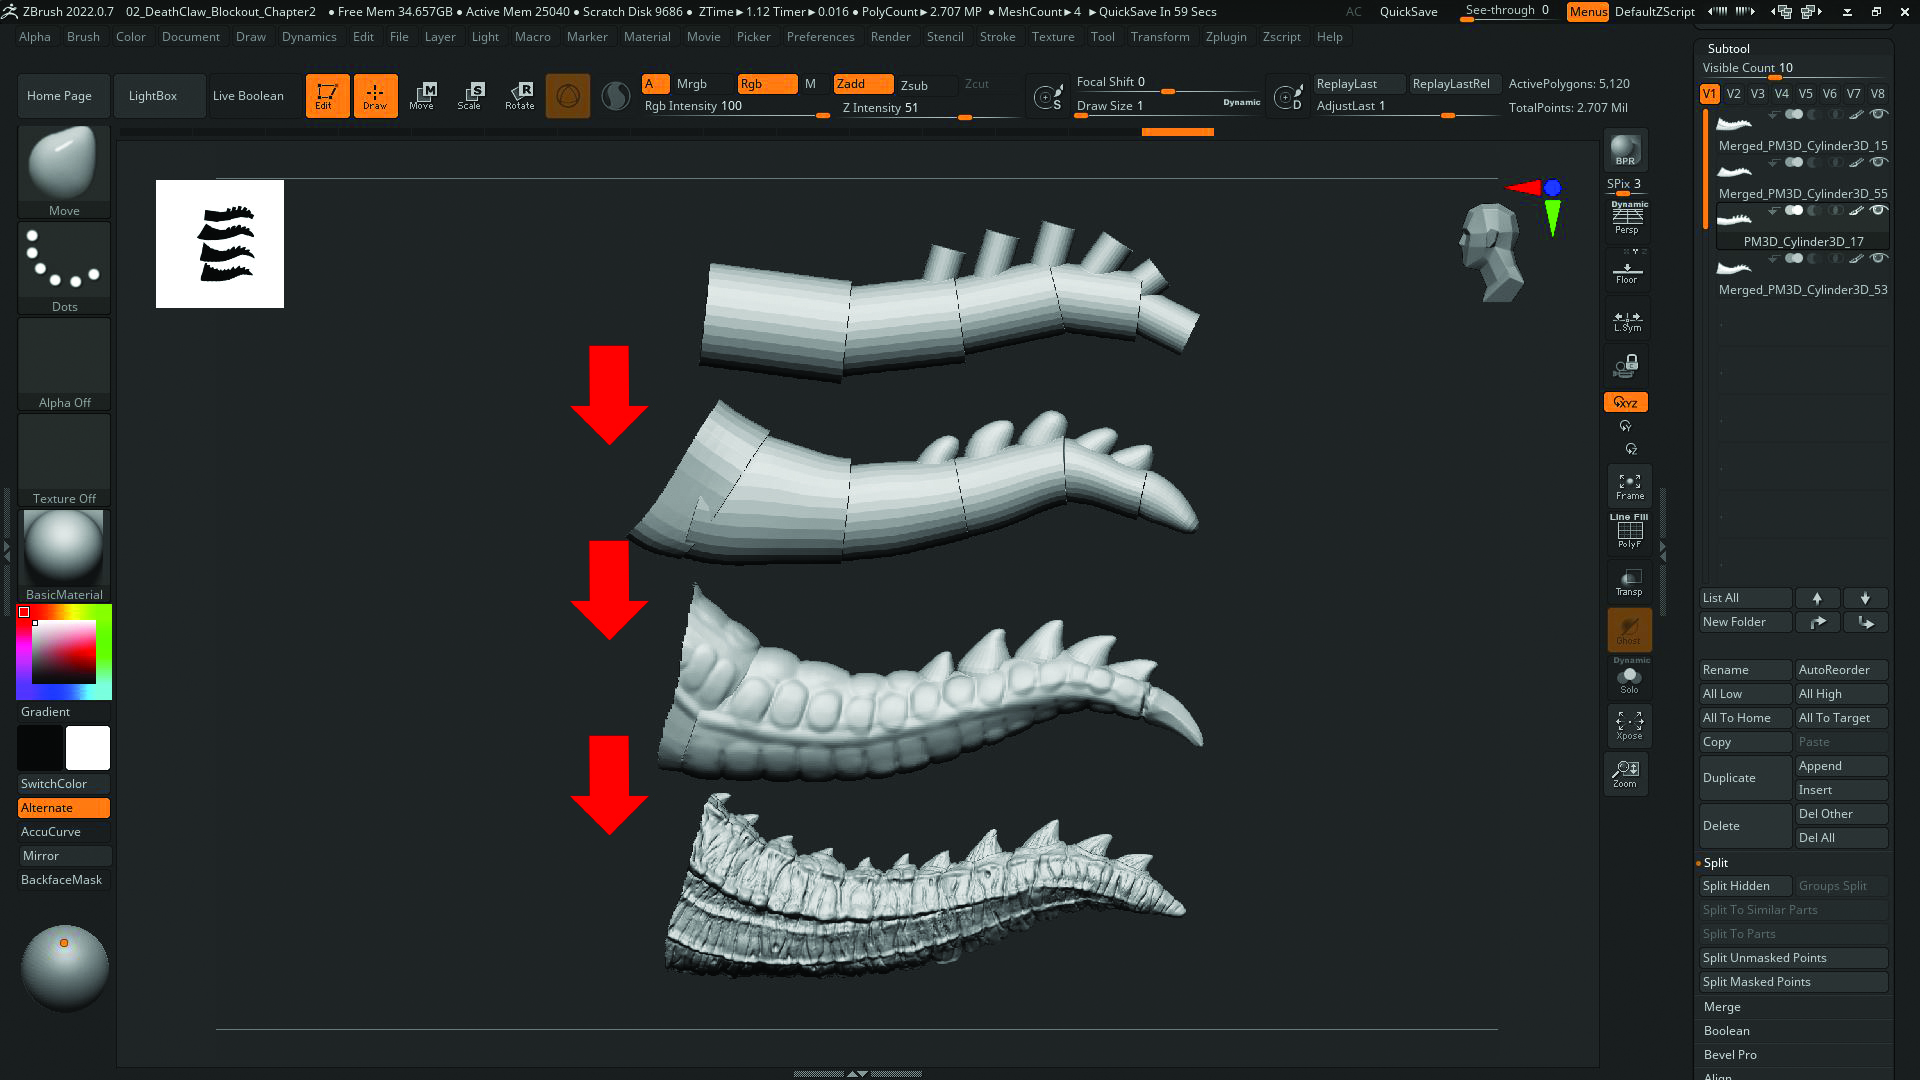
The tail of the creature is different from the rest of the model as it’s mostly scales and melted skin. Using the references we have, as well as animal references such as crocodiles and lizards, we can start blocking out the tail using the DamStandard brush to define the wrinkle lines going vertically, and then use the Standard brush to fill the gaps. Using the Standard brush to draw a few lines going down the length of the tail can break up the cylindrical shape and make it look more interesting.
13. Create claws and more
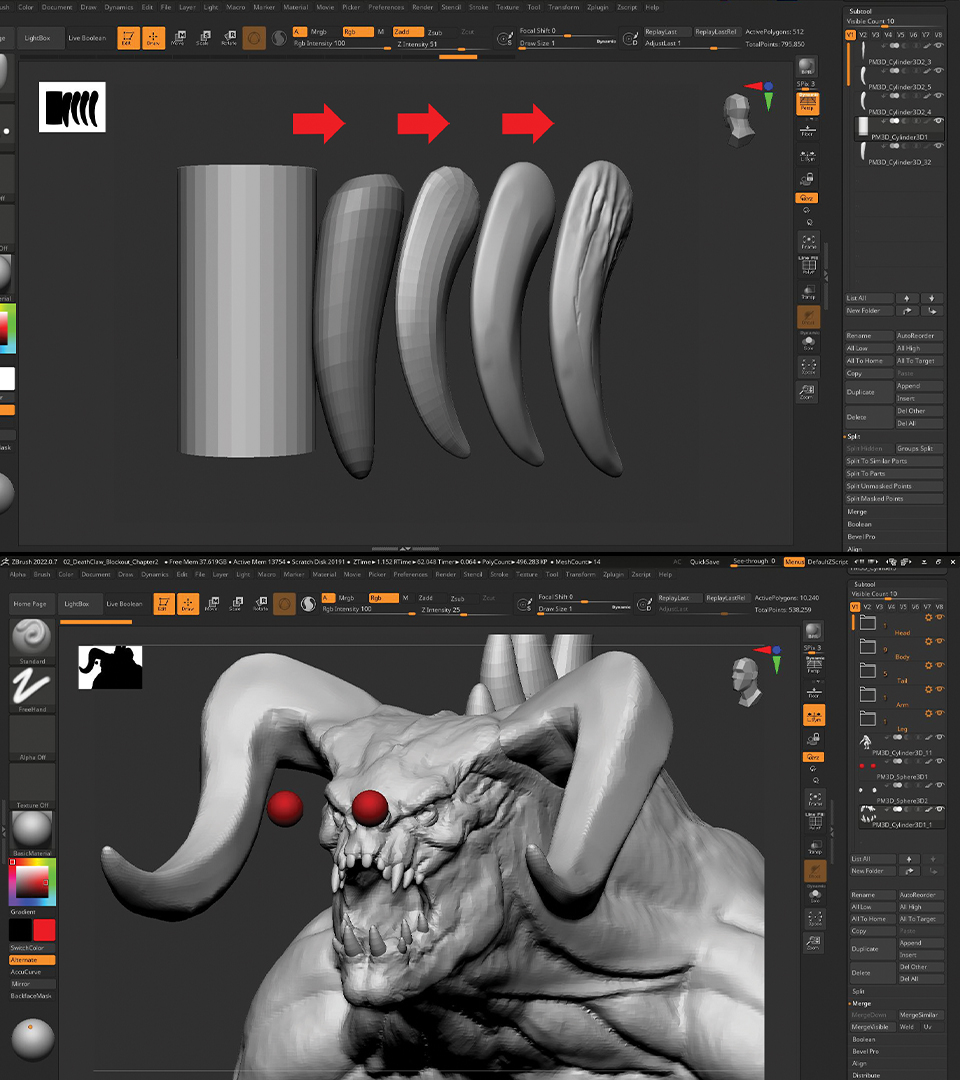
Claws and spikes are easy to create. Use a cylinder primitive, grab the Pinch brush and pinch one end, then take the Move brush and create an arch. When you’re satisfied with the shape, ZRemesh it and subdivide to get more topology to work with. Grab the Trim Dynamic brush and shave four sides of the claw or spike to make it sharper. The best reference to use is an eagle or raptor claw.
Once we have a sharp enough geometry, use the DamStandard brush to add some cracks and grooves along the length of the model for surface details. Rinse and repeat for each claw, spike and tooth. For the eyes, just append two spheres and move them into place on the head.
14. Add alpha details
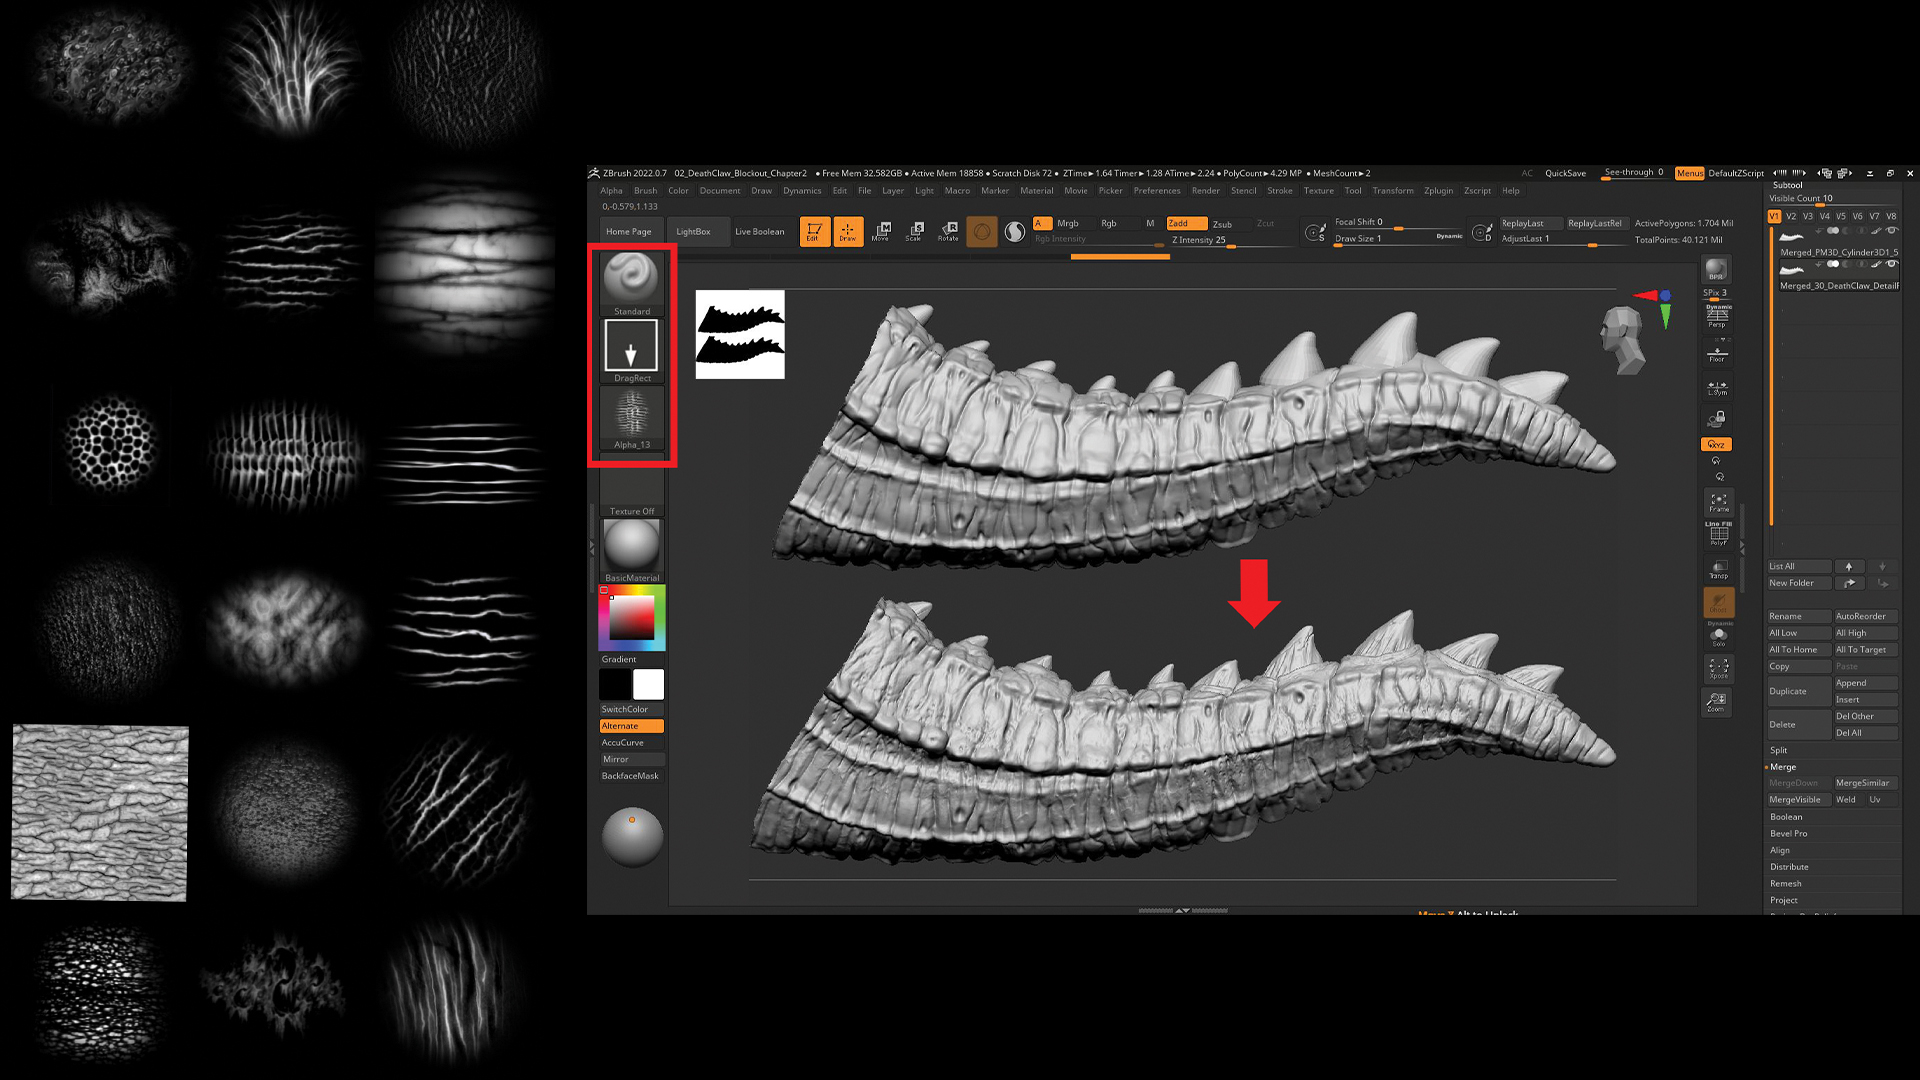
We should be ready to use Alphas for finer details. Using the Standard brush with DragRect selected in the Brush settings, we can import alphas from online to add smaller wrinkles, scales and skin textures. Be careful not to overuse alphas as it will destroy all the hand-sculpted work already created. A good rule is to use alphas sparingly and to have the Intensity setting on the brush low.
15. Finalise model

After hours of modelling and sculpting, we now have a detailed deathclaw ready to show off. We could take it further through the pipeline and retopology, UV mapping and texturing it using Substance 3D Painter. But for those who want a conceptual render, these next steps will be a quick walkthrough of KeyShot and Photoshop to get a beauty shot.
16. Add colour
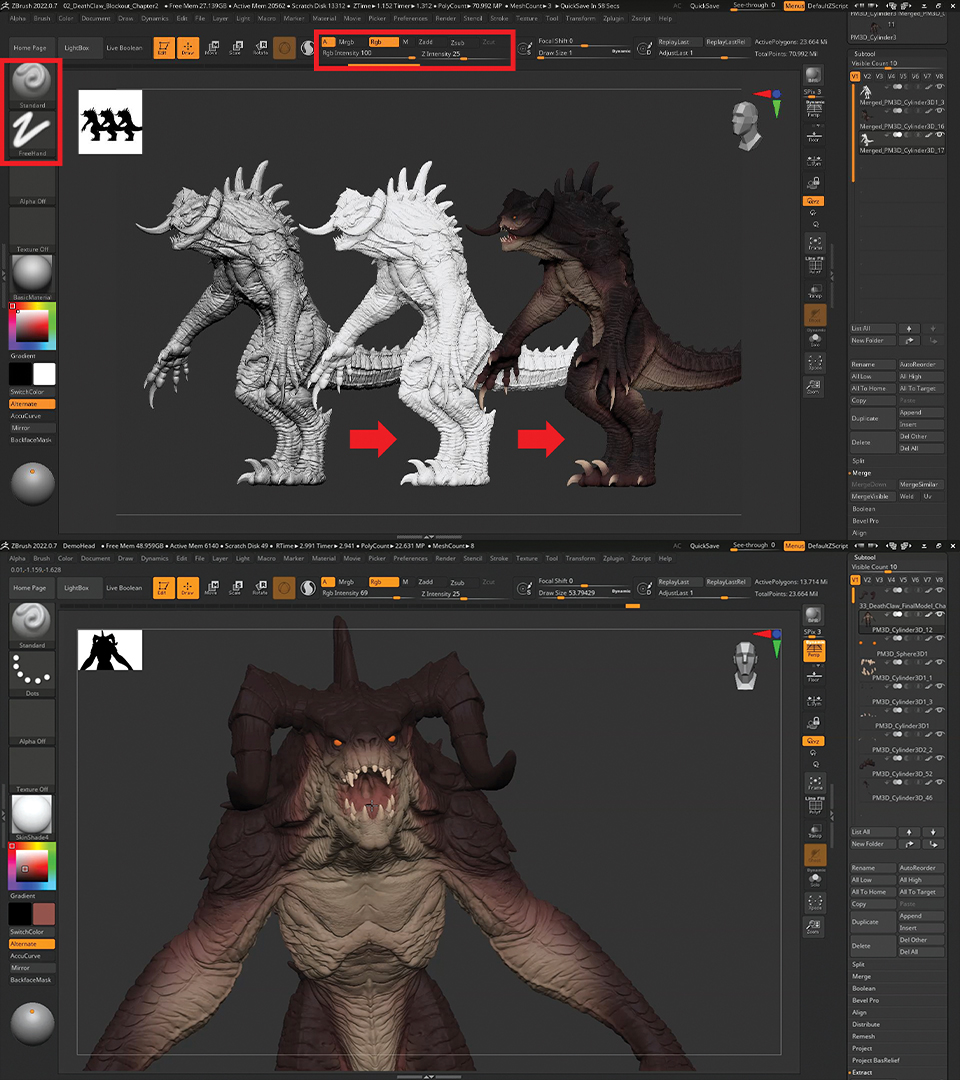
Before we take the model into KeyShot to render, we need to add some colour. This can be achieved with the Standard brush, changing it to RGB and turning off Zadd and Zsub, which will make sure we don’t add any sculpting information. We also want to change the material type to SkinShader to get a better surface to paint on. With that, we can paint the creature with a lighter underbelly and darker colours for the back and scaled areas. Again, a good reference would be reptiles like crocodiles.
17. Create masks for details
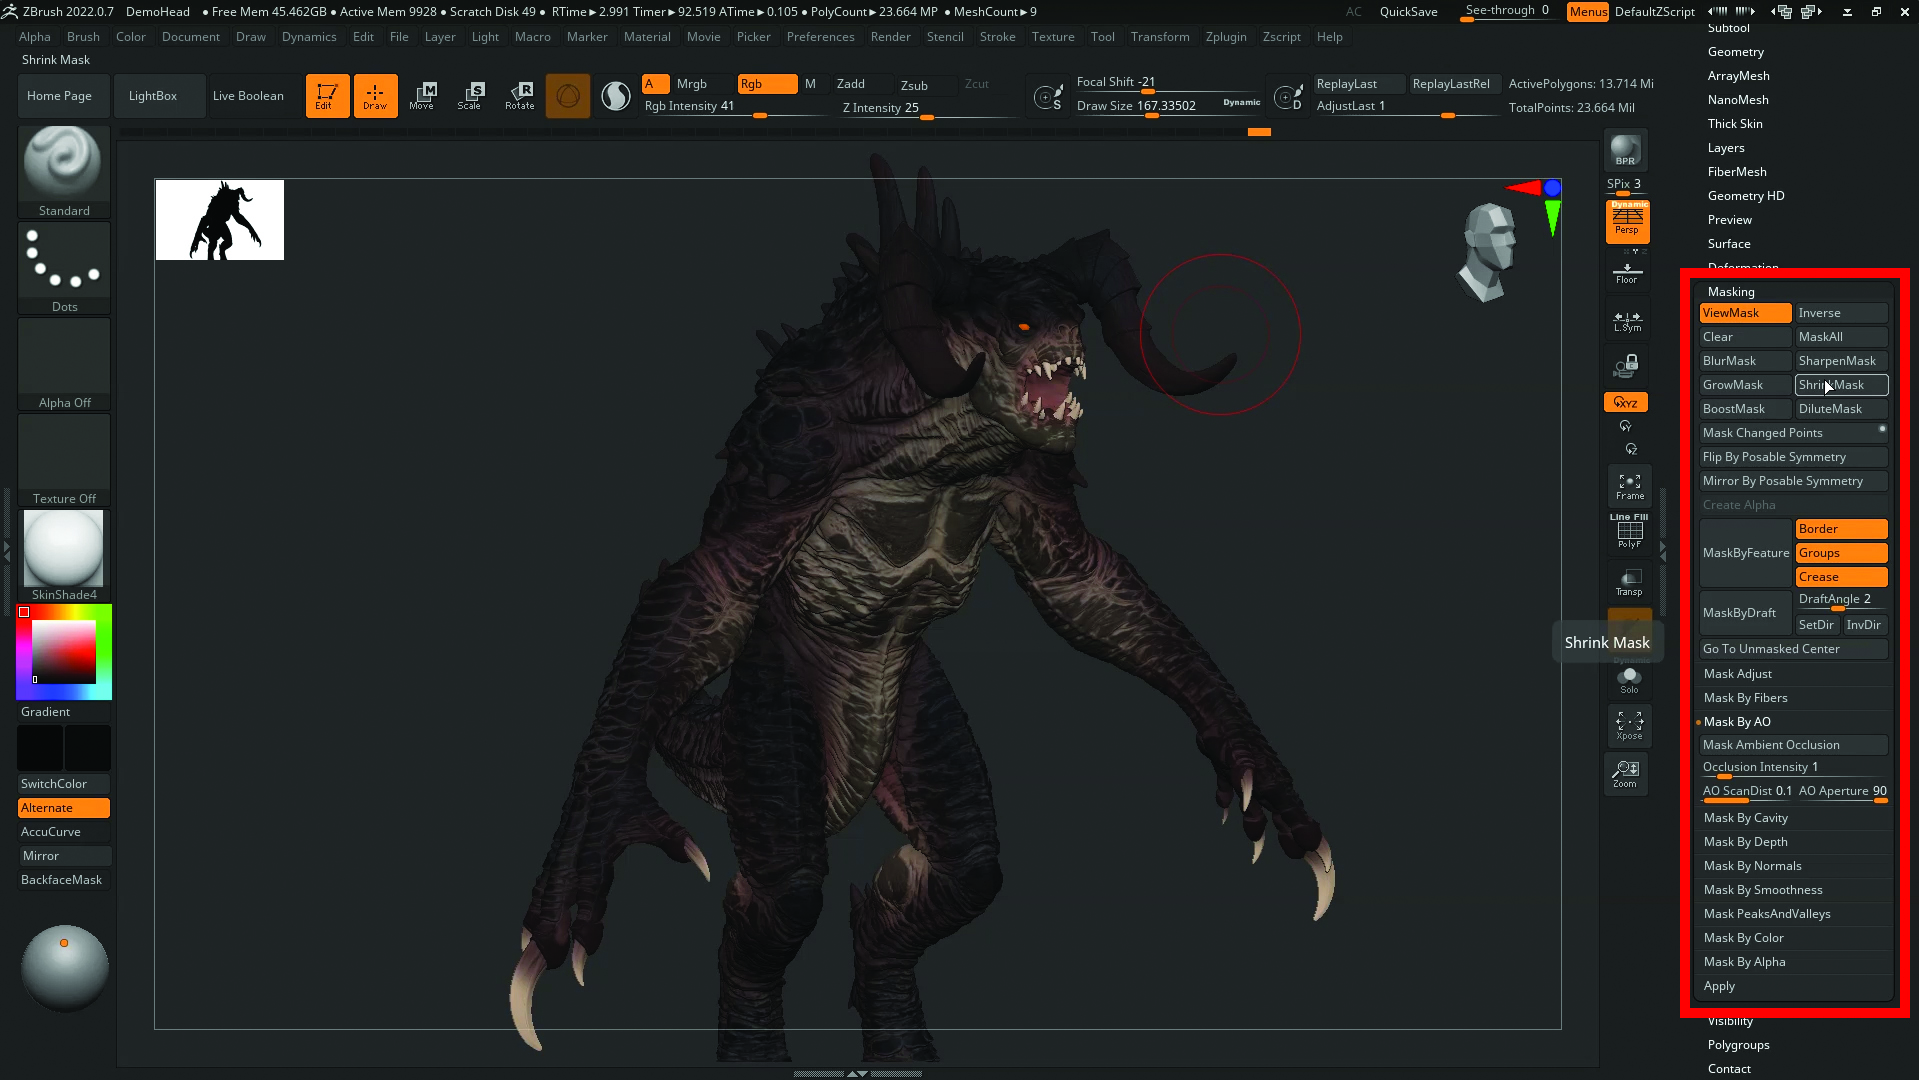
When you have a base coat on each SubTool and are happy with the colour distribution of the underbelly and scales, add in extra texture detail by using masks to create cavities, and paint lighter or darker colours between scales or skin to make it look more interesting. There are plenty of masking techniques in the Masks tab under the Tools section to experiment with.
18. Pose the creature
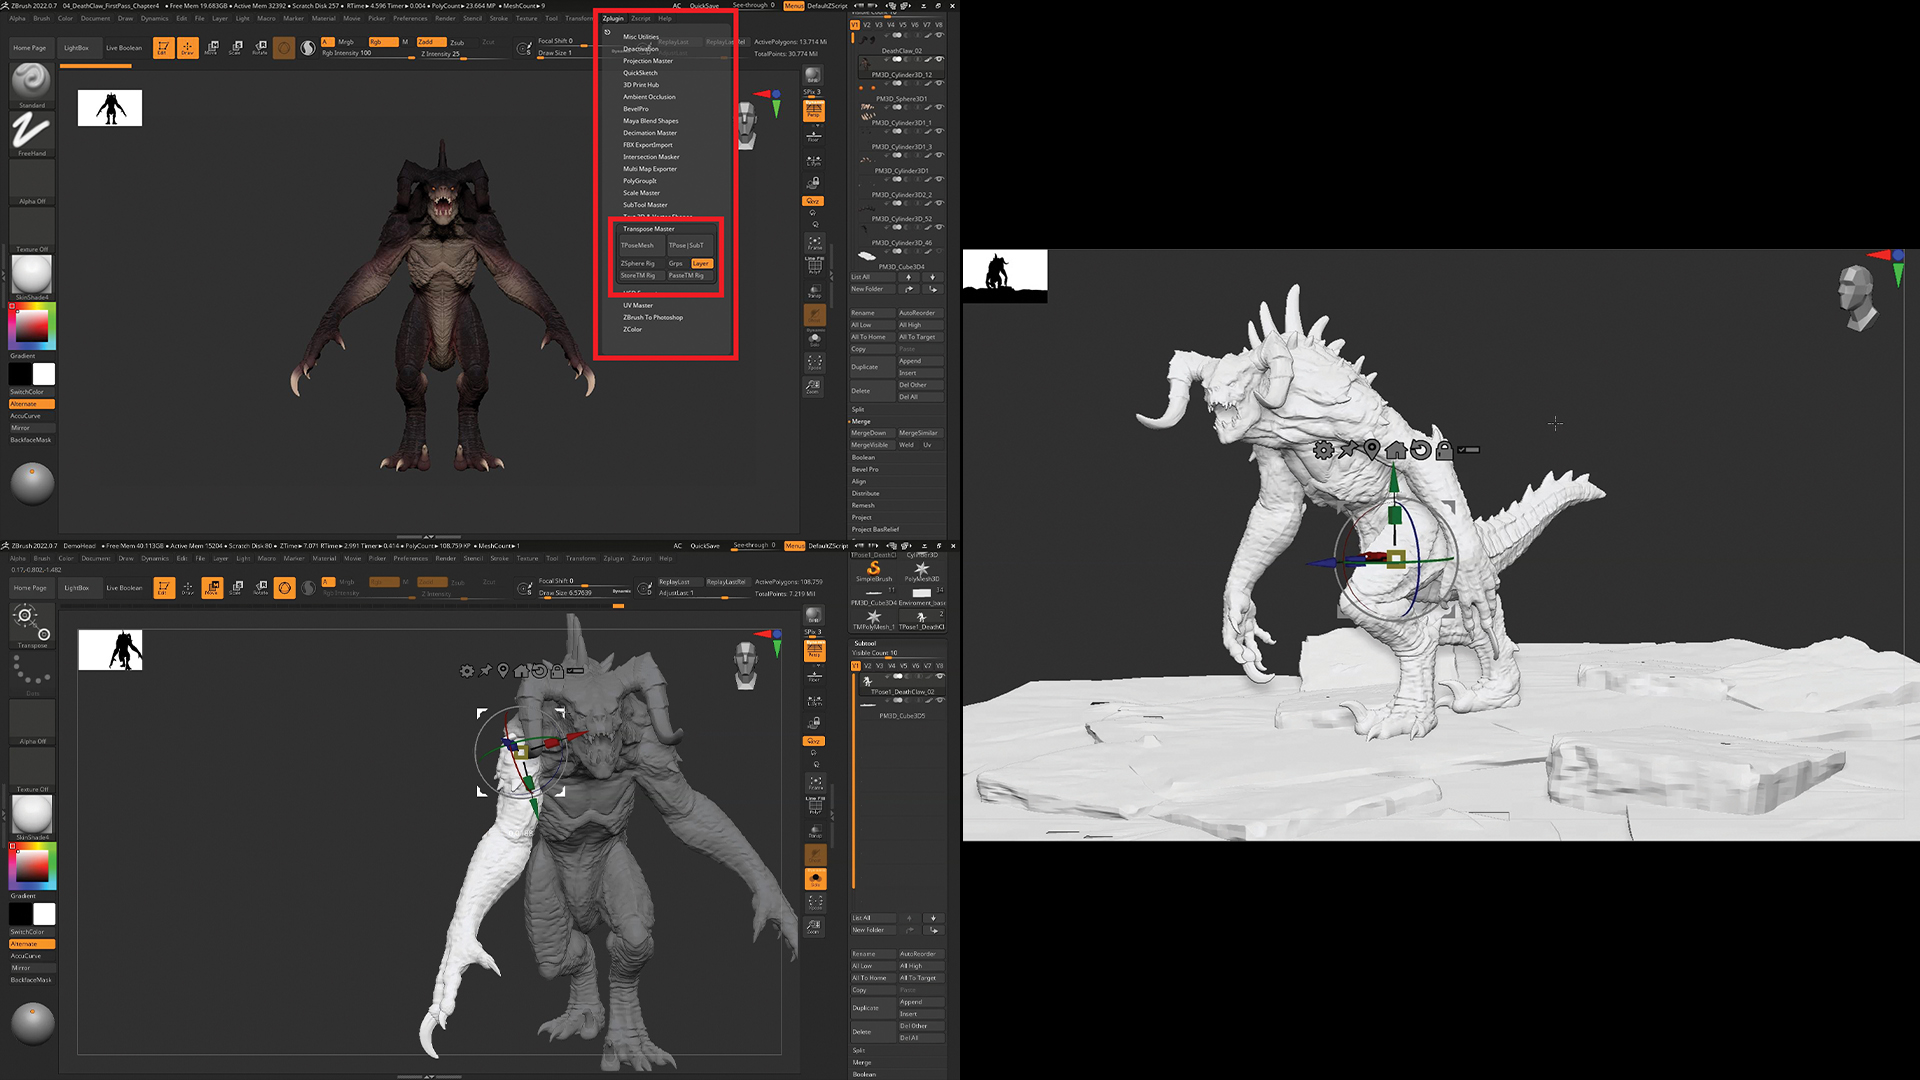
Posing makes your creation more interesting, rather than just the standard A-pose. Using the Transpose Master, select TPoseMesh and wait for ZBrush to calculate the model. We can then use the Masking brush with Lasso selection to mask out the individual limbs and rotate them for a more interesting pose. It can take time to get the perfect pose, so be patient. Once you have the pose you want, simply click on ‘Tpose|SubT’ in the Transpose Master tab and wait for ZBrush to finish posing.
19, Move over to KeyShot
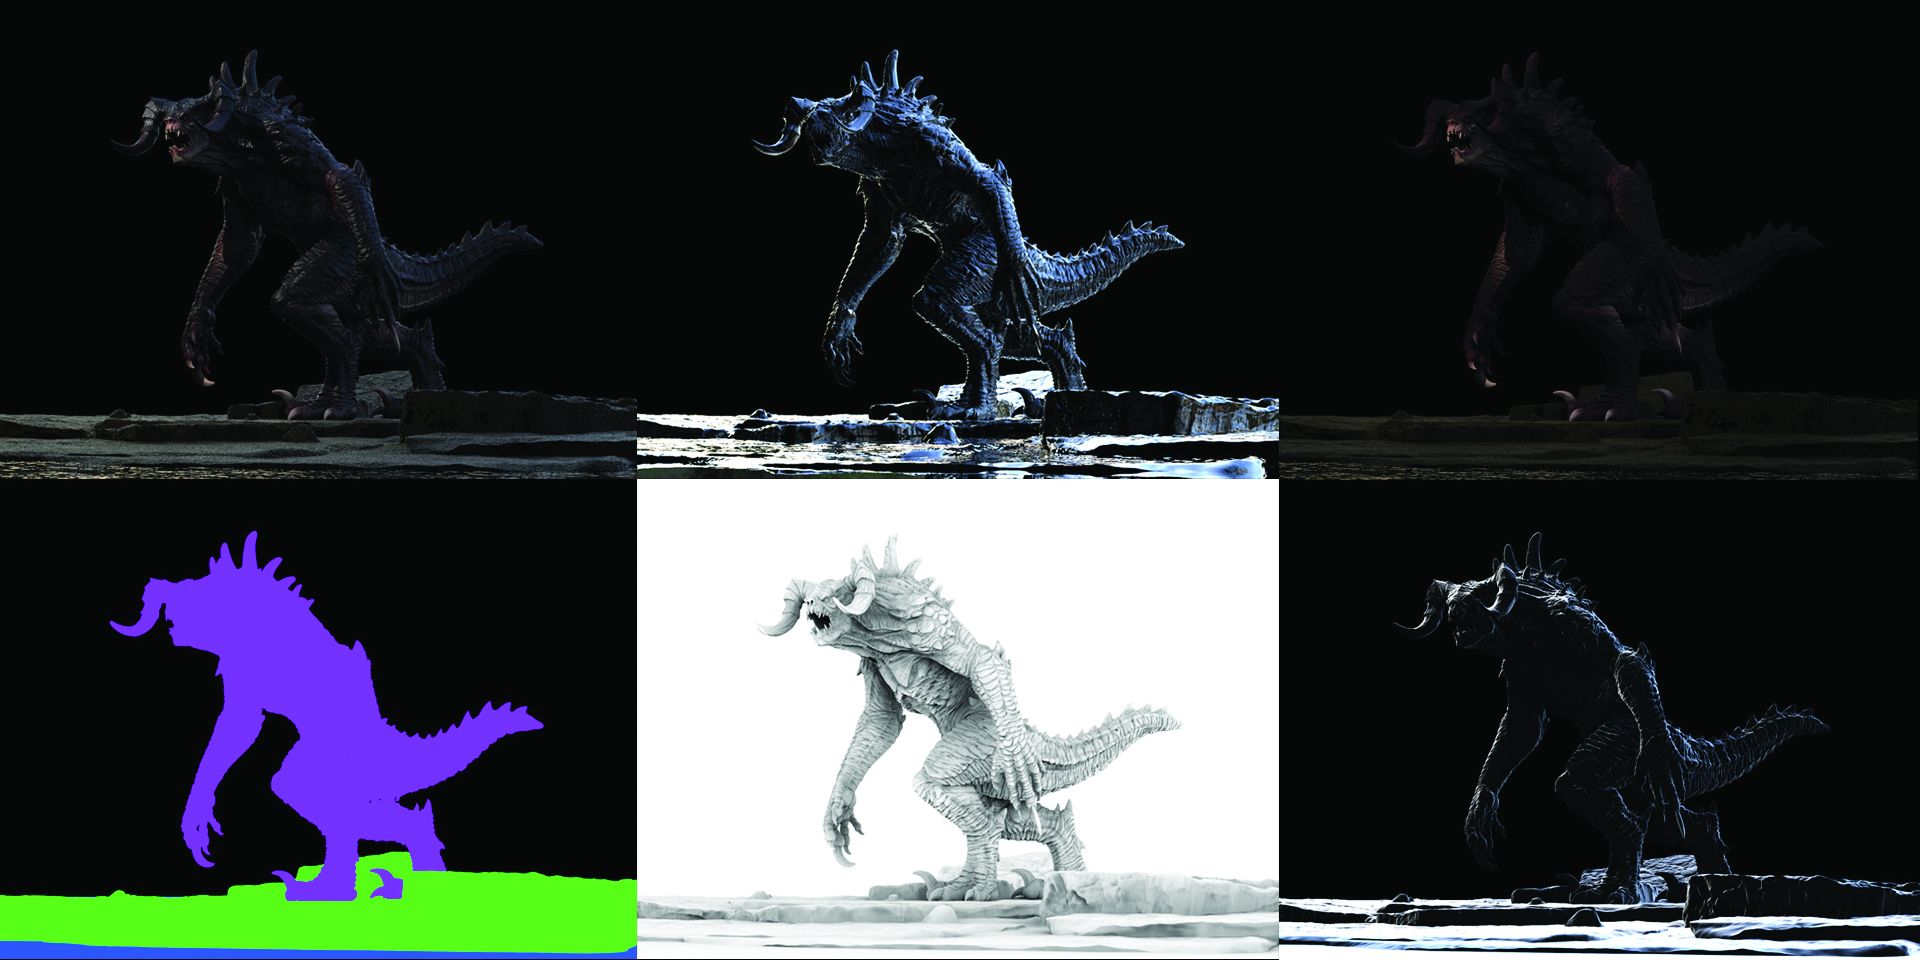
Using the ZBrush to KeyShot Bridge, load up the model into KeyShot and start changing the lighting, materials and environments to make an interesting image. When creating a Beauty render of your model to add to your portfolio, it’s less important to have a perfectly textured model with the correct materials, and that’s rendered using the correct methods. Instead, it’s all about making your image look good and rendering out multiple passes to composite in Photoshop, including Ambient Occlusion, Rim, Matte and Light passes, plus any others that will help you finish off the concept with Photoshop.
20. Finalise on Photoshop
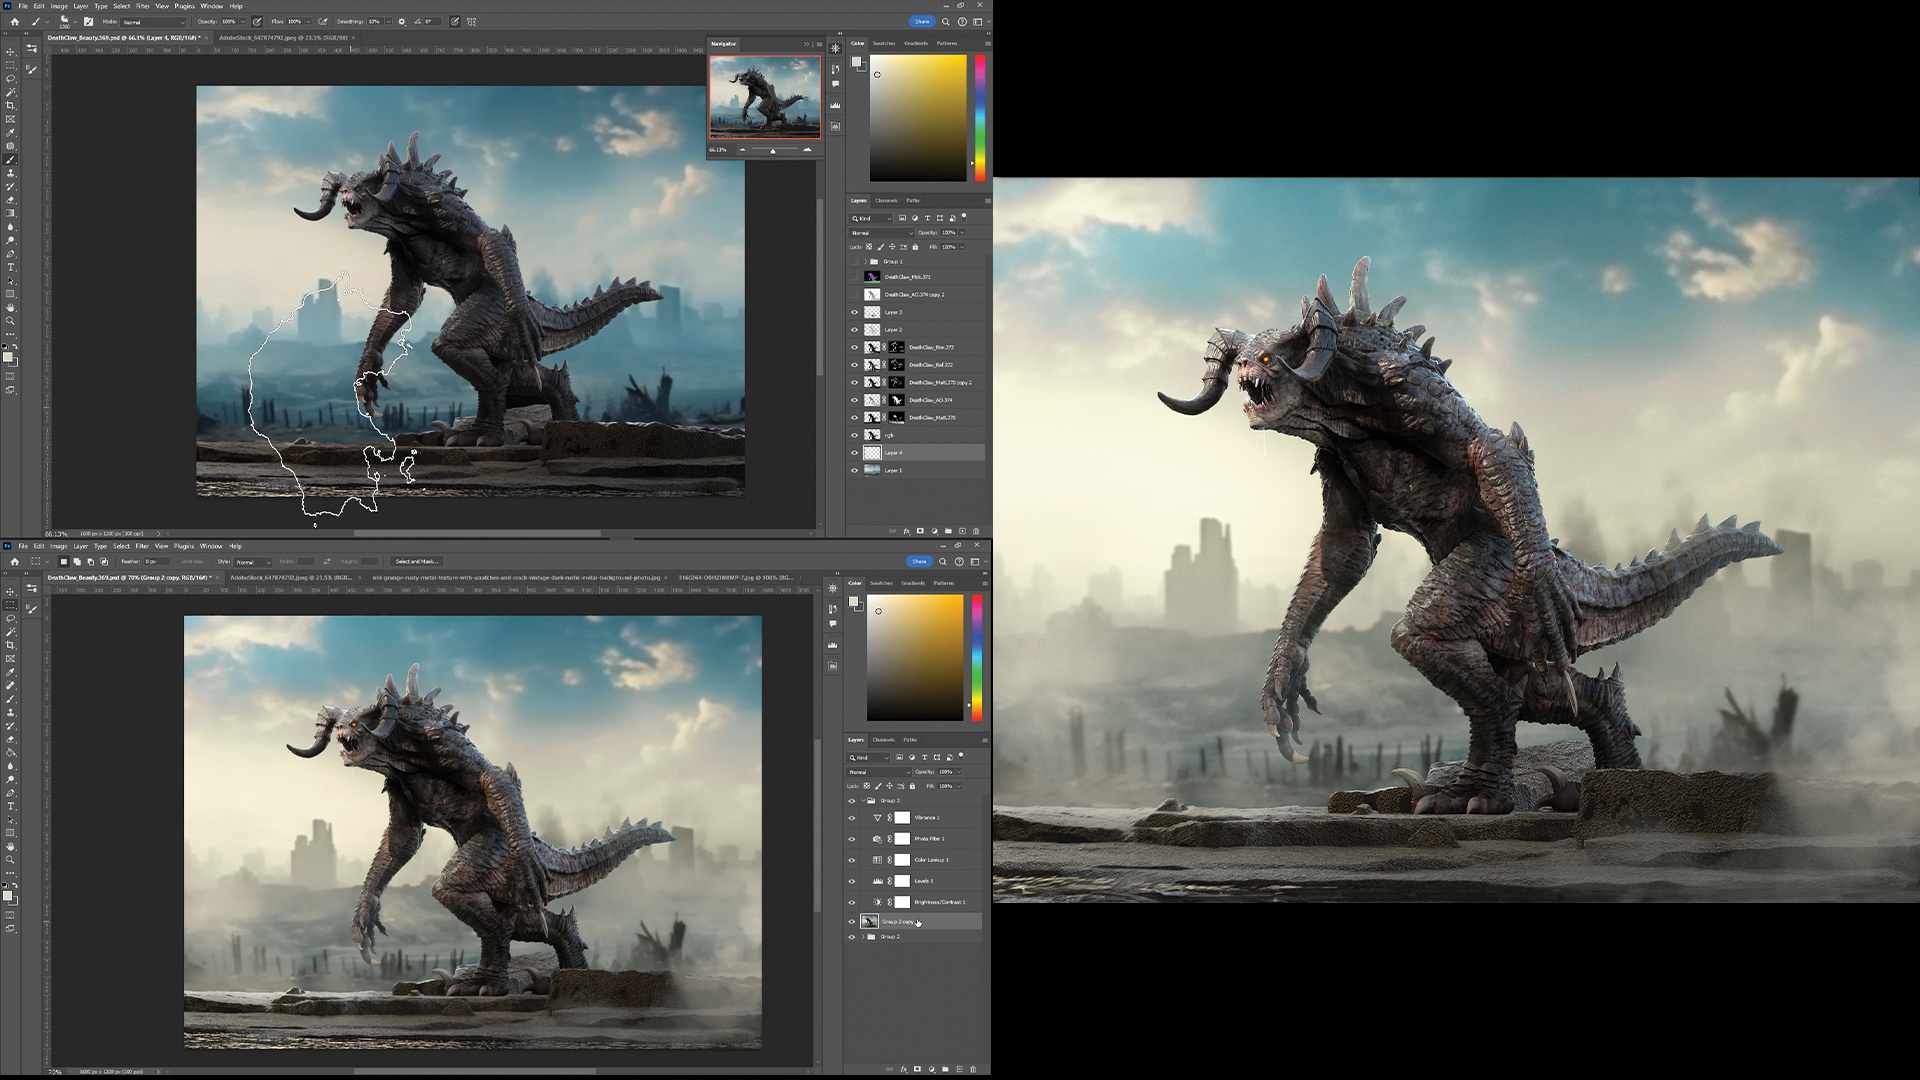
Import all the renders from KeyShot to Photoshop and use a combination of masks, layer blends and image manipulation to achieve the final concept for your creature. We can also use textures found online to enhance wrinkles, dirt and scales, which we couldn’t achieve in the sculpting and Polypainting stages. This is where we can use our artistic skills in Photoshop to create an interesting final image.
This content originally appeared in 3D World magazine, the world's leading CG art magazine. 3D World is on sale in the UK, Europe, United States, Canada, Australia and more. Limited numbers of 3D World print editions are available for delivery from our online store (the shipping costs are included in all prices). Subscribe to 3D World at Magazines Direct.
Get the Creative Bloq Newsletter
Daily design news, reviews, how-tos and more, as picked by the editors.

Thank you for reading 5 articles this month* Join now for unlimited access
Enjoy your first month for just £1 / $1 / €1
*Read 5 free articles per month without a subscription

Join now for unlimited access
Try first month for just £1 / $1 / €1

Marcus is a senior character and creature artist with more than 10 years of pro experience in film and game design. He has a passion for creature concepting.
