How to render depth of field faster
CG artist James Cutler explains how to render DoF faster using 3ds Max and V-Ray.

Rendering depth of field via the V-Ray Physical Camera can be slow, due to the much-needed high number of samples needed to reduce noise levels. By using the V-Ray Shade Map you can greatly reduce the rendering time without affecting the quality of the depth of field.
V-Ray can render stereoscopic images, where the left image is at a slightly different camera position than the right for generating 3D images or films. To render two images of the same frame would certainly double the render time as the GI has to be calculated twice.
The Shade Map reduces this time by collating data from rendering the first image and applies it to the second, resulting in a much quicker render the second time round. Although you are rendering the image twice, the total render time in most cases will be faster than if you were to render the image once without using the Shade Map.
This same technique can be used to speed up rendering depth of field, which is controlled by the V-Ray Physical Camera. The Shade Map is initially rendered without any depth of field so it is quite quick. Then, for the second render, the data contained within the Shade Map is used to generate the depth of field.
Speed up depth of field renders
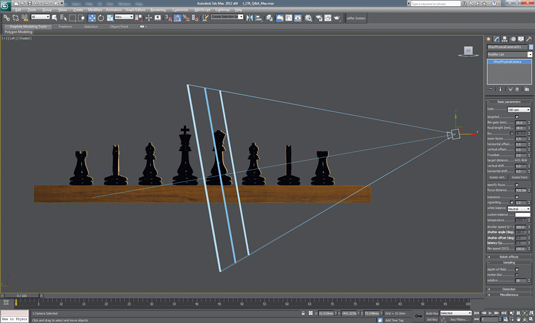
Add a V-Ray Physical Camera to your scene and, under the Sampling parameters, turn on Depth of Field. The amount is controlled via the f-number: smaller values produce a strong but shallow depth of field and larger values make it deeper and less intense. You will also need to adjust shutter speed to balance the exposure – a lower number means the sensor is exposed to light for a shorter time.

Go to the Create panel and, under Helpers, choose V-Ray from the drop-down menu. Then add a VRayStereoscopic Helper to your scene. Since you are only rendering one image and not stereo, you do not want any camera shifting, therefore set the Eye Distance to 0.0 and the View to Left.

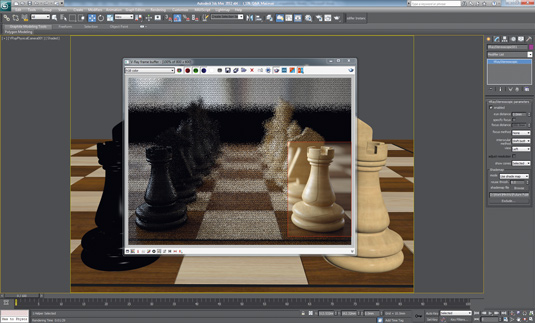
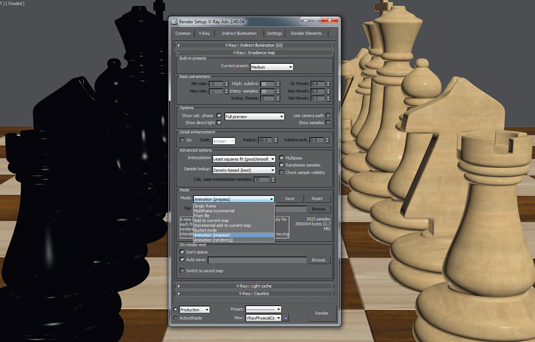
Set the Shade Map mode to Render Shade Map and, under Browse, choose a location for the file. Press Render, and you will notice that even though your depth of field is enabled in the V-Ray Physical Camera, the scene will render without it. After the first render is complete, switch the mode to Use Shade Map and render your scene a final time. You will see that the depth of field effect is now active and the render time is much quicker.
Get the Creative Bloq Newsletter
Daily design news, reviews, how-tos and more, as picked by the editors.

The Shade Map will be used wherever possible for generating depth of field. You can view the results of the shade map by selecting the render element in the V-Ray Frame Buffer. Areas that are black show where the shade map wasn’t used; these areas will render slower. If you're using a large amount of depth of field, increase the Reuse threshold to speed up the rendering.
Words: James Cutler
James Cutler runs MintViz Workshop, a resource for any CG artist, designer or generalist looking to develop their technical skills. This article originally appeared in 3D World issue 176.

Thank you for reading 5 articles this month* Join now for unlimited access
Enjoy your first month for just £1 / $1 / €1
*Read 5 free articles per month without a subscription

Join now for unlimited access
Try first month for just £1 / $1 / €1

The Creative Bloq team is made up of a group of art and design enthusiasts, and has changed and evolved since Creative Bloq began back in 2012. The current website team consists of eight full-time members of staff: Editor Georgia Coggan, Deputy Editor Rosie Hilder, Ecommerce Editor Beren Neale, Senior News Editor Daniel Piper, Editor, Digital Art and 3D Ian Dean, Tech Reviews Editor Erlingur Einarsson, Ecommerce Writer Beth Nicholls and Staff Writer Natalie Fear, as well as a roster of freelancers from around the world. The ImagineFX magazine team also pitch in, ensuring that content from leading digital art publication ImagineFX is represented on Creative Bloq.
