How to make geometric waves in 3ds Max
3D guru Paul Hatton shows us how to create geometric waves.
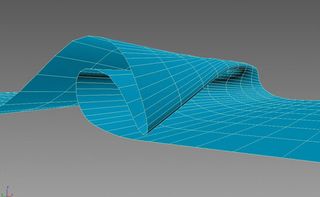
There are some incredible plug-ins out there for creating oceans, including Houdini Ocean Toolkit, Dreamscape and V-Ray Phoenix, to name just a few. I would highly recommend looking into these as they produce beautiful results.
As a studio we rely heavily on Phoenix, which slots in well with our V-Ray rendering engine. However not everyone can afford these plug-ins and therefore may need a solution using only the tools that you find built in to 3ds Max. We are going to look at how to achieve that here.
I would like to start this tutorial by pointing out that this technique was covered at Siggraph in 2007, and a lot of the training here was inspired by that information. We will begin by creating splines, which represent the shape of the wave at the different stages of its life.
If you look at a wave forming and then disappearing you will notice that it goes through several key stages. By creating a set of shapes, we are going to be able to blend them to create an interpolation of the wave’s movement over time.
Spline shapes
With those waves created, we will move on to setting up a morpher that will force a single spline to morph between the spline shapes. By using the Reaction Manager, we will be able to control the morph amount using the rotation value of a separate object. With the spline successfully morphing, we can make it move through the water using a Linked Form.
Once we have a single spline working, we just have replicate the process so that we have multiple cross-sections of the wave across the surface of the water. These splines are then used as ‘bones’ inside a skin modifier of a plane to control its shape.
The process is quite involved and there are a number of constraints, which means that if you don’t follow the process exactly then you might run into some problems. However, once you have the process cracked it is a really nice and flexible setup that lets you customise your waves to meet any requirement.
Then all you'll need to do is set up some really nice water/foam shaders and a killer lighting rig to make it all pop!
01. Create the wave splines
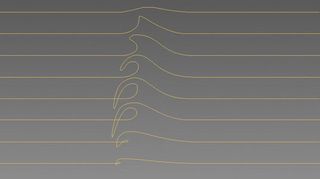
Create a set of splines, which represent the stages of a wave throughout its life. Create each spline from the last to ensure each one has the same number of vertices. Clone the flat spline and add a morpher modifier to it.
Add the wave splines to the morpher by clicking Load Multiple Targets, and select the first one. Add progressive morph targets using Pick Object From Scene and select each spline in order, starting with the second.
02. Set up the controller

The controller will just be a spline of any shape; you can animate it moving forwards as well as rotating 180°. The rotation will control the value in the morph target.
We will do that using the Reaction Manager in the Animation menu. The master is going to be the X rotation of our controller spline. Then add a slave and make it the morpher of the spline. Finally add a new state and set the rotation to 180°.
03. Make the wave move
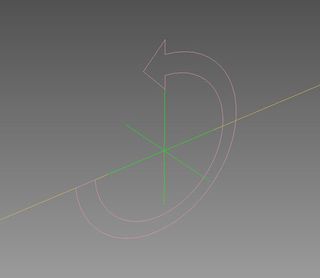
We do this using a Linked XForm modifier. Start by creating a point helper and use a Position Constraint to constrain it to the controller. Add a Spline Select Modifier to the main spline and select all your vertices.
Then add a Linked XForm modifier to the stack and add the point helper to the modifier. Add a final Spline Select Modifier so that you can deselect the vertices. Now you can see that it is morphing between the wave splines as well as moving forward.
04. Wave controllers
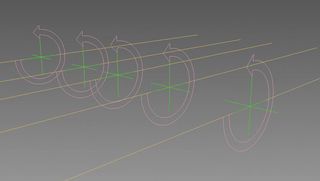
Copy the controller several times. Copy the main spline the same number of times but turn off the modifiers first. Align these new splines to their respective controllers. Then create, align and constrain these new point helpers to their controllers.
Reapply the modifiers for each spline by turning on the first spline select, then set the control object of the Linked XForm modifier before turning that one on. Turn the spline select on. Do this for all splines.
05. The reaction manager
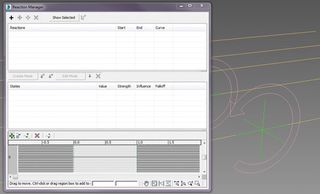
In the Reaction Manager, delete all the newly created masters and leave the original one. Next add a new master for each new controller created and attach it to the X rotation. Add the slave for each master and link it to the morpher of the corresponding spline. Add the states for each master and make sure it’s set to 180°. Finally, constrain each point helper so that they are constrained to the correct splines.
06. Turn waves into surface
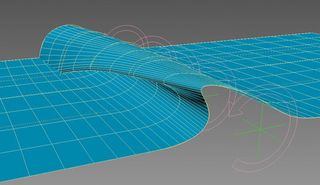
Copy the first spline and delete its modifiers. Put an extrude modifier on it and rotate it 90° so it sits flat to the world. Convert it to an editable poly and make sure the surface covers all of your splines.
Add a skin modifier and add bones by selecting your control splines. Then offset the keyframes of each of the controllers so that the wave forms across the ocean. Finally, add a TurboSmooth modifier to the surface.
Words: Paul Hatton
This article originally appeared in 3D World issue 187.
Like this? Read these!
- Discover what's next for Augmented Reality
- Download free textures: high resolution and ready to use now
- The best photo apps for iPhone, iPad and Android

Thank you for reading 5 articles this month* Join now for unlimited access
Enjoy your first month for just £1 / $1 / €1
*Read 5 free articles per month without a subscription

Join now for unlimited access
Try first month for just £1 / $1 / €1
Get the Creative Bloq Newsletter
Daily design news, reviews, how-tos and more, as picked by the editors.
The Creative Bloq team is made up of a group of design fans, and has changed and evolved since Creative Bloq began back in 2012. The current website team consists of eight full-time members of staff: Editor Georgia Coggan, Deputy Editor Rosie Hilder, Ecommerce Editor Beren Neale, Senior News Editor Daniel Piper, Editor, Digital Art and 3D Ian Dean, Tech Reviews Editor Erlingur Einarsson, Ecommerce Writer Beth Nicholls and Staff Writer Natalie Fear, as well as a roster of freelancers from around the world. The ImagineFX magazine team also pitch in, ensuring that content from leading digital art publication ImagineFX is represented on Creative Bloq.
