How to get started with Cinema 4D
Now it's part of the Creative Cloud, Cinema 4D is more popular than ever. Mike Griggs offers some tips to get you started.
It is a common belief that creating 3D is hard. And it's true that there are a huge amount of concepts you need grasp, including modelling, texturing, animating and sculpting. But thankfully one of the most popular and full featured packages, Maxon’s Cinema 4D, is also one of the most straightforward to learn.
Cinema 4D has been around for years and in that time has built up a deserved reputation for stability and ease of use, bolstered by one of the industry's best motion graphic toolsets, which can also be used for a huge range of other 3D tasks.
A ‘Lite’ version of Cinema 4D is now included with Adobe After Effects if you're a Creative Cloud subscriber, and while it does not have the full toolset of the other versions of Cinema 4D, there is enough in there to get you started to learn how to use this amazing package.
Note: The following screengrabs were created using the full Cinema 4D Studio package, which gives you every tool Maxon can muster, but the methodologies are the same to all of the Cinema 4D packages.
01. Live modelling with Parametrics

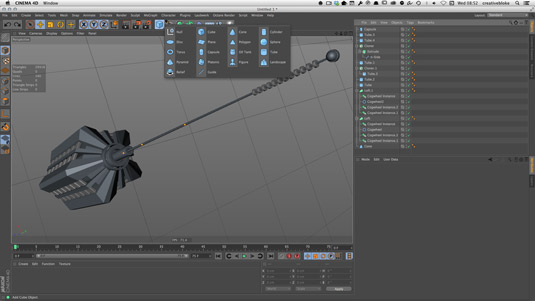
One of the key features of Cinema 4D is that has a fully featured parametric modelling system. This means that you have instant access to a full set of modelled objects such as cubes, spheres and toruses which can have rounded corners added that can be stretched and pulled into most shapes.
There's also a wide range of curve tools, which can be combined with modifers such as the sweep, lathe and loft tools, giving you the ability to create complex shapes very quickly.
The object shown here was created completely with parametric options, which means that the model is live down to the smallest bevel and can be modified at any point - great if you need to administer client changes.
Get the Creative Bloq Newsletter
Daily design news, reviews, how-tos and more, as picked by the editors.
If you want to change your parametric option to a more traditional polygon model, you can hit the ‘Make Editable’ button. This feature is not available in C4D Lite; however this pared-down version does come with a better range of motion tools to work with parametric options than the basic paid version of Cinema 4D.
02. Cloning tools

Cinema 4D also has a range of cloning tools, which can duplicate your shape into various configurations, based on 3D grids, or they can use another object as a source for your clones.
There is a huge range of creative possibilities that are capable with the cloning tools. Coupled with a mograph effector, you can use them to add parameters as varied as randomising clones positions and moving in time with an audio track.
If you don’t want to use clones but want to use the power of the mograh effectors, indvidual objects can be placed into a ‘fracture’ object in the object list. The fracture object is a great way of getting objects to animate and is available in C4D Lite.
03. Get to know the object list

Understanding and keeping the the object list in Cinema 4D is the key to keeping your files nice and tidy, and it also unlocks a lot of the fundamental power of Cinema 4D. The object list works with a parent-child relationship, which means that any object placed into another will inherit the properties of the parent.
While great for keeping things organised, it can also be a great boon for animating. You can use Nulls (which are objects which only exist as placeholders) to group a range of objects and animate them from the null's pivot point rather than the object’s own pivot point. You can also control visibility of objects, either to have them visible only in edit view or have them render only.
If you're working with parametric objects and modifiers you can toggle the ‘tick’ button to switch them off and on. This is particularly useful if your working with sweep or lathe objects as it can give you quick access to your creation splines.
You can further augment the object list by adding them to layers, which can batch control object visibility, if they can be selected and hide them from the object list altogether. This makes Cinema 4D one the most powerful and straightforward 3D programmes to keep yourself organised.
04. Changing layouts

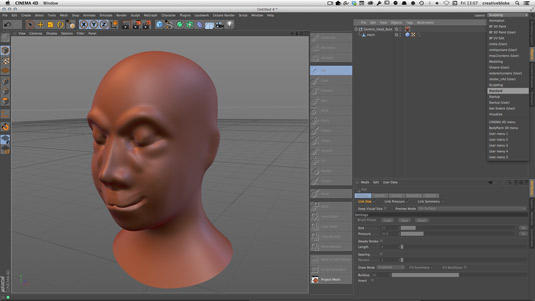
One of the most useful features of Cinema 4D is its versatility. It has a wide range of toolsets from advanced polygon modelling and animation through to sculpting and even 3D texture painting (dependant on your Cinema 4D version).
However when you first open Cinema 4D, none of these toolsets is immediately apparent. This is due to the fact that the layout of Cinema 4D is customisable to give you access to the best tool for a specific workflow.
Different workflows are available at the top right using the ‘Layout’ dropdown menu. I use these all the time, especially the Sculpting and BP UV Edit view for quick sculpting and texture management respectively. Once you have started to get your head round these workflows, you can create your own layouts of tools for specific tasks, by right clicking on the small array of grey dots which appear on individual panels which give you the options of undocking and arranging palettes to suit your specific favourite tools or computer setups.
For example I have a Cinema 4D custom layout for when I am working on 2 screens, another for when I am using when I am using the 3rd Party GPU render plugin Octane, which loads up a live preview window. The one thing I do with all my custom layouts is nest the ‘Customise Commands’ button in a handy location so that I can add more tools as I need.
05. Making the UI your own

Here are a couple of final small tips which can speed up your workflow when using Cinema 4D. The default settings for Cinema 4D are to have animations set at the American Standard 30 Frames per second (fps), with a render resolution of 640 by 480 pixels.
I mainly work in full HD for UK clients where the TV frame rate is 25 fps. To make sure Cinema 4D always opens with these settings, I create a file called ‘New.c4d’ and place in the same folder as my Cinema 4D application.
Cinema 4D will now take the default settings from the ‘New.c4d’ file whenever it creates a new file. You can modify this file to whatever settings or setup you like.
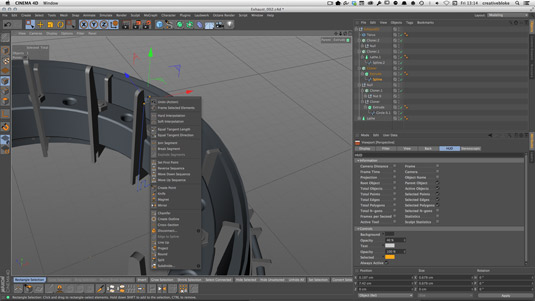
Aside from the massively configurable layouts, there are context sensitive menus with Cinema 4D, I find these most useful when polygon modelling. Hitting the ‘V’ key in a viewport window brings up quick access under your mouse pointer to a range of main menu tools and plugins.
If you are working in point, edge or polygon mode on an editable object, right clicking creates a pop-up menu of modelling tools. If you press the ‘U’ key in the viewport , a shortcuts menu appears which shows which shortcuts you can now access. My two most commonly used are ‘UL’ to select a loop, and ‘UW’ to select connected items.
Finally, if you press ‘Shift-V’ you can bring up your viewport settings palette, with this very handy palette controllinb how each of your viewports looks. You can add reference images into the background to aid you when your modelling, but I mainly use the ‘HUD’ tab to control what information is available, such as viewport frame speed, or how many vertices I have selected.
Conclusion
Cinema 4D has a huge amount of depth, and I hope with these quick tips help get you on the way to understanding this fantastic package.
As stated these tips are applicable to all versions of Cinema 4D, but features like sculpting are only available in the most expensive packages - so check you are buying the right package. Maxon does a comparison page: the one thing to note is that C4D Lite has a surprisingly large number of features, and it can import 3D models made in free packages such as Blender or Sculptris. So if you're an Adobe CC subscriber you may already have all the functionality you need.
Please leave comments below if you want to know more about this amazing 3D package.
Words: Mike Griggs
Mike Griggs is a freelance concept 3D, VFX and Mograph artist working across TV, exhibition and digital design. Follow him on Twitter @creativebloke

Thank you for reading 5 articles this month* Join now for unlimited access
Enjoy your first month for just £1 / $1 / €1
*Read 5 free articles per month without a subscription

Join now for unlimited access
Try first month for just £1 / $1 / €1

The Creative Bloq team is made up of a group of art and design enthusiasts, and has changed and evolved since Creative Bloq began back in 2012. The current website team consists of eight full-time members of staff: Editor Georgia Coggan, Deputy Editor Rosie Hilder, Ecommerce Editor Beren Neale, Senior News Editor Daniel Piper, Editor, Digital Art and 3D Ian Dean, Tech Reviews Editor Erlingur Einarsson, Ecommerce Writer Beth Nicholls and Staff Writer Natalie Fear, as well as a roster of freelancers from around the world. The ImagineFX magazine team also pitch in, ensuring that content from leading digital art publication ImagineFX is represented on Creative Bloq.
