How to create realistic reflections in Blender
How to create those all-important realistic reflections.

In this Blender tutorial, I'll walk through my process for how to create realistic reflections. When I start a new project, the first task to which I devote myself is modelling. After this, I begin to study the elements that constitute it, in order to create the materials.
At this stage, I observe real objects with the same characteristics, in order to understand how to recreate the material whilst remaining faithful to the original. It's precisely at this time that we begin to work with the reflexes.
Change it up
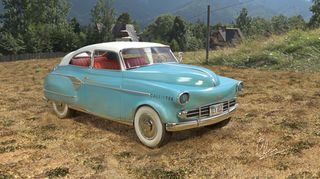
Looking at the render above, you'll notice that not all the surfaces have the same reflective capacity; the rims of the car, as you can see, are more reflective than the paint or compared to the glass. This derives from the fact that each material has a different setting.
In Blender there are three shaders in particular that help us to add reflectivity to a material, these are Glossy, Anisotropic and Glass. These three shaders when combined with other shaders such as Diffuse or Transparent, allow us to add a certain level of reflection to each material we are creating – whether that's for a wall, a table, a cup, an egg and so on.

Making the connection
Putting it into practice, if we want to create the paintwork of the car, we have to open the Node Editor panel, and add two shaders: Diffuse and Glossy. After that, we have to connect them – to do this, simply add the Mix Shader and subsequently connect them to the Material Output node.
Setting the node
Now we can begin to set the node, changing the values
of roughness and the colour of the Diffuse and Glossy shaders. It's important to note that in the Glossy shader, the lower the value of Roughness the greater the reflective capacity of the material will be.
Obviously this is a node basis; in fact we can combine many shaders and connect the texture to give a more realistic effect to the material. In the end we can highlight the reflective capacities of the materials, adding a Glare node in the Node Editor panel for compositing.
This article originally appeared in 3D World issue 199.
Like this? Read these!

Thank you for reading 5 articles this month* Join now for unlimited access
Enjoy your first month for just £1 / $1 / €1
*Read 5 free articles per month without a subscription

Join now for unlimited access
Try first month for just £1 / $1 / €1
Get the Creative Bloq Newsletter
Daily design news, reviews, how-tos and more, as picked by the editors.

Pietro is a freelance 3D artist and YouTuber with more than 10 years of experience in different fields of 3D production, from animated movies to VFX and game production. He shares many of his creations on his YouTube channel @PietroChiovaro.