A beginner's guide to using a renderer
3D artist Paul Hatton walks you through five major aspects of the rendering process.

Whether you're an experienced 3D artist who is interested in how the third version of V-Ray has changed, or you've been a 3D visualiser for a short while, but you don't have a good grasp on the settings, or you're an absolute beginner taking your first steps in 3D visualisation, this tutorial is for you.
When first starting out, the whole process can be quite overwhelming. Also without a solid understanding of what each setting does, you will be limiting your ability to deliver good results consistently. So over the next few pages, we are going to focus on five aspects of the rendering process.
They are aspects which are contained within any piece of rendering software, so no matter what your renderer of choice is you will get something out of this tutorial. Each aspect will be covered in two steps, the first will cover the theory, and the second will explore how V-Ray implements it.
01. Image buffer
Theory
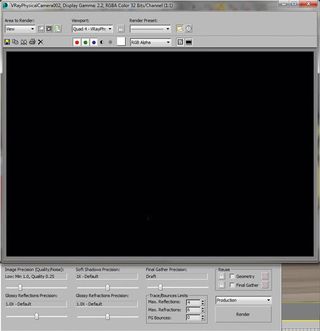
Every renderer has a buffer that enables you to view your rendered image. If it didn't then it would be the most useless renderer in the world.
An image buffer is essentially a place in memory where your rendered pixels are stored for a period of time, usually until you either close the software or render another image. It is called a different thing in each render engine, but I would advise using the specific one for the renderer you are using as it will be more fine-tuned.
Practical
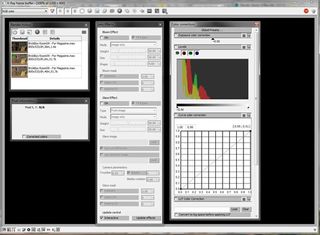
With each new edition of V-Ray the image buffer has been improved and the third version is no different. It's called the V-Ray frame buffer and it gives you a plethora of options to be able to adjust and view your renderings.
One of the best parts is the History, which enables you to compare and contrast your current rendering with older versions. In V-Ray 3.0 they have also moved all of the bloom and glare lens effects into the frame buffer, enabling you to make adjustments to your effects on the fly more easily.
02. Colour mapping
Theory
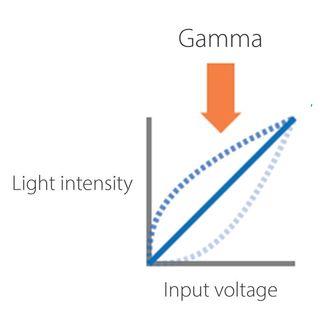
In an ideal world, the light intensity put out by the monitor would be exactly the same as the input voltage put into it, but unfortunately some of it is lost in the process. Thankfully there is a way to get it back for display purposes.
We do this by applying an inverse gamma of 2.2 to the light intensity to bring it back into linear and to display all the true colour information. Note that some artists adjust their colour mapping values for artistic creativity.
Practical
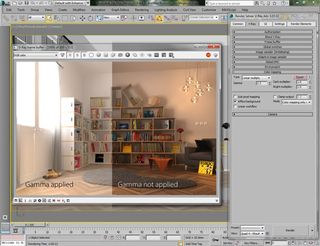
In V-Ray 3.0 the colour mapping defaults to linear multiply. Also, if you're using 3ds Max 2014 then all of the gamma is dealt with behind the scenes too. So all we have to be concerned about is making sure that our render is displayed correctly.
This is quick and easy in V-Ray by utilising the sRGB button at the bottom of the V-Ray frame buffer. Activating it will only affect the way the image is displayed, not the underlying mathematical colour values.
03. Image sampling
Theory
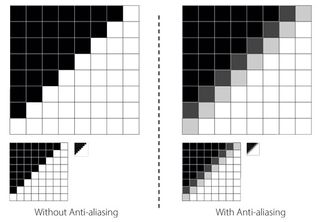
This is the process of sampling and filtering an image, and producing the final set of pixels that make up the final render. The quality of the image sampling sets how jagged the lines are in the render.
Usually you have fixed and adaptive options. The fixed option takes a pre-determined number of samples, whereas the adaptive option will take more samples in the areas of the image where it's required.
Practical
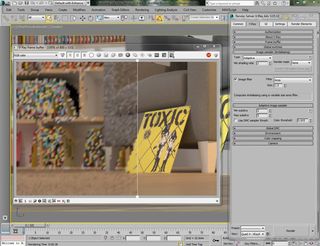
You can set the image sampler type in the Image sampler rollout of the V-Ray tab. Your choice will determine what settings you can adjust. The Adaptive option is great with fine details and uses less RAM than the others. The three primary settings are the min/max subdivisions and the colour threshold.
For each pixel V-Ray will carry on sampling to the maximum number of subdivisions until the colour threshold is reached with its surrounding pixels. The threshold is a percentage of the full colour range available for each pixel.
04. Global illumination
Theory

GI takes into account not only the light that comes directly from a light source (direct illumination), but also subsequent light rays which are reflected around the scene (indirect illumination). This creates a much more realistic render as that reflects the reality of how our world works.
Some of you may remember having to fake this effect by placing direct light sources in strategic positions around your scene to fill in the missing indirect light. This was very hard to control and thankfully is an outdated option.
Practical
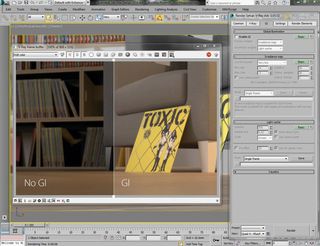
V-Ray gives you several engines to simulate the primary and secondary bounces of global illumination. Your choice will be dependent upon the required quality and speed. Let's cover the main three.
Brute Force is the simplest as it traces a set number of rays in different directions from a hemisphere around each point. The irradiance map computes the global illumination for some points in the scene but then interpolates the rest. Light Cache approximates the GI in the scene
by tracing many paths out from the camera. More reading will be required to decide which option is best in your particular situation.
05. Render elements
Theory
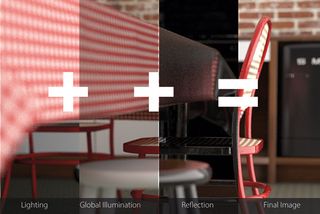
When your render is finished, believe it or not, that image you see has been constructed from a larger set of individual elements. These elements are essentially mathematically constructed to give you the final image. They include things like the lighting, the object buffer, the depth pass, the global illumination, the ambient occlusion and the reflection, to name just some of the elements.
In the most basic form you can add the pixel values of the lighting, global illumination and reflection to get your final image. If you have refraction and other elements then these can also be included.
Practical

The render elements in V-Ray can be accessed in the Render Elements tab of the Render Setup dialogue box. Simply click Add and then Shift-select as many of the elements that you wish to have access to. Once the render is complete you can then use the V-Ray frame buffer drop-down menu to select and save each element.
These elements can all be saved automatically or you can also save all of your elements into one .exr file, which is the easiest option. This can be opened in an image-editing package, such as Photoshop or After Effects, and the elements extracted into individual items.
Words: Paul Hatton
Paul Hatton is the 3D visualisation team leader at CA Design Services, a design and planning services studio based in Great Yarmouth, England. This article originally appeared in 3D World issue 178.

Thank you for reading 5 articles this month* Join now for unlimited access
Enjoy your first month for just £1 / $1 / €1
*Read 5 free articles per month without a subscription

Join now for unlimited access
Try first month for just £1 / $1 / €1
Get the Creative Bloq Newsletter
Daily design news, reviews, how-tos and more, as picked by the editors.
The Creative Bloq team is made up of a group of design fans, and has changed and evolved since Creative Bloq began back in 2012. The current website team consists of eight full-time members of staff: Editor Georgia Coggan, Deputy Editor Rosie Hilder, Ecommerce Editor Beren Neale, Senior News Editor Daniel Piper, Editor, Digital Art and 3D Ian Dean, Tech Reviews Editor Erlingur Einarsson and Ecommerce Writer Beth Nicholls and Staff Writer Natalie Fear, as well as a roster of freelancers from around the world. The 3D World and ImagineFX magazine teams also pitch in, ensuring that content from 3D World and ImagineFX is represented on Creative Bloq.
