Adding depth and texture to 3D objects
Luke O'Neill demonstrates how you can breathe life into your 3D vector shapes in and
Illustrator's 3D tools are excellent at adding an extra dimension and depth to what would otherwise be a flat piece of vector artwork.
I have often used the 3D Rotate tool to add a sense of perspective to a piece of work, but have largely steered clear of the Extrude & Bevel tool - I have always found the results to look a little crude and overly computer generated.
Through these five steps I will demonstrate how you can quickly and simply generate 3D objects in Illustrator, and add texture and depth to them in Photoshop to give them an altogether more natural appearance.
Click here to download the support files (5.18MB)
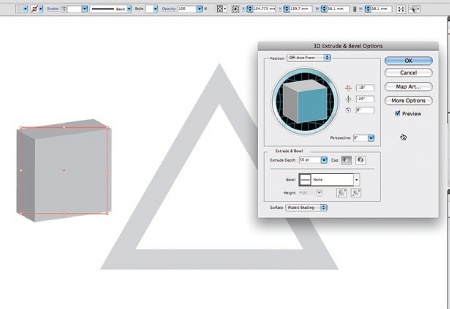
01 Create a new document in Illustrator and draw a few simple shapes using the Pen tool. Colour these grey and selecting one of the shapes, go to Effect>3D>Extrude & Bevel. Hit the Preview button and play around with the variables until you're satisfied with your 3D shape. Repeat this process for all of the shapes.
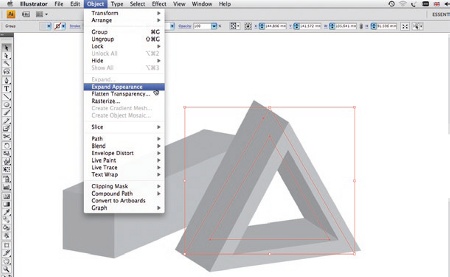
02 Now to prepare the files for Photoshop. Selecting each 3D shape individually, go to Object>Expand Appearance. Now hit Shift+Ctrl/Cmd+G a few times to ungroup your expanded vectors. Next, separate the shadows and highlights out onto individual, appropriately named layers - this stage will be particularly important when we export to Photoshop.
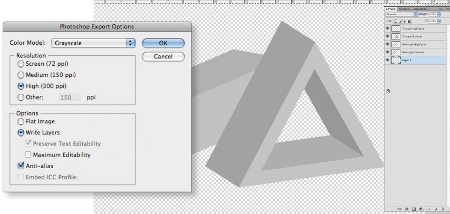
03 Now go to File>Export, and select PSD from the Format drop-down menu. In the next dialog box, select Grayscale for the colour mode and 300 dpi for the resolution, and ensure that 'Write Layers' is selected. Open your PSD in Photoshop, and you will notice that all the layers from your Illustrator file are still intact.
Get the Creative Bloq Newsletter
Daily design news, reviews, how-tos and more, as picked by the editors.
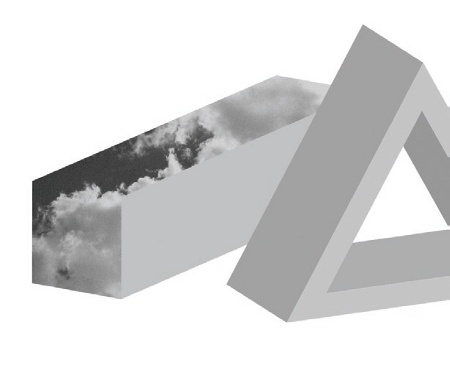
04 Now for the fun part. If you're anything like me, you'll have an archive of textures and effects on your machine to you use as and when necessary. Open up a number of these or, alternatively, use the files supplied. Click on each individual layer whilst holding Ctrl/Cmd to create a layer mask. Now simply copy one of your textures and go to Edit>Paste Into.
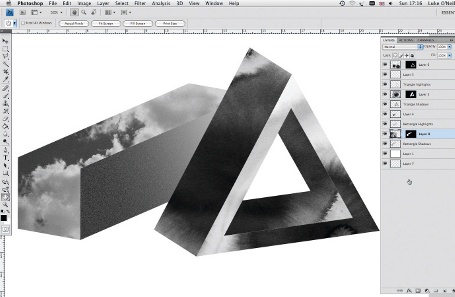
05 Repeat this process for all of the faces of your shapes, experimenting with different images and crops. For one of the faces of the oblong shape, I simply create a mask as before and, instead of pasting an image into the selection, I create a gradient. I then use the film grain filter to give it a slightly rougher feel that is in keeping with the rest of the image.

Thank you for reading 5 articles this month* Join now for unlimited access
Enjoy your first month for just £1 / $1 / €1
*Read 5 free articles per month without a subscription

Join now for unlimited access
Try first month for just £1 / $1 / €1

The Creative Bloq team is made up of a group of art and design enthusiasts, and has changed and evolved since Creative Bloq began back in 2012. The current website team consists of eight full-time members of staff: Editor Georgia Coggan, Deputy Editor Rosie Hilder, Ecommerce Editor Beren Neale, Senior News Editor Daniel Piper, Editor, Digital Art and 3D Ian Dean, Tech Reviews Editor Erlingur Einarsson, Ecommerce Writer Beth Nicholls and Staff Writer Natalie Fear, as well as a roster of freelancers from around the world. The ImagineFX magazine team also pitch in, ensuring that content from leading digital art publication ImagineFX is represented on Creative Bloq.
